
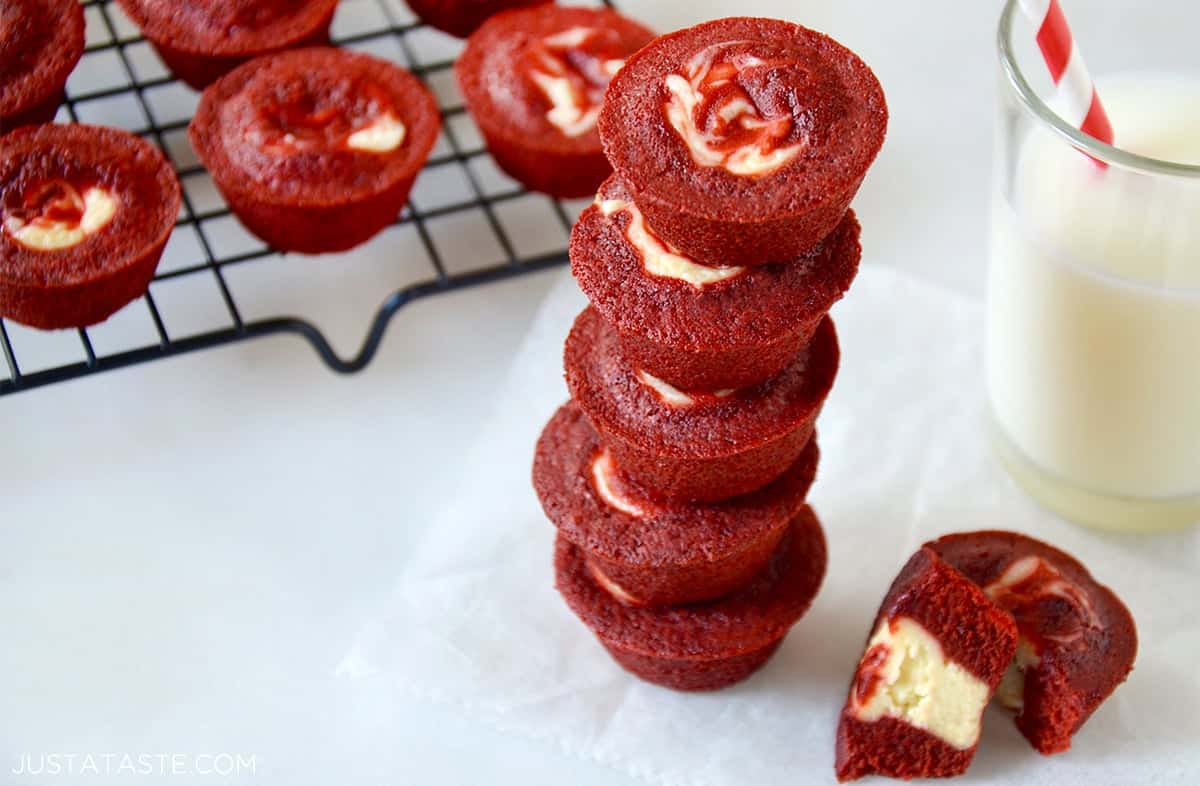
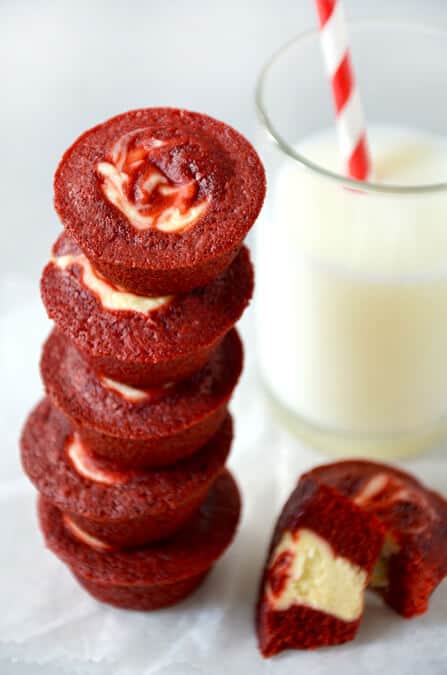
Can’t decide between cheesecake and brownies? Enjoy the best of both worlds with Red Velvet Cheesecake Brownie Bites! A fudgy red velvet brownie with a creamy cheesecake filling in the center — bite-sized perfection for any occasion.
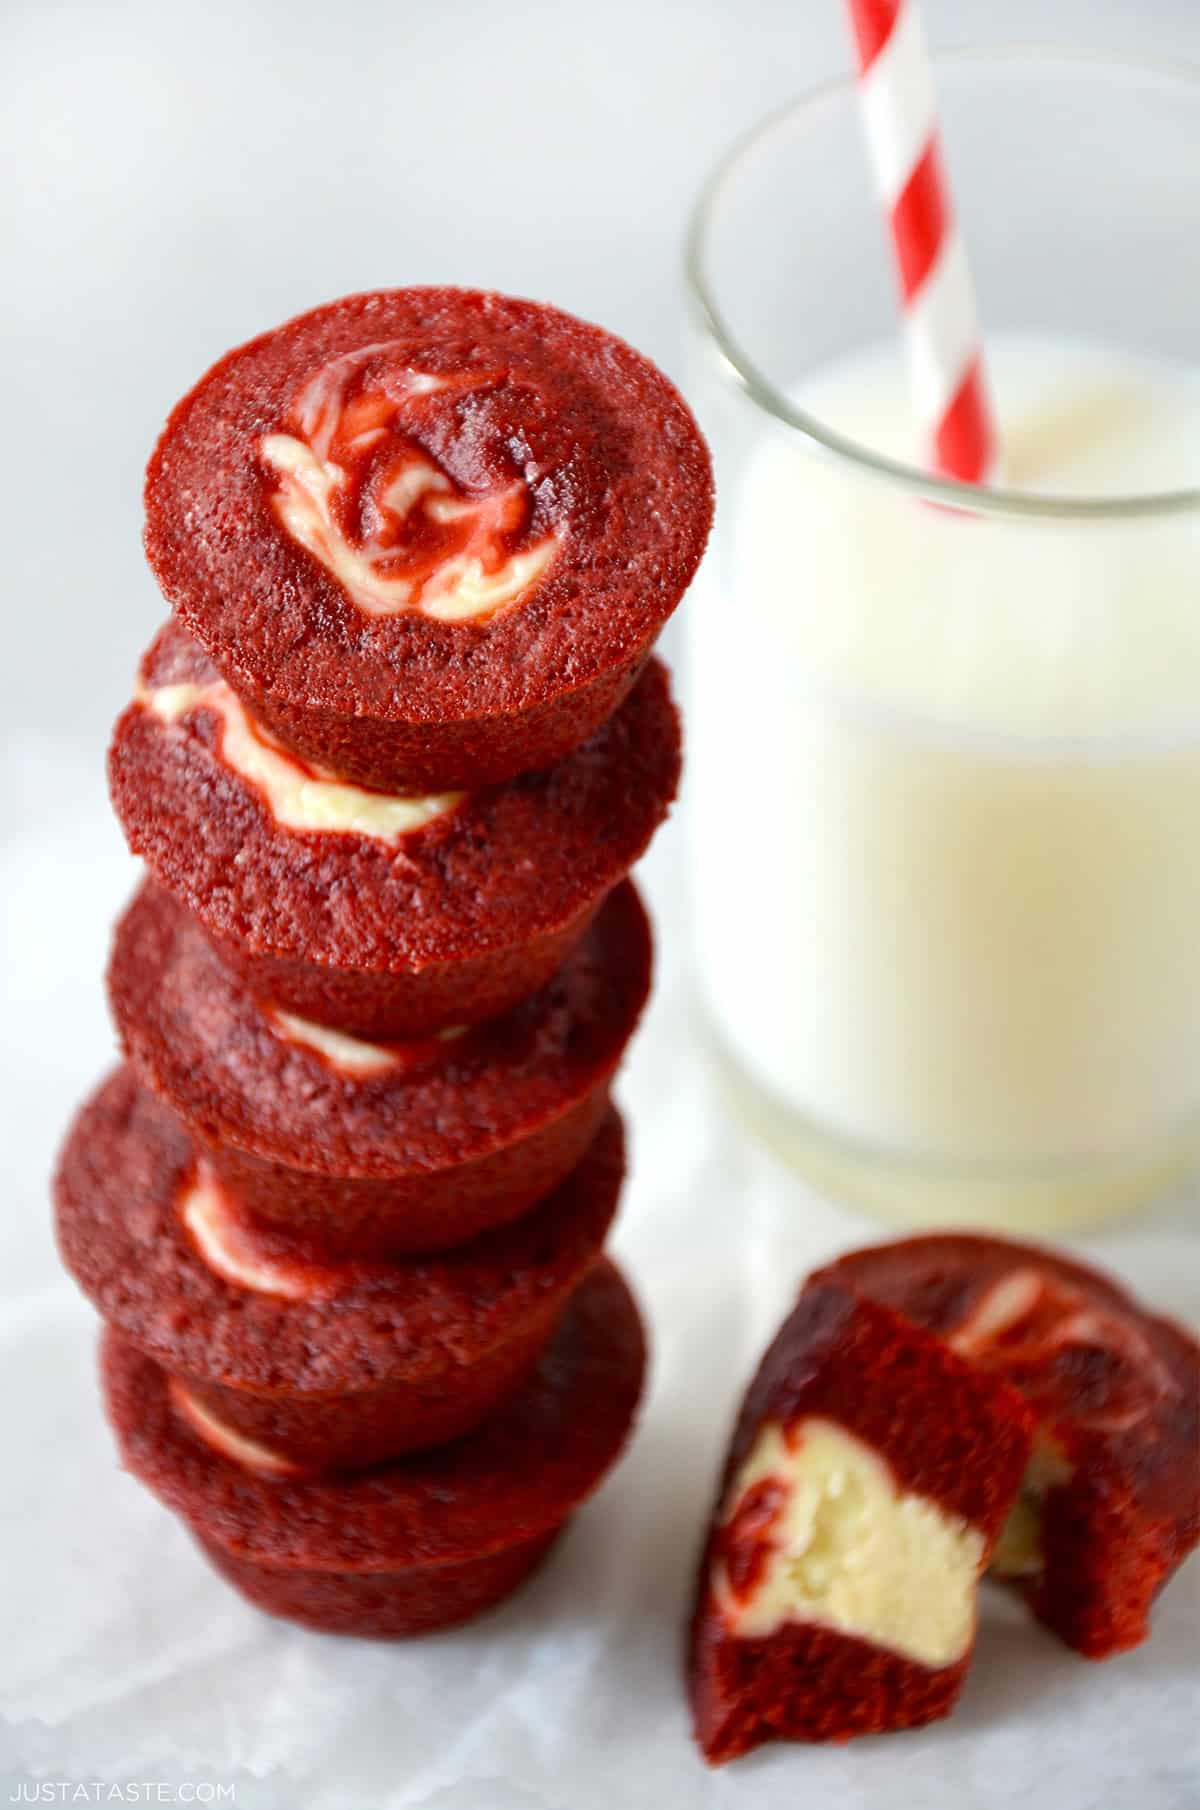
Table of Contents
Brownie bites and I go way back, and my love affair with the tiny treats has been well explored around here. I’ve dabbled in both the classic cheesecake brownie bites and the German chocolate cake brownie bites varieties, but I think this latest version takes the cake brownie bite. Welcome to the sweet snack-size soiree, Red Velvet Cheesecake Brownie Bites.
This dessert is dedicated to all those struggling with the decision between red velvet cake, cheesecake and brownies. Let me tell you that I know the struggle is real. Thankfully, no further decisions will be required because now you can enjoy all three desserts swirled into one trifecta of a bite. That is sweet success indeed.
For the brownies:
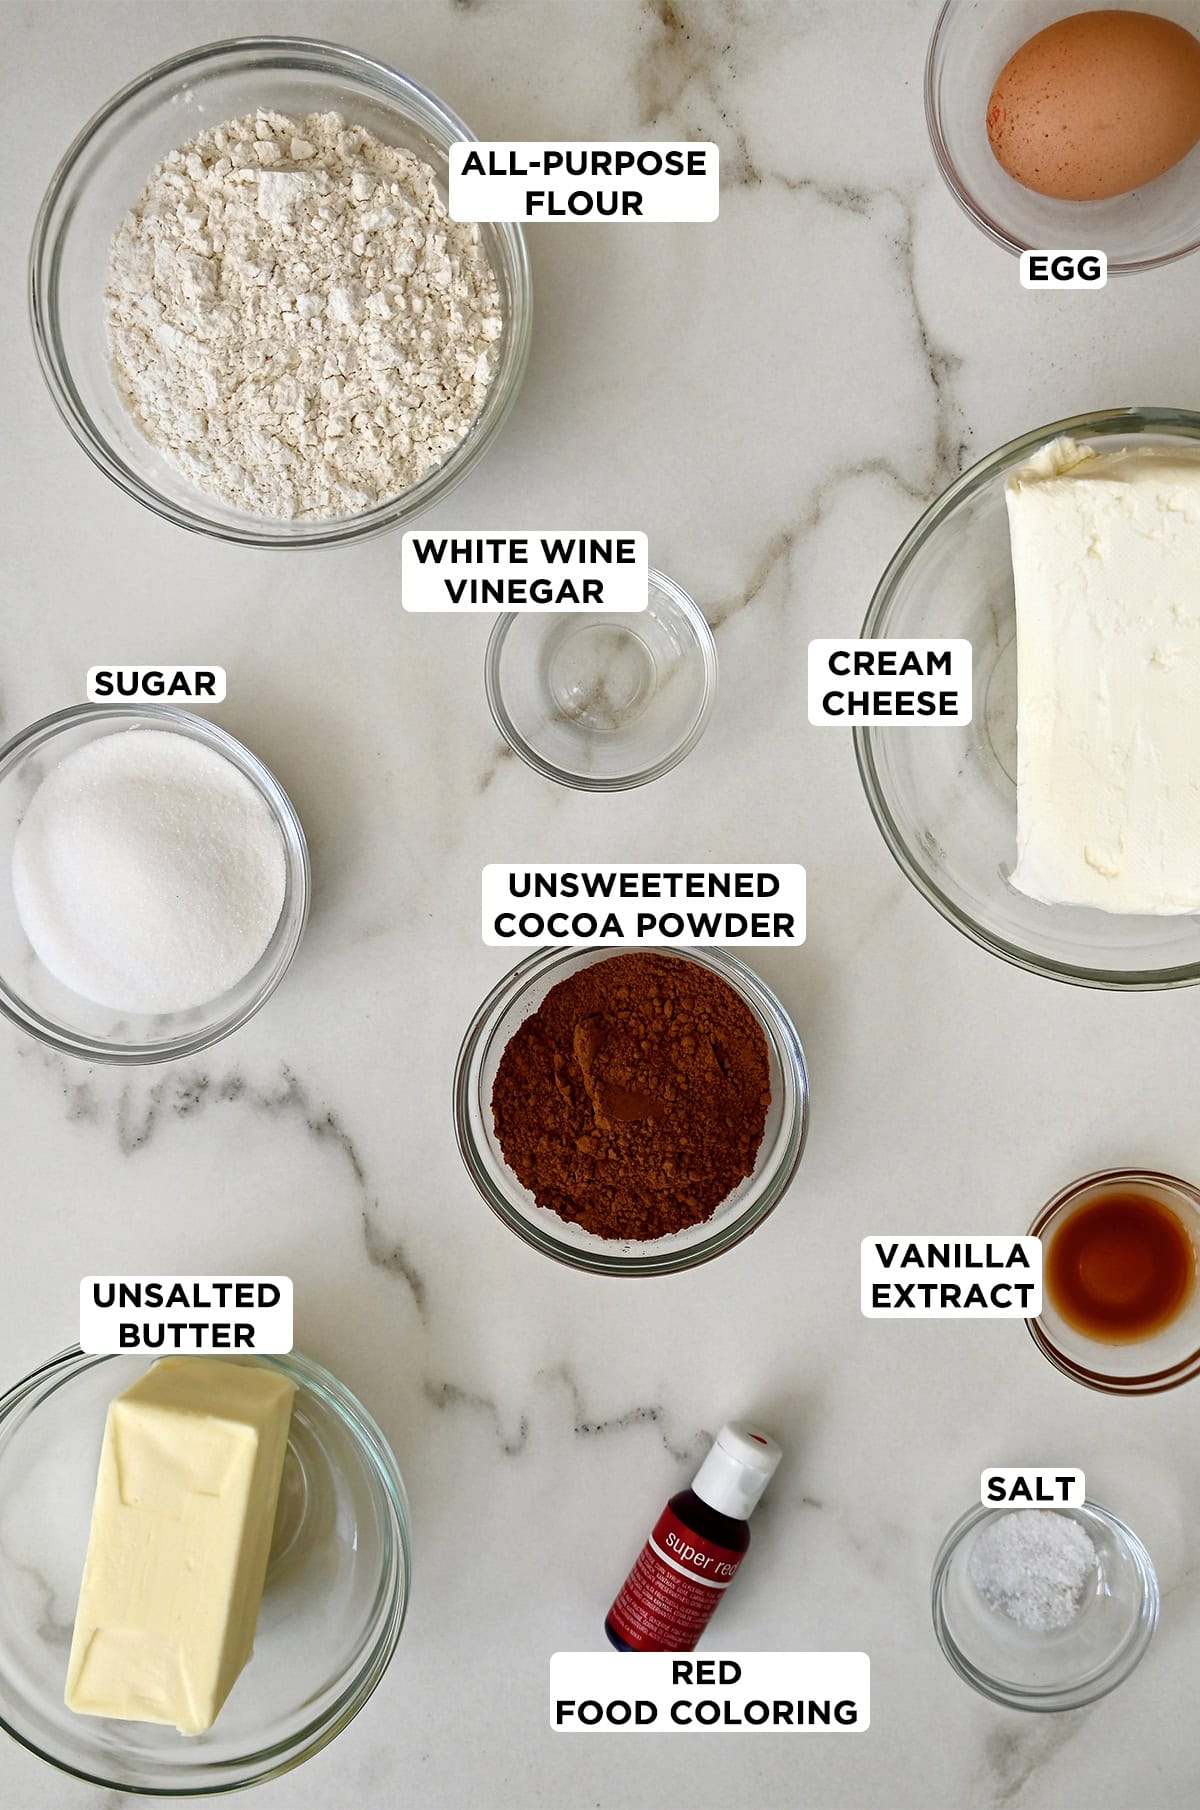
- Butter: I always go for unsalted butter so I can control the salt in the recipe. Melted butter gives the brownies a rich flavor and keeps them moist and tender.
- Sugar: Sweetens the batter and helps create that soft, chewy texture we love in brownies.
- Unsweetened cocoa powder: I prefer Dutch-process cocoa powder for its smoother, richer chocolate flavor, but natural cocoa works too if that’s what you have on hand.
- Vanilla extract: Boosts the overall flavor.
- Red food coloring: I prefer gel food coloring because it gives a vibrant red hue without watering down the batter. A little goes a long way, so start with just a couple of drops.
- White vinegar: A key ingredient in red velvet recipes, it reacts with the cocoa powder to deepen the color and flavor.
- Eggs: Room-temperature eggs are key for smooth mixing. They bind the ingredients together and give the brownies structure.
- All-purpose flour: Use the spoon-and-level technique to measure your flour to avoid overpacking it. This ensures the brownies stay soft and fudgy rather than dense or dry.
For the cheesecake filling:
- Cream cheese: Always use full-fat cream cheese for the creamiest texture and tangiest flavor. Let it soften at room temperature for easier mixing.
- Sugar: Just enough to lightly sweeten the cheesecake filling without overpowering the tang of the cream cheese.
- Egg yolk: Adds richness and helps the cheesecake set.
See the recipe card for full information on ingredients and quantities.
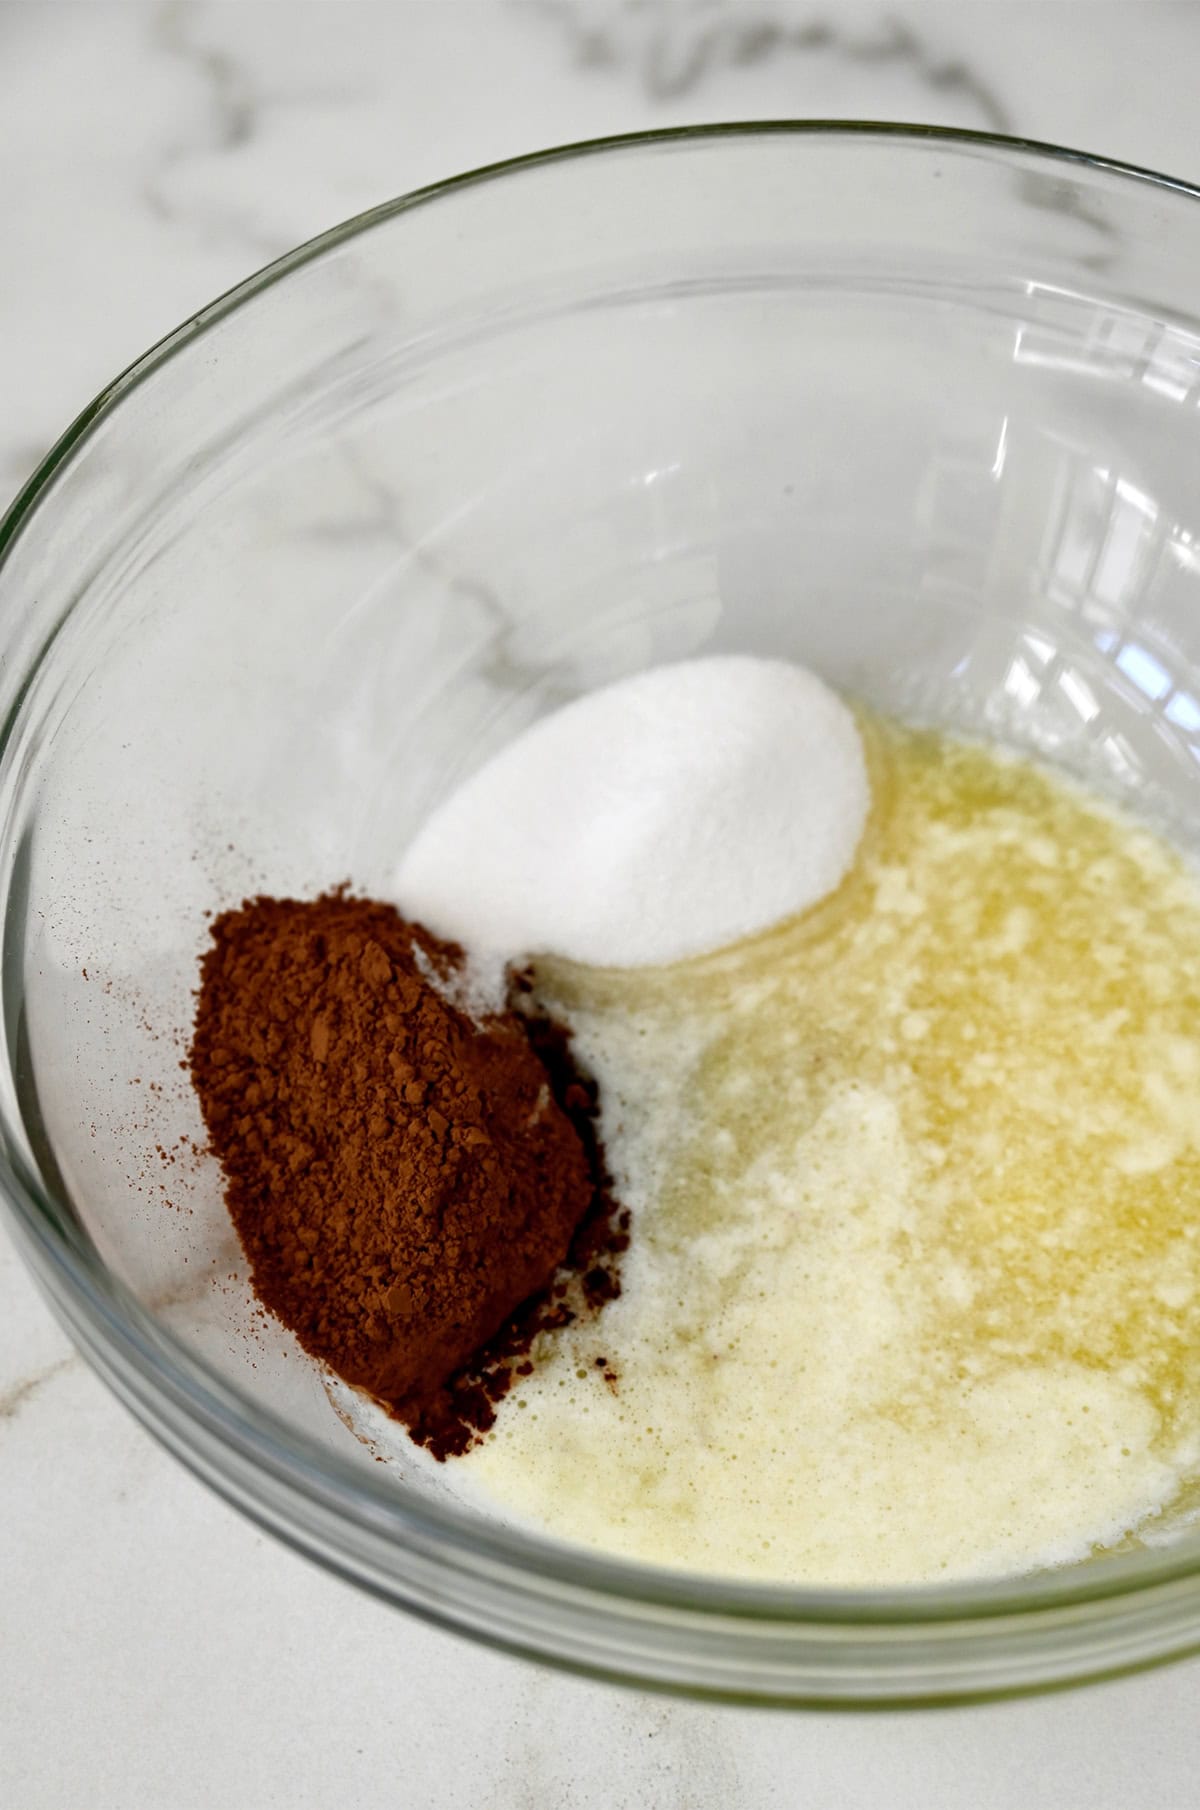
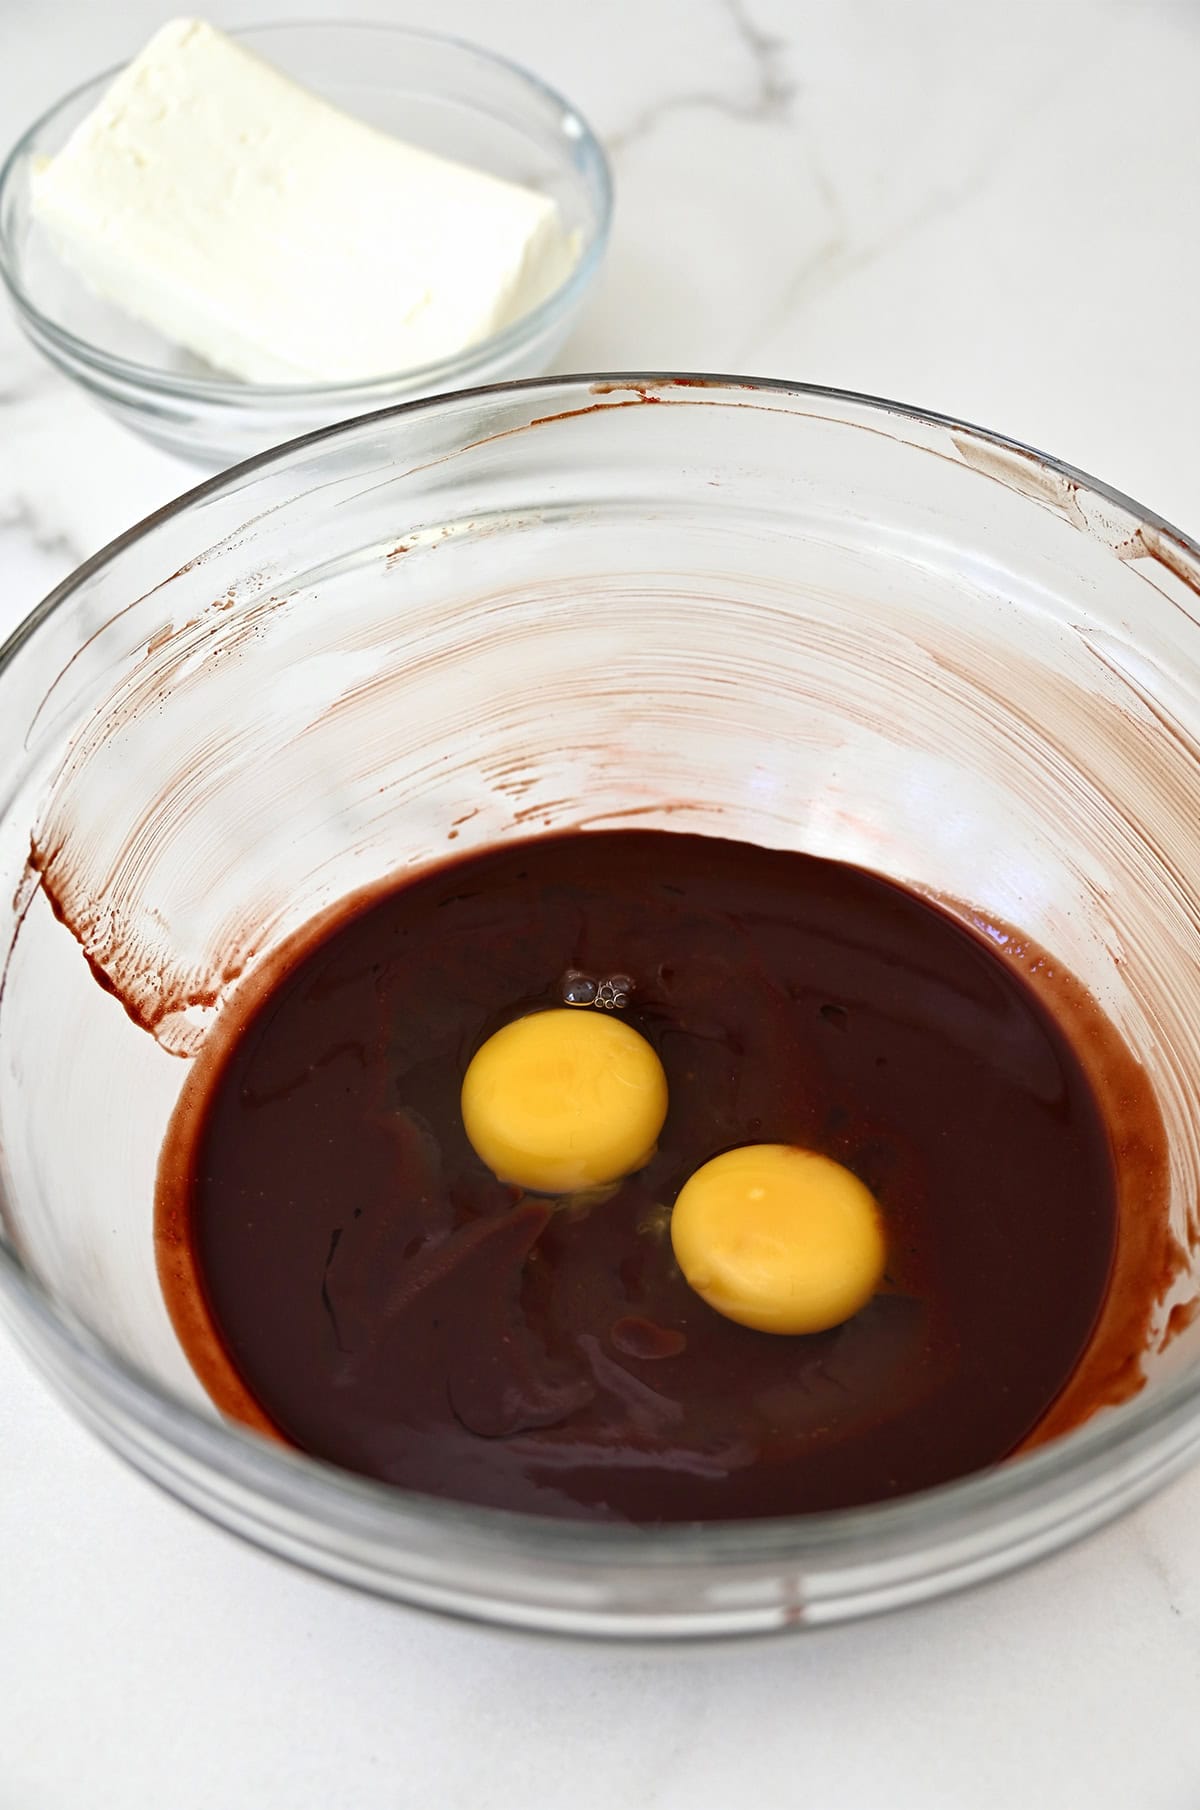
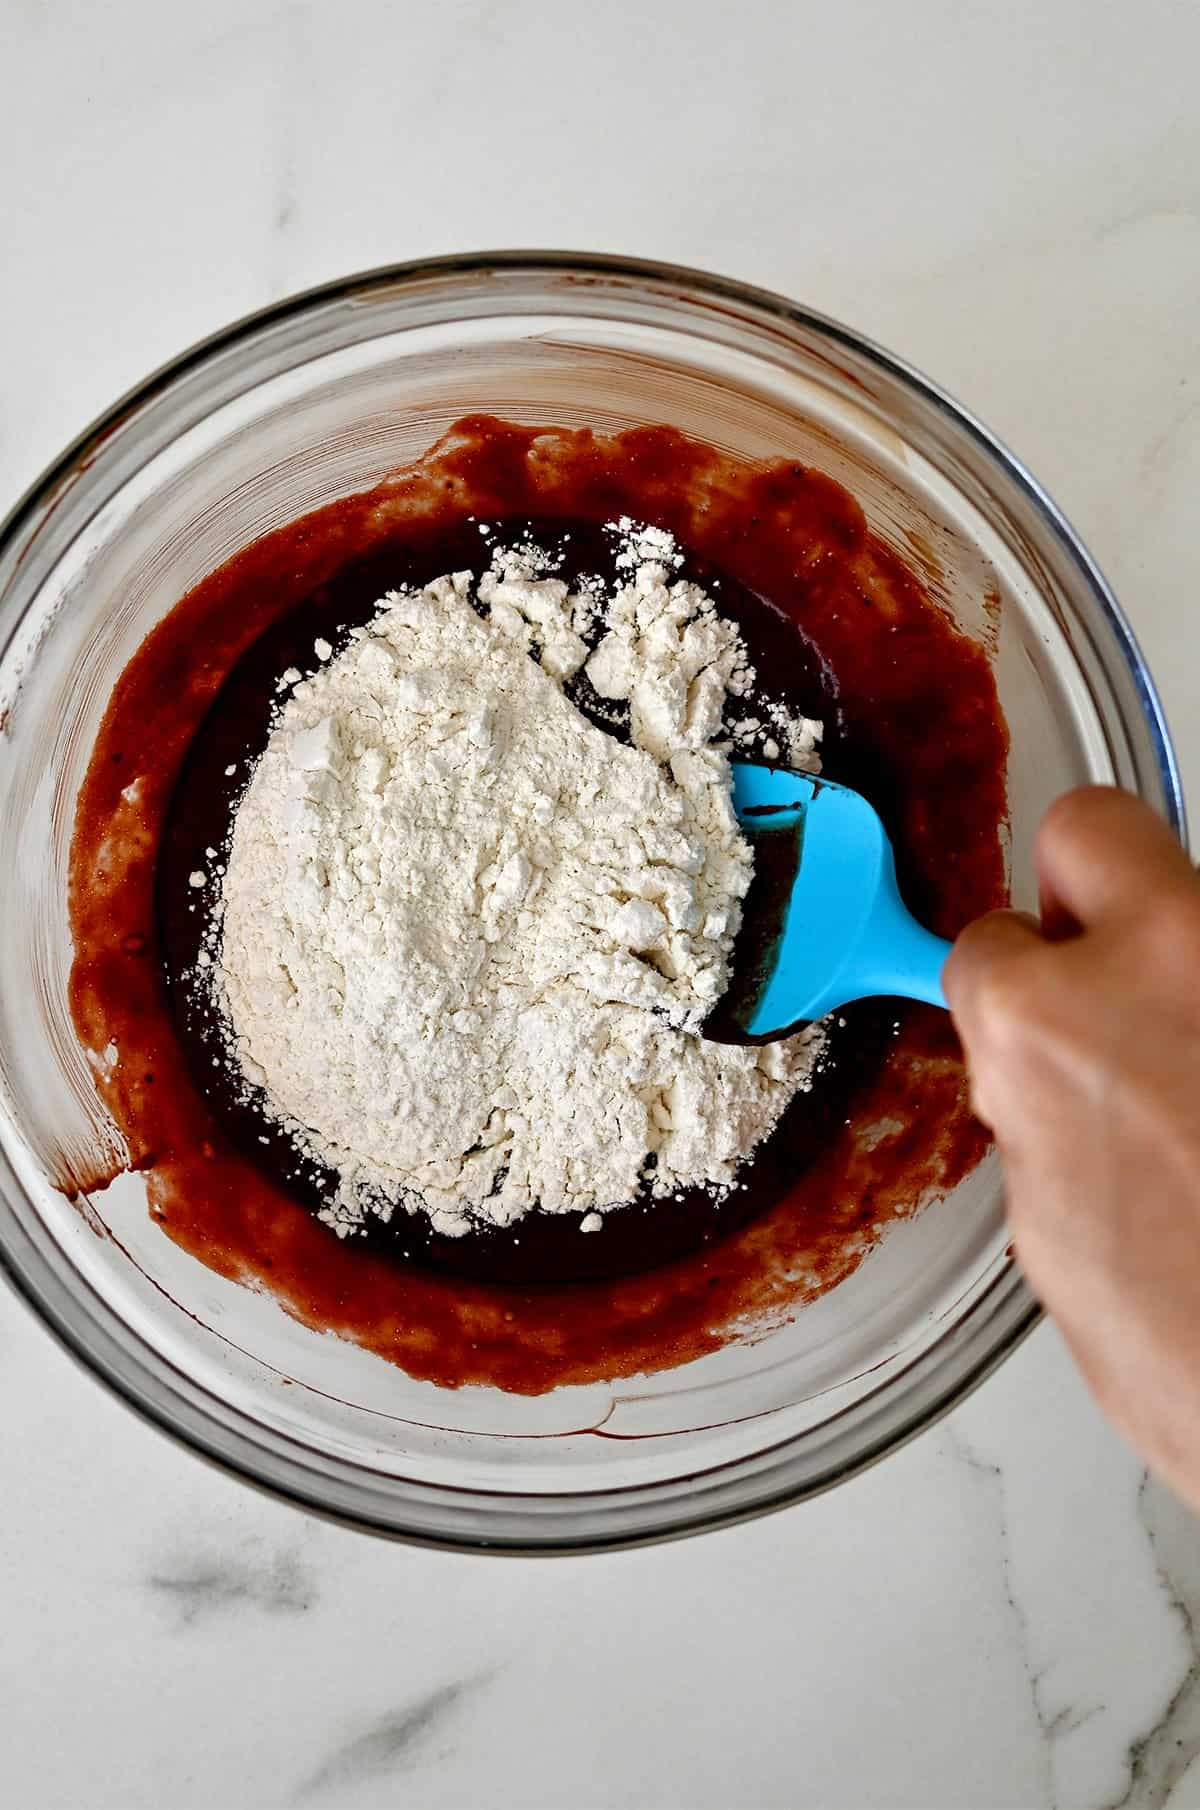
- Make the red velvet brownie batter. In a large bowl, whisk together the melted butter, sugar, cocoa powder, vanilla extract, red food coloring and salt until smooth. Stir in the white vinegar. Add the eggs and mix until combined. Fold in the flour gently until just incorporated.
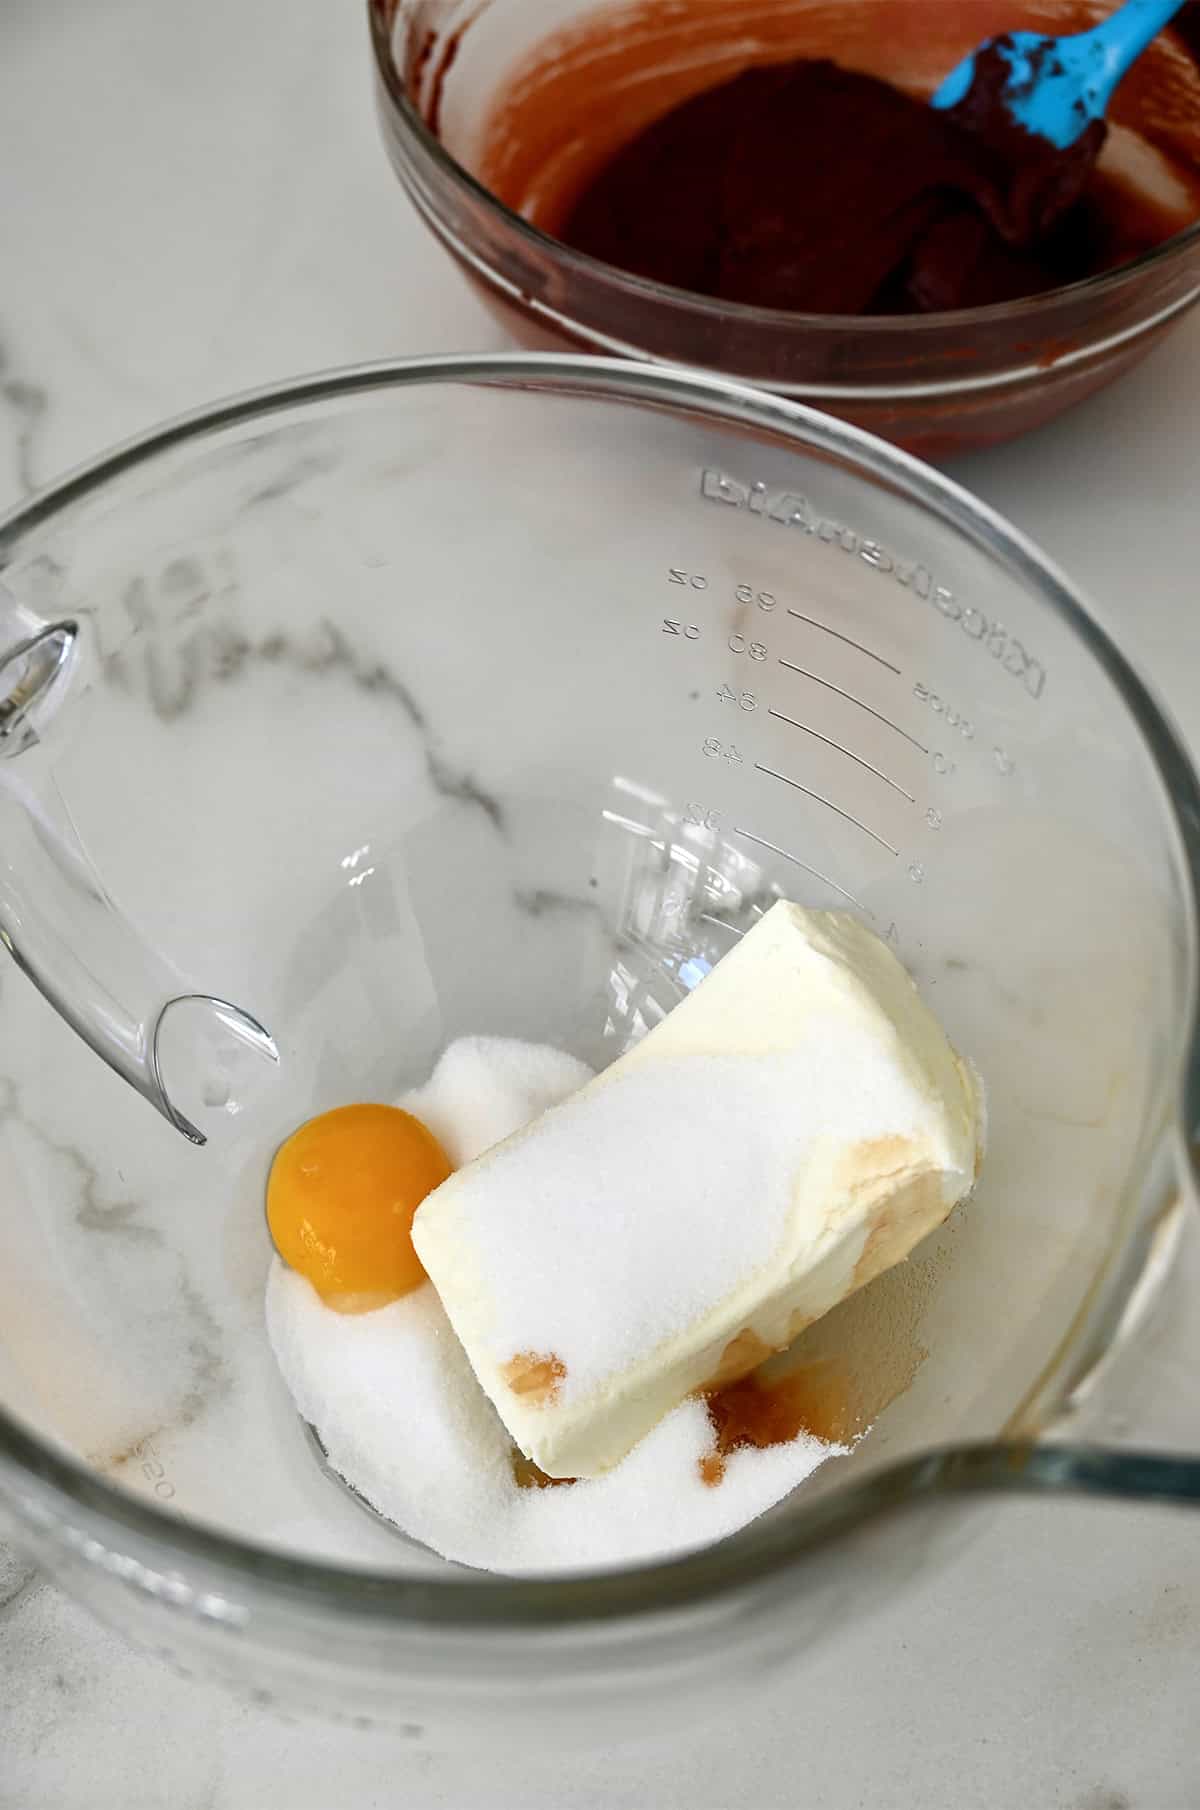
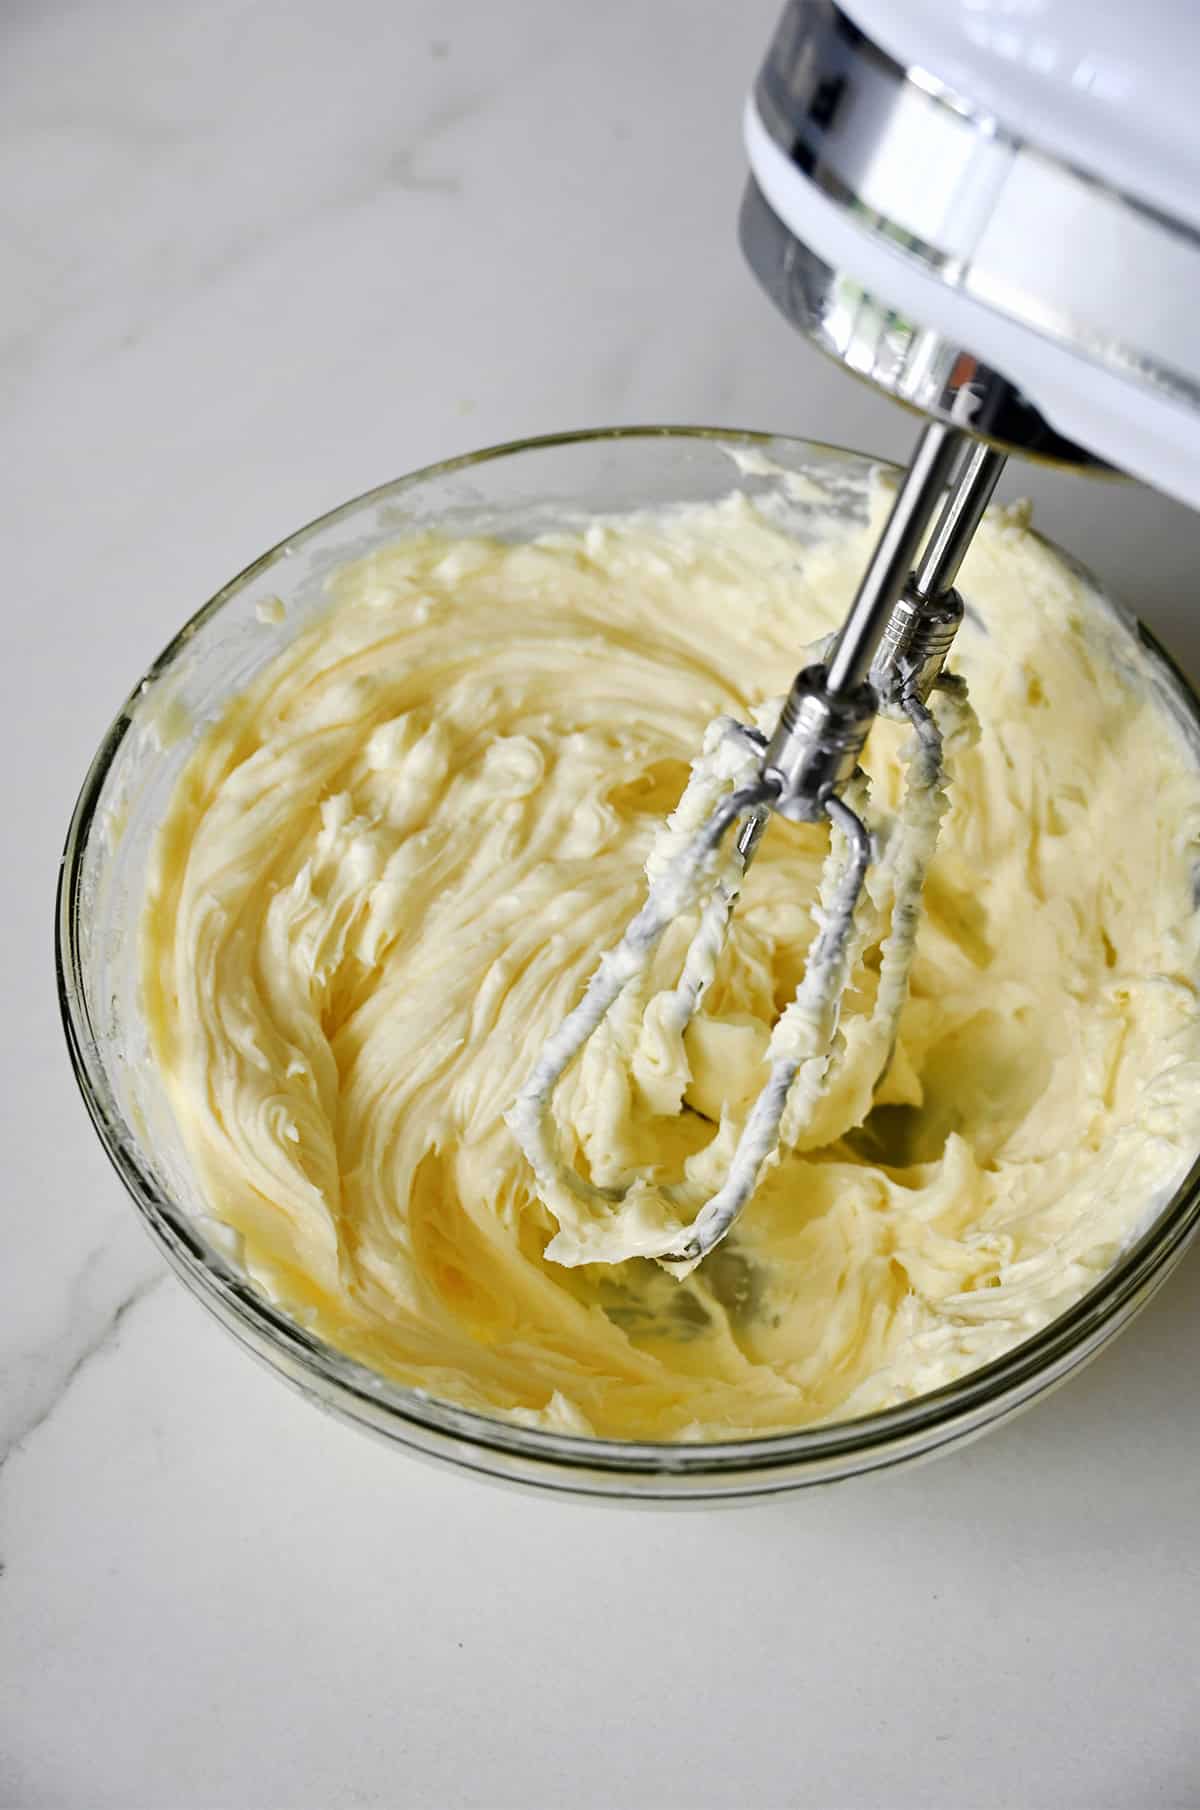
- Make the cheesecake filling. Beat the cream cheese, sugar, vanilla extract and egg yolk until smooth and creamy. Transfer the mixture to a piping bag or sealable plastic bag and snip off the tip.
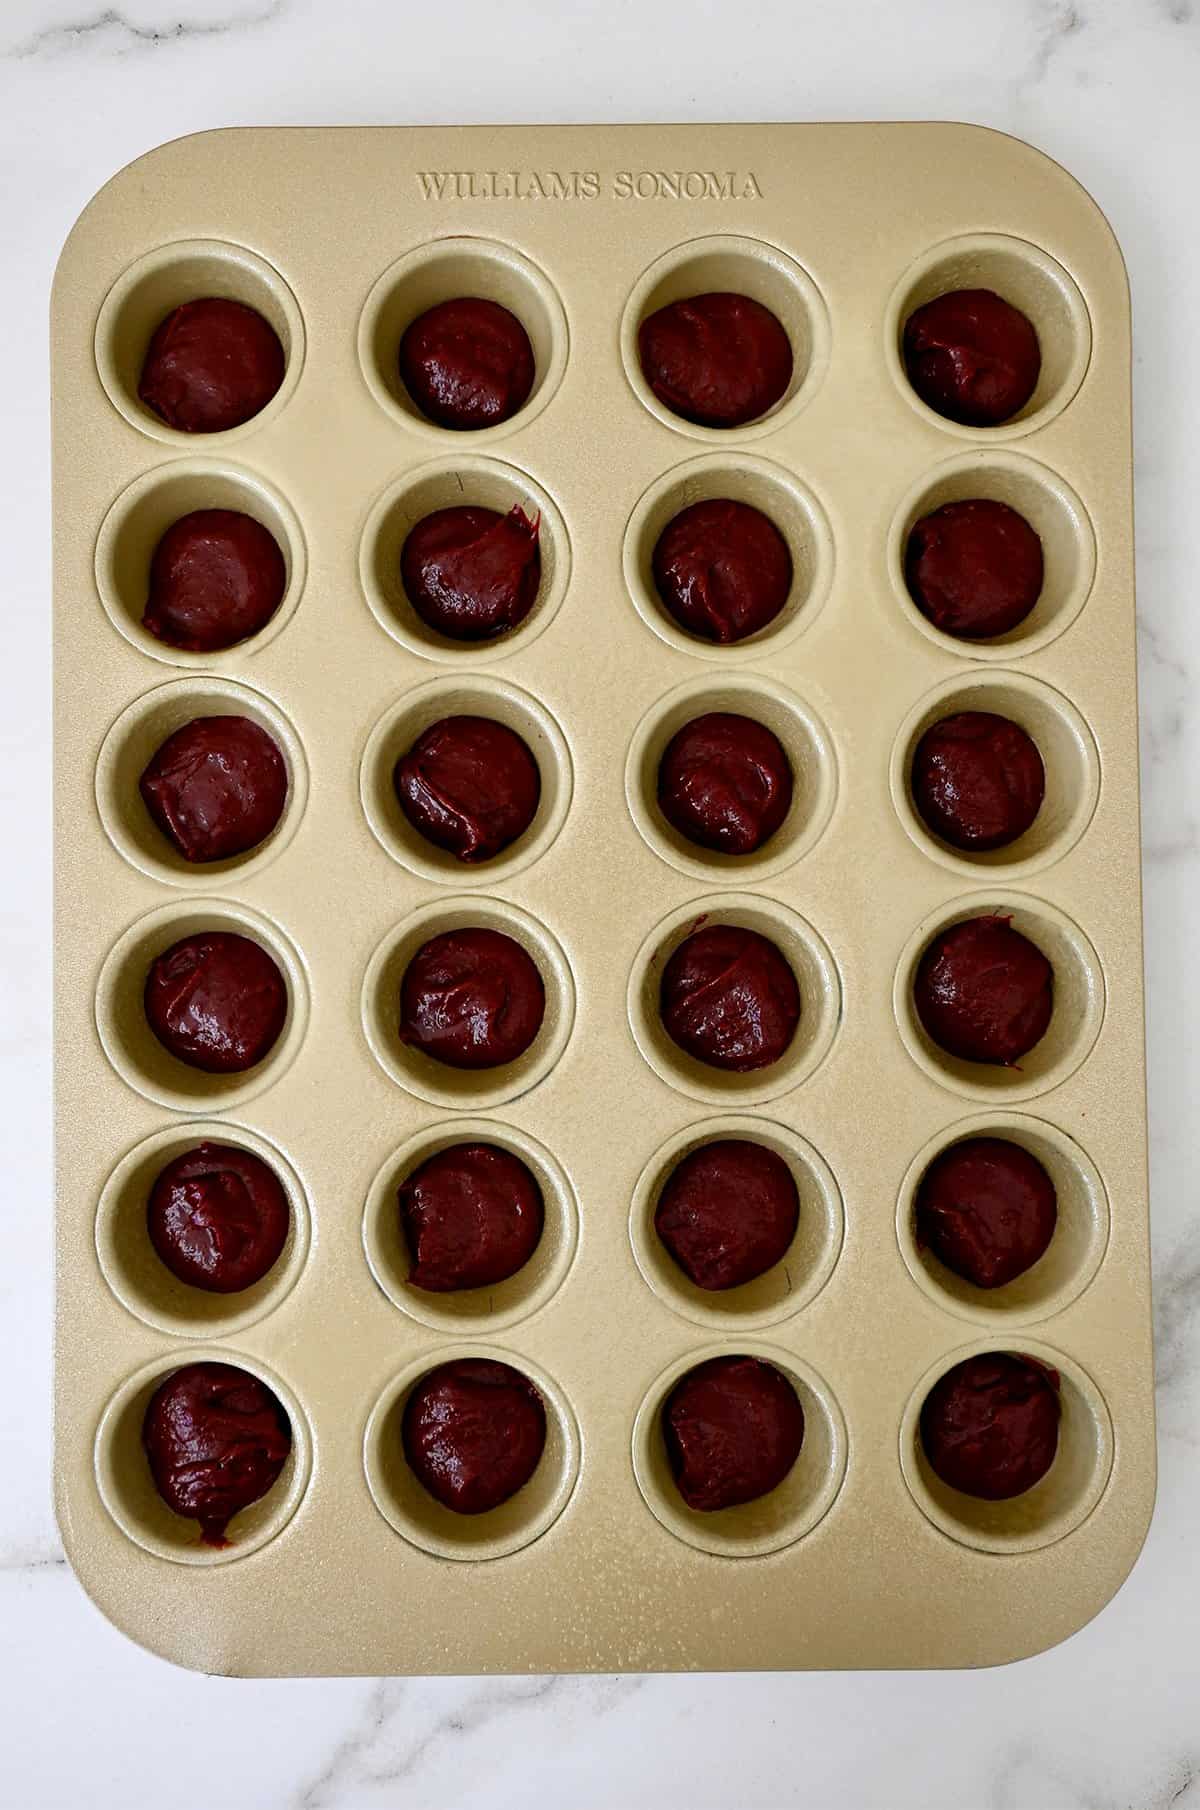
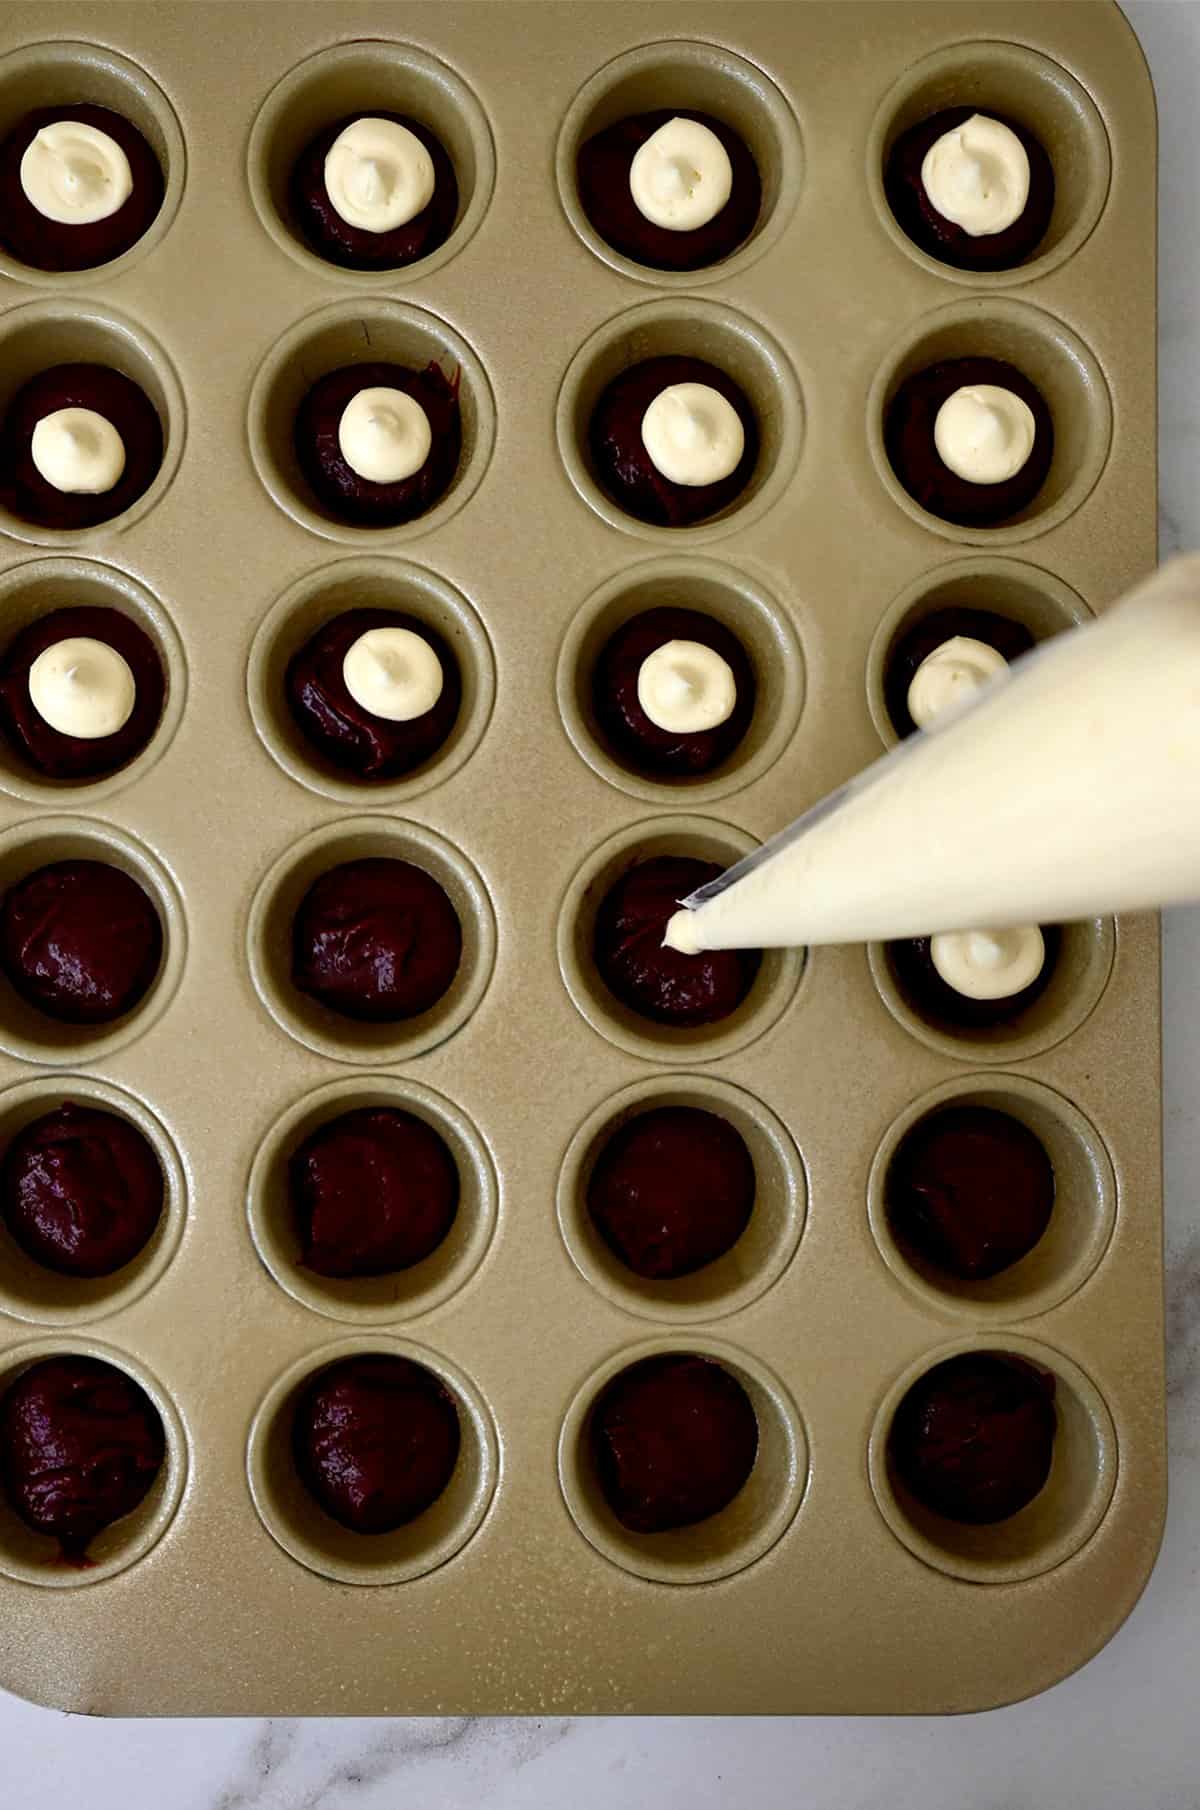
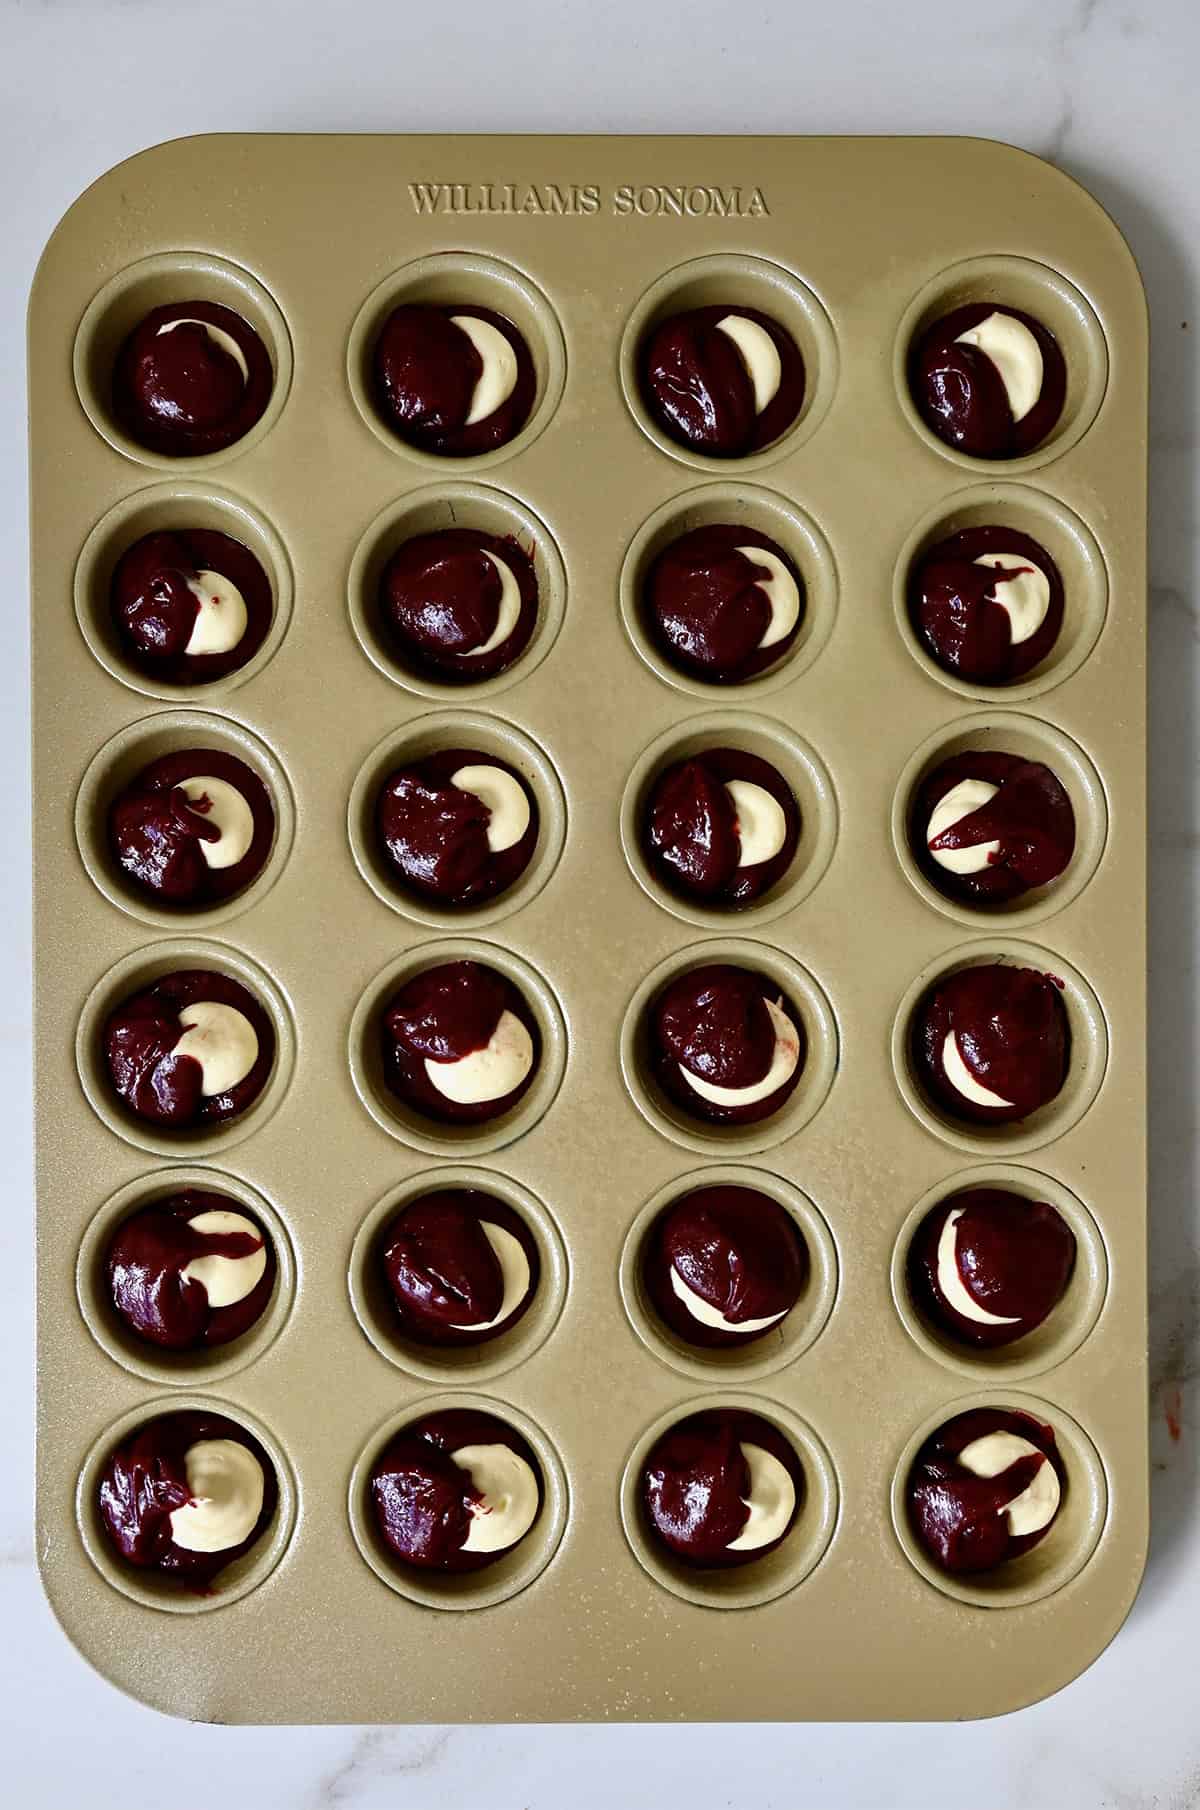
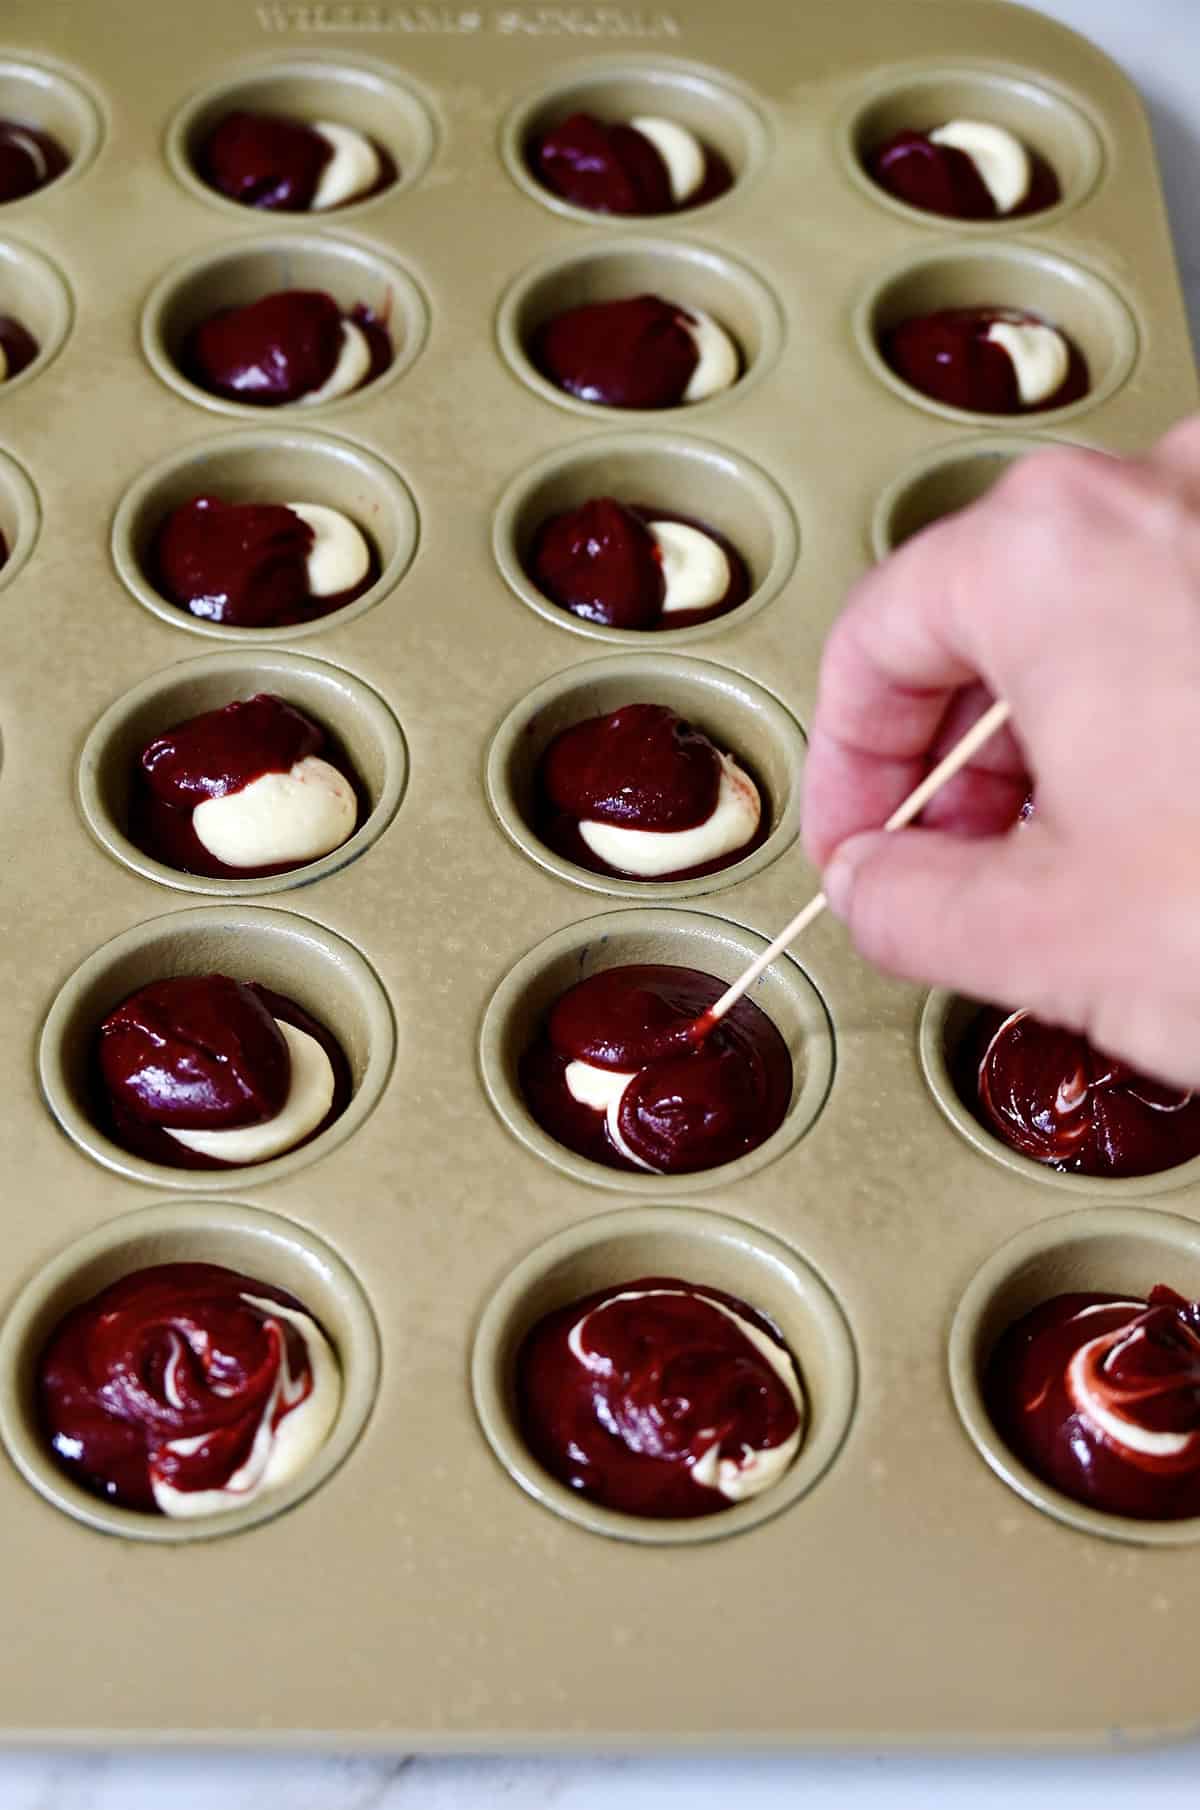
- Assemble the brownie bites. Use a small ice cream scoop or two spoons to add 1 tablespoon of brownie batter into each greased well of a mini muffin pan. Pipe 1 teaspoon of cheesecake filling on top of the batter, then add another teaspoon of brownie batter. Use a toothpick to gently swirl the cheesecake filling and brownie batter together for a marbled effect.
- Bake. These mini brownie bites take about 12 minutes to bake in a 350ºF oven. Allow the brownie bites to cool in the pan for about 5 minutes before transferring them to a wire rack to cool completely.
- Make sure your cream cheese is softened to avoid lumps in the cheesecake filling. Let it sit out for about 30 minutes before mixing.
- Don’t overmix. Stir the brownie batter just until the flour disappears for a tender texture.
- These bites bake quickly—set your timer for 12 minutes and check for doneness. Insert a toothpick into the red velvet layer near the edge of the pan. If it comes out with just a few moist crumbs, they’re ready! The cheesecake should be set but still have a slight jiggle.
Storage Instructions
When it comes to treats like these red velvet cheesecake brownie bites, I always play it safe and stash them in the fridge. They’ll stay fresh for about 3 to 5 days, as long as you pop them in an airtight container or wrap them up tightly with plastic wrap. A little parchment or wax paper between the layers works wonders to keep them from sticking together!
As tempting as it may be, I wouldn’t recommend freezing these mini brownies. Freezing can mess with that creamy cheesecake center and leave you with a texture that’s just not the same.

Equipment
Ingredients
For the brownies:
- 8 tablespoons unsalted butter, melted
- 1 cup sugar
- 1/4 cup unsweetened cocoa powder
- 1/2 teaspoon vanilla extract
- 1 Tablespoon red food coloring
- 1/8 teaspoon salt
- 1/2 teaspoon white vinegar
- 2 large eggs, lightly whisked
- 3/4 cup all-purpose flour
For the cheesecake filling:
- 1 (8-oz.) package cream cheese, softened
- 3 Tablespoons sugar
- 1/2 teaspoon vanilla extract
- 1 large egg yolk
Instructions
Make the brownie batter:
- Preheat the oven to 350ºF. Grease a mini muffin pan with cooking spray.
- In a large bowl, stir together the melted butter, sugar, cocoa powder, vanilla extract, food coloring and salt until combined and then stir in the white vinegar.
- Add the eggs and stir until combined. Fold in the flour just until combined. Set brownie mixture aside.
Make the cheesecake filling:
- In the bowl of a stand mixer fitted with the paddle attachment, beat the cream cheese with the sugar, vanilla extract and egg yolk until combined. Transfer the cheesecake mixture to a piping bag or sealable plastic bag and snip off the tip.
- Using a small ice cream scoop (or two small spoons) scoop about 1 tablespoon of the brownie batter into each well of the mini muffin pan. Pipe about 1 teaspoon of the cheesecake mixture atop the brownie batter then top the cheesecake mixture with an additional 1 teaspoon of brownie batter. Using a toothpick, swirl the brownie batter and cheesecake mixture together.
- Bake the brownie bites for about 12 minutes or until the cheesecake mixture is fully baked. Remove the brownie bites from the oven and allow them to cool in the pan for about 5 minutes before removing them.
Kelly’s Notes
- Store the red velvet cheesecake brownie bites in an airtight container in the fridge. They’ll stay fresh for about 3 to 5 days. A little parchment or wax paper between the layers keeps them from sticking together. As tempting as it may be, I wouldn’t recommend freezing them. Freezing can mess with that creamy cheesecake center and leave you with a texture that’s just not the same.
- ★ Did you make this recipe? Don’t forget to give it a star rating below!
Nutrition
Shoutout
Did you try this recipe?
Share it with the world! Mention @justataste or tag #justatasterecipes!
This post may contain affiliate links.
Recipe adapted from Sunny Anderson.


These look delicious, can’t wait to make them! My only question- if using a different size pan, how much should I fill it up? I’ve ready all the other comments but didn’t see anything about that. Thanks for your help!
Hi Crystal – What size pan are you using?
Have you baked these in a regular muffin pan?
Hi Geri! You should definitely be able to use a regular-size muffin tin, however I’ve never baked them at that size so I’m not sure how long they’d take. Let me know if you give it a shot!
Can you make these in mini foil cupcake liners? Hope so!
A mini cupcake pan will work great, Caryn!
Hi! Can I use a boxed brownie mixture and just add good color to it?
Sure!
Has anyone else also a problem with the cacao powder? I used 1/4 cup unsweetened cacao powder, as the recipe said but my muffins turned out brown even though I used red food coloring. Besides that, the muffins are so tasty!
Hi Gina – All food coloring brands vary in the depth of color they provide. I use gel-based food coloring, which is more concentrated. :)
Has anyone made these with Gluten Free flour?
Hi Anne – You could try using a gluten-free flour such as Cup4Cup that’s a 1:1 ratio as regular flour. I’ve never tried this substitution so I’m not sure what the result would be. I would love to hear your results if you give it a shot! :)
These look yummy. Could you tell me if sugar is granulated or caster
Granulated!
Can these be made without the food coloring? I don’t have any.
Absolutely!
Delicious! I loved this recipe.
So glad you enjoyed it, Douglas!
I made this for a family dinner and it was a huge hit!! Very forgiving recipe, I left the batter sitting out on the counter for an hour before baking due to having to attend to a very fussy baby. I baked them with no issue and they came out soft and moist! My MIL who is a professional baker called the recipe a keeper.
Amazing! I’m so thrilled you enjoyed the recipe, Veronica!
Hi! Do you have the recipe in grams? :)
Hi Sophia – I don’t provide metric conversions for my recipes, as I cannot guarantee they would be 100% accurate without being tested. However, you are welcome to use an online converter. :)