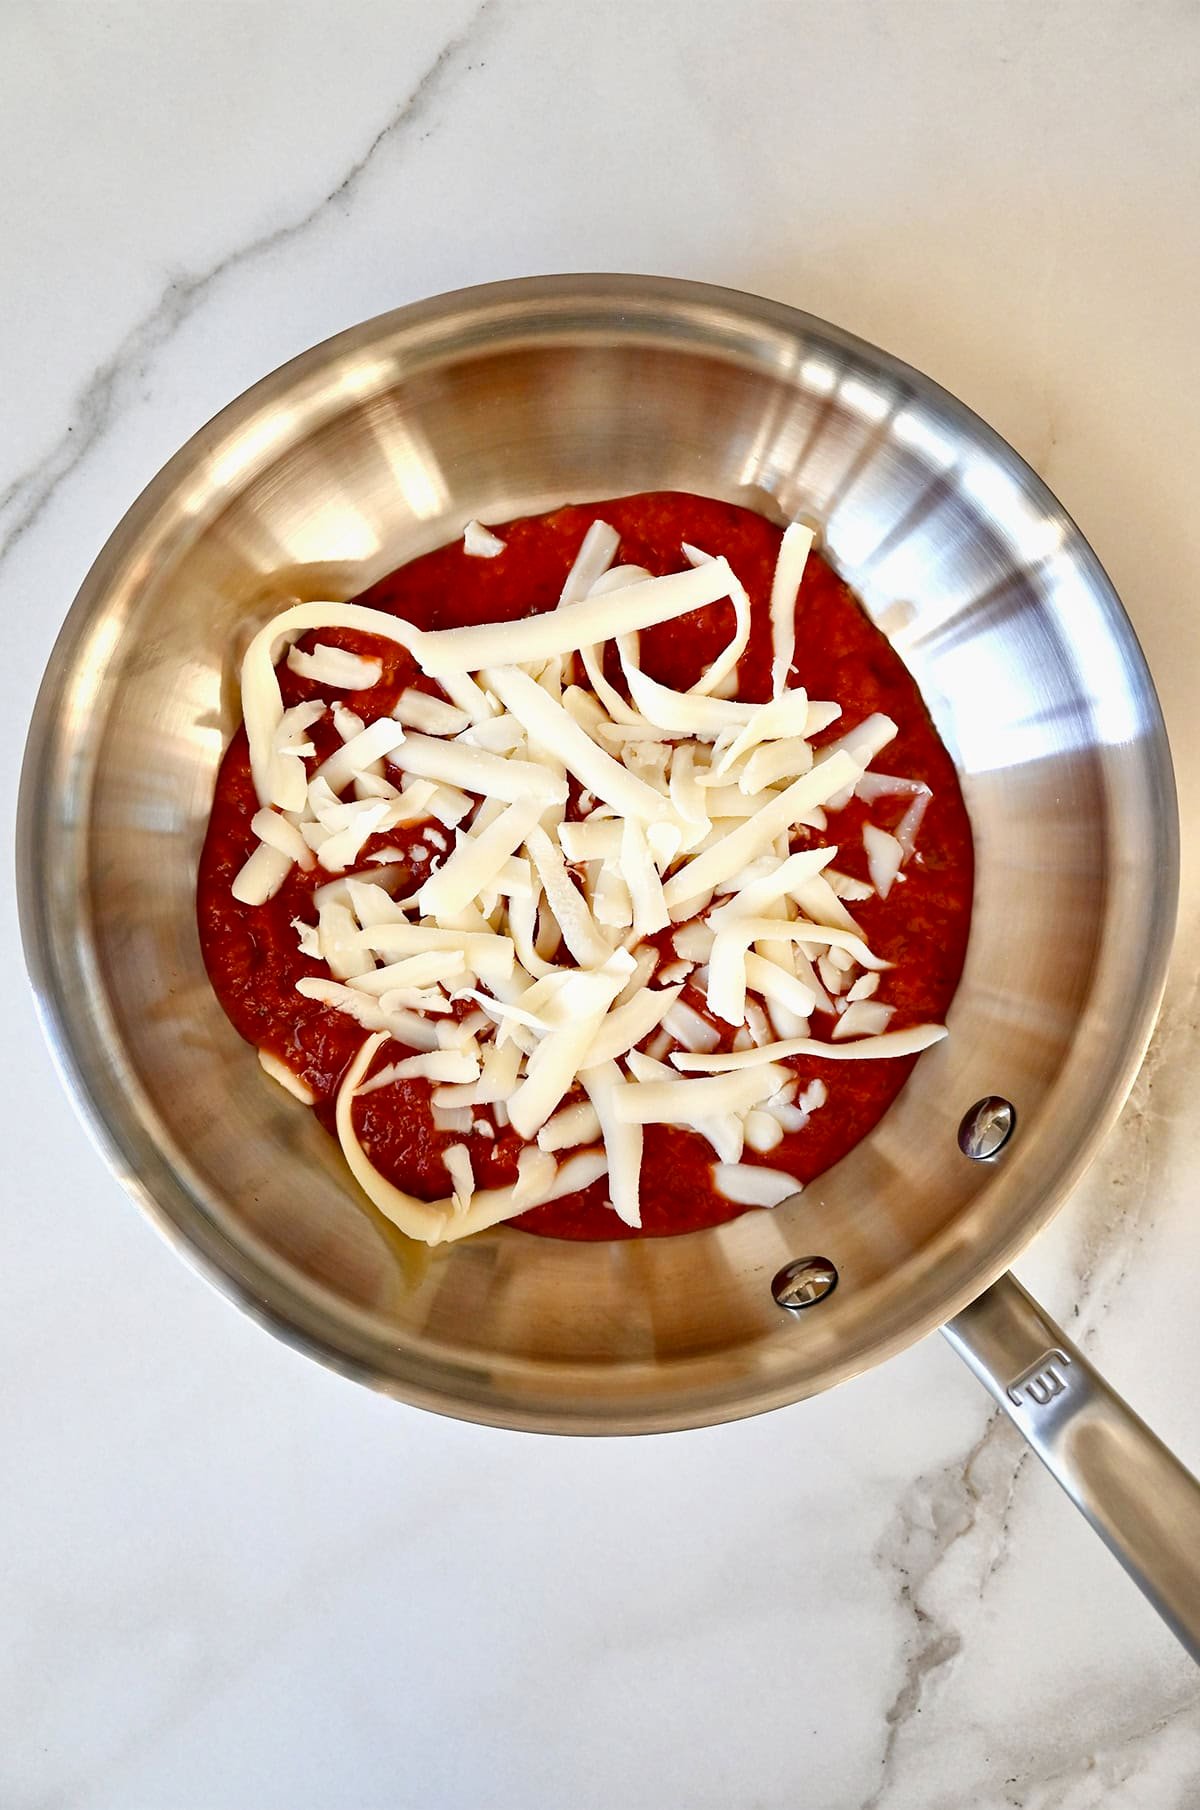
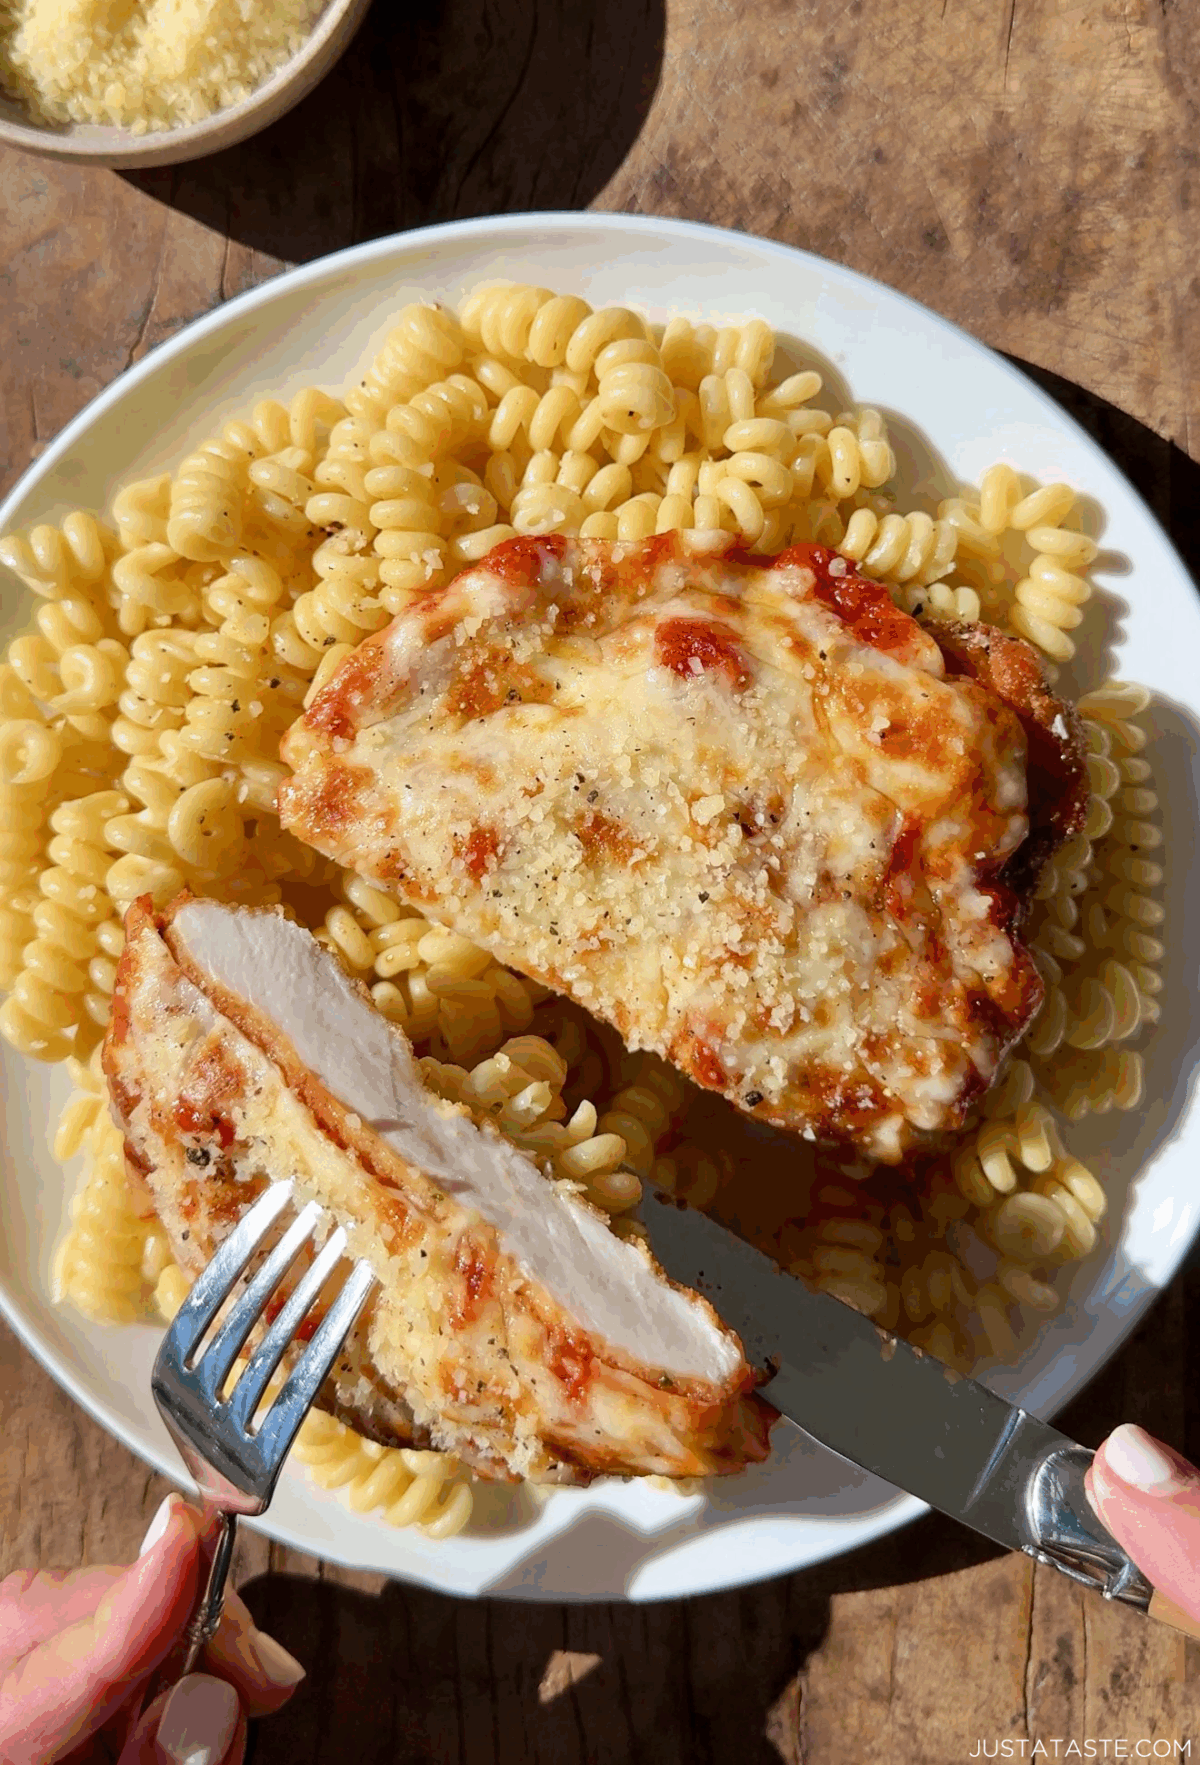
This is the best chicken Parmesan I’ve ever made, and it’s become one of my most-requested dinner recipes! My secret is to warm the marinara in an oven-safe skillet, top it with shredded mozzarella and broil until melted and lightly golden. It’s a simple trick that guarantees shatteringly crisp cutlets every single time.
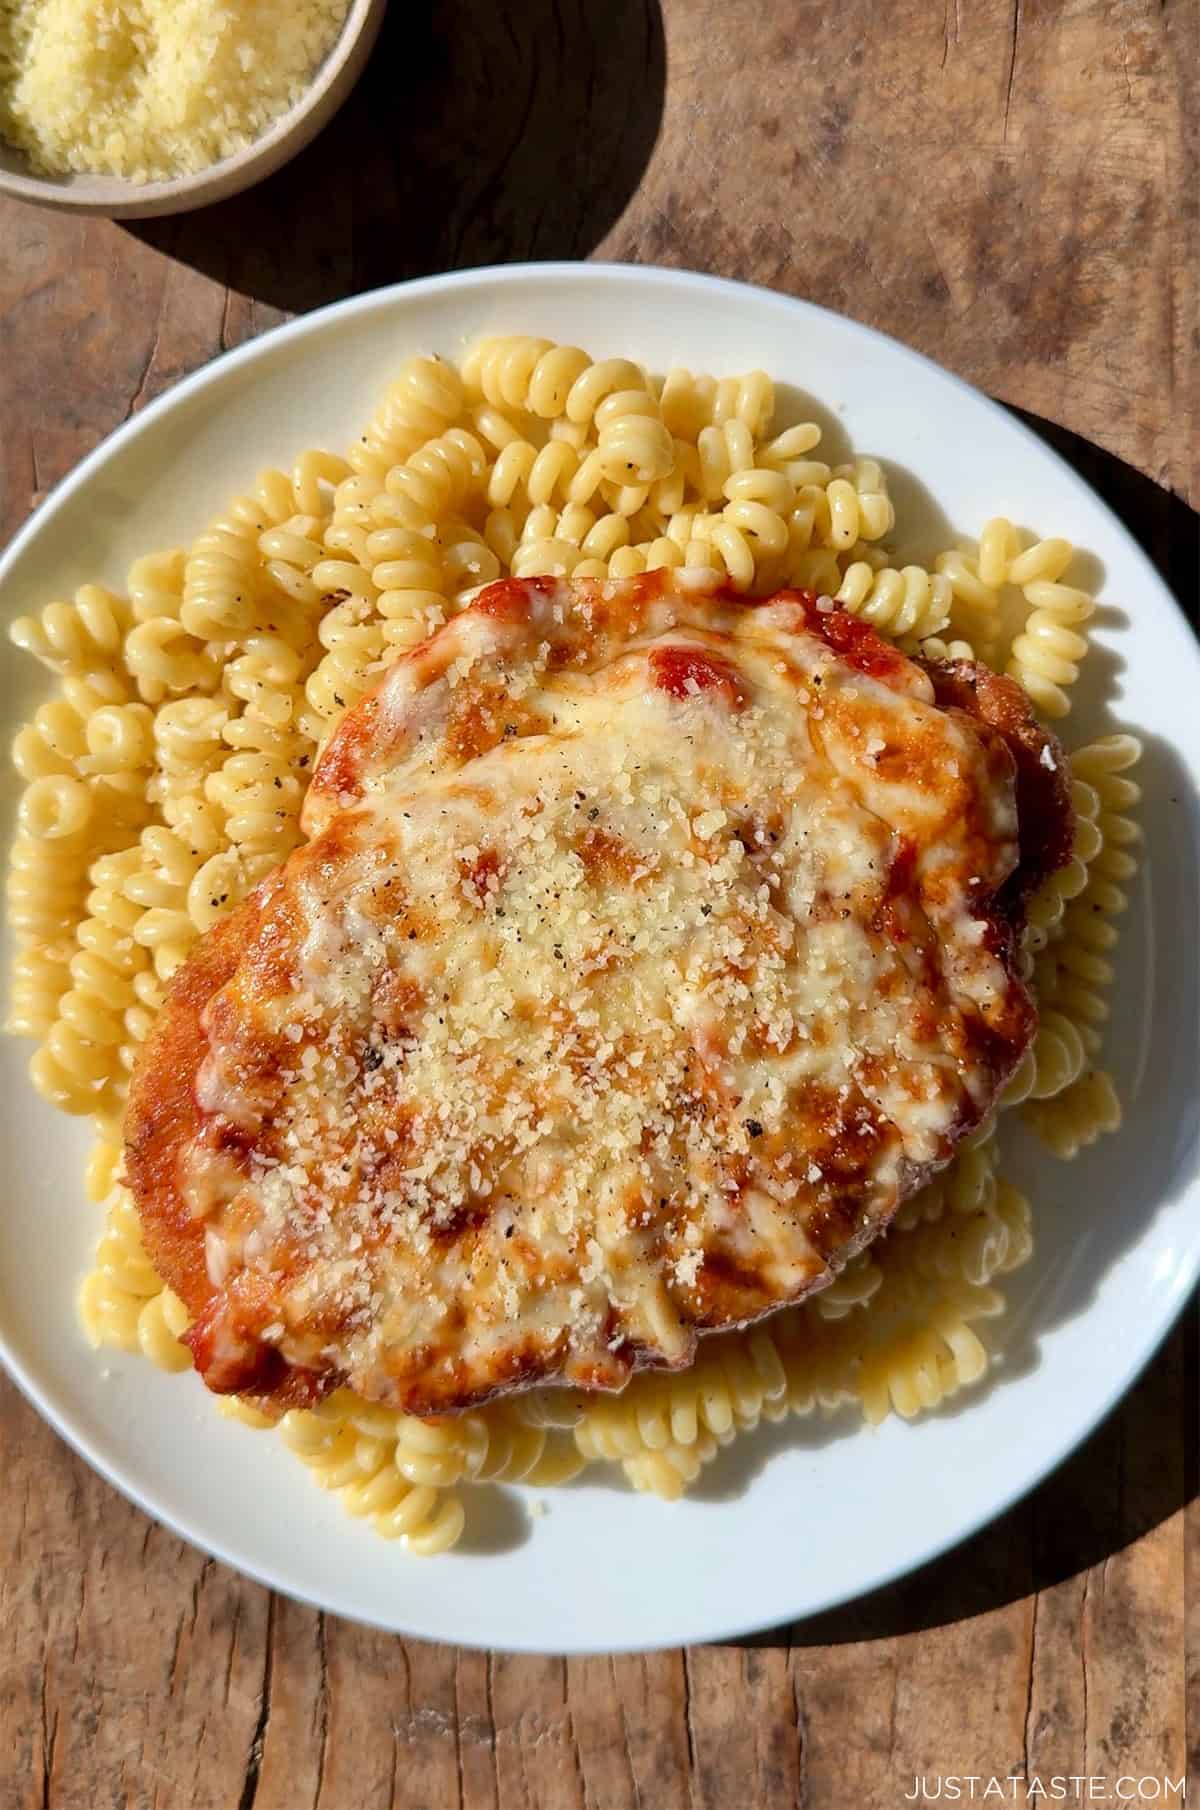
Table of Contents

My mom, Noni’s, chicken cutlets are legendary. They were one of the very first things she ever taught me how to cook, and to this day, they’re the most requested item at our weekly Tuesday dinners. (If you follow along on Instagram, you already know my mom, Noni, is the MVP of Tuesdays—she cooks dinner for our entire family every single week.)
That’s the inspiration behind this recipe. And the setup couldn’t be easier. Ultra-thin chicken cutlets get breaded and pan-fried until golden brown and crispy before getting topped with just enough marinara and plenty of shredded mozzarella. From there, you can go the traditional route and broil everything until the cheese is melty, or use my go-to technique that I’ll show you below—one that guarantees the breading stays crispy.
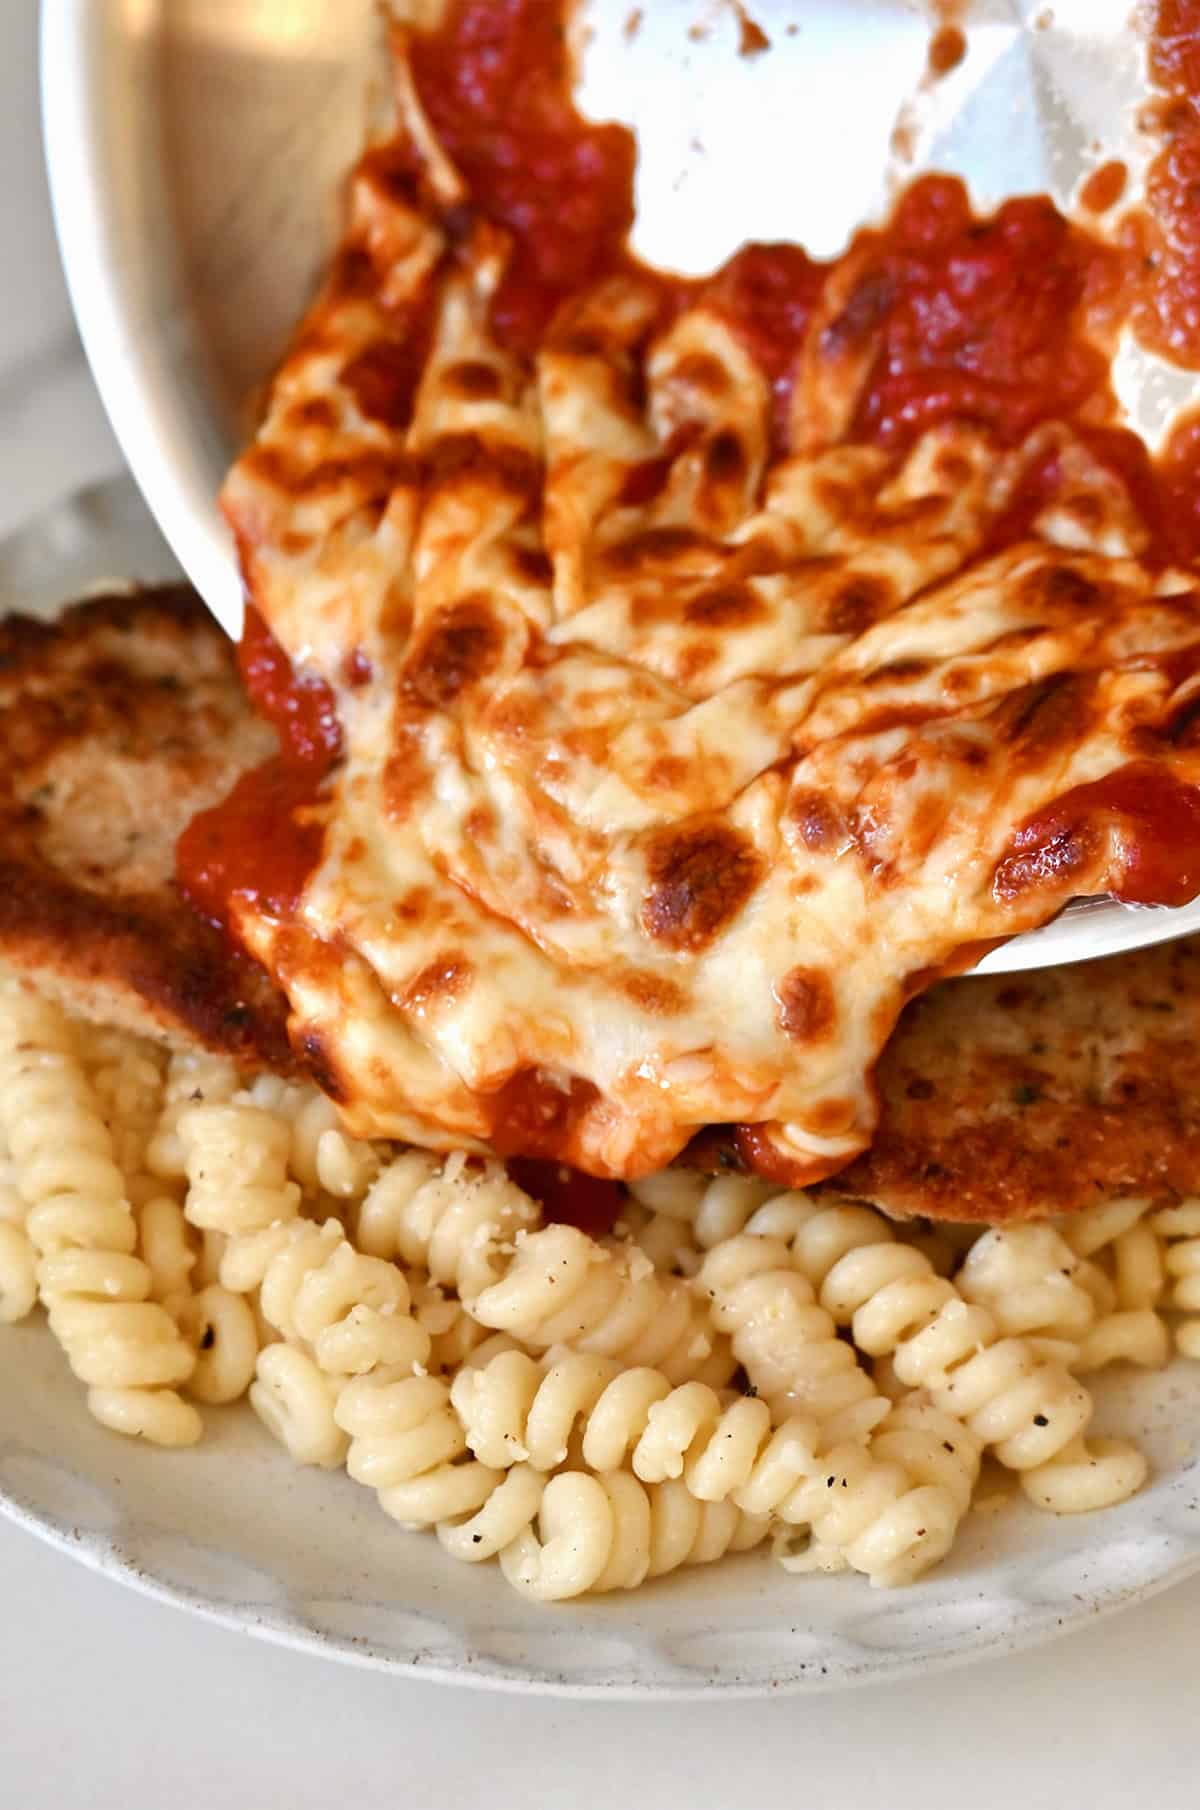
Whether you call it chicken parm, chicken parmigiana, or—like we’ve called chicken cutlets in my family since I was a kid—little guys (don’t ask… no one remembers how that name stuck!), this is the version I make on repeat. Serve it over a big ol’ bowl of cacio e pepe pasta with a side of cheesy garlic bread for the ultimate comfort food dinner your whole family will love.
Why This is the BEST Chicken Parm:
- Inspired by my mom, Noni’s, famous chicken cutlets (this chicken milanese recipe is the one that started it all!)
- Thinly pounded chicken breasts… thin, thin, thin for the crispiest results!
- Seasoned flour so flavor is layered in from the very first step
- Pan-fried for maximum crunch, then finished under the broiler
- My go-to trick keeps the breaded chicken crispy even after adding the marinara and cheese
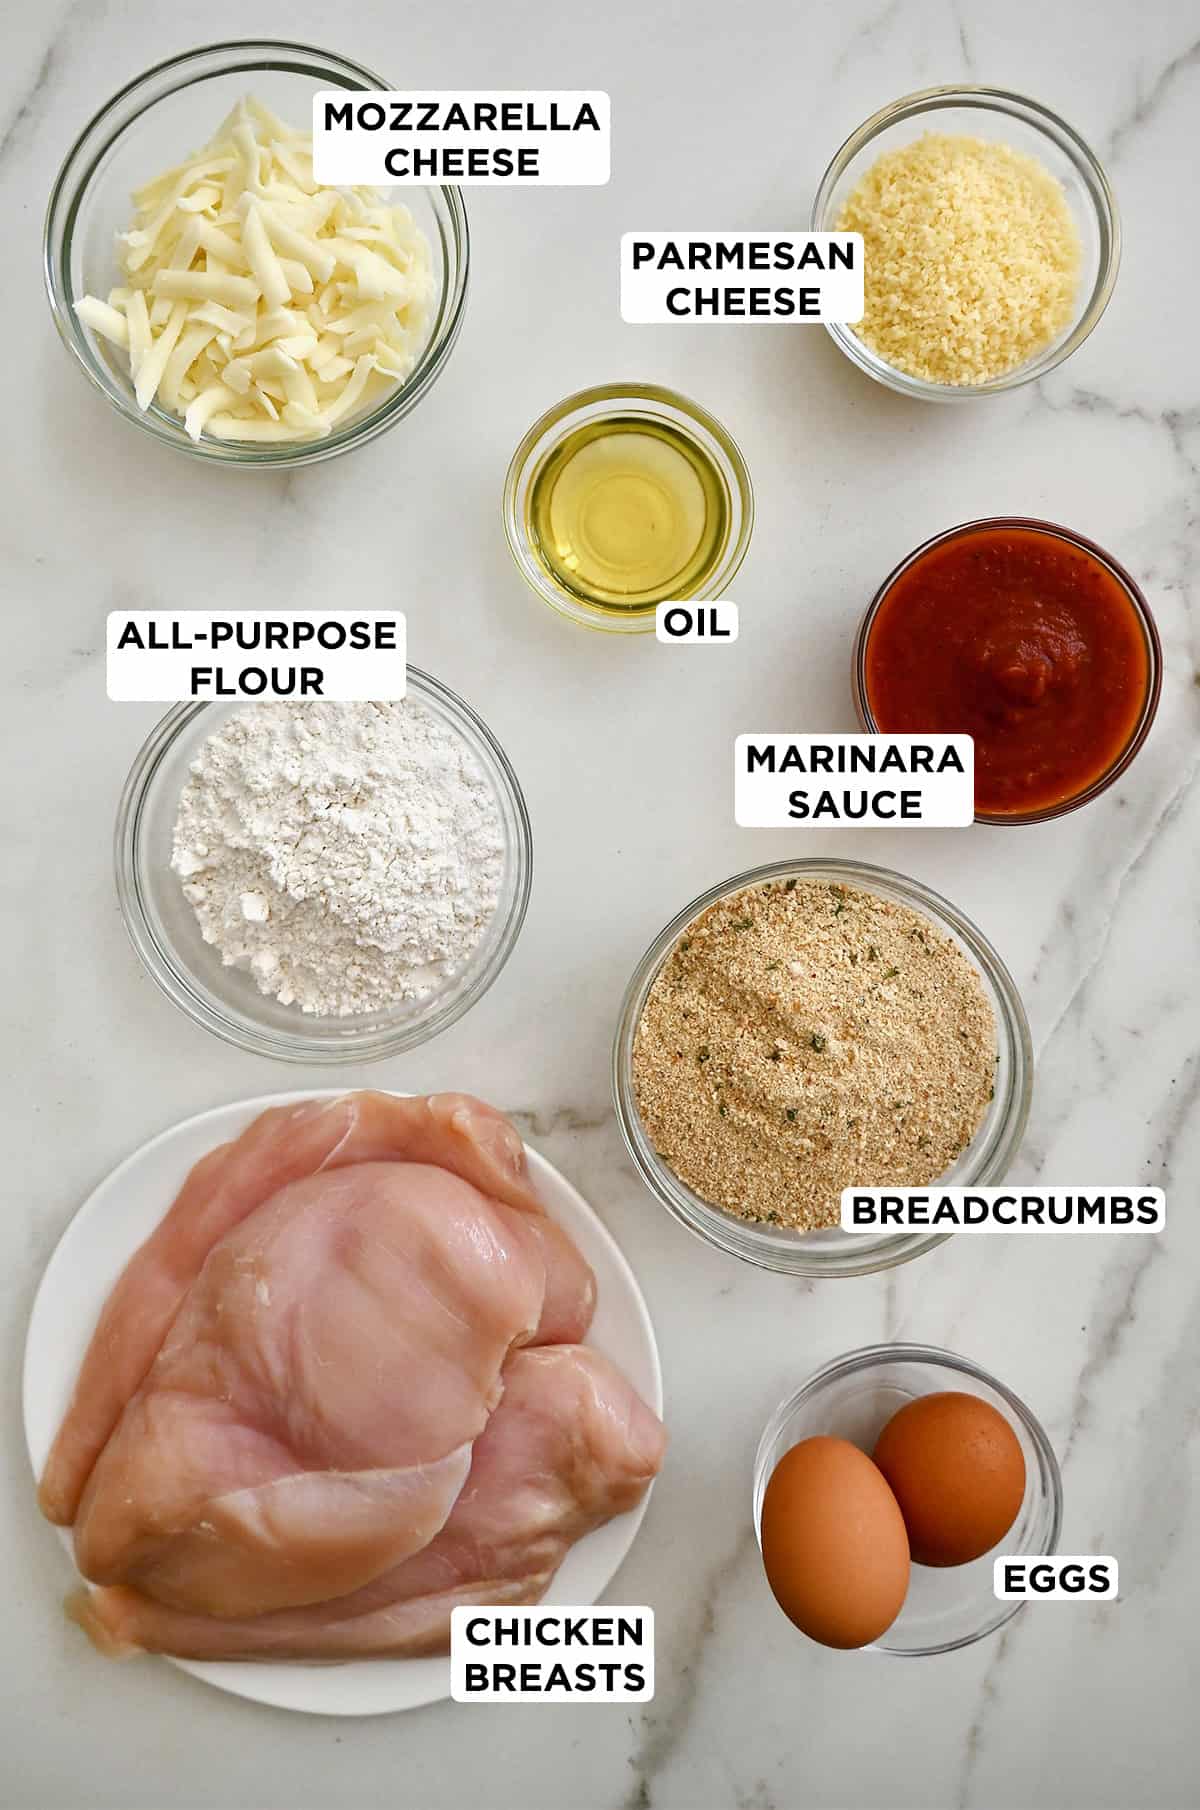
- Chicken breasts: Boneless, skinless chicken breasts work best because you can control the thickness (more on why that matters below!). You can also use store-bought chicken cutlets or chicken tenders; adjust the cook time as needed.
- All-purpose flour: Creates a dry surface on the chicken so the egg can actually stick. And once the egg sticks, the breadcrumbs stick. Skip the flour, and the breading is far more likely to slide off in the pan. I always season the flour generously with salt and pepper to layer in flavor from the very first step.
- Eggs: Act as the glue between the flour and breadcrumbs. I sometimes add a small splash of milk to thin them out, which helps create a more even coating on the chicken. It’s optional, but it’s a trick I use often.
- Panko breadcrumbs: Panko gives you a lighter, crunchier crust than traditional breadcrumbs. You can use regular breadcrumbs, but I like Italian-seasoned panko for extra flavor right in the breading. Gluten-free Panko works, too.
- Parmesan cheese: Mixed into the breadcrumbs to add salty, nutty flavor and help the crust brown beautifully.
- Marinara sauce: Use a marinara you love, whether that’s homemade (my homemade marinara sauce recipe takes just 10 minutes!) or store-bought.
- Mozzarella cheese: I stick with shredded, low-moisture mozzarella here. Fresh mozzarella is delicious, but it releases more liquid and can make the cutlets soggy.
- Oil for frying: I like using avocado oil because it has a high smoke point and can handle the heat needed for a deep golden crust. Vegetable oil works, too. I skip olive oil here as it can burn before the chicken is cooked through.
See the recipe card for full information on ingredients and quantities.
Success Tip: Start with Perfectly Thin Chicken Cutlets
The key to the best chicken parmesan isn’t the sauce or the cheese—it’s the cutlets. Crispy is the goal, and the way you get there is by pounding the chicken breasts thin. And then thinner. Thin, thin, thin is the name of the game.
Thin cutlets cook quickly and evenly, which means the breading has time to turn golden and crisp without the chicken drying out or absorbing excess oil. Thicker pieces tend to steam instead of fry, which is how you end up with soggy breaded chicken, and nobody wants that.
Place each chicken breast between two pieces of parchment or wax paper and use a meat mallet or the bottom of a heavy skillet to pound it to about 1/2-inch thickness. Try to keep the thickness as even as possible so the chicken cooks at the same rate across the pan.
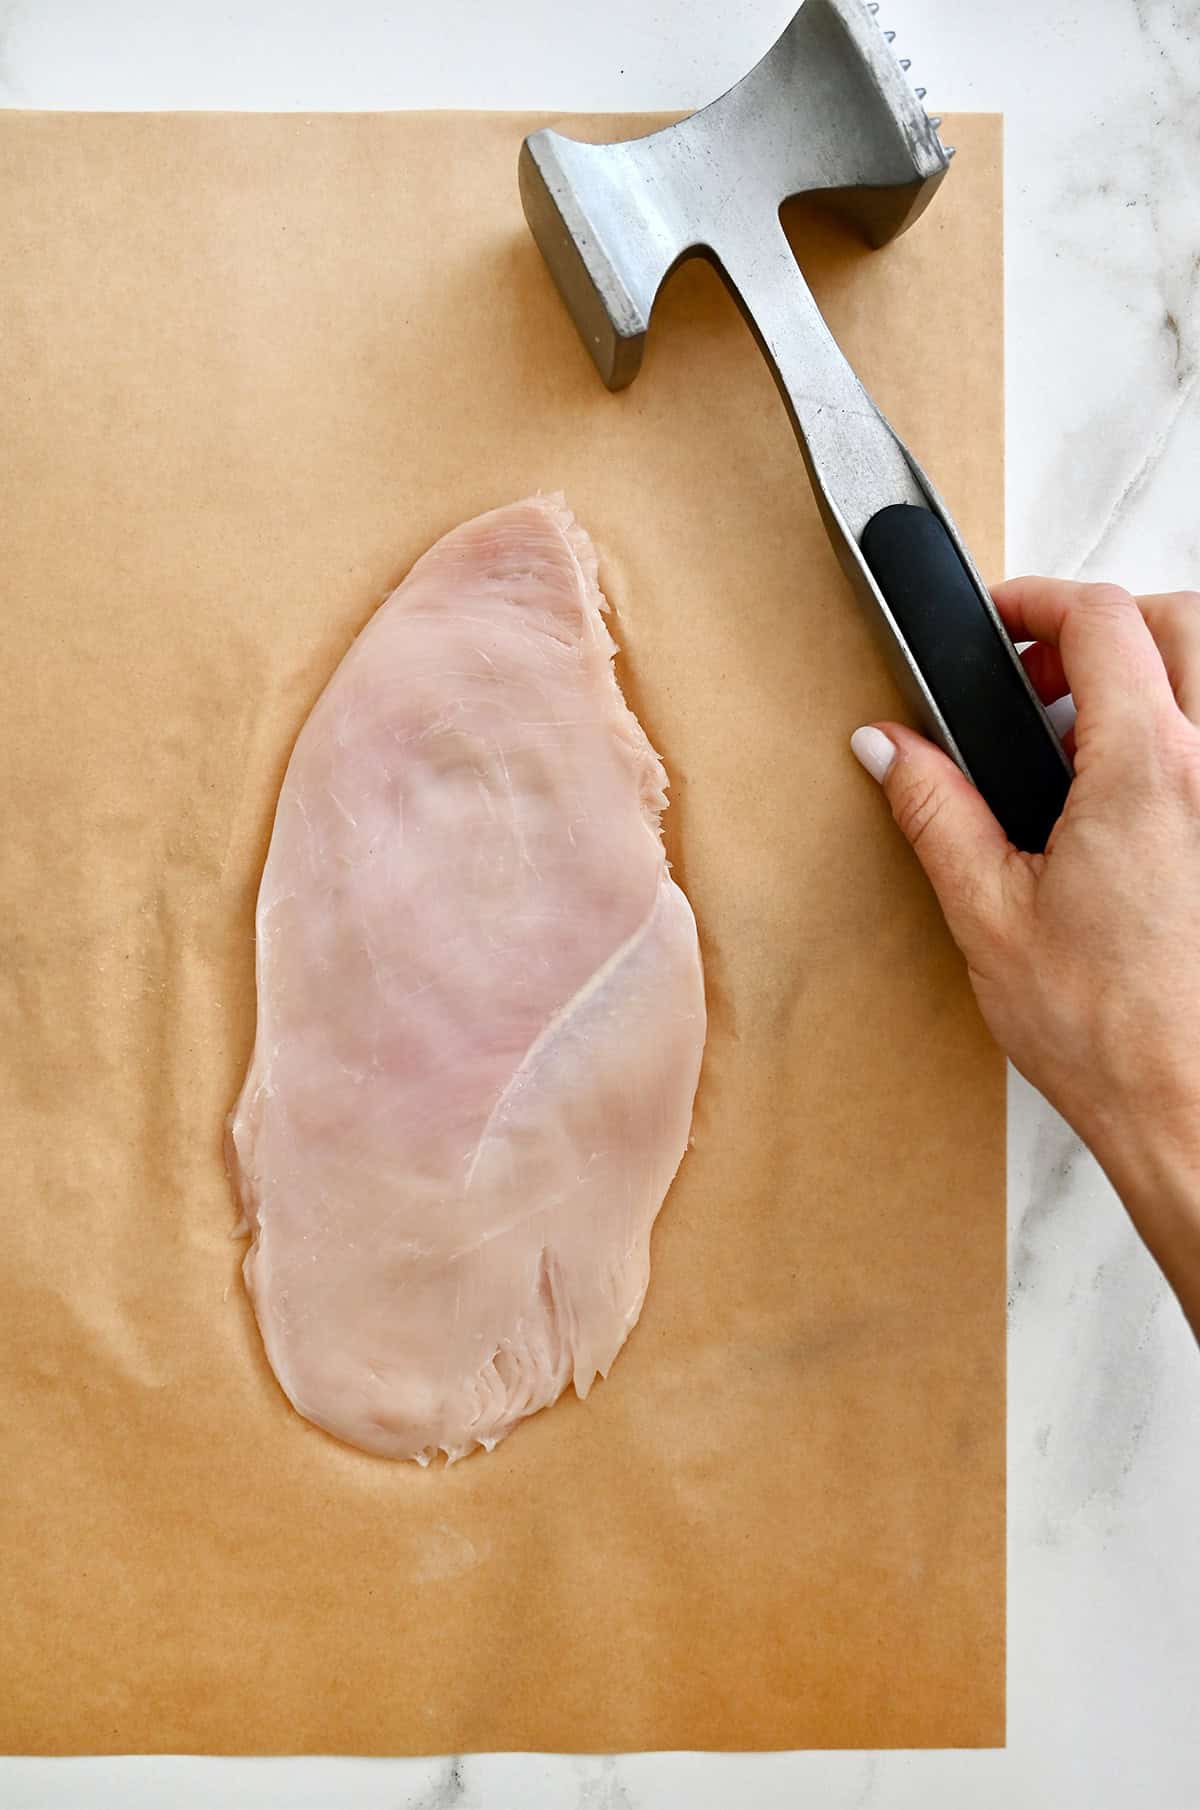
This one step makes all the difference. Get the cutlets right, and everything else—crispy breading, juicy chicken, perfectly melted cheese—falls into place.
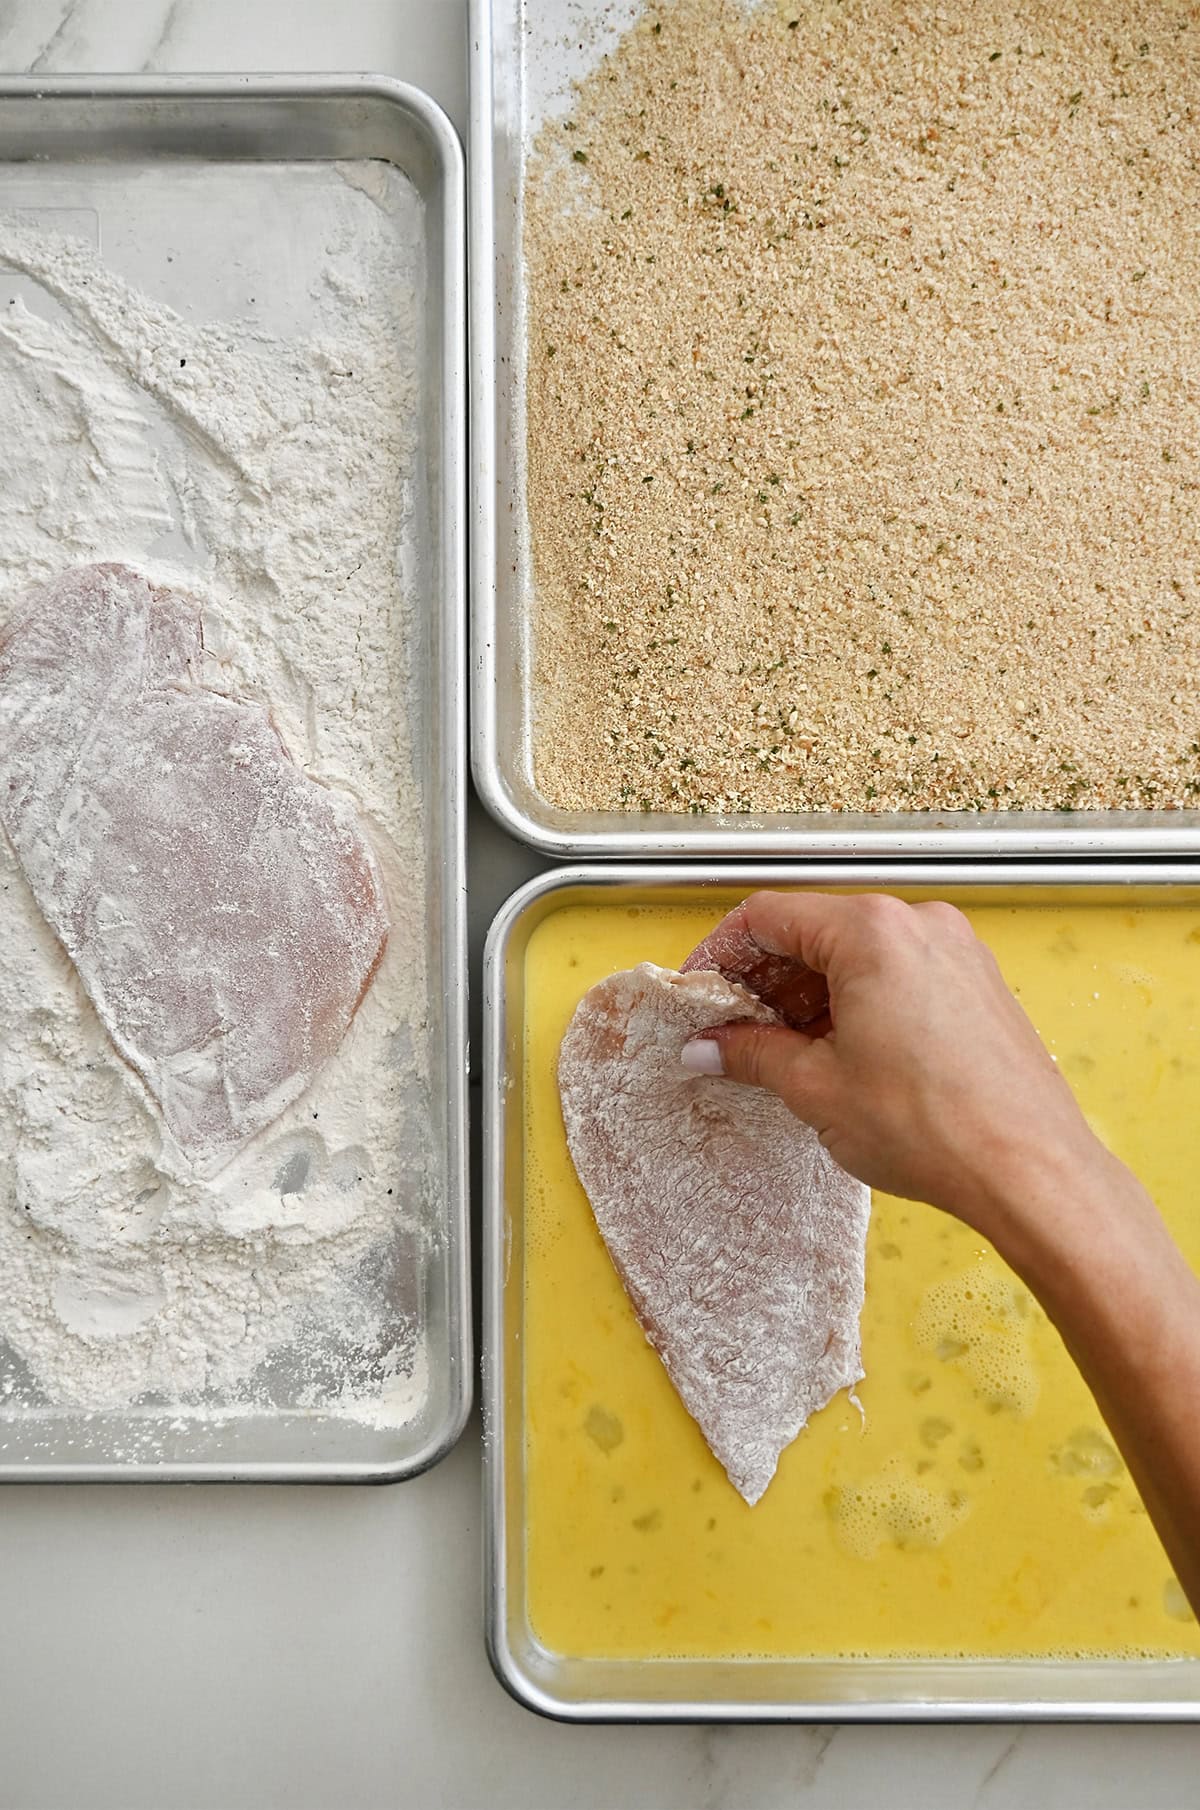
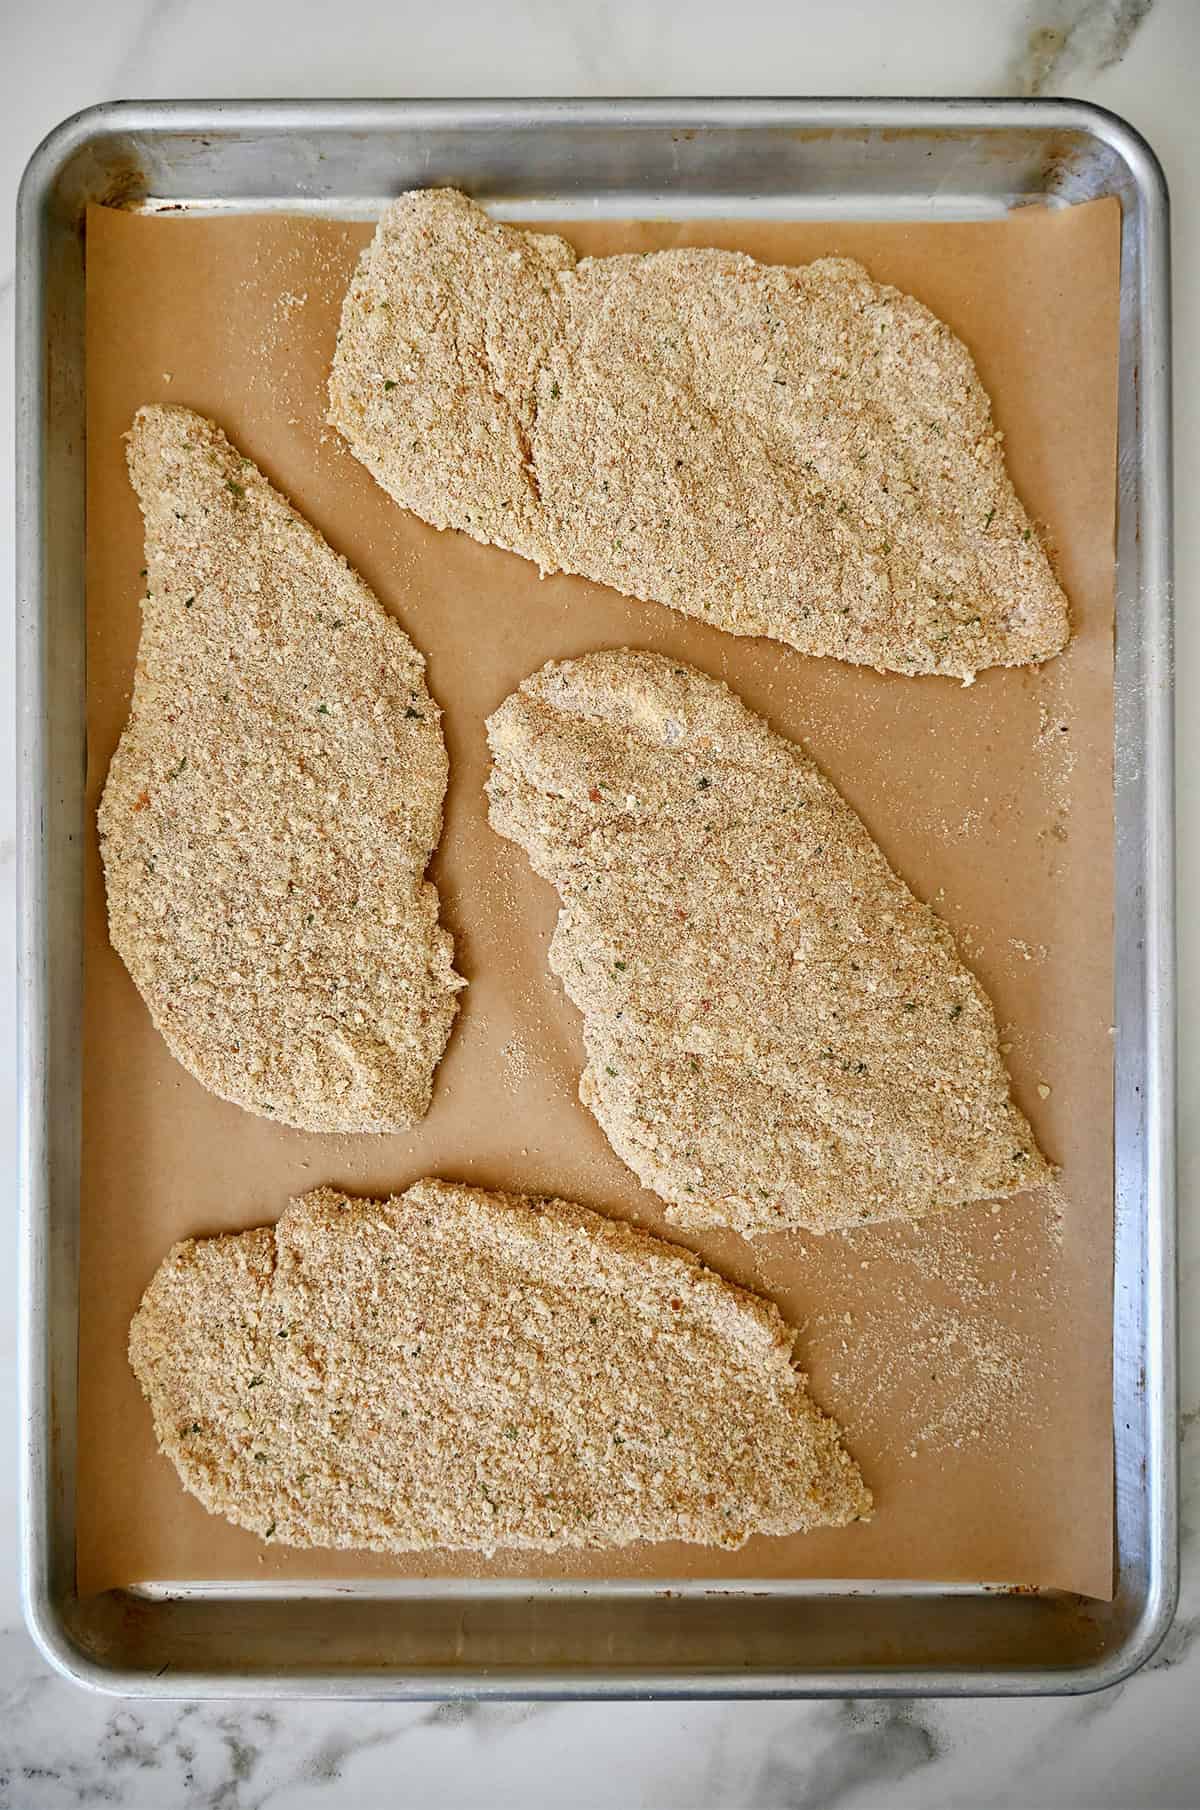
Once you’ve got perfectly thin chicken breasts, it’s time to bread and fry them. I like to set up my breading station using baking sheets because they give me more room to work, but large, shallow dishes work just as well.
Add the flour to the first, whisk the eggs with a splash of milk in the second, and combine the Panko breadcrumbs with grated Parmesan cheese in the third. Dredge each chicken cutlet in the flour, then the egg wash, and finally the breadcrumbs, gently pressing so the coating sticks.
Kelly’s Tip: Just like when making my air fryer mozzarella sticks or homemade arancini, you’ll want to follow the golden rule of breading: keep one hand for the dry steps (flour and breadcrumbs) and one hand for the wet (eggs). That way you’ll bread the chicken and not your fingers!
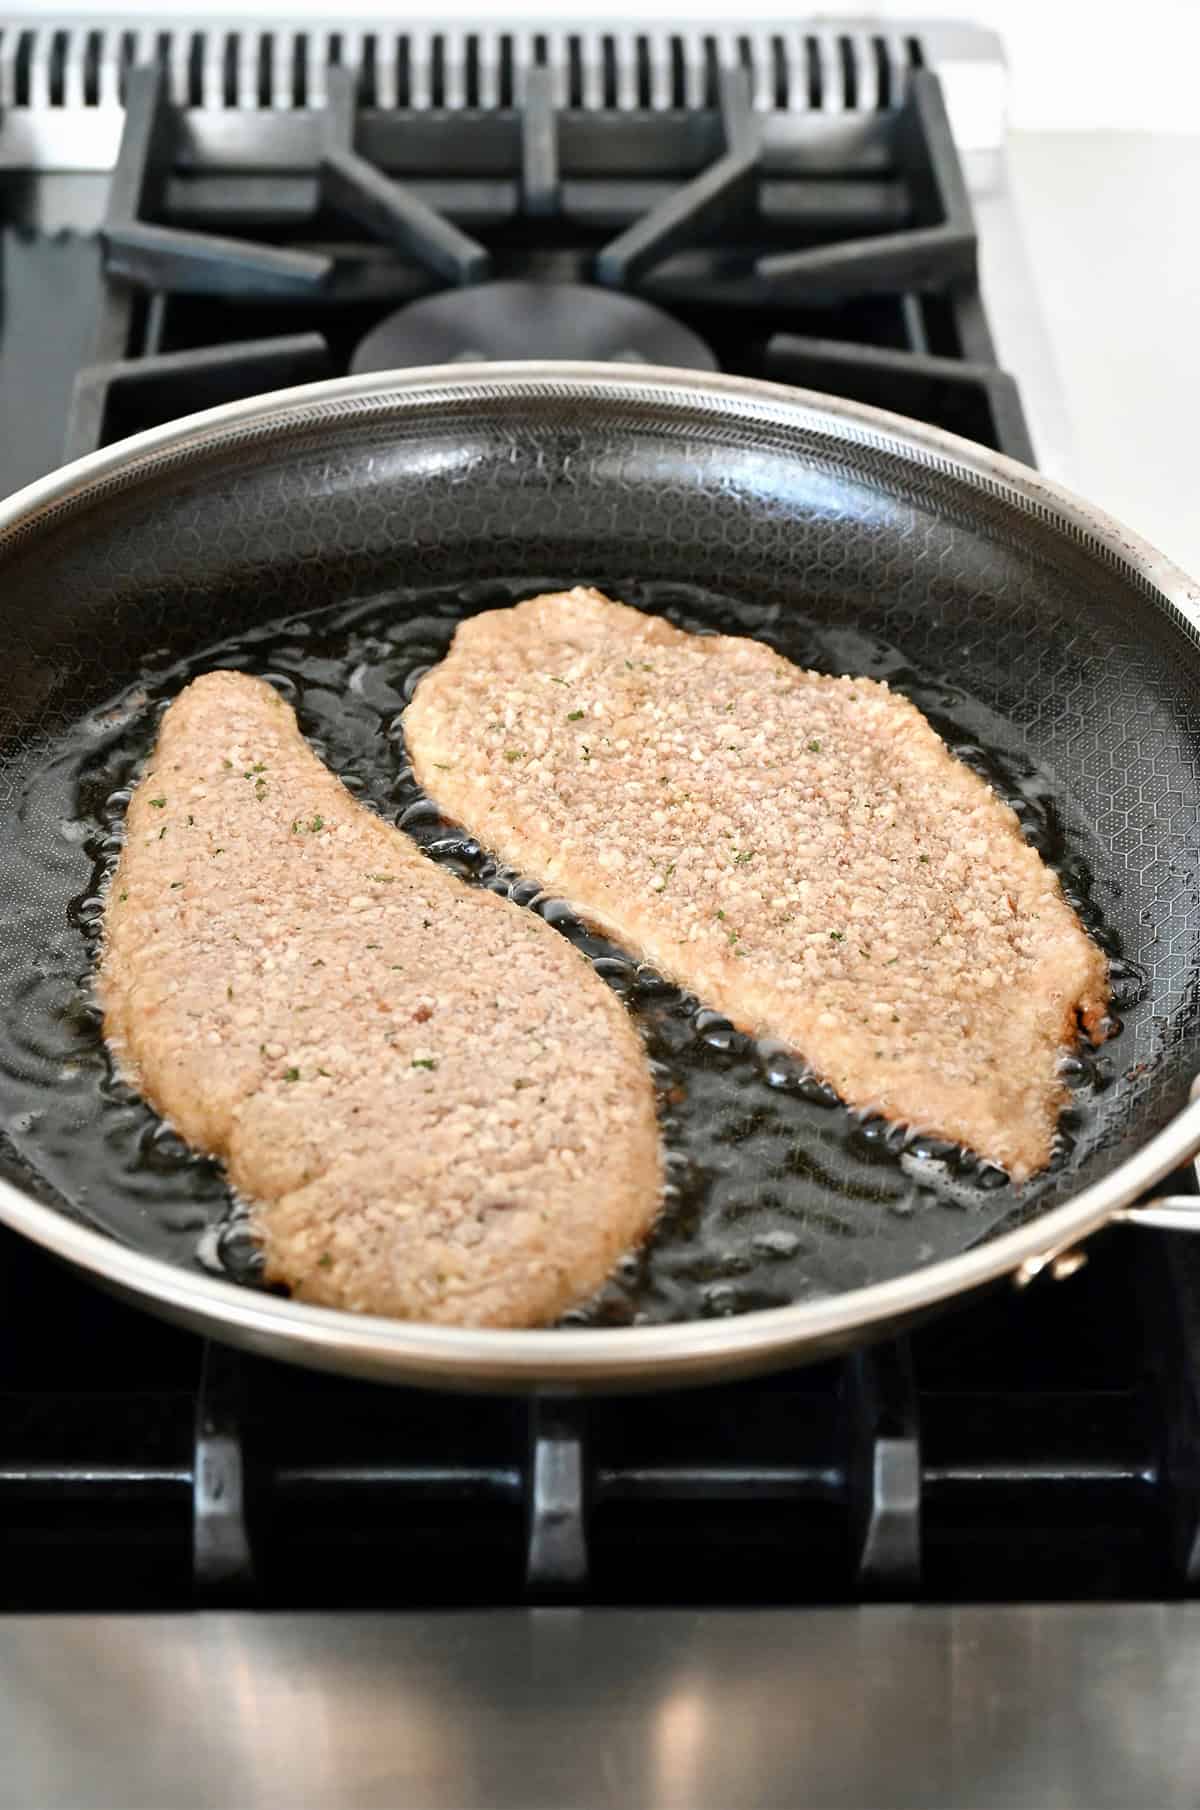
Once your chicken is coated, it’s time to pan-fry. Make sure your oil is hot before adding the breaded chicken. You’ll know it’s hot when it shimmers across the surface of your skillet. If you want to test if the oil is hot enough, drop in a small pinch of breadcrumbs—if they sizzle immediately, you’re good to go. Starting with hot oil helps the breading crisp up right away instead of soaking in oil.
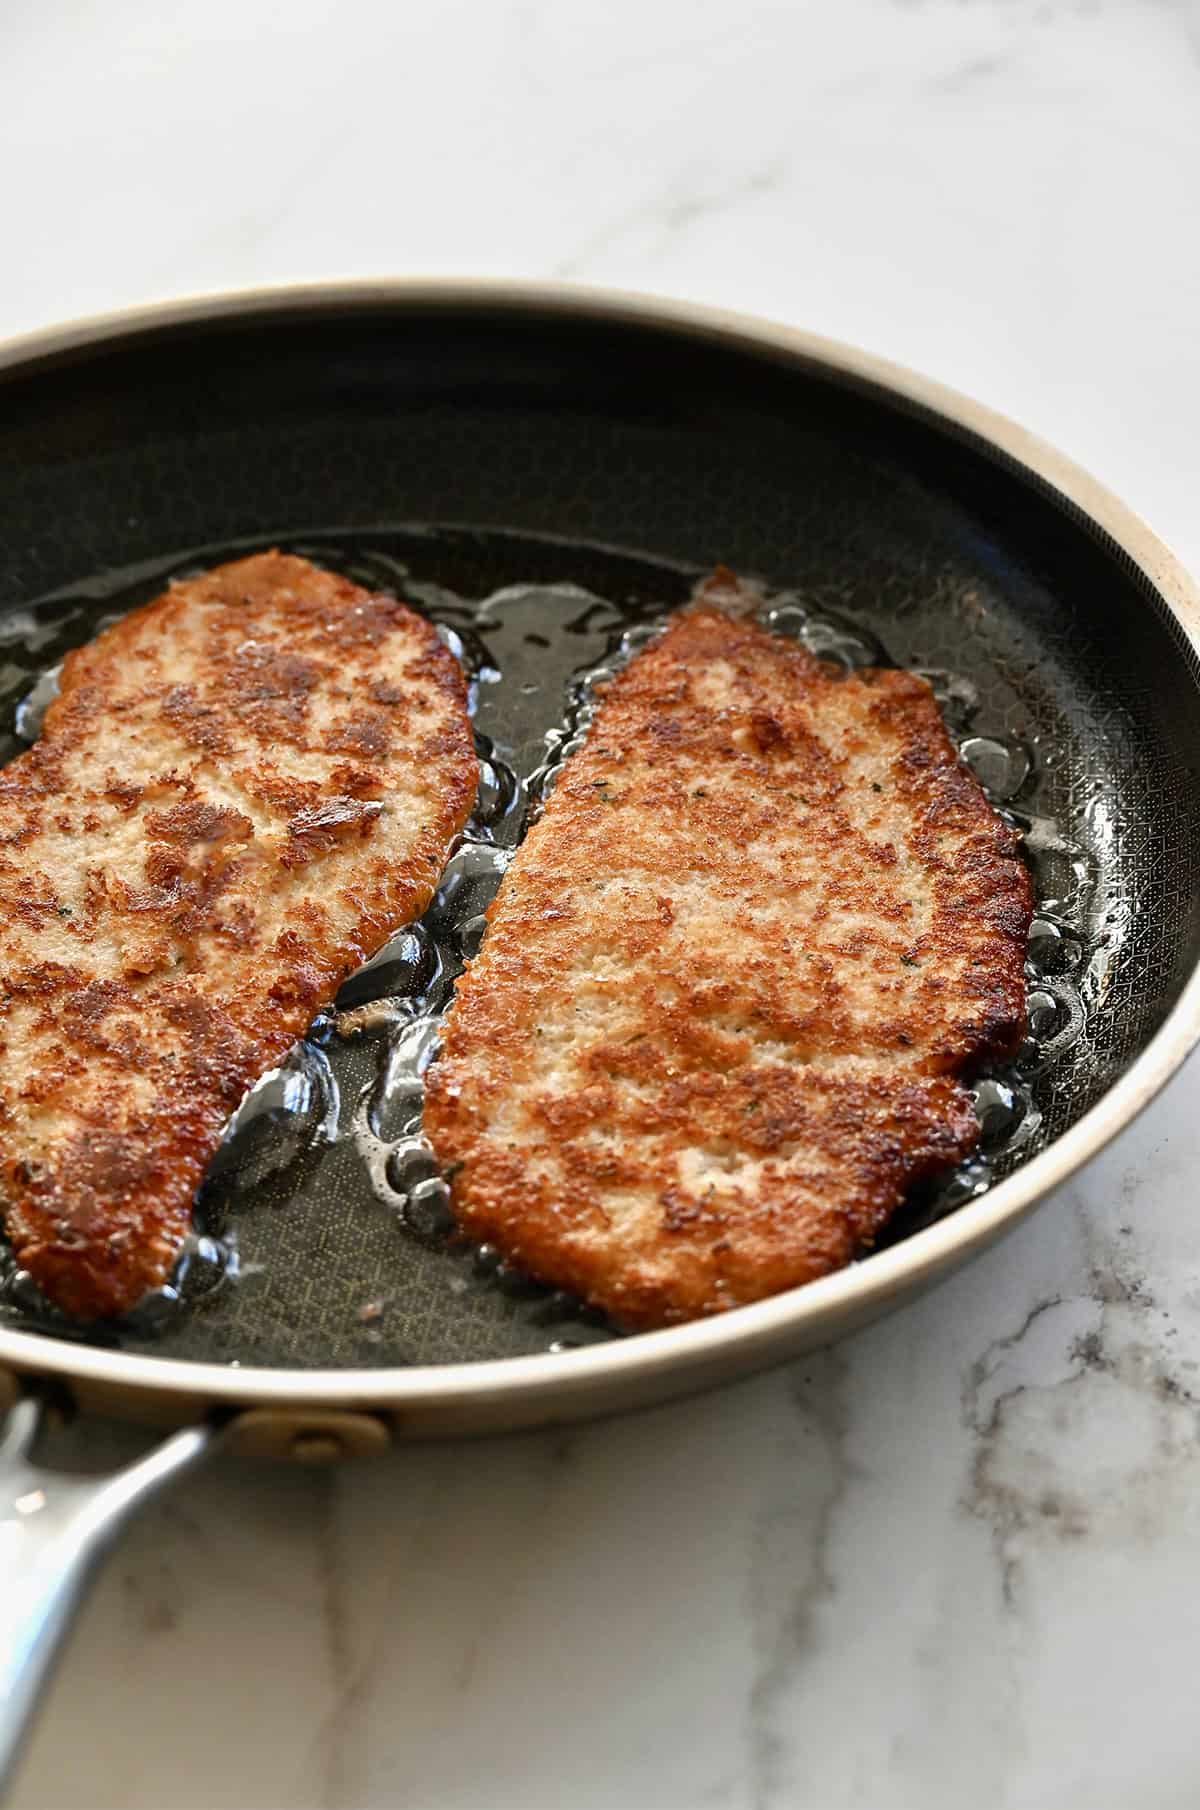
Carefully add the cutlets to the pan, working in batches if needed so you don’t overcrowd the skillet. Let them cook undisturbed until deeply golden on the first side, about 3 minutes. Flip once and continue cooking until the chicken is cooked through and no longer pink (if you like extra reassurance, an instant-read thermometer should register 165°F in the thickest part of the meat). Resist the urge to keep flipping—one flip is all you need for the best crust.
Now for my favorite part, and the step that makes this chicken parmesan recipe a little different…
My Secret to Keeping the Cutlets Crispy
Most chicken parmesan recipes have you spoon marinara sauce and cheese directly onto the fried cutlets and pop everything under the broiler. Totally fine, but it can cost you some of that hard-earned crispiness.
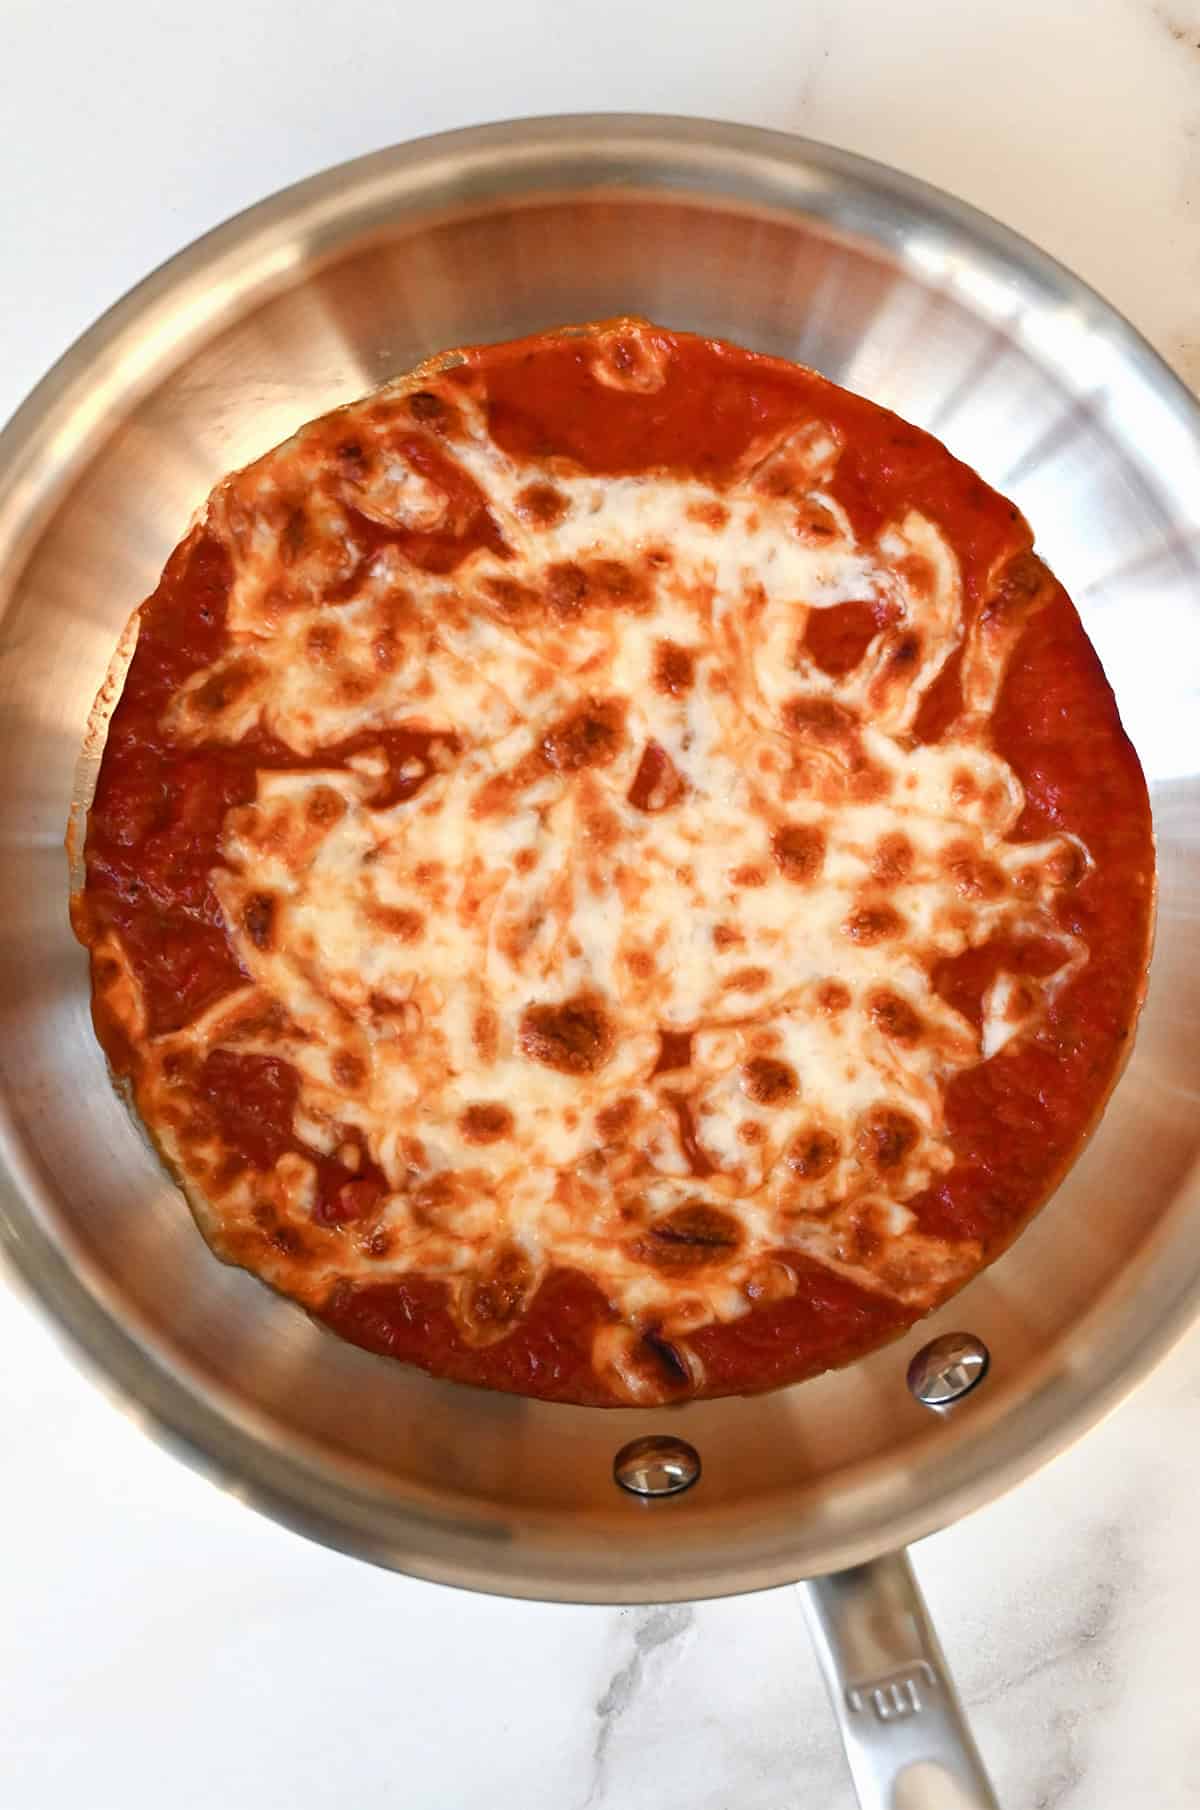
If you want to keep the cutlets extra crispy, here’s what I do instead: warm the marinara sauce in an oven-safe skillet, top it with the shredded mozzarella, and broil until the cheese is melted and lightly golden. Then slide that glorious blanket of sauce and cheese right onto the crispy cutlets just before serving.
Crispiness maintained. Cheesiness guaranteed.
Prefer the Traditional Method? Here’s How to Do It
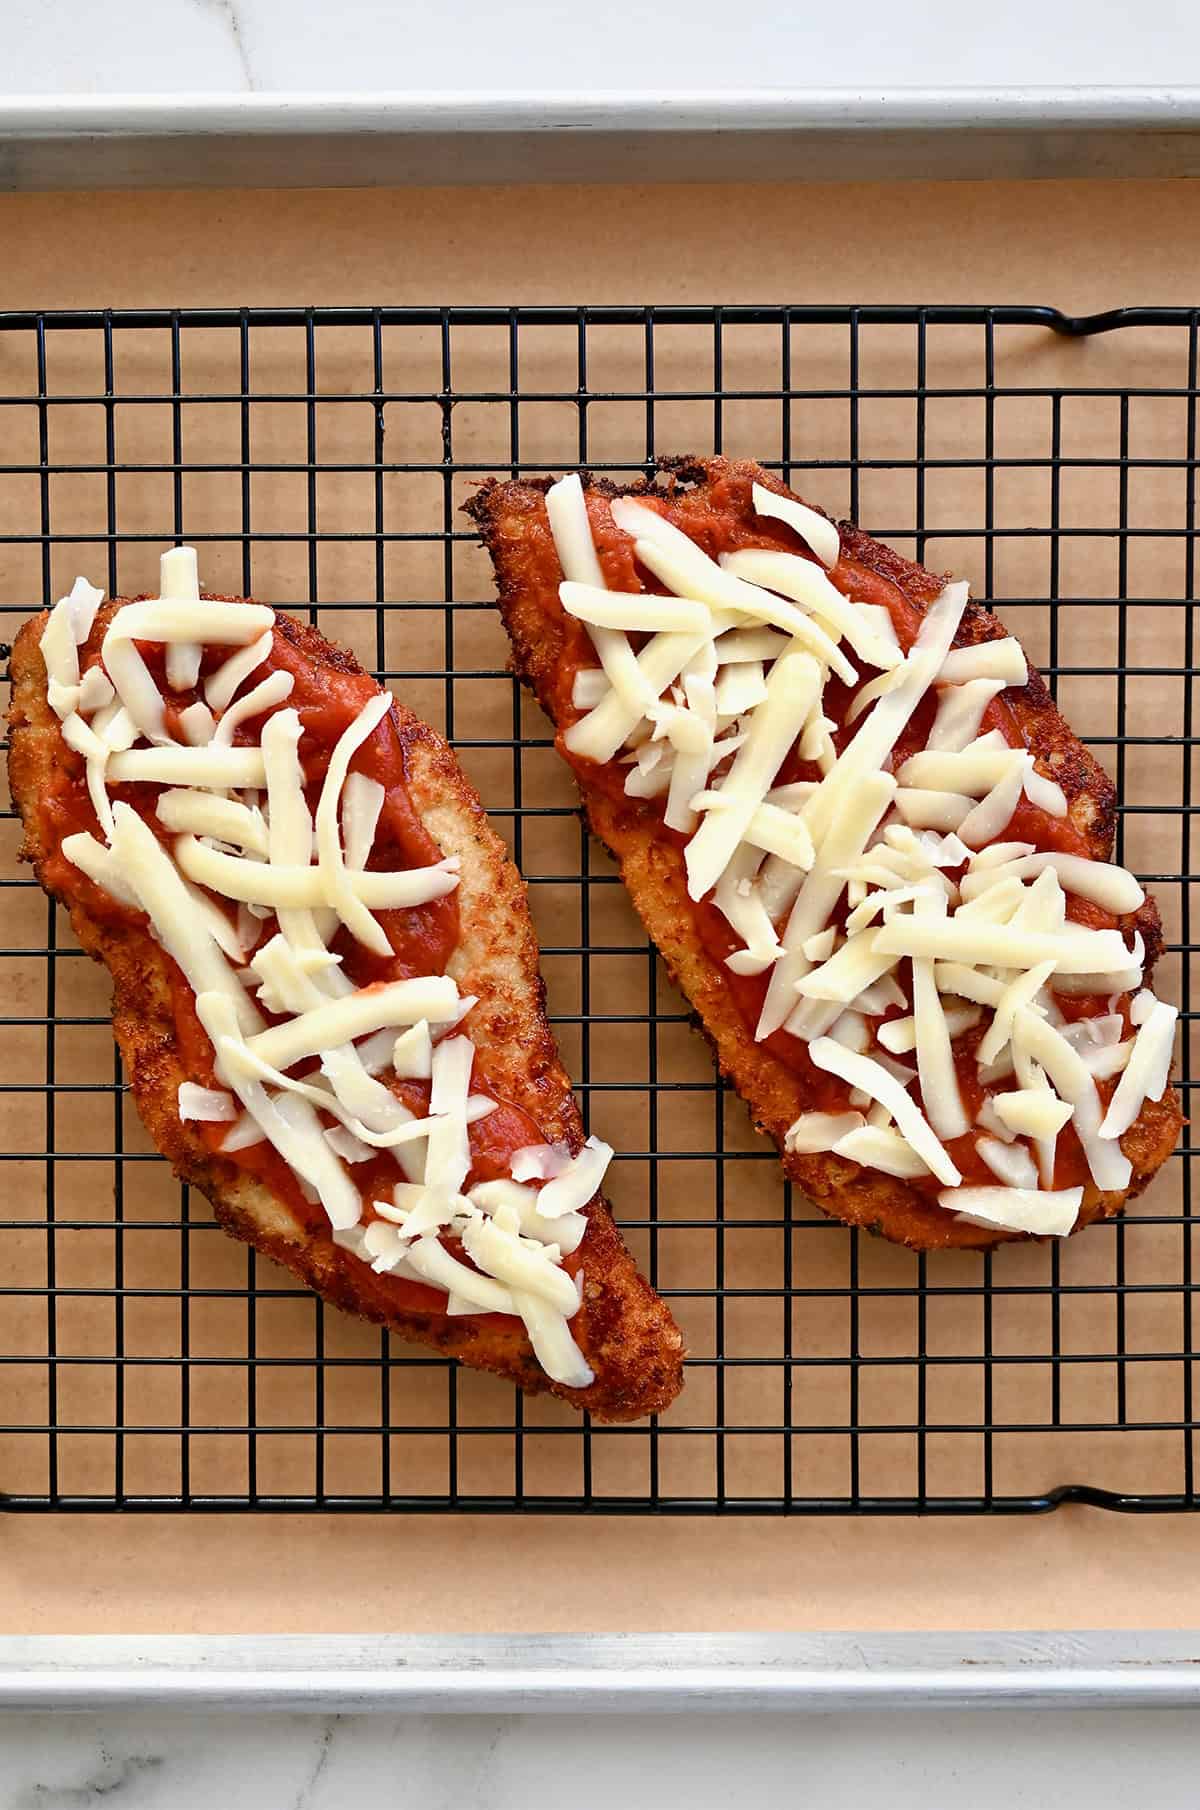
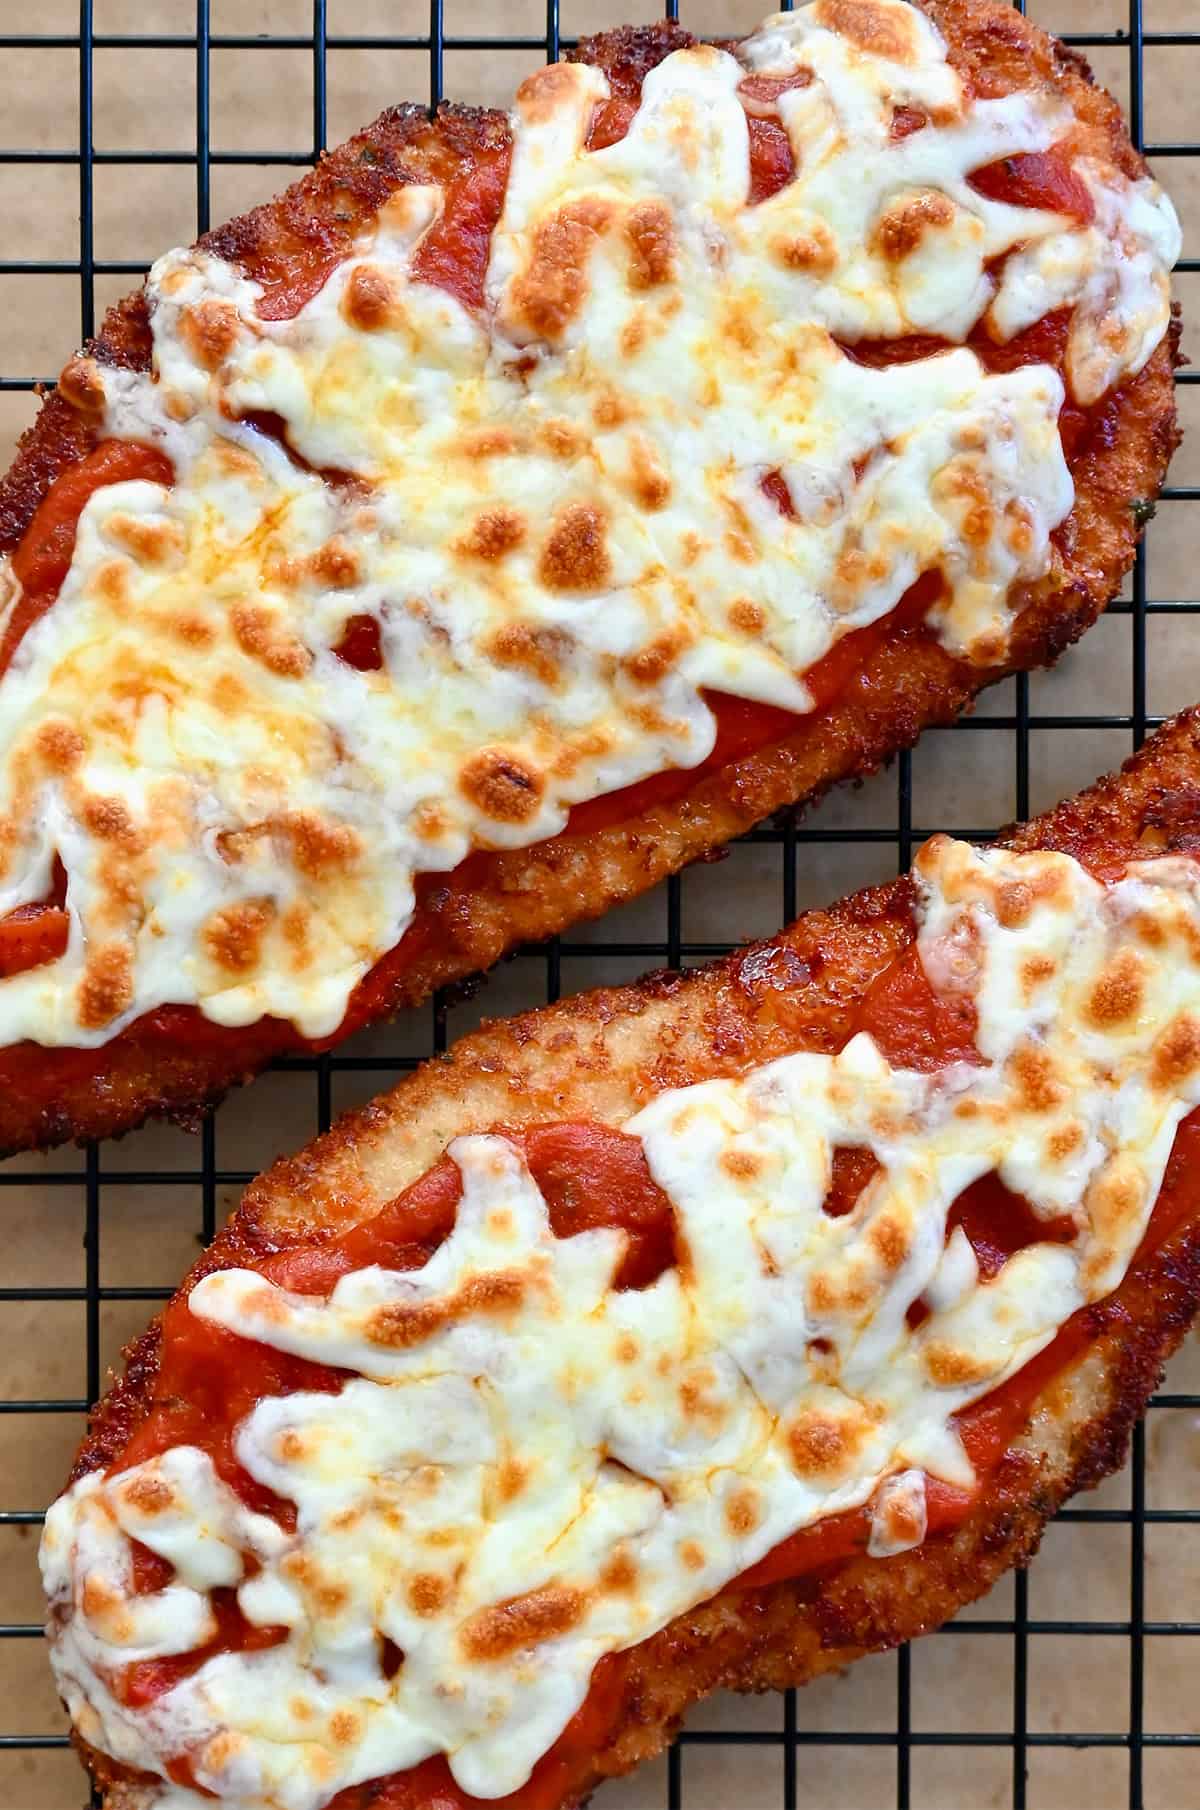
If you prefer the classic approach, you can absolutely top the fried cutlets directly with marinara sauce and shredded mozzarella, then place them under the broiler until the cheese is melted and bubbling. This method works well and is how chicken parmigiana is traditionally made.
Just keep in mind that adding the sauce and cheese directly to the cutlets can soften the breading a bit, which is why I usually opt for the method I described above when I want to keep everything extra crispy.
FAQs
You can bread the chicken cutlets up to 24 hours ahead and refrigerate them. Fry and finish just before serving for the crispiest results.
You can, but the texture won’t be the same. Pan-frying creates a crisp, golden crust that baking just can’t replicate. If you’re looking for classic, restaurant-style chicken parmesan, pan-frying is the way to go.
Serving Ideas
Once you learn how to make this comfort food favorite, you’ll want to make it on repeat. I like to switch up the sides depending on my mood or what I have in the fridge. Here are a few favorites:
- Cacio e Pepe
- Noni’s Basil Pesto Pasta – fresh, herby, and a favorite with my crew
- Leftover Mashed Potato Gnocchi
- No-Yeast Focaccia – a must for soaking up extra sauce
- Kale Caesar Salad
- Caprese Skewers
- Roasted Green Beans
- Or take a cue from my favorite Caesar sandwich and serve it on a toasted hoagie roll.
Ingredients
- 4 medium boneless, skinless chicken breasts
- 1/2 cup all-purpose flour
- 2 large eggs
- 2 cups Panko breadcrumbs (Italian or regular)
- 1/4 cup grated Parmesan cheese
- Avocado or vegetable oil, for pan-frying
- 3/4 cup marinara sauce
- 1 cup shredded mozzarella cheese
Instructions
- Place one chicken breast between two pieces of parchment or wax paper. Using a meat mallet or the bottom of a heavy skillet, pound the chicken breast until it is about 1/2-inch thick.
- Add the flour to a large, shallow dish. Whisk the eggs and a splash of water or milk in a second large, shallow dish. Stir together the breadcrumbs and grated Parmesan in a third large, shallow dish. Line a plate with parchment paper.
- Dredge the chicken in the flour, shaking off any excess, then dip it in the egg wash and finally in the breadcrumbs, pressing to adhere them on all sides. Repeat the breading process with the remaining chicken cutlets.
- Line a baking sheet with paper towels.
- Place a large stainless steel or nonstick skillet over medium high then generously coat it with oil. (There should be roughly 1/4-inch of oil coating the entire pan.) Once the oil is hot and shimmering, add one or two of the cutlets to the pan and cook, undisturbed, until golden brown, about 3 minutes, then flip it once and continue cooking until it is cooked through and no longer pink.
- Transfer the cutlets onto the paper towel-lined plate then repeat the cooking process with the remaining cutlets.
- Preheat the oven to broil with the top oven rack at least 6 inches from the broiler. Line a baking sheet with parchment paper (alternately, place a baking rack atop a baking sheet).
- Arrange the cutlets on the baking sheet then top them with the marinara sauce and shredded mozzarella cheese. Broil the cutlets until the cheese is melted and bubbling. (This happens for quickly, so keep an eye on them.)
- Remove the cutlets from the oven and serve immediately.
Kelly’s Notes
- When breading, follow THE GOLDEN RULE: Keep one hand for the dry steps (flour and breadcrumbs) and one hand for the wet (eggs). That way you’ll bread the chicken and not your fingers!
- My secret to keeping the cutlets CRISPY: Add the sauce to a skillet, top it with the shredded mozzarella, then pop it into the oven until the cheese is golden brown. Remove it from the oven and slide the sauce and cheese out onto the cutlets. Crispiness maintained, cheesiness guaranteed!
- Make ahead: You can bread the chicken cutlets up to 24 hours ahead and refrigerate them. Fry and finish with sauce and cheese just before serving for the crispiest results.
- To store: Store leftovers in an airtight container in the refrigerator for up to 3 days.
- ★ Did you make this recipe? Don’t forget to give it a star rating below!
Nutrition
Did you try this recipe?
Leave a comment below with your star rating!
This post may contain affiliate links.


This was delicious! My chicken hating daughter gobbled it right up! #jatrecipechallenge
So glad you enjoyed it, Katie!
#jatrecipechallenge – I made this tonight and it was delicious! I used chicken thighs due to preference but that was the only change I made.
I’m so glad you enjoyed the recipe, Katie!
This is such a favorite in my house! So crispy and delicious and so easy to make!
#jatrecipechallenge
I’m thrilled you enjoyed the recipe, Adrienne!
I made this last night for dinner. It was so good! Perfectly crispy as well. My entire family loved it. #jatrecipechallenge
So glad you enjoyed the recipe, Nicole!
#jatrecipechallenge
Very easy and flavorful! I served with a side of broccoli. Next time I will serve it over spaghetti. My daughter loved it and she’s not a fan of things with red sauce. Clean plate club tonight
So glad you enjoyed it, Lorrie!
My husband and I really loved this chicken parmesan and it was so quick and easy to prepare! We’ll definitely be making it again!
So glad you enjoyed the recipe, Sarah!
#jatrecipechallenge Tastes great and was easy to make
So glad you enjoyed it!
#jatrecipechallenge
My husband and I agree…this IS the best chicken parm recipe! Your hack, broiling the sauce & cheese first before sliding it onto the crispy chicken, worked perfectly! Thanks Kelly!
Thrilled you enjoyed it!
Excellent and easy to follow. My wife really enjoyed it served with a side salad.
So glad you enjoyed it, Bob!
My husband and I have never had chicken parmesan before but I thought it looked yummy when I got your email the other day so we decided to try it last night. My husband was nervous about pan frying the chicken so we did it in the oven instead. served over pasta with a little olive oil and more cheese. It was a hit! We both went back for seconds and will be adding this to our rotation of different ways to cook chicken! Thank you, Kelly, for the inspiration to try something different.
So glad you both enjoyed the recipe, Cheryl!
Made this last night and the chicken was moist and flavorful. I decided to bake the chicken instead of pan frying so I could work on the rest of our dinner. Will definitely make again. Next time I will add more sauce to the top that was my hubs only comment.
#jatrecipechallenege
So glad you enjoyed it, Carol!
Wow!!! Had no idea it was this easy. Used all your tips and now my husband said it has to be a weekly meal. LOL!
So happy you enjoyed the recipe, Amanda!