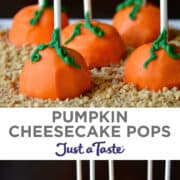
Pumpkin Cheesecake Pops do double duty as dessert and fall tabletop décor! Creamy, crustless pumpkin cheesecake stars in this finger-friendly dessert.
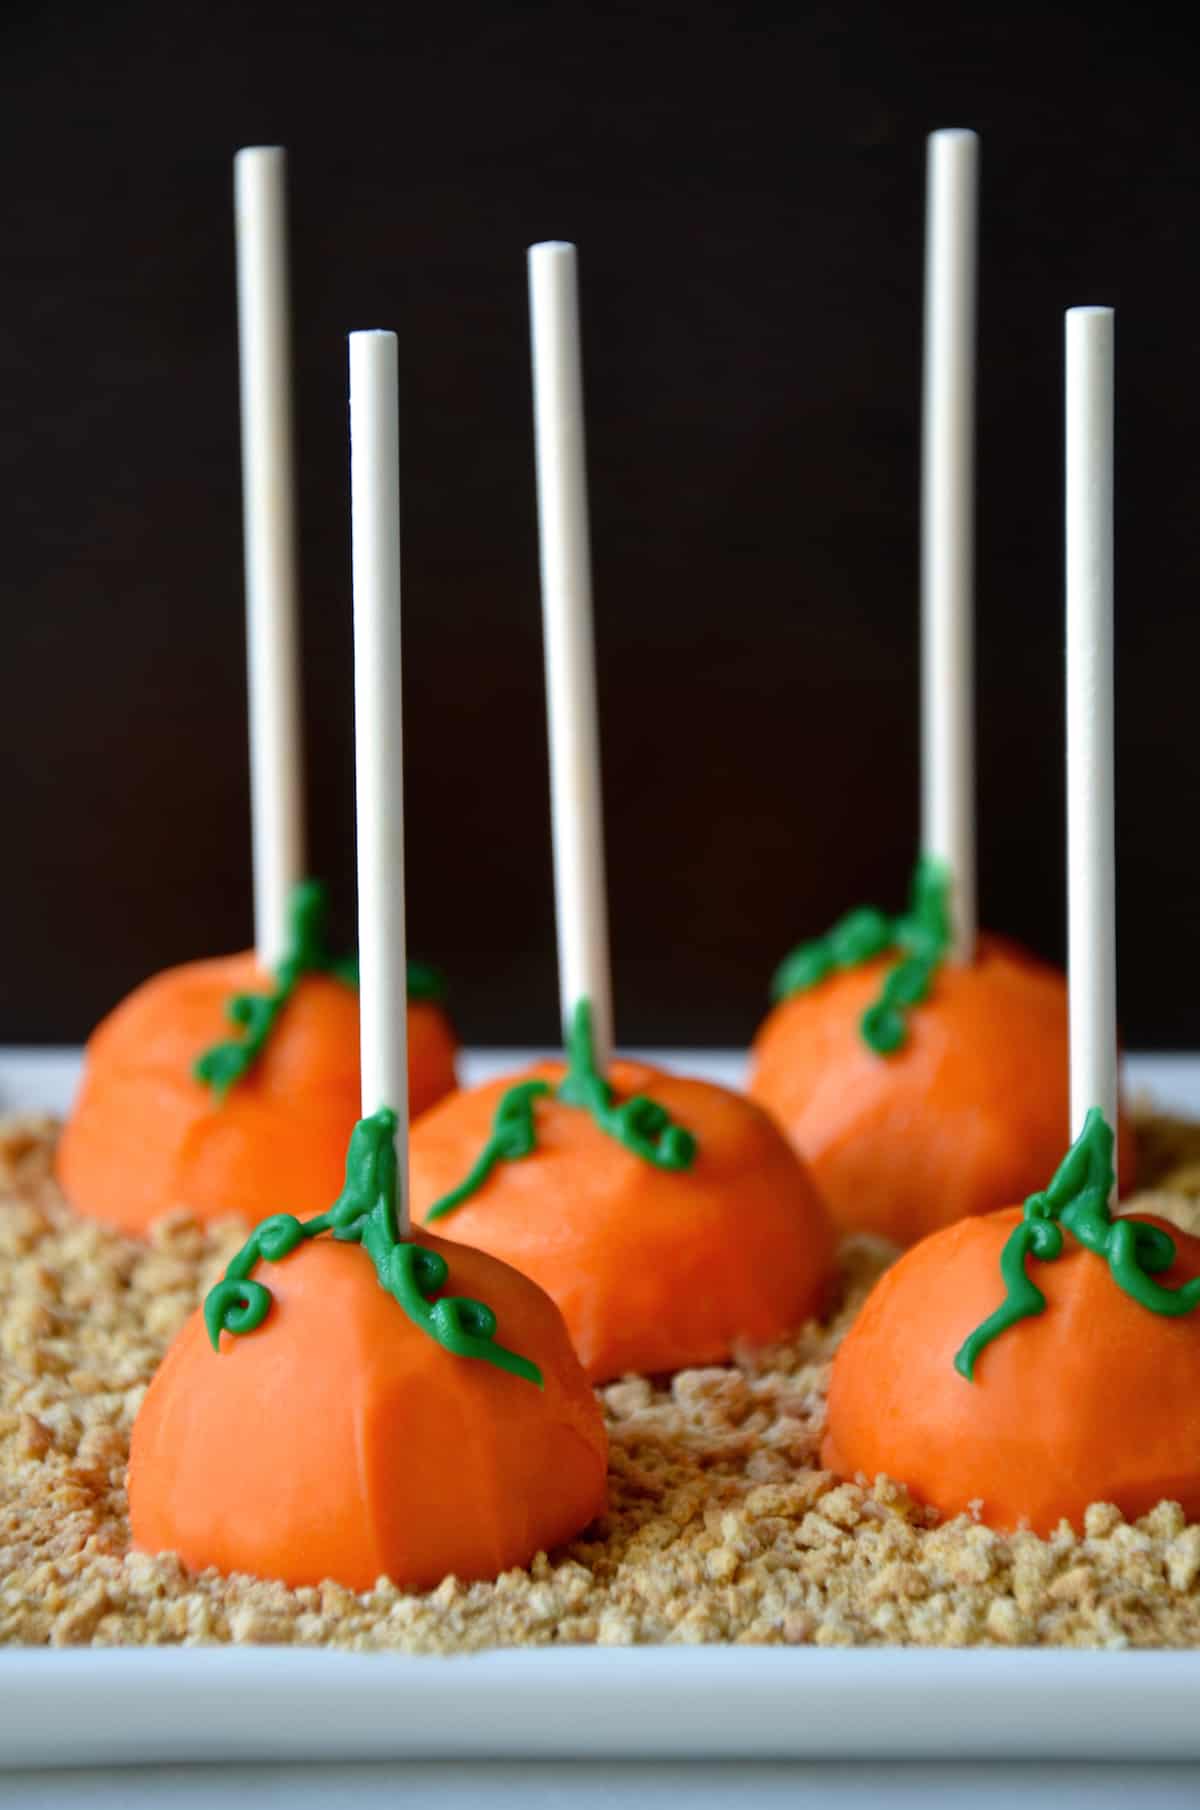
Table of Contents
Cheesecake has made many an appearance on these pages. Cheesecake cookies, cheesecake brownies, cheesecake chimichangas. I’ve nearly cheesecake’d it all, folks. And now I’m adding pumpkin cheesecake pops to the list.
Creamy, crustless pumpkin cheesecake stars in this finger-friendly dessert. It’s baked, scooped, frozen, skewered, dunked and then served on a bed of graham cracker crumbs. And the result is one seriously sweet finale to your holiday feast. In need of a fork-free cocoa counterpart to these pops? Don’t miss my No-Bake Chocolate Cookie Pops. Because food just tastes better on a stick.
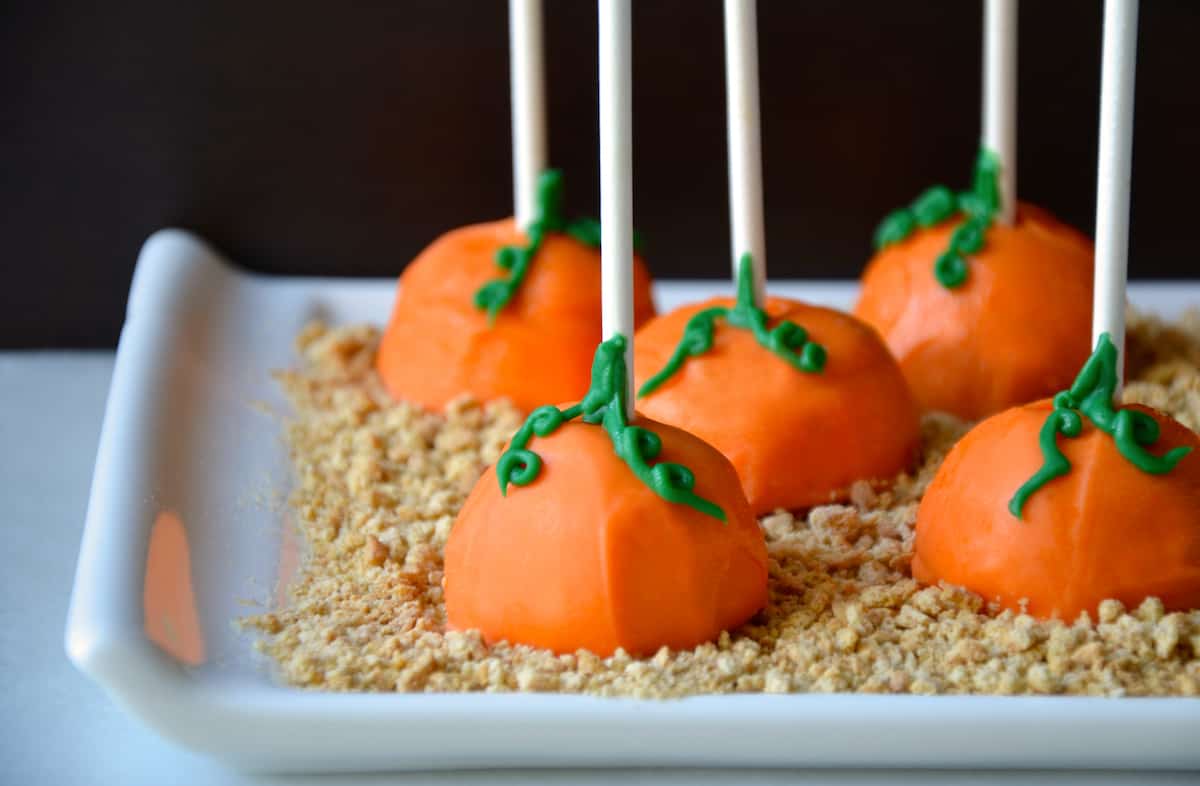
This make-ahead dessert is a great Thanksgiving option for kids or anyone who loves pumpkin spice sweets. Unlike cake and cookie pops, which are made of mixed cake or cookie crumbs and frosting, these pops consist of a pumpkin cheesecake base that is formed into balls, frozen, and then dipped in melted orange candy melts. The pops are finished with green candy melt “stems” for decoration.
Why You’ll Love This Recipe
- Make-ahead. While you can make the pumpkin cheesecake ahead of time, you can also go full out and make the pops ahead, too! Just keep them in the fridge or freezer until you’re ready to serve them.
- Crowd-pleasing. This recipe makes 20 pops, which will definitely serve a crowd (even if folks have two, which they’ll definitely want to!).
- Festive. Packed with pumpkin flavor and decorated with orange and green candy melts, these pumpkin cheesecake balls look fall-tastic.
- Vegetable oil: You don’t want your cheesecake sticking to the pie plate. A light greasing of vegetable oil will prevent this.
- Cream cheese: Cream cheese makes up the base of the 6-ingredient cheesecake. I recommend using full-fat cream cheese for the best flavor.
- Sugar: You’ll need just ½ cup of granulated sugar for the small-batch cheesecake. Make sure you use granulated (white) sugar and not brown sugar.
- Egg: A single egg will be enough to help set the cheesecake.
- Canned pumpkin: For real-deal pumpkin flavor, canned pumpkin is the way to go. Look for 100% pumpkin and not pumpkin pie filling.
- Vanilla extract: Vanilla, pumpkin and warming spices are a match made in heaven.
- Pumpkin pie spice: Keep a jar of this stuff on hand and you’ll find a reason to use it all fall long (pumpkin dip, anyone?). Pumpkin pie spice is made up of ground cinnamon, ginger, cloves, nutmeg and allspice—so you can absolutely make your own if you don’t already have it on hand.
- Orange candy melts: Orange candy melts will make up the pumpkins’ shells. Candy melts are easier to use for dipping than chocolate since they have stabilizers in them that make them melt more smoothly.
- Green candy melts: For the pumpkin vine, pipped-on melted green candy melts are the way to go.
- Graham cracker crumbs: Serving the pops on graham cracker crumbs makes the gourds look like they’re sitting in soil. Adorable!
See the recipe card for full information on ingredients and quantities.
These cheesecake pops are impressive-looking, but easy to make (the hardest part is waiting around while things chill!).
- Preheat the oven. Preheat the oven to 350°F and grease a pie plate with vegetable oil.
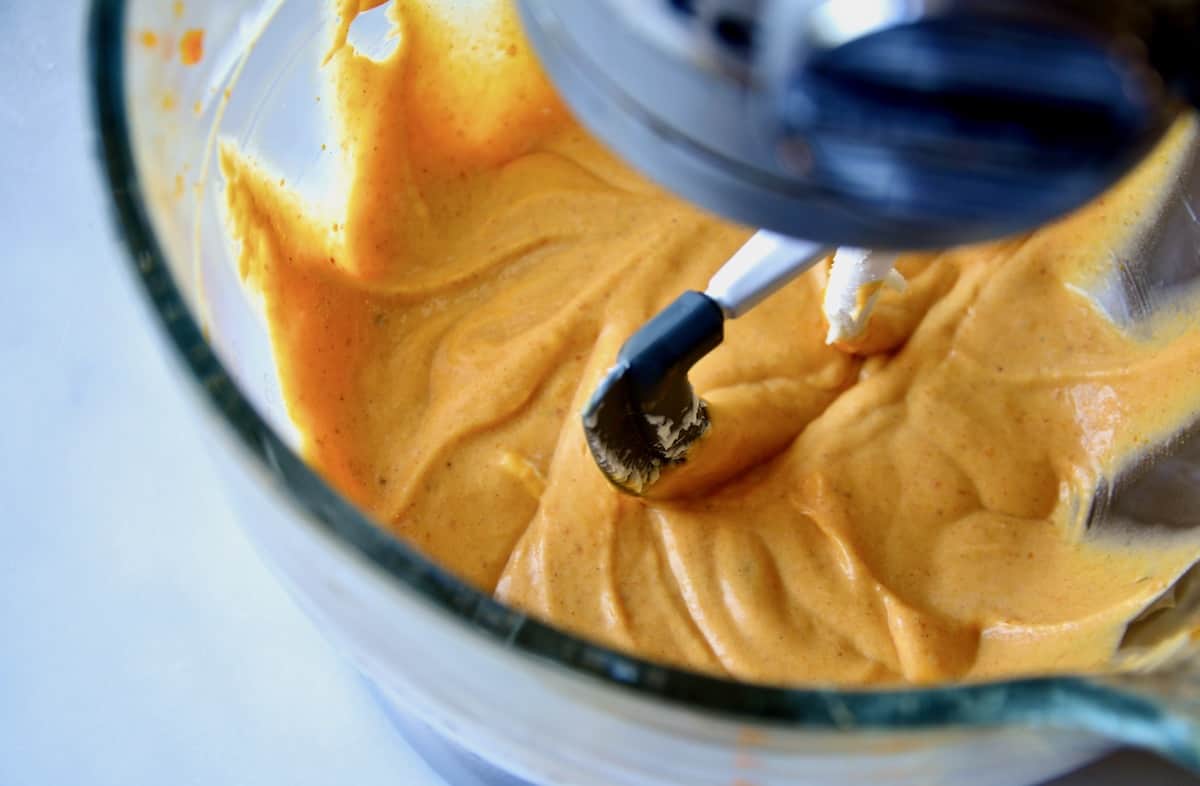
- Make the cheesecake. In the bowl of a stand mixer fitted with the paddle attachment, beat the cream cheese and sugar until creamy, then add the egg and mix until combined. Add the pumpkin, vanilla and pumpkin pie spice and beat until incorporated. Pour the cheesecake into the pie plate and bake for 25 to 30 minutes (until the edges are set).
- Chill the cheesecake. Transfer the cheesecake to a wire rack, and let chill. Place a round of wax paper or parchment on top of the cheesecake, then wrap it in plastic and chill in the fridge for at least 3 hours.
- Portion the pops. Line two baking sheets with wax paper. Using a small ice cream scoop, pack level portions of the cheesecake into the scoop and place them onto the prepared baking sheets. Freeze until solid (at least an hour).
- Dip the cheesecake balls. Press a lollipop stick into the center of each ball, then dip into the melted orange candy melts. Scrape off any excess candy melts with a small spatula, then return to the baking sheet. Repeat with the remaining pops. Place in the freezer while you prepare the green candy melts.
- Decorate the pops. Melt the green candy melts, then pour them into a piping or zipper-lock bag. Snip off the end of the bag, and decorate the top of each cheesecake pop with green vines.
- Serve. Keep the pops refrigerated or frozen until ready to serve, then serve on a bed of crushed graham crackers.
Pro Tip: Use a glass or ceramic pie plate to bake the cheesecake. A metal pie plate will cause the cheesecake to bake too quickly.
- Make It Ahead: The cheesecake can be baked one day in advance and stored, wrapped in plastic wrap, in the fridge.
- Use Melted Chocolate: If you can’t find candy melts, you can forgo the orange and green colors and simply dip the cheesecake in melted chocolate.
- Make Graham Cracker Crumbs: To easily make graham cracker crumbs, you can blitz whole graham crackers in a food processor or place them into a zipper-lock bag and smash them with a rolling pin or meat pounder.
- How to Soften Cream Cheese: You’ll want to use softened cream cheese for this recipe, as it’ll be easier to mix. To soften cream cheese, place the unwrapped cream cheese onto a microwave-safe plate and microwave in 15-second bursts until the cream cheese easily indents when you press your finger on it.
You can bake the cheesecake one day ahead and store it in the fridge.
The cake pops can be frozen for up to 6 months in a zipper-lock bag. Just make sure to thaw in the fridge before eating (overnight works).
Frequently Asked Questions
When a cheesecake is finished baking, the edges should be set and the center a little jiggly/wobbly.
If you over beat a cheesecake, it may cause the top of the cheesecake to crack. This is why you’ll want to mix ingredients into the cheesecake batter until they’re just incorporated towards the end of mixing.
Cheesecake sets and solidifies as it cools. If you were to eat cheesecake right out of the oven, the cheesecake would be too liquidy.
- Easy Pumpkin Bundt Cake
- No-Bake Pumpkin Cheesecake Parfaits
- Pumpkin Pie Rice Krispies Treats
- Pumpkin Bars with Cream Cheese Frosting
- The Best Pumpkin Whoopie Pies with Cream Cheese Frosting

Ingredients
- Vegetable oil, for greasing pie plate
- 1 (8-ounce) package cream cheese, softened
- 1/2 cup sugar
- 1 large egg
- 1 cup canned pumpkin
- 1 teaspoon pure vanilla extract
- 1/2 teaspoon pumpkin pie spice
- 2 cups orange candy melts
- 1 cup green candy melts
- 1 cup Graham cracker crumbs
Equipment:
- 9- inch glass or ceramic pie plate; Small ice cream scoop; Lollipop sticks
Instructions
- Preheat the oven to 350°F with the rack in the middle. Grease a 9-inch glass or ceramic (not metal) pie plate with vegetable oil.
- In the bowl of a stand mixer fitted with the paddle attachment, beat together the cream cheese and sugar until creamy and smooth, then beat in the egg until combined. Add the pumpkin, vanilla extract and pumpkin pie spice to the bowl, beating just until combined.
- Pour the mixture into the greased pie plate and bake until the edges are set and the center is still a little wobbly, 25 to 30 minutes. Transfer the pie to a rack and let it cool completely. Cover the cheesecake with a round of wax paper or parchment then wrap it in plastic and refrigerate it until cold, at least 3 hours.
- Line two small baking sheets with wax paper. Using a small ice cream scoop, scoop out portions of the pumpkin cheesecake, packing it into the scoop then leveling it off. Release the cheesecake onto the prepared baking sheets so that each scoop lands flat side down. Freeze the cheesecake balls until frozen solid, at least 1 hour.
- Melt the orange candy melts, then working with one pan of cheesecake balls at a time (and keeping the other pan frozen), push a lollipop stick into the top of each ball then dip it in the candy melts. Use a small spatula to scrape off any excess and return the cheesecake pop to the lined baking sheet. Repeat the dipping process with the remaining cheesecake balls then return both pans to the freezer.
- Melt the green candy melts then transfer them to a plastic bag or piping bag. Remove one sheet of pops from the freezer, snip off the tip of the bag and pipe on green vines and a stem. Return the pops to the freezer then repeat with the second sheet of pops.
- Keep pops refrigerated or frozen until serving. Serve atop a bed of Graham cracker crumbs.
Kelly’s Notes
- The cheesecake can be baked one day in advance and stored, wrapped in plastic wrap, in the fridge.
- If you can’t find candy melts, you can forgo the orange and green colors and simply dip the cheesecake in melted chocolate.
- To easily make graham cracker crumbs, you can blitz whole graham crackers in a food processor or place them into a zipper-lock bag and smash them with a rolling pin or meat pounder.
- You’ll want to use softened cream cheese for this recipe, as it’ll be easier to mix. To soften cream cheese, place the unwrapped cream cheese onto a microwave-safe plate and microwave in 15-second bursts until the cream cheese easily indents when you press your finger on it.
- ★ Did you make this recipe? Don’t forget to give it a star rating below!
Nutrition
Did you try this recipe?
Leave a comment below with your star rating!
This post may contain affiliate links.
Recipe adapted from Gourmet.


Great, tasty recipe!
This looks delicious. Never made any pumpkin desserts but learning to. What are the graham cracker crumbs used for?
Thanks, Susan! The crushed graham crackers make for a fund serving base atop which to place the cheesecake pops since cheesecake has a graham cracker crust.
Ok, these are the cutest thing ever. Your pictures are fantastic and I love your recipes! Thanks for sharing!
If only I spotted these sooner! They would have made the best Halloween treats for my coworkers. Pinned & noted for next year (;
These are awesome!!
Cheesecake is my fav. Cute food is my second fav.
I love and hate you for posting this, because I am gonna eat them ALL! Pinned!
I’m such a fan of pumpkin cheesecake – these look amazing!
These are adorable! Love any food on a stick. :)
Such a fun (and super cute!) idea!
There are 2 tablespoons of grahams in the recipe then a cup of Graham’s later in the recipe.
What’s the 2 tablespoons for?
Thanks for catching this, Cheryl! I just updated the recipe so that the “2 tablespoons” was removed.