Candy Cane Cookies are a classic holiday treat that are easier to make than they look! They’re made with a simple sugar cookie dough and have a buttery vanilla flavor. These show-stopping treats are the perfect addition to your Christmas cookie platter!

Table of Contents
Christmas cookie season is in full swing around these parts! While I’ve been busy whipping up my holiday classics (hello, Marshmallow Christmas Wreaths!), I have a whole bunch of brand-new Christmas cookie recipes coming your way, and I’m kicking things off with iconic candy cane cookies!
These beautiful cookies are made from a basic sugar cookie dough that’s dyed and twisted into the classic candy shape. And the result? A soft, tender, buttery cookie that’s an absolute showstopper!
Imagine them on your holiday dessert table or tucked inside cookie boxes for gifting. And don’t forget to leave some out for Santa Claus!
Why You’ll Love Them
- Made with one simple dough. My go-to sugar cookie dough stars in this festive recipe. Simply divide the dough in half, add red food coloring and twist to create those iconic candy cane stripes.
- Buttery soft. These sugar cookies have a soft and tender texture that will melt in your mouth, just like my Christmas pinwheel cookies.
- Simple to make. Despite their intricate appearance, these cookies are surprisingly easy to make, just follow all of my tips and tricks for shaping success.
- Freezer-friendly dough. Just like white chocolate peppermint cookies, you can prepare the dough up to 3 months ahead. So, put on your apron, gather the ingredients and start your holiday baking early!
Candy Cane Cookies Video
The key ingredients you’ll need for this recipe are the same as the base of my cinnamon roll cookies. Let’s take a closer look at each ingredient and its importance:
- All-purpose flour: Measure the flour accurately and sift for a lighter texture, preventing a dense cookie.
- Baking powder: Acts as a leavening agent, contributing to the cookies’ rise and light texture. To check the freshness of baking powder, add ½ teaspoon to a bowl and pour a small amount of white vinegar or water over it. If it fizzes immediately, the baking powder is fresh; otherwise, replace it with a new batch.
- Kosher salt: Salt plays a crucial role in flavor enhancement. I usually use kosher salt for baking because it dissolves evenly, but if you have table salt, that’s fine too—just use a bit less to adjust for its finer texture.
- Unsalted butter: Just like butter cookies, butter is the secret to creating soft, rich and flavorful cookies. Opt for unsalted butter to better control the overall salt content.
- Sugar: Does more than add sweetness—it plays a role in the texture and structure of your cookies, too. Cream it with butter for about 3 minutes until the mixture turns light and fluffy, ensuring your cookies have that perfect texture.
- Eggs: The binding force that brings all the ingredients together. Use room-temperature eggs for better incorporation into the dough.
- Vanilla extract: Enhances overall flavor with a rich vanilla aroma.
- Red food coloring: The rich red color you see in my photos is the result of gel food coloring, which is much more concentrated than regular (water-based) food coloring. You also need much less gel food coloring to achieve a vibrant red candy cane color.
Peppermint Twist: If you’re a fan of peppermint, tweak the recipe by reducing the vanilla extract to 1 teaspoon and adding 1.5 teaspoons of peppermint extract. And then try my recipe for white chocolate peppermint cookies!
See the recipe card for full information on ingredients and quantities.
How to Make Candy Cane Cookies
Chilling the cookie dough for at least 1 hour is essential to the success of this recipe, so be sure to set enough time aside before starting. Trust me, they’re absolutely worth the wait!
- Sift and mix dry ingredients. In a medium bowl, sift together the flour, baking powder and salt.
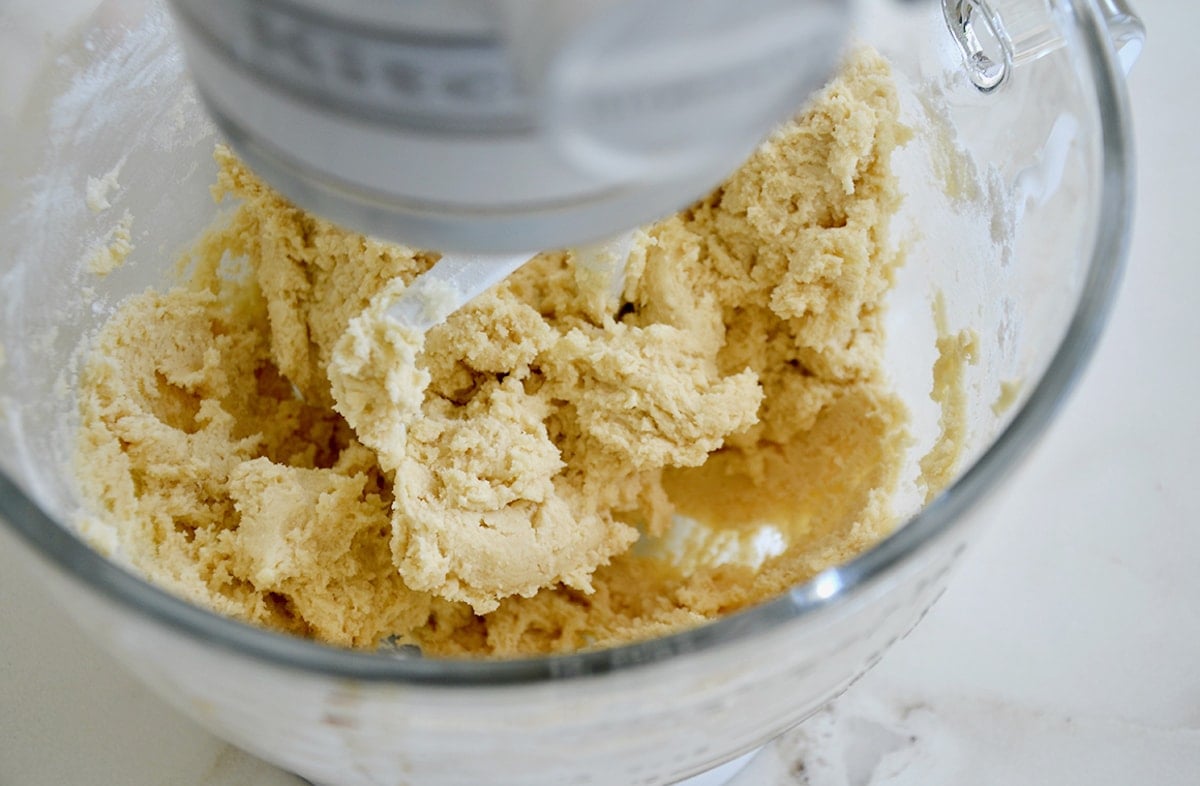
- Cream butter and sugar. In a large mixing bowl, cream together the softened unsalted butter and sugar until light and fluffy. This can be done with a hand mixer or a stand mixer.
- Add eggs and vanilla extract. Add the eggs one at a time, beating well after each addition. Stir in the vanilla extract, combining the ingredients until smooth and creamy.
- Add dry ingredients. Turn the mixer off and add the sifted dry ingredients to the wet ingredients, mixing until a soft dough forms. Be cautious not to overmix; just combine until the ingredients are incorporated.
- Divide the dough. Remove the dough and divide it in half. Shape one piece of the dough into a square, wrap it securely in plastic wrap and place it in the fridge. This will be the white portion of the candy cane cookies.
- Add food coloring. Return the remaining dough to the stand mixer bowl, and with the mixer on “low,” add in the red food coloring until it reaches your desired color. Remove the dough, shape it into a square, wrap it securely in plastic wrap and place it in the fridge. This will be the red portion of the cookies.

- Refrigerate both pieces of the dough for 30 minutes.
Kelly’s Note: The key to this recipe is to refrigerate the dough after mixing it so that the butter has a chance to re-solidify before you begin shaping the cookies.
- Line two baking sheets with parchment paper.
- Shape the candy canes. Lightly flour your work surface. Divide each piece of dough (plain and red) into 18 pieces. Roll each piece into a ball, then roll each ball into an 8-inch rope.
Pro Tip: Generously flour your work surface during the rolling and twisting process to prevent the dough from sticking.
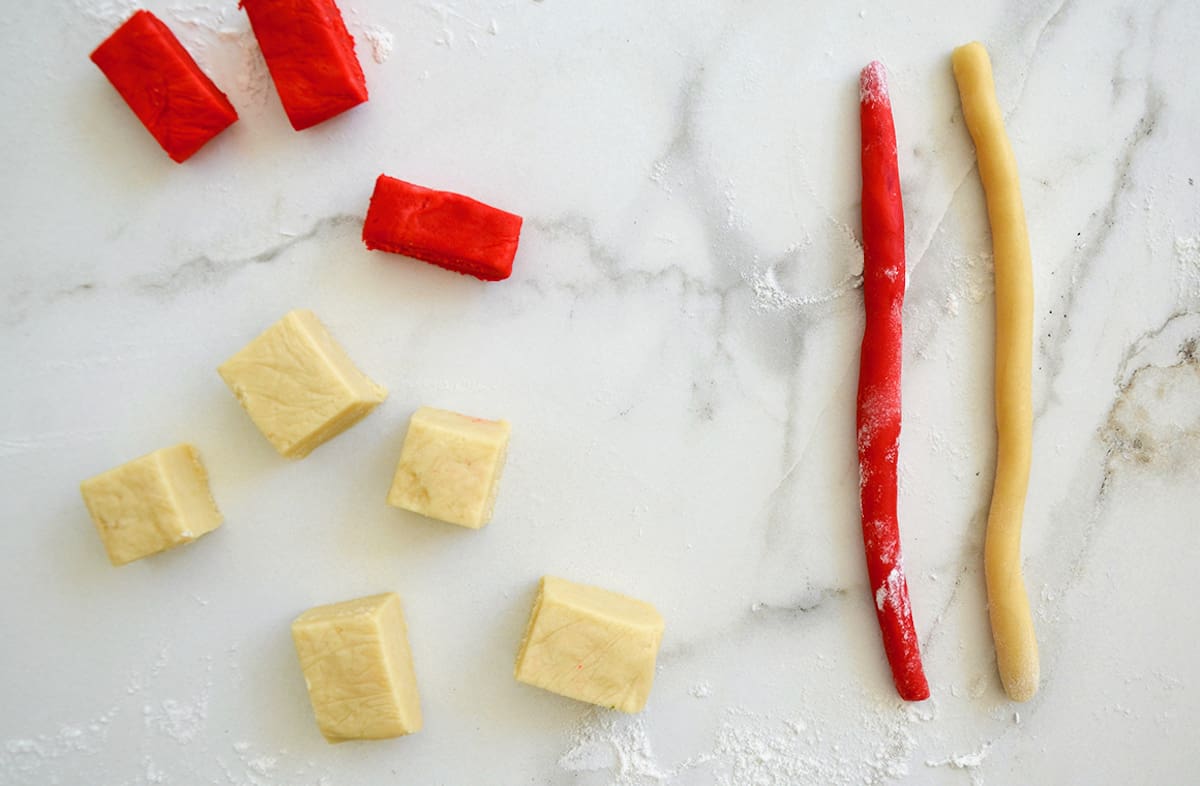
- Twist one white and one red rope together.
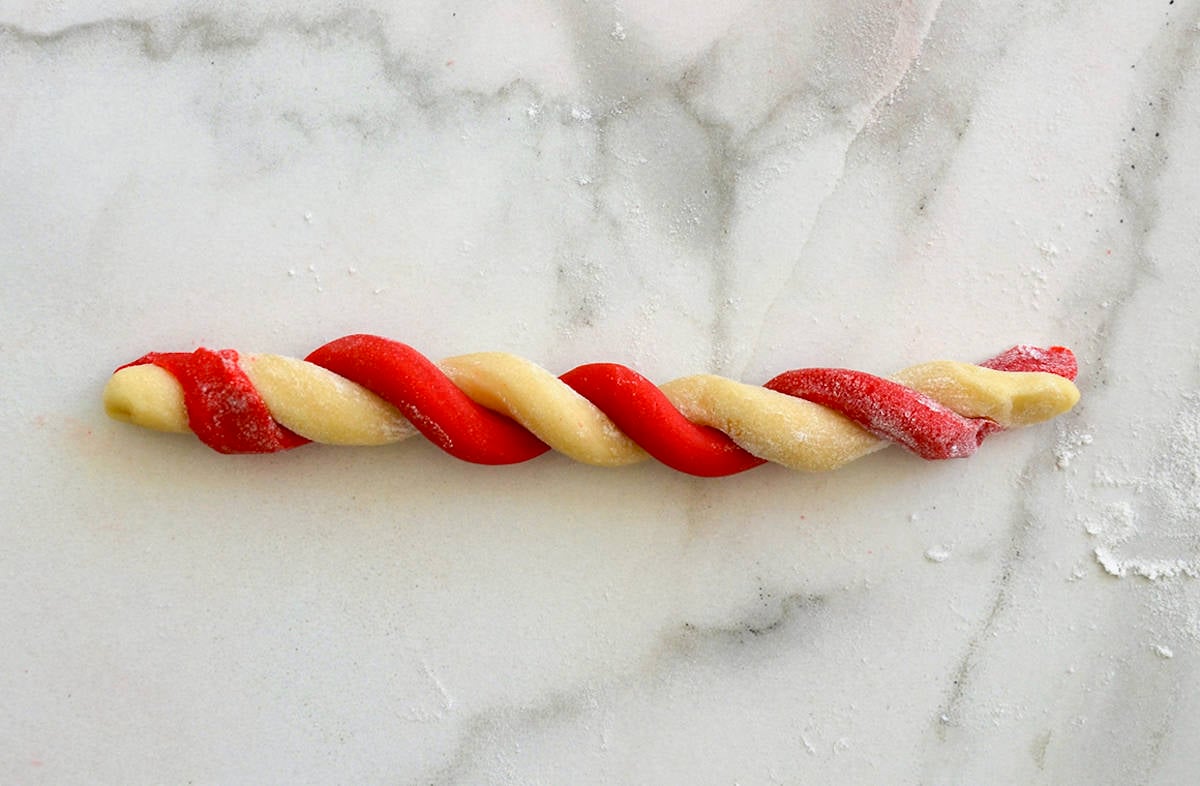
- Transfer the cookie onto the baking sheet then bend the top slightly to form the candy cane shape. Repeat with the remaining balls of dough, re-flouring your work surface as needed.
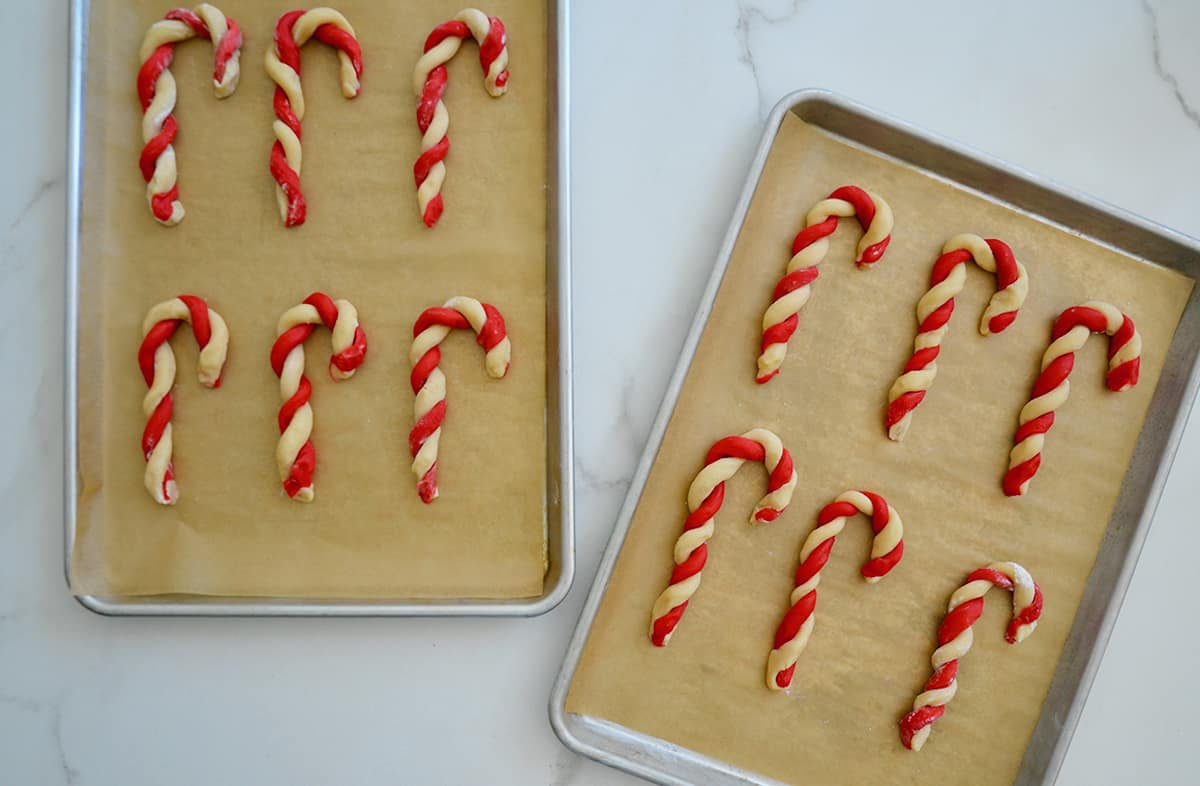
- Chill the shaped cookies before baking. Place the baking sheets in the freezer for 20 minutes or in the fridge for 30 minutes.
Kelly’s Note: Perhaps the most important tip of all is to refrigerate (or even freeze) the cookies after you shape them into candy canes and before you bake them. This important step will prevent the butter in the dough from melting too quickly in the oven, which is the prime culprit for cookies turning into shapeless blobs!
- Bake the cookies for 10 to 12 minutes in a 350ºF oven until pale golden.
- Cool and enjoy! Allow the candy cane cookies to cool on the baking sheets for a few minutes before transferring them to wire racks to cool completely. Once cooled, share these festive treats with friends and family or save them for your holiday gatherings!
- Creaming Technique: Cream the butter and sugar thoroughly for about 3 minutes until the mixture is light and fluffy. This step contributes to the candy cane cookies’ soft and tender texture.
- Handling the Dough: Because this dough has so much butter, it’s important to handle it the least amount possible so the heat from your hands doesn’t soften it. Flour your work surface as needed to avoid any sticking. If it becomes too soft, pop it back into the fridge for 15 minutes to firm up.
- Twist as You Go: Twist together one cookie at a time instead of rolling out all the white and red dough first. This ensures that the cookie dough stays pliable and doesn’t dry out before twisting.
- Chilling the Dough: Don’t skip this step! Once you shape the cookies, chill them in the freezer for at least 20 minutes. This helps prevent excessive spreading during baking and maintains the candy cane shape.
- Experiment with Peppermint Extract: If you love peppermint, consider the peppermint twist! Reduce the vanilla extract to 1 teaspoon and add 1.5 teaspoons of peppermint extract to the red portion of the dough for an extra minty flavor.
- Decorating: For an extra-festive touch, sprinkle the cookies with crushed candy canes or sanding sugar immediately after removing them from the oven.
Make-Ahead Instructions
Prepare the candy cane cookie dough according to the recipe, and once it’s ready, you have two options:
- Chill in the refrigerator. If you’re planning to bake within a day or two, wrap the dough tightly in plastic wrap and refrigerate.
- Freeze for later use. For an extended make-ahead option, wrap each portion tightly in plastic wrap, place them in a freezer-safe bag or container, and freeze for up to 3 months. Thaw in the refrigerator overnight when ready to use.
Freezing Baked Cookies
If you’ve already baked your cookies and want to freeze them, follow these steps:
- Cool completely, layer and wrap. Once the cookies have cooled completely, stack them in layers separated by parchment or wax paper. Wrap the entire stack in plastic wrap to prevent freezer burn.
- Place the wrapped stack of cookies in a freezer-safe bag or airtight container. Store in the freezer for up to 2-3 months.
- Thaw and enjoy. When you’re ready to enjoy the cookies, remove them from the freezer, unwrap and let them thaw at room temp. This helps preserve their texture and flavor.
Frequently Asked Questions
Chilling the dough helps it firm up, making it easier to handle and preventing excessive spreading during baking. It also enhances the flavor and texture of the cookies.
If the dough starts to crack, return it to the refrigerator for a 15-minute chill. This firms up the dough, making it more manageable and reducing the likelihood of cracks.
The baked cookies can be stored in an airtight container at room temperature for about 1 week.
Keep a close eye on the cookies while baking, and remove them from the oven when the edges are just set. They will continue to firm up as they cool.

- Marshmallow Christmas Wreaths
- Chocolate Sugar Cookies
- Soft Ginger Molasses Cookies
- Gingerbread Cookie Cups with Cream Cheese Frosting
- The Best Cutout Sugar Cookies
- Red Velvet Chocolate Chip Cake Mix Cookies
- Grinch Cookies
Ingredients
- 3 cups all-purpose flour, plus more for rolling out dough
- 1/2 teaspoon baking powder
- 1/2 teaspoon kosher salt
- 1 cup unsalted butter
- 1 1/3 cups sugar
- 2 large eggs
- 2 teaspoons vanilla extract
- Red food coloring
Instructions
- In a medium bowl, sift together the flour, baking powder and salt.
- In the bowl of a stand mixer fitted with the paddle attachment, beat the butter until smooth, about 2 minutes. Add the sugar and continue beating until the mixture is light and fluffy, about 3 minutes. Add the eggs one at a time, beating between each addition, then add the vanilla.
- Turn the mixer off. Add the flour and then beat just until combined.
- Remove the dough and divide it in half. Shape one piece of the dough into a square, wrap it securely in plastic wrap and place it in the fridge. (This will be the white portion of the candy cane cookies.)
- Return the remaining dough to the stand mixer bowl, and with the mixer on "low," add in the red food coloring until it reaches your desired color. Remove the dough, shape it into a square, wrap it securely in plastic wrap and place it in the fridge. (This will be the red portion of the cookies).
- Refrigerate both pieces of the dough for 30 minutes.
- Line two baking sheets with parchment paper. Lightly flour your work surface.
- Divide each piece of dough into 18 pieces. Roll each piece into a ball, then roll each ball into an 8-inch rope. Twist one white and one red rope together. Transfer the cookie onto the baking sheet then bend the top slightly to form the candy cane shape. If desired, trim the edges of the candy canes. Repeat with the remaining balls of dough, re-flouring your work surface as needed. (See Kelly’s Note.)
- Place the baking sheets in the freezer for 20 minutes or in the fridge for 30 minutes.
- Preheat the oven to 350ºF.
- Bake the cookies for 10 to 12 minutes until pale golden, and then transfer them to a wrack to cool completely.
Kelly’s Notes
- Because this dough has so much butter, it’s important to handle it the least amount possible so the heat from your hands doesn’t soften it. Flour your work surface as needed to avoid any sticking.
- Twist together one cookie at a time instead of rolling out all the white and red dough first. This ensures that the cookie dough stays pliable and doesn’t dry out before twisting.
- If you love peppermint, consider the peppermint twist! Reduce the vanilla extract to 1 teaspoon and add 1.5 teaspoons of peppermint extract to the red portion of the dough for an extra minty flavor.
- The baked cookies can be stored in an airtight container at room temperature for about 1 week.
- ★ Did you make this recipe? Don’t forget to give it a star rating below!
Nutrition
Did you try this recipe?
Leave a comment below with your star rating!
This post may contain affiliate links.


Has anyone tried this recipe with gluten free flour?
Perfect! I always made theses at Christmas time with my mom, but the canes would spread and get messy during baking. I don’t think we chilled the dough. It was key! Thanks so much for bringing back this fun family memory!
So glad you enjoyed the recipe, Adrienne!
These look so good I want to really try him this year.
I hope you enjoy the recipe if you give it a shot, Deborah!
What a great recipe to get you into the spirit if Christmas.
Yesss! Happy holidays, Sharon!
I absolutely love these cookies! My mom used to make them every year and they were the first to be eaten! I haven’t checked out this recipe yet, but my Mom used to put cream cheese in hers.
Love reading this, Lorene!
Can’t wait to make these!
I hope you enjoy the recipe, Allie! Happy baking :)