
Spruce up your spuds with this family favorite recipe for Easy Cheesy Hasselback Potatoes loaded with cheddar and Parmesan cheese and topped off with fresh chives.

I’m bringing hasselback … back.
Oh boy. Face, meet palm. Palm, meet face. But I just couldn’t resist. Every time I say or type or, let’s be honest here, even think of the word “hasselback,” I am transformed back into my 16-year-old, Justin Timberlake-loving self.
Boy band obsession of my youth aside, who doesn’t love a new spin on the most classic of starchy sides? We’ve mastered French fries, perfected potato pancakes, and found endless ways to even put leftover mashed potatoes to great use.
So now it’s time to keep things simple while still stepping it up a notch. The solution? Easy Cheesy Hasselback Potatoes!

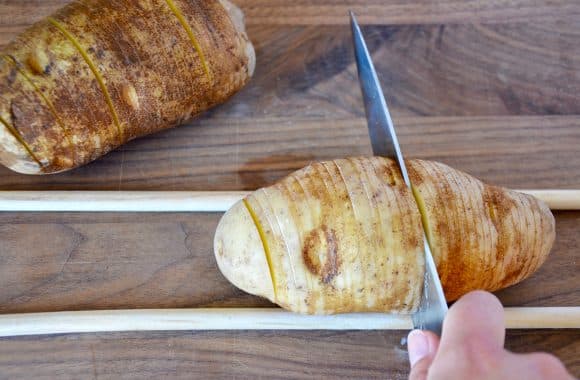
Don’t let those jazzy slices scare you. The simple trick is to place the potato between two wooden spoons and just start slicing. The spoons will prevent you from cutting entirely through the potato. And after a quick bake in the oven, all that’s left to do is insert your cheese (or cheeses) of choice then return them to an oven for a quick melt.
And look at the results! Buttery potato slices, melted cheese and fresh chives. These spuds are simple enough for busy weeknights and impressive enough for weekend dinner parties. Get creative with the cheese combos and even top ’em off with some crispy bacon or a dollop of sour cream!

Ready to make your prep and clean-up even easier? Skip the foil and opt for a nonstick pan. I’ve teamed up with Williams Sonoma and SCANPAN for the launch of their new TechnIQ line of nonstick cookware, which takes the stress and mess out of all that gooey, melted cheese. Intrigued? Tune in below!
Craving more? Subscribe to Just a Taste to get new recipes, meal plans and a newsletter delivered straight to your inbox! And stay in touch on Facebook, Twitter, Pinterest and Instagram for all of the latest updates.
Ingredients
- 4 medium Russet potatoes
- 2 Tablespoons unsalted butter, melted
- 8 to 12 thin slices cheddar cheese, cut into 1-inch squares (See Kelly's Notes)
- 1/3 cup shredded Parmesan cheese
- 1 Tablespoon chopped fresh chives
Instructions
- Preheat oven to 450°F. Line a baking sheet with foil
- Place each potato between two wooden spoons and carefully make cuts every 1/8-inch without cutting all the way through the potato.
- Place the potatoes on the baking sheet and brush them with the melted butter. Season them with salt and pepper.
- Bake the potatoes for 55 to 60 minutes or until tender. Remove them from the oven and carefully insert the cheddar cheese slices into each cut in the potato. Sprinkle the tops of the potatoes with the Parmesan cheese then return them to the oven and continue baking until the cheese is melted, about 3 minutes.
- Remove the potatoes from the oven, top them with the chopped chives and serve immediately.
Kelly's Notes:
- How much cheese you use depends on whether you add the cheese in between every slice or every other slice.
- The potatoes should be fully baked when you add the cheese.
- ★ Did you make this recipe? Don't forget to give it a star rating below!
Nutrition
Did you try this recipe?
Leave a comment below with your star rating!
This post may contain affiliate links.
Recipe by Kelly Senyei of Just a Taste. Please do not reprint this recipe without my permission. If you'd like to feature this recipe on your site, please rewrite the method of preparation and link to this post as the original source.


These are the best✨potatoes. I’ve also used the Hasselback method on sweet potatoes for Thanksgiving for the last 3 years, amazing❣️❣️I wish that I could post a picture.
I’m so glad you enjoyed the recipe!
Totally the most bang for your potato buck! Aptly named “Easy” and “Cheesy.” This will definitely enter the rotation!
So glad you enjoyed the recipe, Lorelei!
Omg I’m sharing this recipe with my family!! Since I’m Polish we always eat Potatoesand this one is such easy and delicious recipe Great for BBQs and not only!!!!
I’m thrilled you enjoyed the recipe, Agata!
Easy to make and yummy to eat. I’d been wanting to make these for a long time but I had a bad accident 3 years ago with concussion and nerve damage. As part of my physical/emotional recovery, after the first 2 years of PT/OT, I had regained enough coordination in the evening to start cooking again. Your recipes are well written, no confusion, so they are in my cue to cook more of them!! Thank you so much!!
I’m so happy you are regaining your coordination and strength, Julia. And I’m glad you enjoyed the recipe :) Welcome to Just a Taste!
Soooo good
So glad you enjoyed it!
Really delicious and a great way to use up those potatoes in the bag. Very easy and straightforward. They are my new favorite!
I’m so glad you enjoyed the recipe, Jeff!