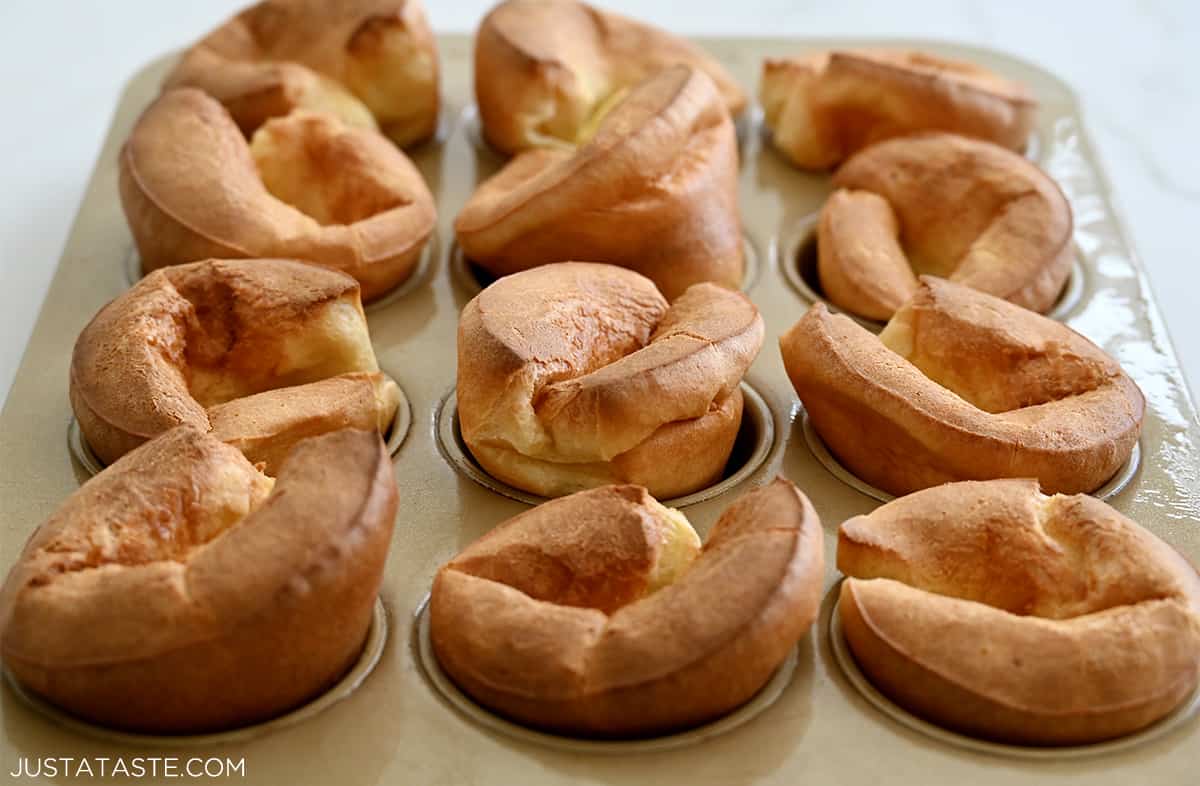
Forget the single-use pan in favor of this fool-proof Muffin Pan Popovers recipe that comes together in minutes. Best of all, you only need five simple ingredients: eggs, milk, salt, flour and butter.
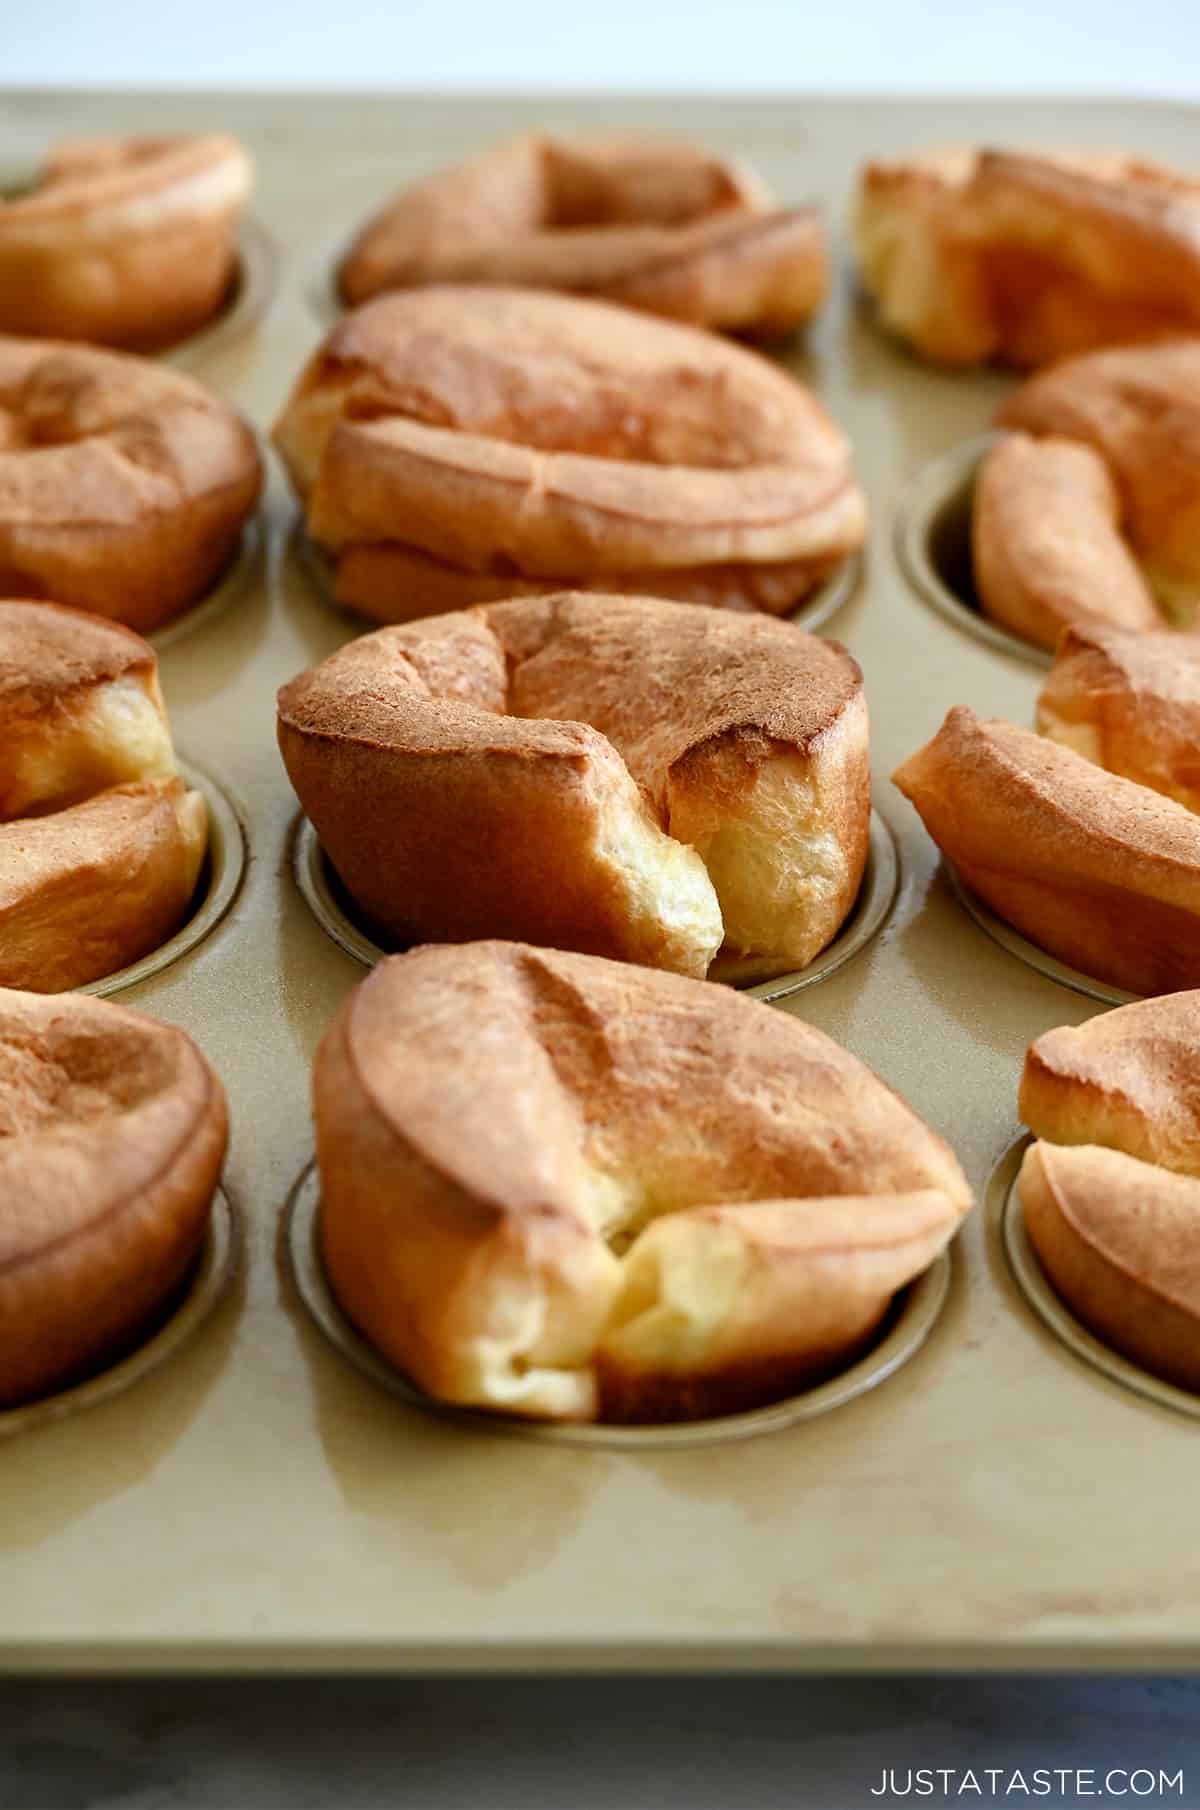
Table of Contents
I had my first introduction to popovers at a Neiman Marcus café eight great years ago. As you might’ve guessed, shopping and carbs go hand in hand when you eat for a living. But I’ll never forget that first fluffy, eggy, impossibly tall and tender popover I tore at, alternating bites with slathers of fresh strawberry butter.
Of course the recipe for said popovers (and strawberry butter!) made its way onto the site and features the ever-popular, but ever-one-dimensional popover pan. And I recently stumbled upon that pan, and about a half-dozen muffin pans, during a recent spring cleaning expedition. Long story short, I was craving popovers and contemplating if the best-ever bread substitute could be whipped up sans fancy pan?
Oh you better believe it! We’re talking popovers you can make in minutes without a single-use pan and with a batter comprised of five simple ingredients. Slather on some homemade butter and we are in business!
Why You’ll Love this Recipe
- Made without a single-use, specialty pan.
- Perfectly fluffy, eggy and tall just like regular popovers.
- Made with five pantry staples.

- Eggs: At room temperature. An easy way to bring cold eggs to room temp is to place them into a bowl of hot water for 10 minutes. The warmer the eggs the warmer your batter will be going into the oven and the more quickly it’ll produce steam. And more steam means fluffier, taller popovers.
- Milk: Whole milk, 2% or fat-free milk all work. Heating the milk is key to the rise and stability of popovers, keeping them from dipping in the center as they bake. Either warm the milk on the stove until small bubbles appear around the edges of the pan or in 30-second intervals in the microwave. It should feel hot to the touch, but not boiling.
- Salt: Just a pinch for flavor.
- All-purpose flour: Spoon and level the flour – don’t scoop! How you measure flour can mean the difference between failure and success. If you have too much flour, the batter will be heavy and the popovers won’t rise quite as high.
- Butter: You’ll need three tablespoons of melted butter for the batter, plus more to generously grease your muffin tin. I use unsalted butter 99% of the time because it allows me to easily control the salt level of any recipe. If you prefer to use salted butter, just omit the ½ teaspoon salt from this recipe.
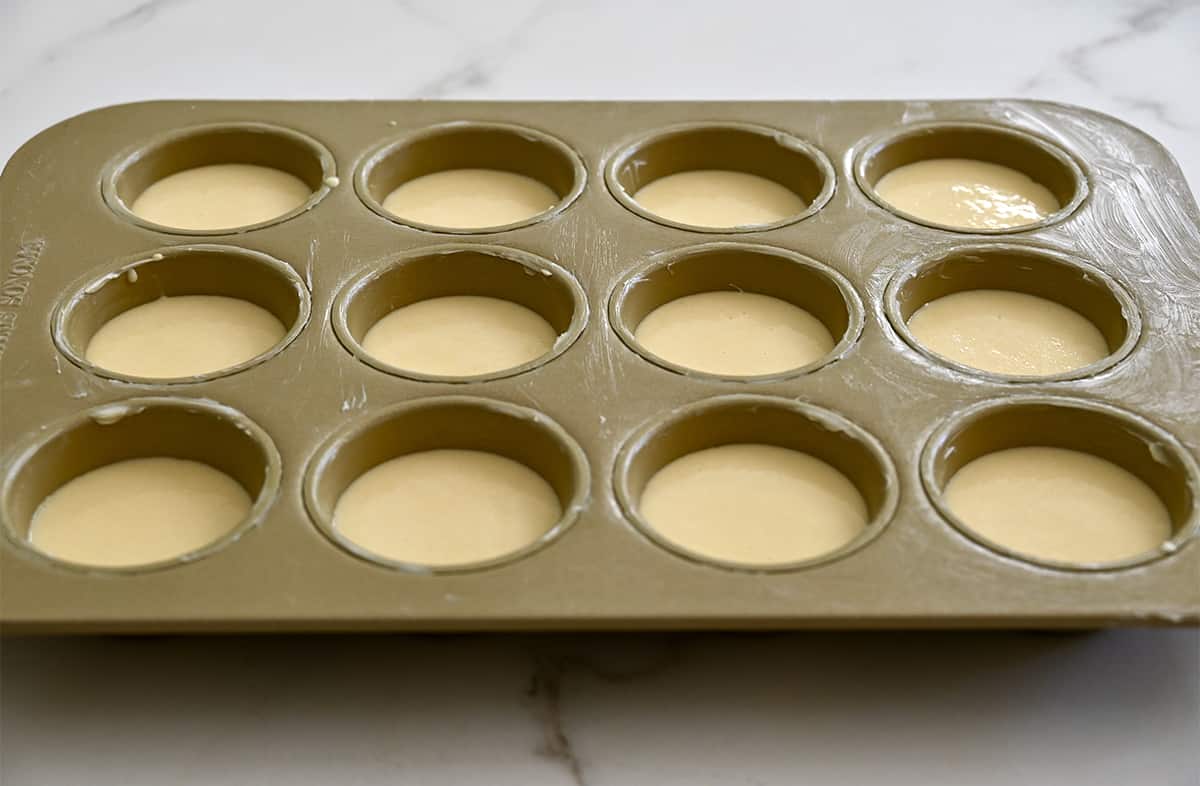
Before starting, ensure that all of your ingredients are at room temperature. Then, simply whisk together the ingredients and ladle the batter into a well-greased muffin pan. And when I say “well-greased,” I mean “grease every last quarter-inch … and then grease it all over again.” Because popovers can be a bit finicky and a bit sticky if you don’t prep the pan with a Paula Deen-inspired slathering of butter.
Kelly’s Note: Once the pan enters the oven, do not open said oven again until you’re ready to remove the golden brown puffs of deliciousness and start your countdown to chowing down. I repeat: Do not open the oven at any point during the baking process! The batter’s ability to puff, or I suppose more appropriately, pop, all comes down to a consistent oven temp (meaning no cool drafts from opening and closing the oven door).
- Generously grease your muffin pan, including the areas around the cups. This will prevent the popovers from sticking.
- Oven temperature is essential. When in doubt, use a separate (and very accurate!) thermometer to ensure your oven is exactly 450°F and then 350°F.
- Do not open the oven at any point during the baking process. The popovers will not rise properly if you do.
- Be mindful of your oven rack! If you place the rack too high, the tops of the popovers will burn as they rise.
- If the popovers are browning too quickly, place an oven rack at the top of the oven and place a baking sheet on top of the rack to shield the popovers from the direct heat.
Ready to put your skills to the test? Read on for the full recipe and don’t forget your choice of salted, unsalted, whipped, fruit-flavored or honey butter to cover every last pillowy canyon and crevice.
Recipe FAQs
Unlike popovers that are made with butter in a butter-greased pan, Yorkshire pudding is traditionally made with beef drippings. One other notable difference is the type of pan used. A Yorkshire pudding is traditionally made with a typical, angled muffin pan, whereas the popover is baked in a special popover pan.
The batter’s ability to puff all comes down to a consistent oven temp (meaning no cool drafts from opening and closing the oven door). And if possible, use a separate (and very accurate!) thermometer to ensure your oven is exactly 450°F and then 350°F.
Popovers really are best when fresh from the oven. However, if you need to make them ahead, simply place them on a baking sheet and re-warm them in a 350°F oven for about 5 minutes.
Allow the popovers to cool completely before transferring them to an airtight container or zip-top plastic bag (if they are still warm when you store them, they’ll become soggy). You can leave them at room temperature for up to 2 days.
Craving more? Subscribe to Just a Taste to get new recipes, meal plans and a newsletter delivered straight to your inbox! And stay in touch on Facebook, Twitter, Pinterest and Instagram for all of the latest updates.
Ingredients
- 4 large eggs
- 1 1/2 cups whole milk, lukewarm
- 1/2 teaspoon salt
- 1 1/2 cups all-purpose flour
- 3 Tablespoons unsalted butter, melted, plus more for greasing pan
Instructions
- Preheat the oven to 450°F and position the oven rack on a lower shelf. (See Kelly’s Notes.)
- Place the eggs in a bowl of hot water for 10 minutes.
- Generously grease a standard 12-cup muffin pan all over (including the areas around the cups) with unsalted butter.
- In a large bowl, whisk together the eggs, milk and salt until the mixture is well combined. Add the flour and continue whisking until the mixture is frothy. (There shouldn’t be any large lumps.)
- Quickly whisk in the melted butter until combined then divide the the batter among the muffin cups, filling them 2/3 to ¾ full.
- Bake the popovers for 20 minutes without opening the oven door. Reduce the heat to 350°F (again without opening the door), and bake the popovers for an additional 10 to 15 minutes, until they’re a deep, golden brown. (See Kelly’s Notes.)
- Remove the popovers from the oven, release them from the pan and serve immediately.
Kelly’s Notes:
- It’s important that the oven rack is positioned so that the fully baked popovers rise about halfway up the oven. If you place the rack too high, the tops of the popovers will burn as they rise.
- The oven temperature is also very important. So when in doubt, use a separate (and very accurate!) thermometer to ensure your oven is exactly 450°F and then 350°F.
- If the popovers are browning too quickly, place an oven rack at the top of the oven and place a baking sheet on top of the rack to shield the popovers from the direct heat.
- Popovers really are best when fresh from the oven. However, if you need to make them ahead, simply place them on a baking sheet and re-warm them in a 350°F oven for about 5 minutes.
- ★ Did you make this recipe? Don't forget to give it a star rating below!
Nutrition
Did you try this recipe?
Leave a comment below with your star rating!
This post may contain affiliate links.
Recipe adapted from King Arthur Flour.


Easy to make, no need for a special pan and my kids loved them! Making for breakfast again tomorrow.
So glad you enjoyed it, Alejandra!
How can I just make 6 instead of 12
Hi Martita! Feel free to halve the recipe.
Can you freeze the popovers?
Hi Sharon! Popovers won’t defrost very well because they’ll lose their “puff” and be more dense.
Simple, and delicious!
So glad you enjoyed it, Susan!
These were surprisingly easy and puffed really well. Excited to keep them in my regular brunch rotation. Thnx!
Perfect recipe!! Mine were puffy and of course they fall a bit but wow, the flavor was so good! Served with a boysenberry jam. YUM.
Glad you enjoyed them, Kayla!
Hi, I’ve been dying to make popovers for the longest…. They have so many great family memories. I tried these followed everything to the T… But they didn’t pop . The taste was ok. Just didn’t really bring back those long ago memories