
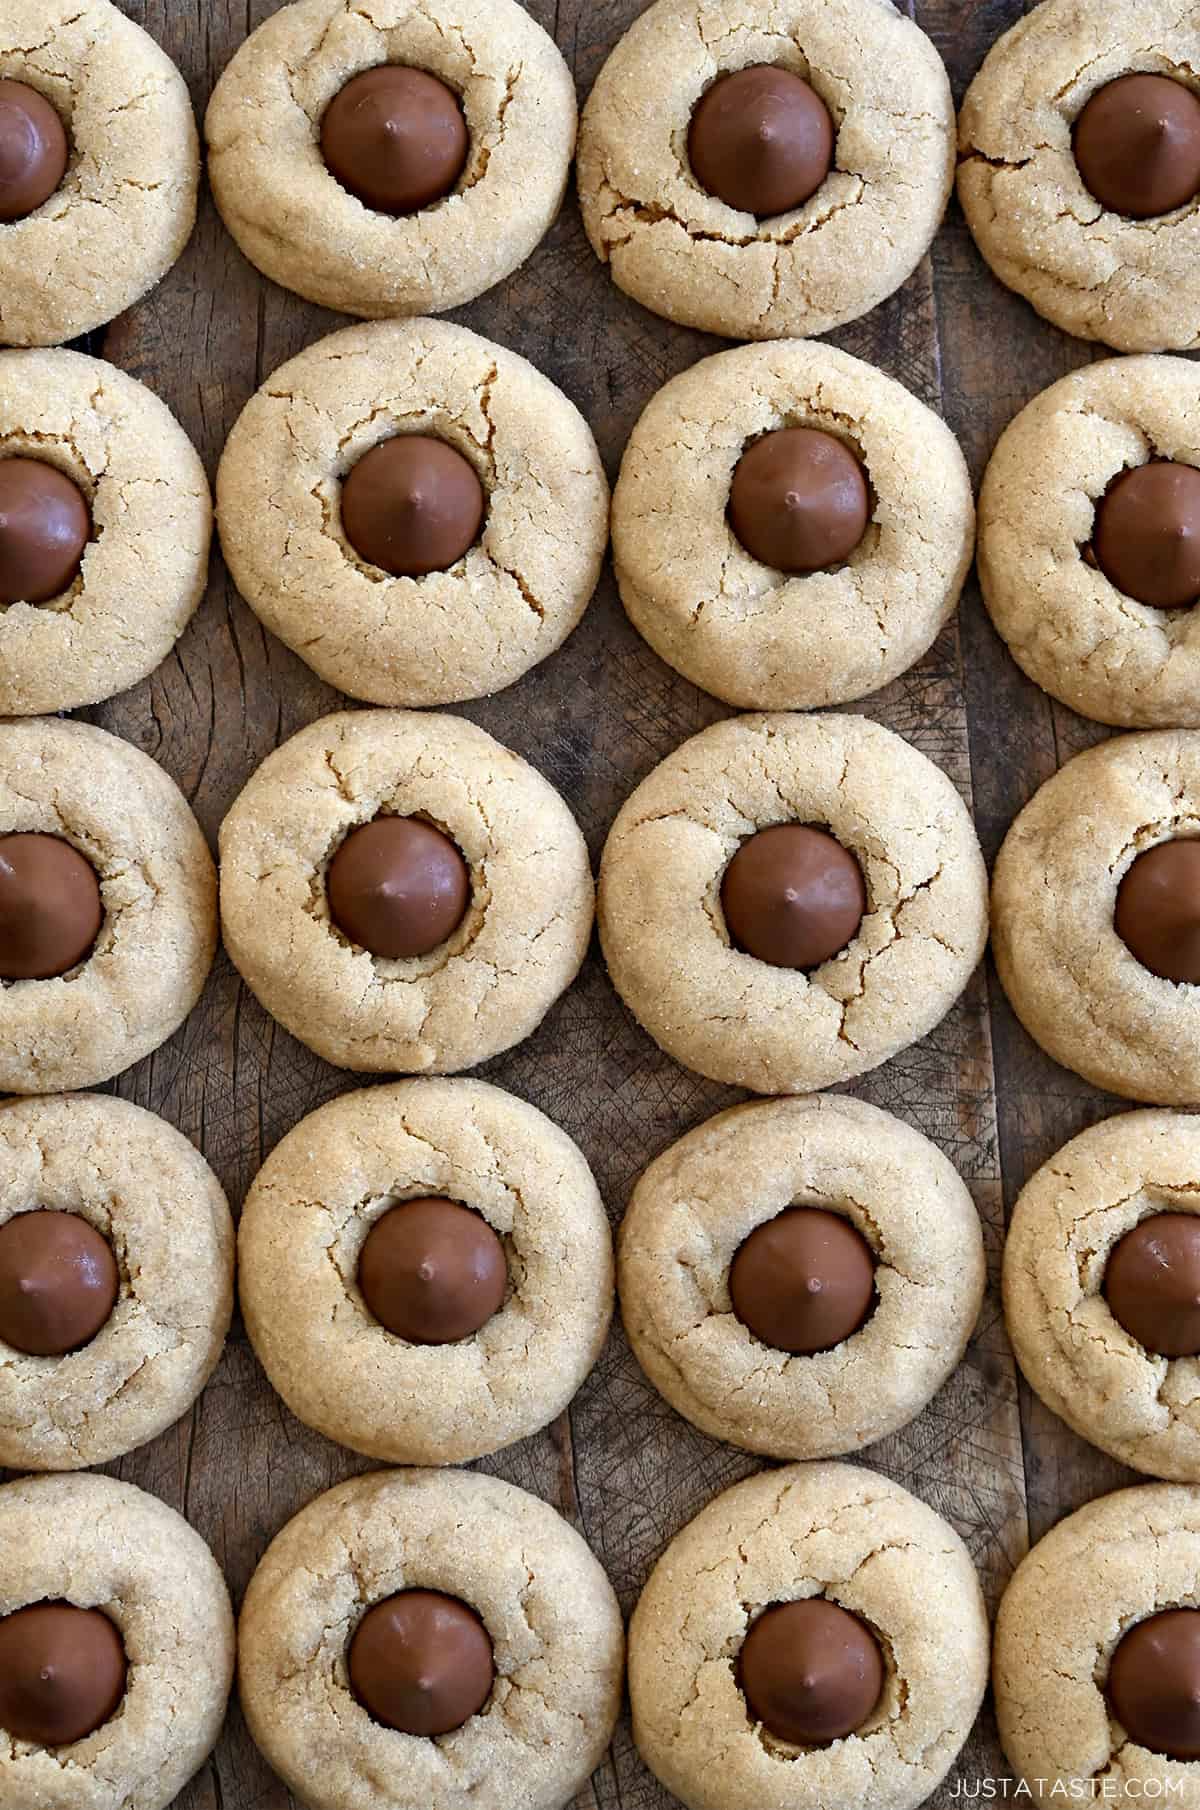
Soft and chewy peanut butter blossoms deliver big peanut butter flavor, picture-perfect crackly tops and an iconic Hershey’s Chocolate Kiss. Whether you’re baking for a cookie swap, filling a festive tin or just treating yourself to something sweet, this classic quick-fix (no dough chilling!) holiday cookie is a must for any Christmas cookie tray.
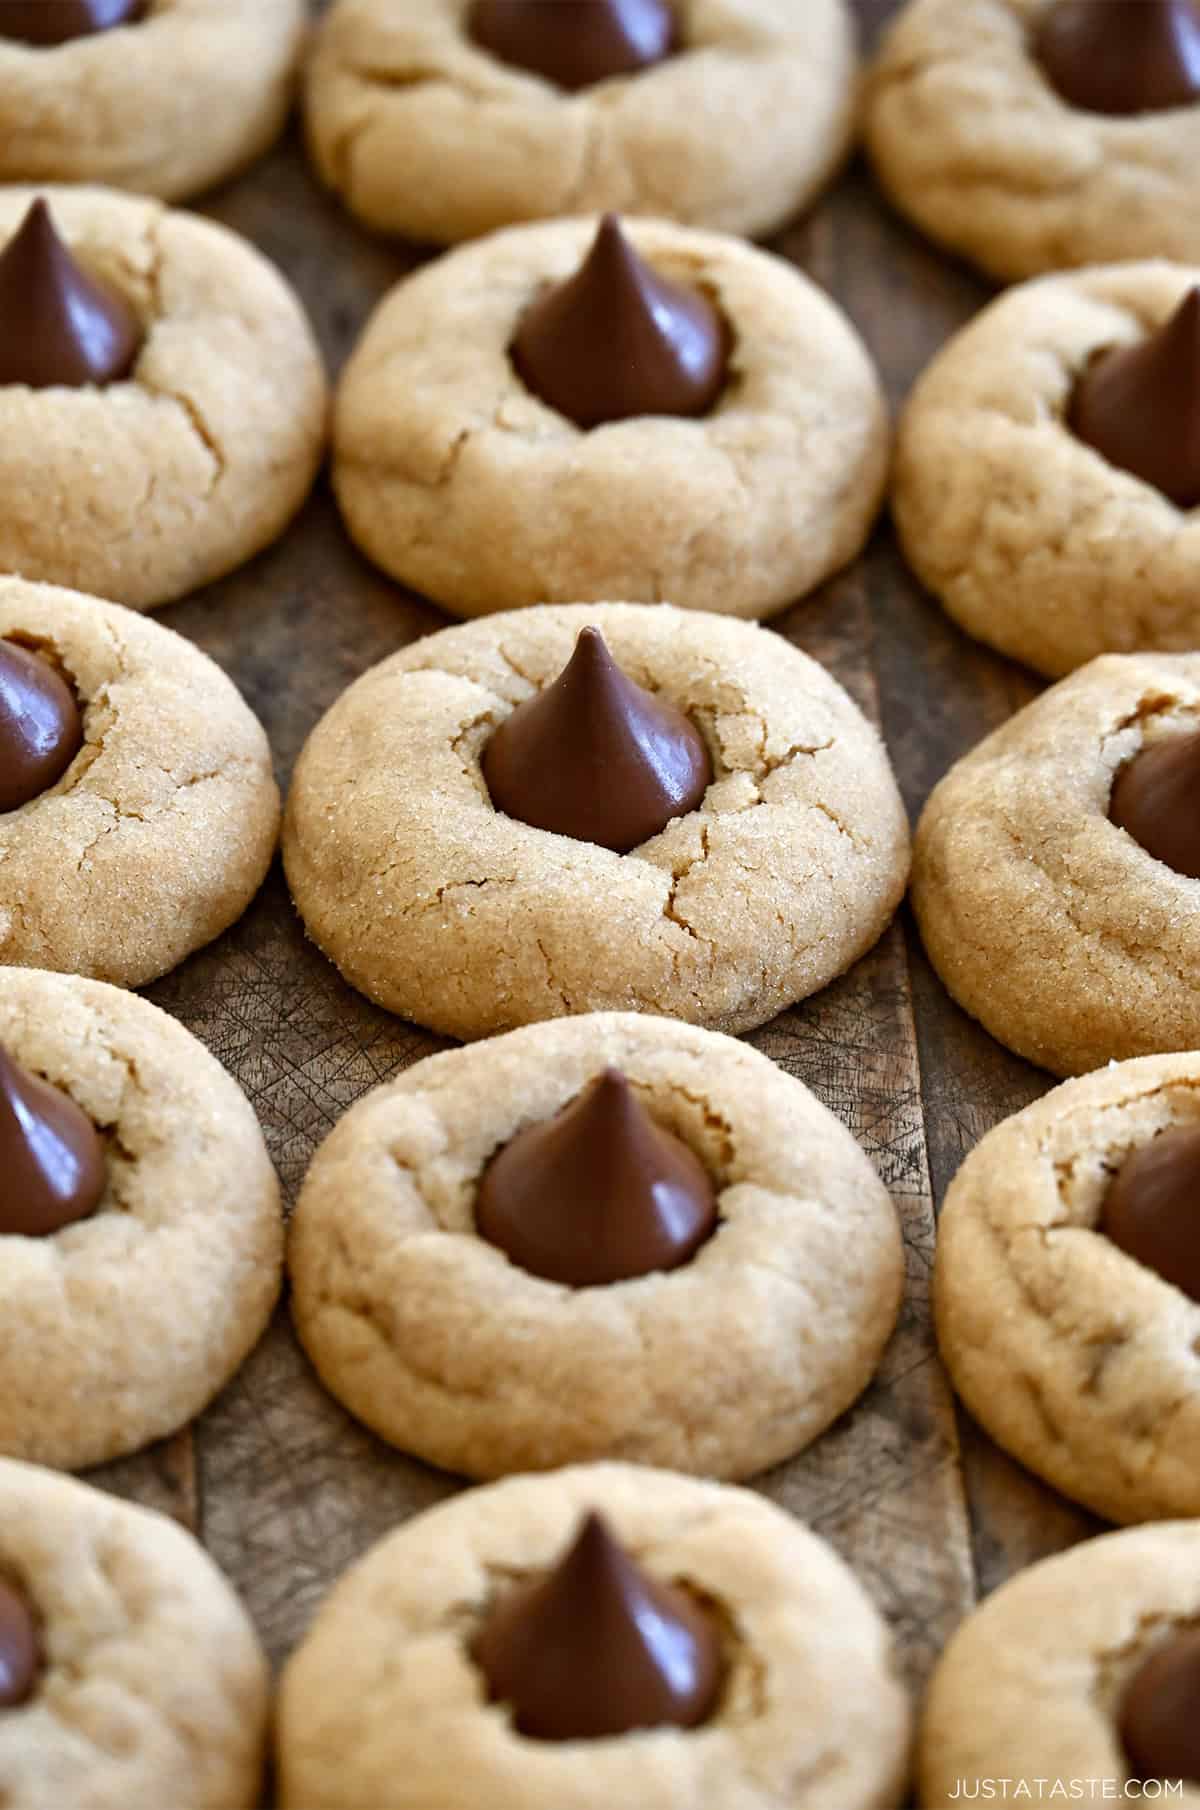
Table of Contents

Peanut butter blossoms weren’t one of the cookies on my family’s holiday tray growing up, but leave it to my Marketing Coordinator, Libby, to change that.
When I set out to develop the perfect Peanut Butter Blossoms recipe, I thought it’d be a quick win. Spoiler: It was not. Some recipes come together in one Tuesday Test Kitchen session, and sometimes… it takes four rounds and a whole lot of cookies that spread into peanut-butter puddles before you land on “The One.”
By round four, I was this close to abandoning these cookies. And that’s when Libby said, “Why don’t you just use my step-mom Patti’s recipe?”
Enter Patti. One small tweak (because your girl never has shortening in her pantry), and suddenly everything fell into place. What came out of the oven were the Peanut Butter Blossoms I’d been chasing all along: incredibly soft and chewy, loaded with peanut butter flavor and topped with a chocolate kiss. No chilling, no spreading, no panicking required.
From Patti’s kitchen to Libby’s to mine… and now to yours. I hope these classic holiday cookies make their way onto your cookie tray this season, and maybe even become the tradition you didn’t know you were missing.
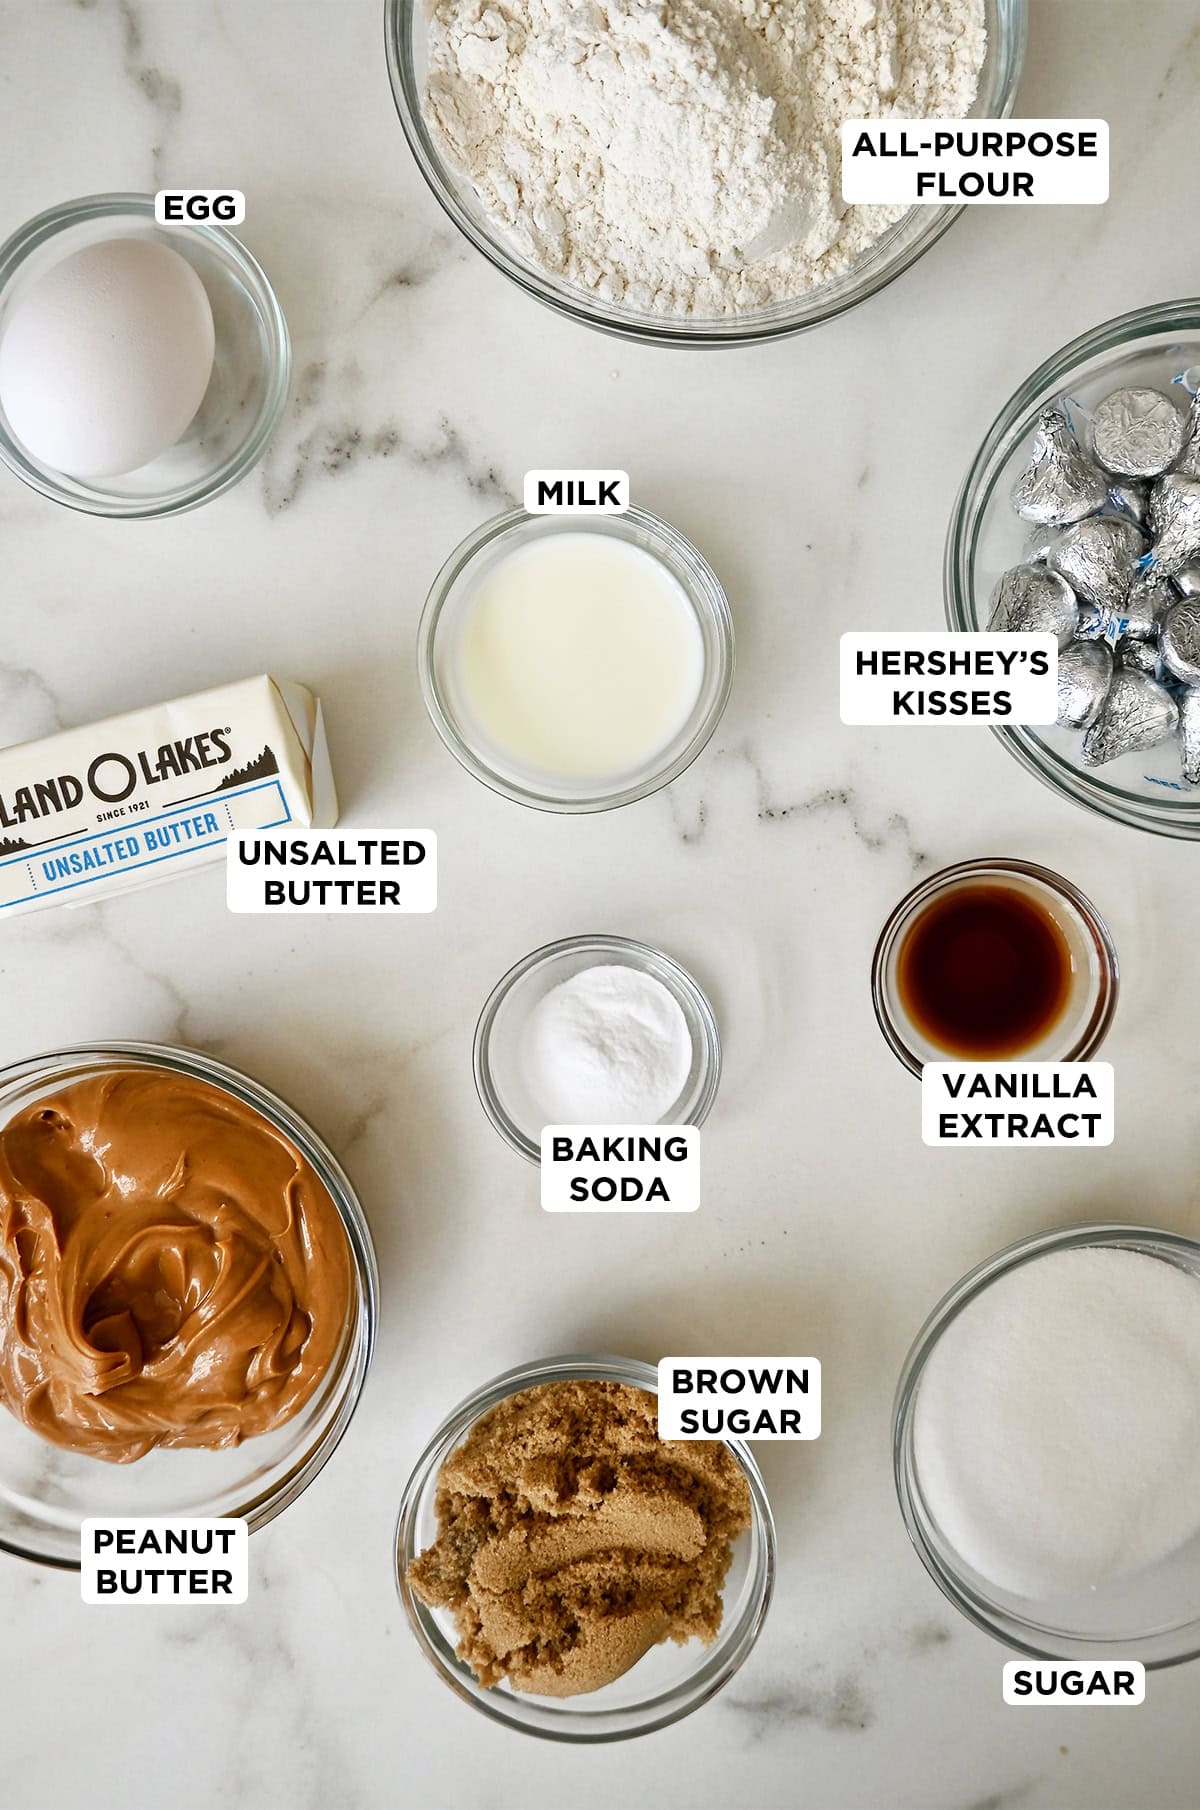
- Peanut butter: Both creamy and crunchy work for this recipe, but skip natural peanut butter, which tends to separate and lead to an oily, unpredictable dough. (My go-to brand is Jif; it’s what I always use when making my buckeye balls or peanut butter chocolate chip cookies.)
- Butter: Make sure your butter is properly at room temperature before creaming it with the sugars. This is key to the cookies holding their shape without any chilling. (If you’re unsure what “room temp butter” actually means, or need to get it there fast, my guide on how to soften butter quickly breaks it all down.)
- Granulated sugar and light brown sugar: Using both sugars gives a perfect balance: crisp edges from granulated sugar and extra-soft centers from the brown sugar. The brown sugar also helps those signature crackly tops form. You’ll also need a little extra granulated sugar for rolling the dough balls before baking.
- Egg: Just one egg binds the dough and keeps the cookies chewy.
- Milk: A splash of milk keeps the dough smooth and easy to roll, and is part of what makes these truly the best peanut butter blossoms.
- All-purpose flour: The sturdy base that gives the cookies structure. Measure your flour by spooning and leveling so the cookies stay soft and tender.
- Vanilla extract and salt: Both balance the sweetness and enhance the peanut butter flavor.
- Baking soda: For lift.
- Hershey’s Kisses: The classic finish! Milk chocolate kisses are the traditional choice, but dark chocolate or any seasonal flavor works great, too. You can even swap in mini Reese’s peanut butter cups, like I do in my peanut butter cup cookies.
See the recipe card for full information on ingredients and quantities.
Before you dive in, go ahead and unwrap the Hershey’s Kisses so you’re not scrambling when the cookies come out of the oven. This is also one of my favorite holiday cookies to make with little ones: rolling the dough into balls, coating them in sugar, and gently pressing the chocolate kisses into the warm cookies are all great tasks for little hands. Here’s exactly how to make them, step by step:
- Whisk together the dry ingredients. In a medium bowl, whisk the flour, baking soda and salt. Set it aside.
- Cream the butter and sugars. Beat the room temp butter with the granulated sugar and brown sugar. Don’t rush this step. You want the mixture to look pale and fluffy, which will take a good 2 to 3 minutes. Under-creamed butter is the #1 culprit behind cookies that spread.
- Mix in the wet ingredients. Add the egg and beat until combined, then mix in the peanut butter, milk and vanilla extract. The dough should look smooth and cohesive.
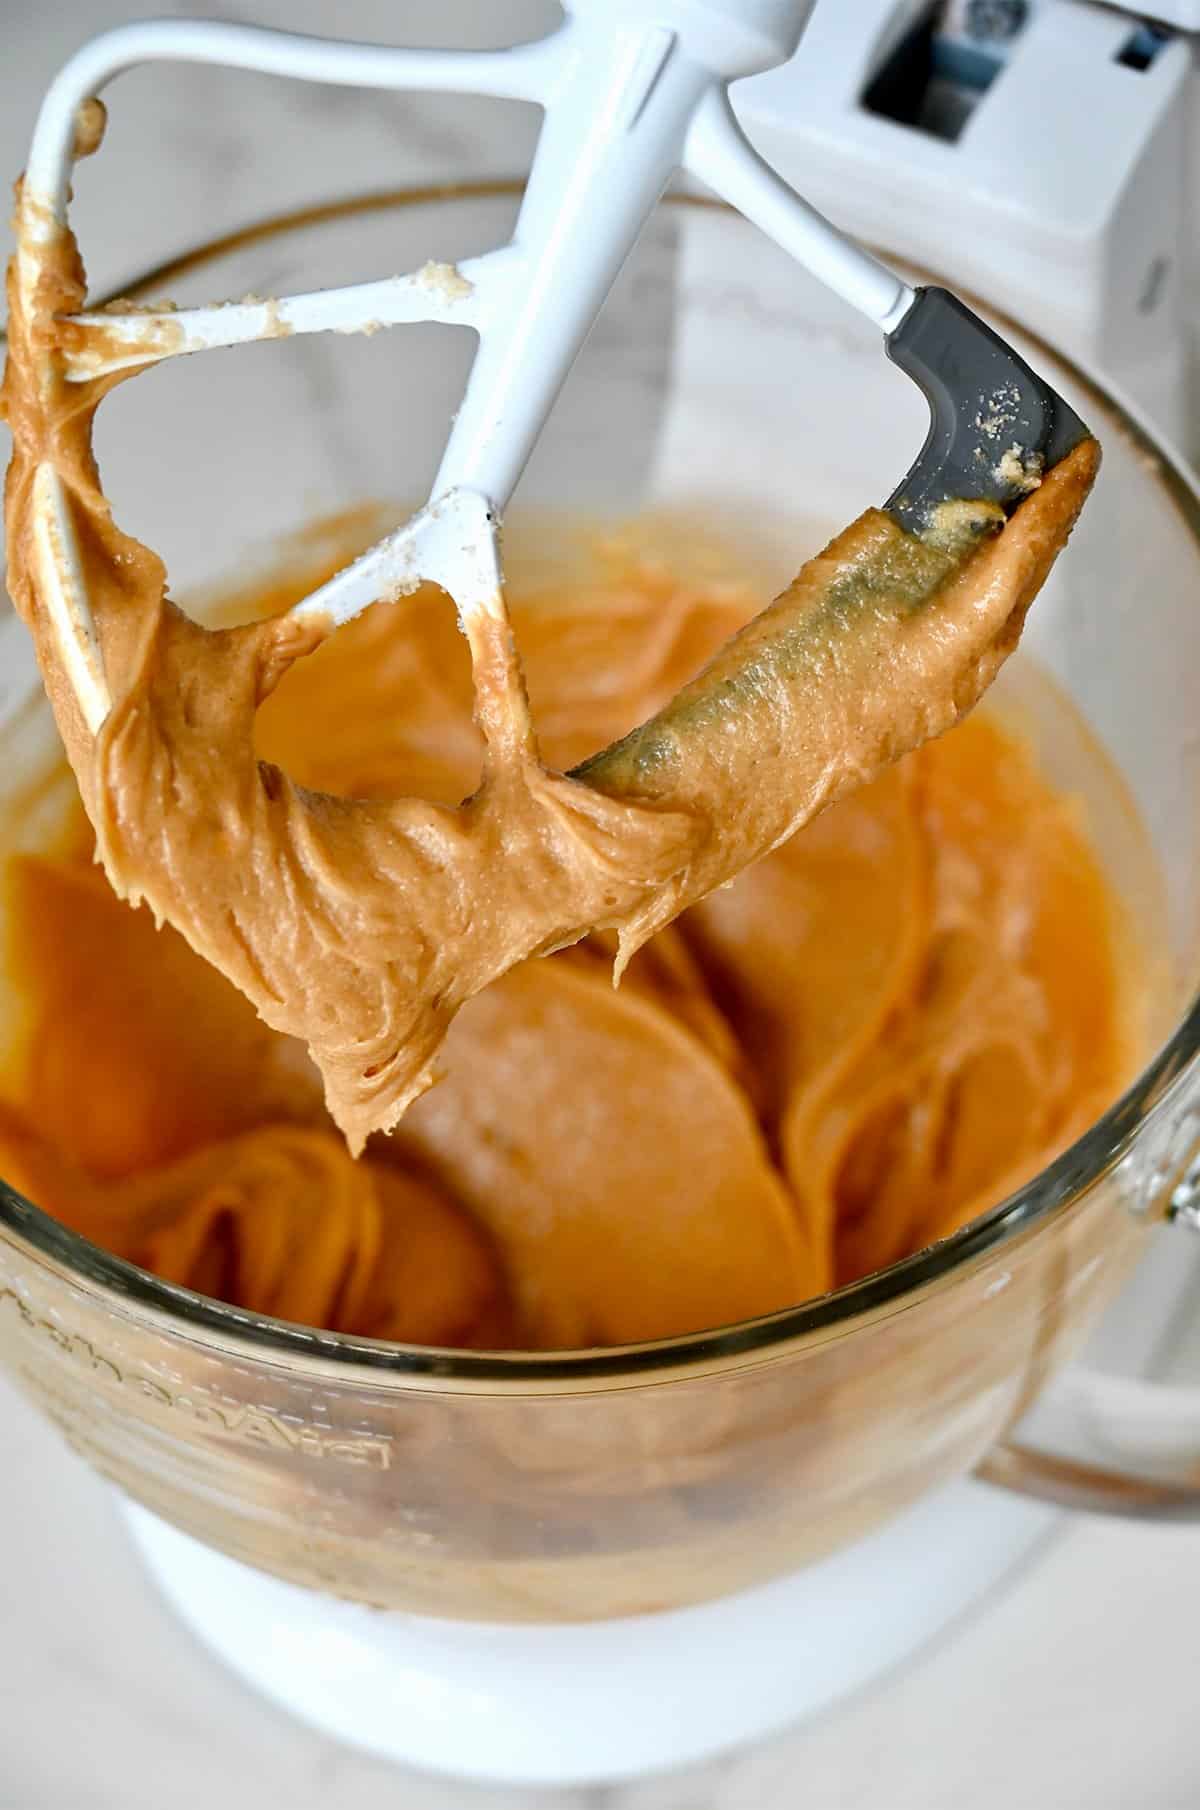
- Add the dry ingredients. Mix in the flour mixture just until you no longer see streaks of flour. Overmixing can lead to tough cookies. And be sure to scrape the bottom of the bowl while mixing; that’s where sneaky pockets of flour like to hide.
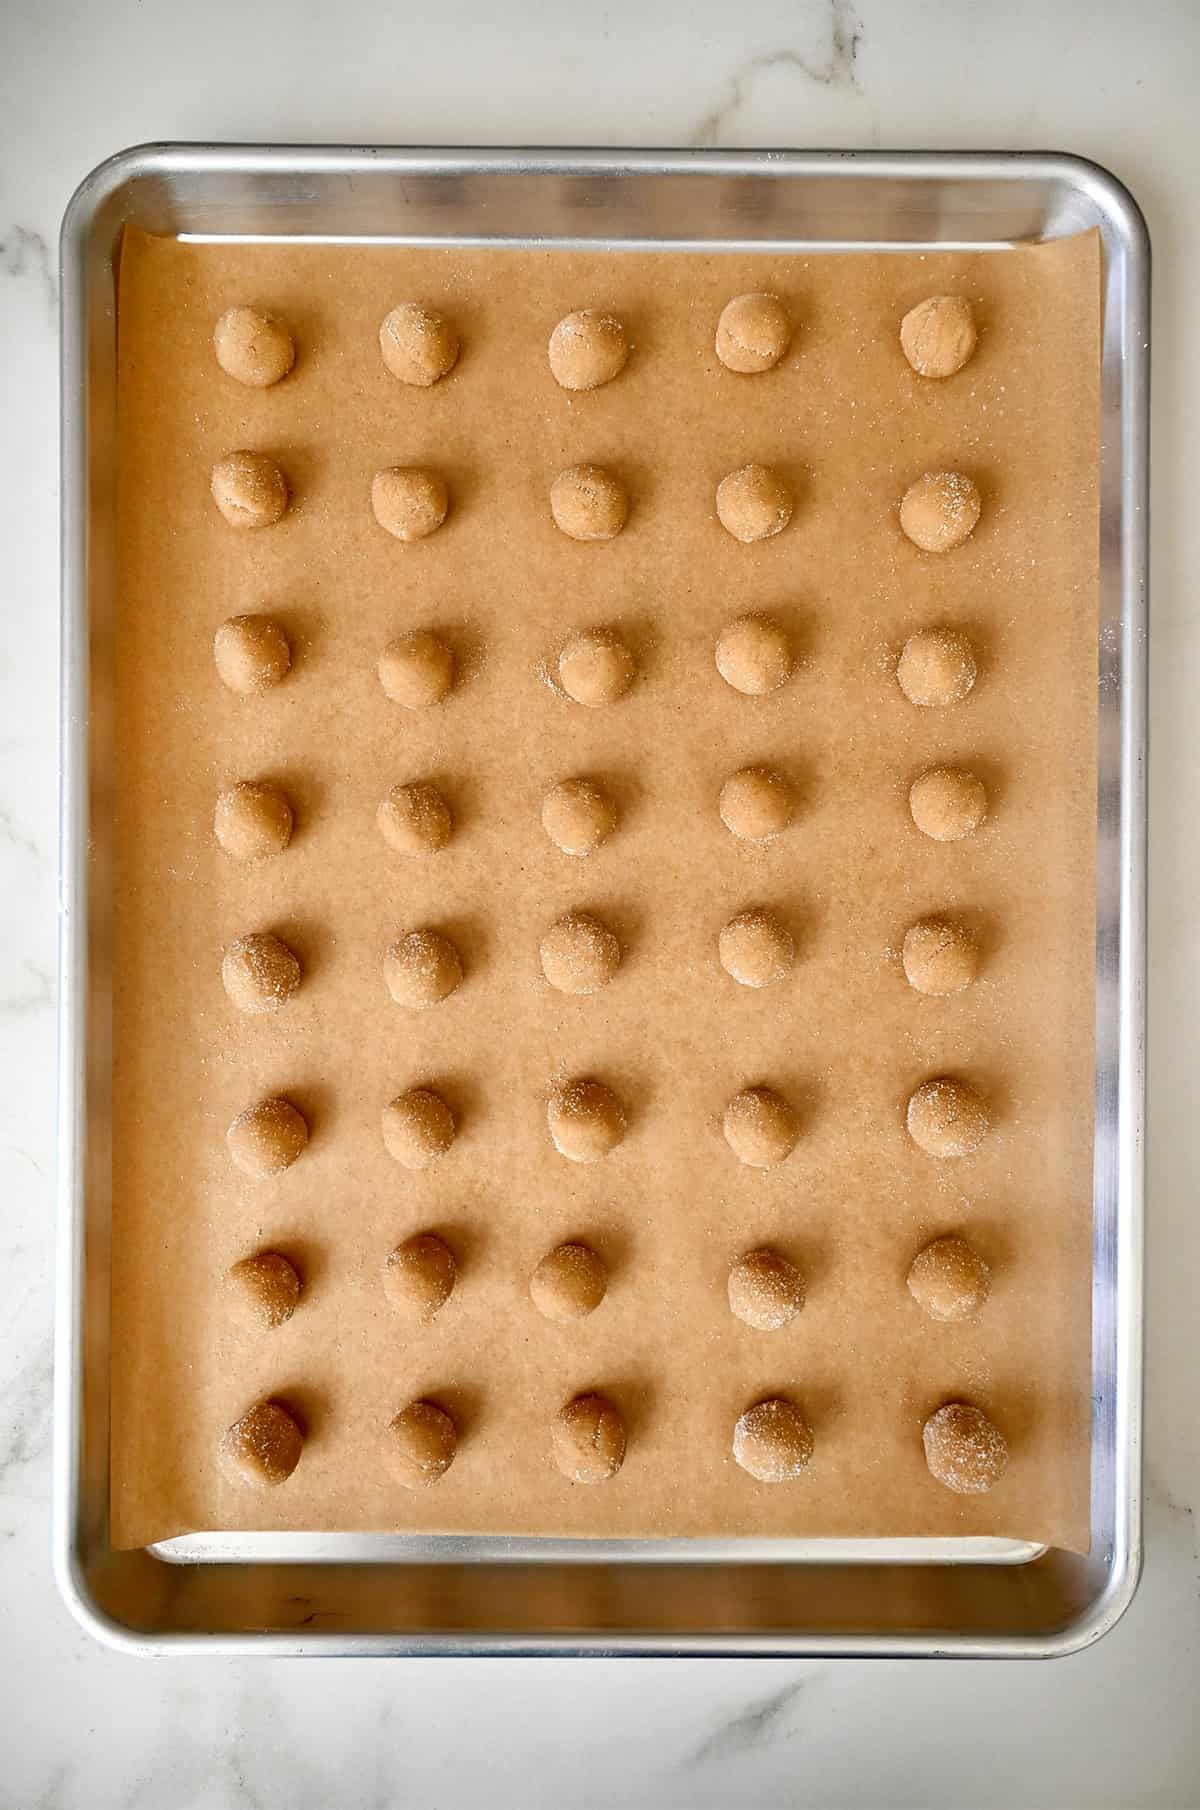
- Scoop and roll the dough into balls. I use a 2-tablespoon cookie scoop for even portions, but you can make the dough balls as big or small as you’d like. The key is to keep them roughly the same size (about 1 inch is great) so they bake evenly.
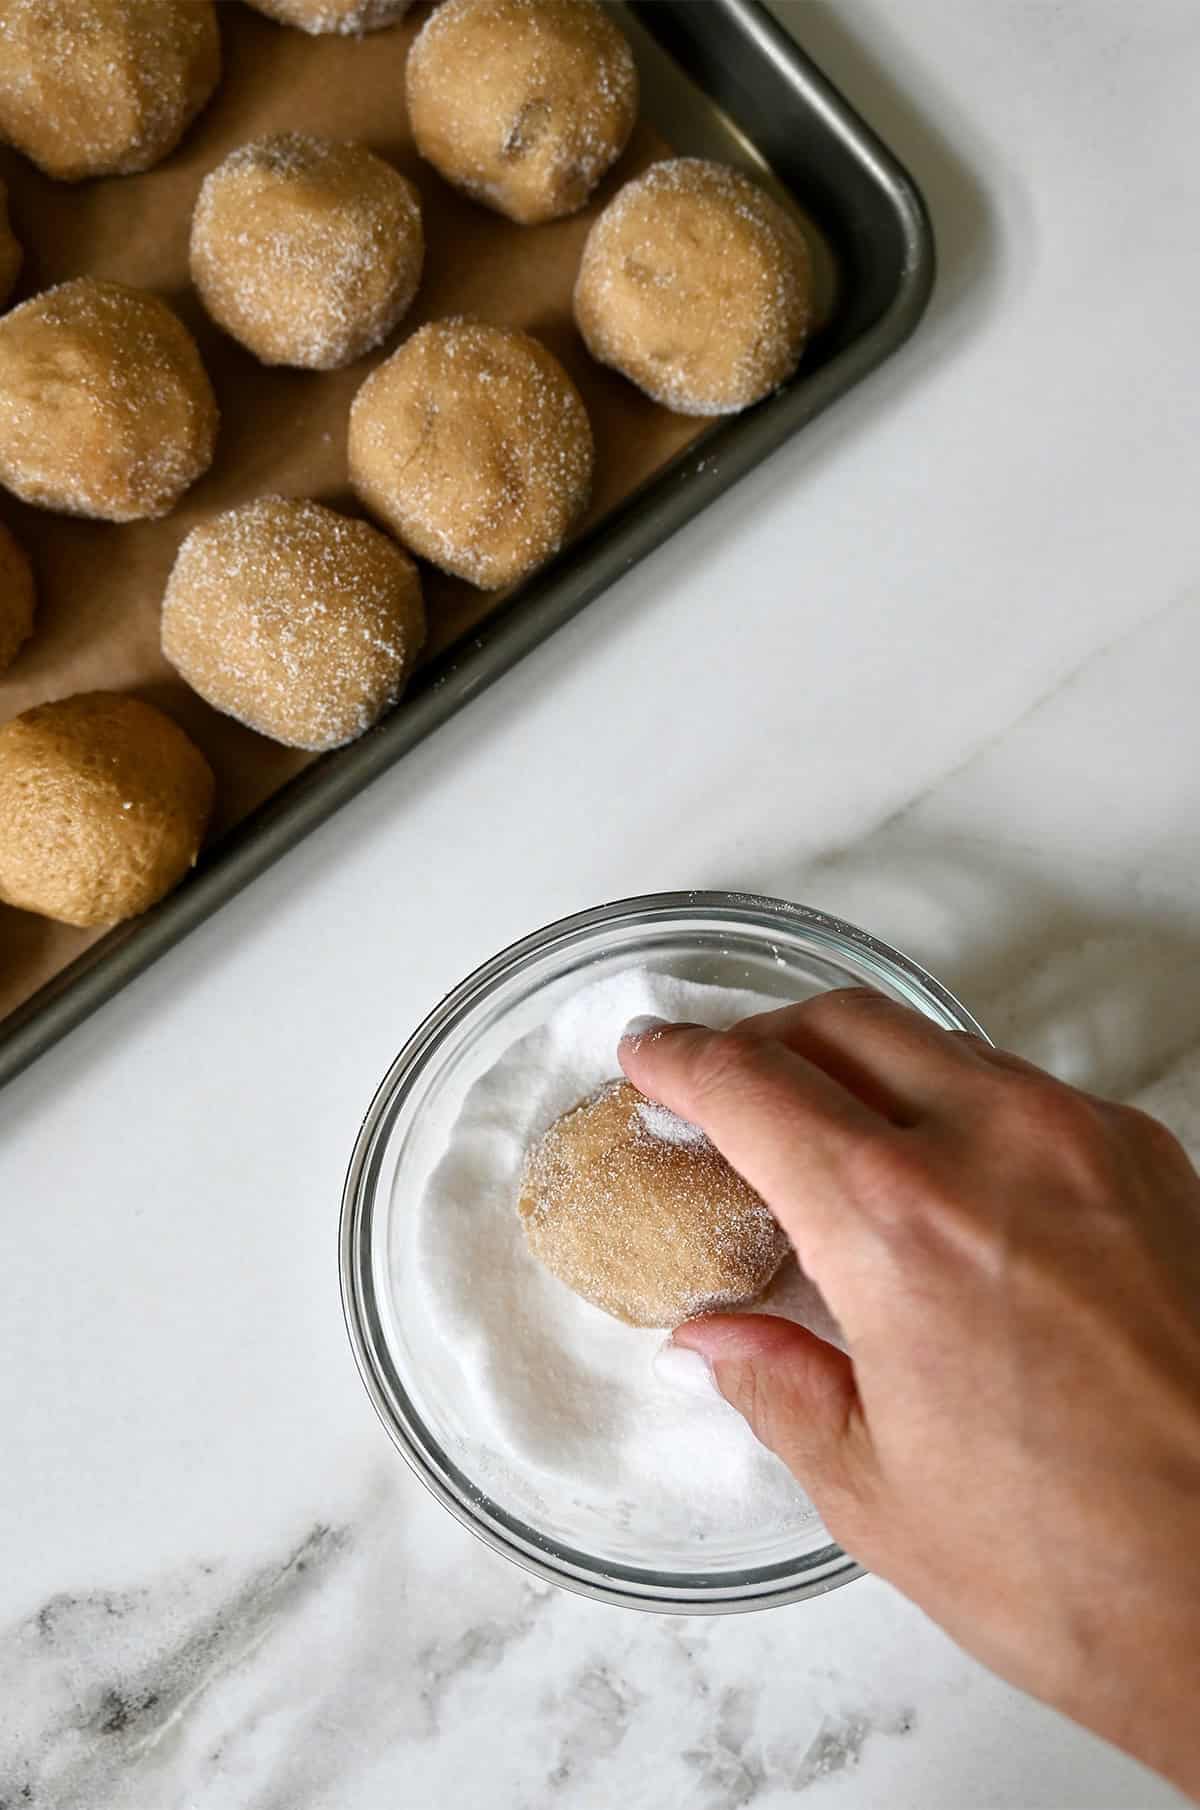
- Roll in sugar. Add ½ cup granulated sugar to a bowl and roll each cookie dough ball in the sugar so it’s coated all around. Some might say this step is optional, but it’s what gives each peanut butter cookie a little sparkle and crunch. You could even use colored sanding sugar, like red or green, if you’re feeling festive!
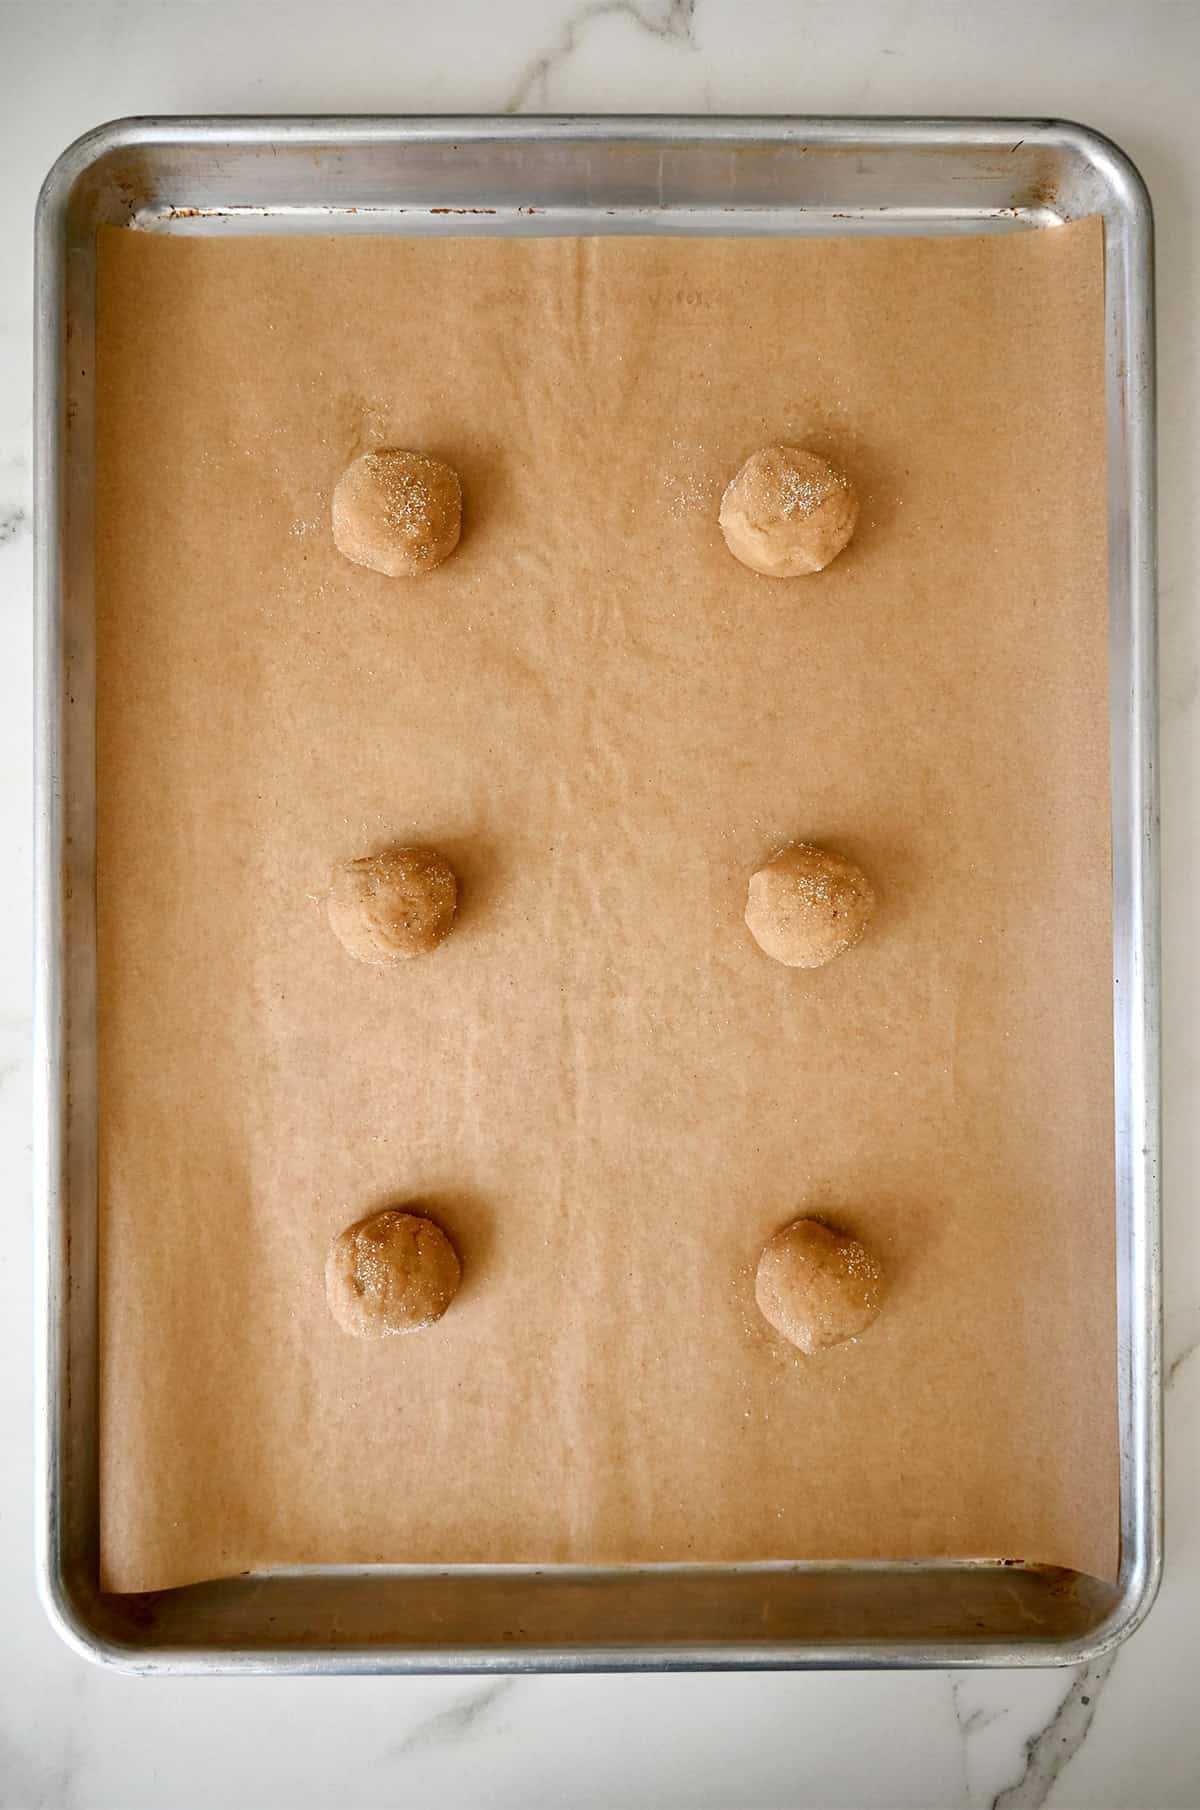
- Bake. Line two cookie sheets with parchment paper. Space the peanut butter blossom dough balls on the prepared cookie sheet about 2 inches apart. Bake in a 350°F oven until the edges look set and the tops are puffed. This takes about 8 to 10 minutes in my oven.
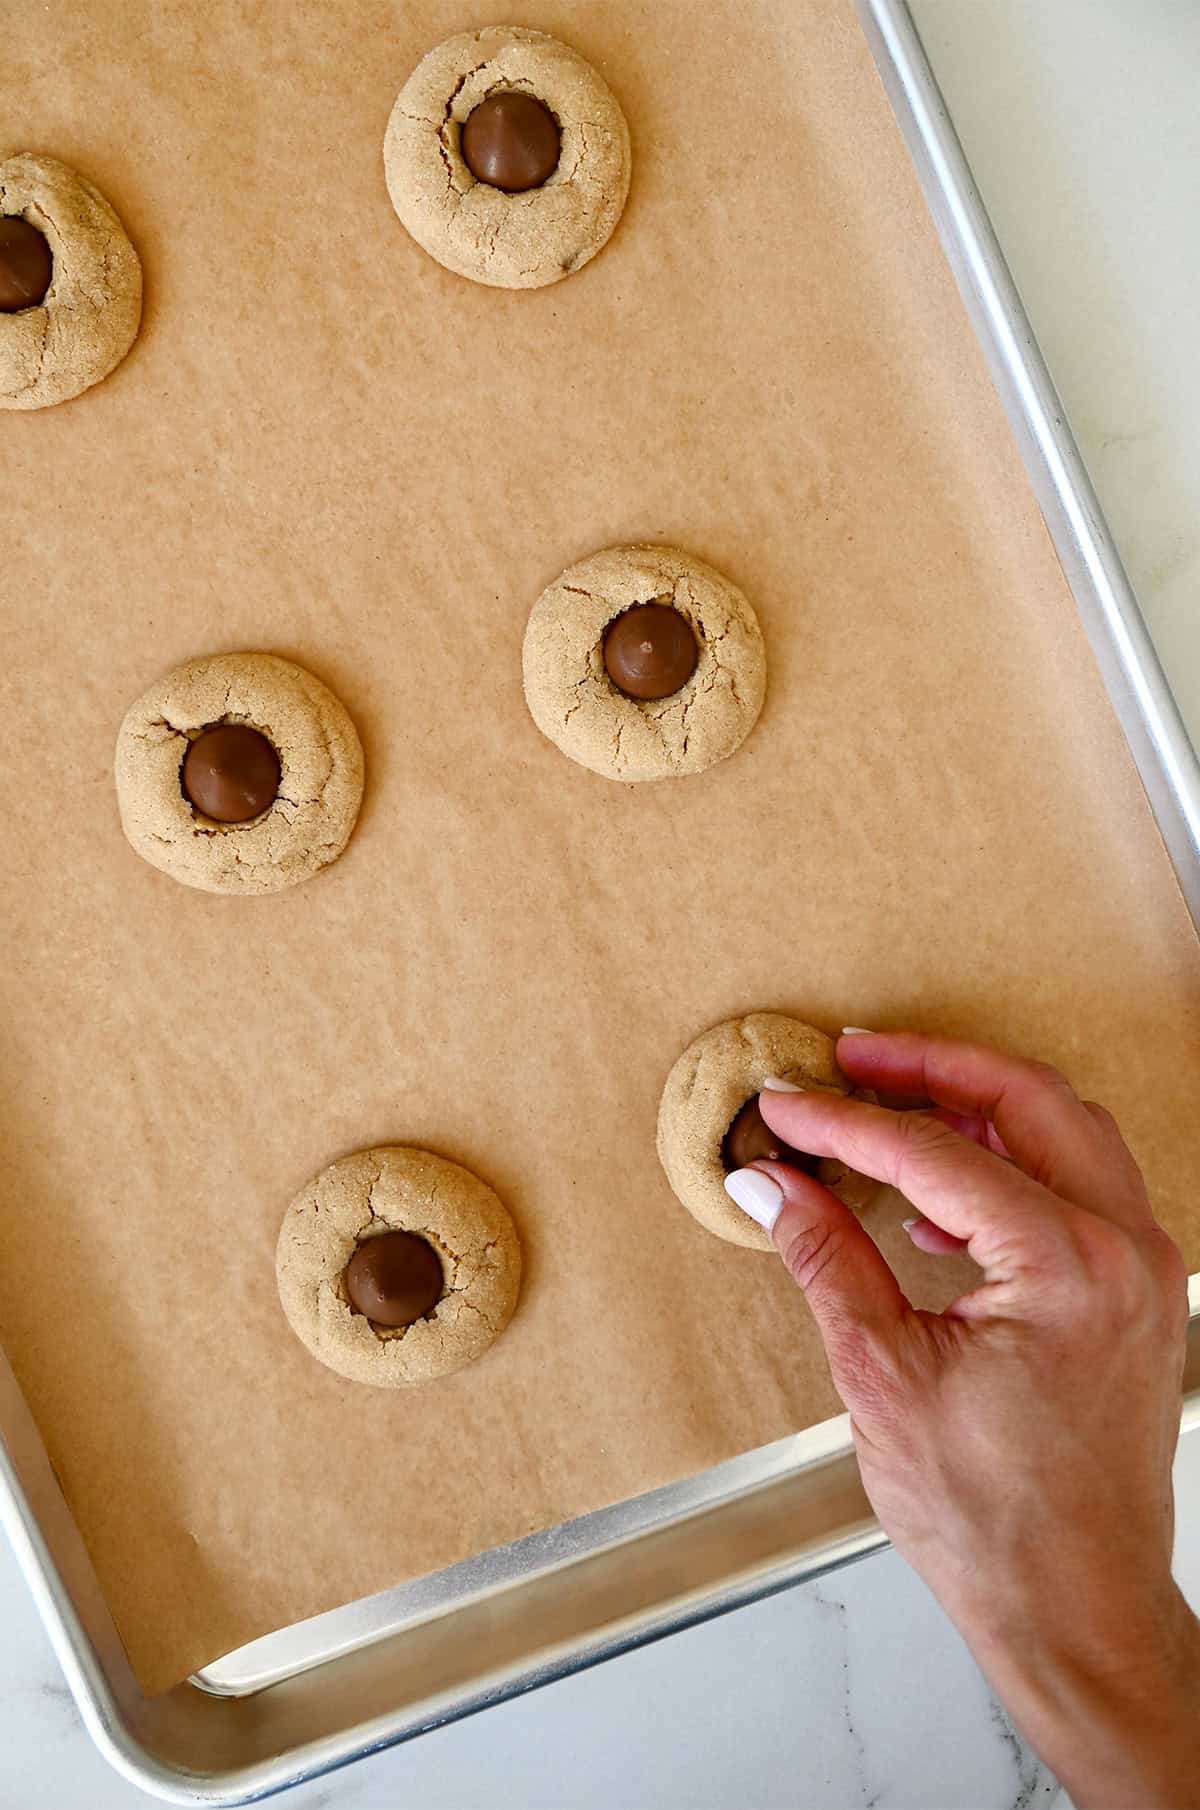
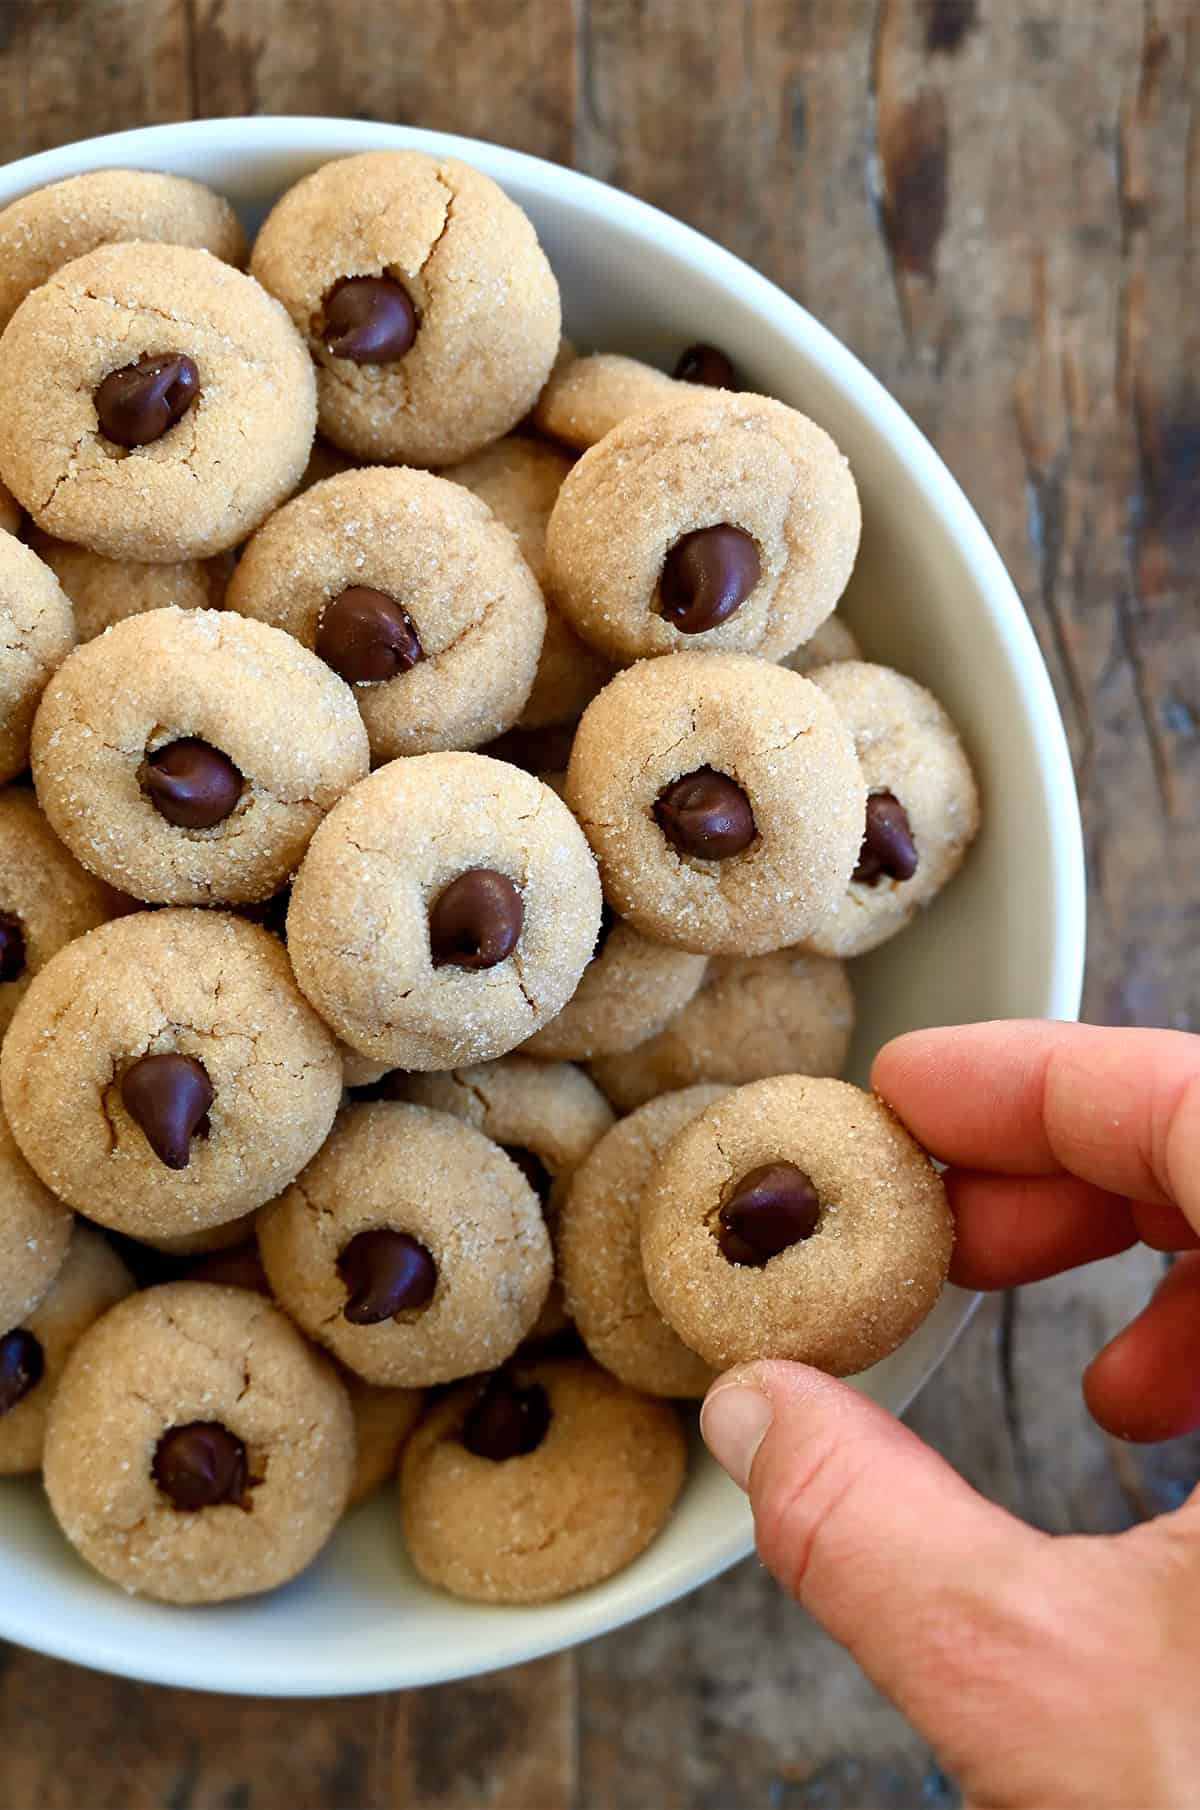
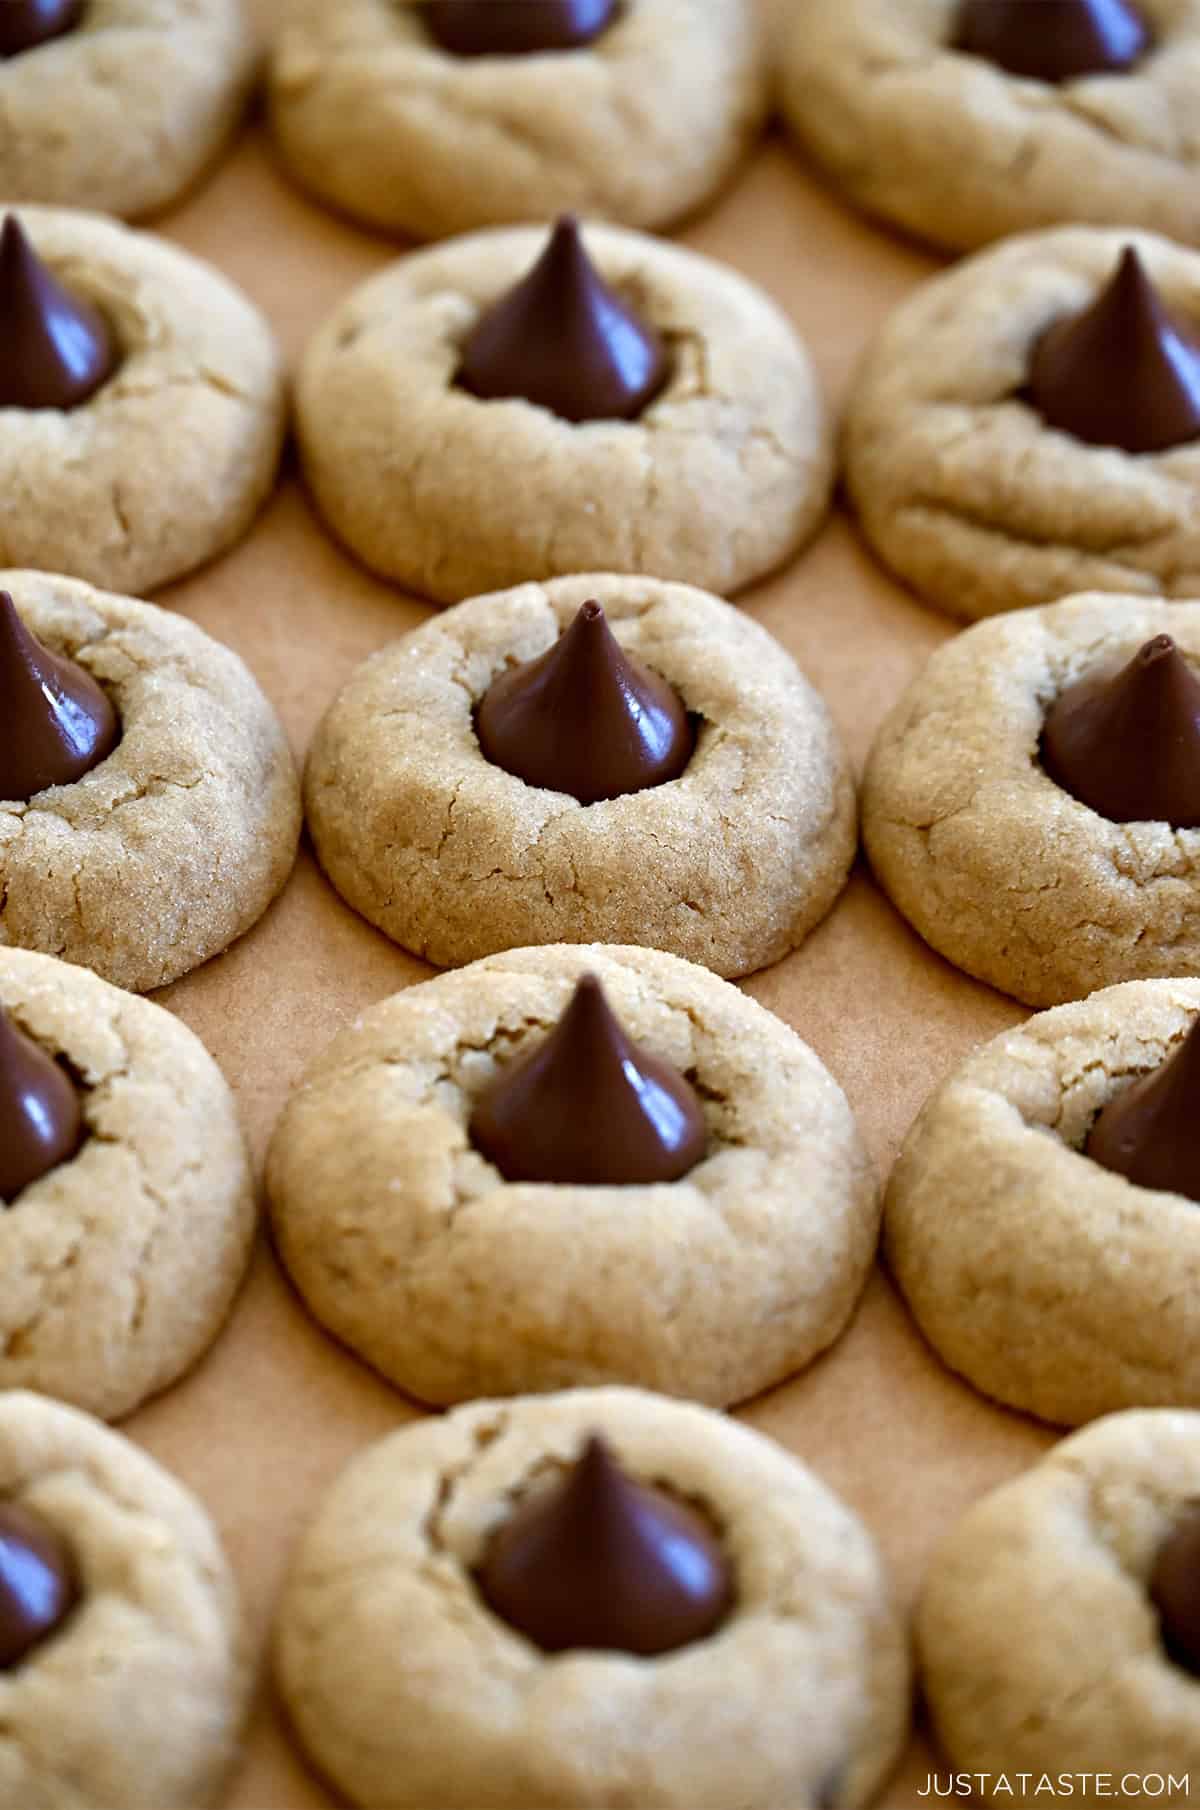
- Press in the Hershey’s Kiss. Remove the cookies from the oven and let them cool for 5 minutes, then gently press a chocolate kiss into the center of each one. The warm peanut butter cookie softens the chocolate just enough to create the classic “blossom,” and you’ll notice that the cookie will crack. That’s exactly what you want to see. Let the cookies finish cooling on the baking sheet before moving them to a rack. Then dig in… and try to eat just one!
Kelly’s Recipe Notes
- Worried about the chocolate melting? I’ve never had issues using room-temperature Hershey’s Chocolate Kisses, but if you want extra insurance, pop them in the freezer while the cookies bake. They’ll hold their shape beautifully.
- If your cookies spread… It almost always comes back to butter that was too soft. Chill the dough for 15–20 minutes to firm it up. (I have a whole YouTube video on why sugar cookies spread, and many of the same tips apply here!)
- Crackly tops = perfection. Those little cracks are your cue that the cookies baked up just right.
- Timing is everything with the Hershey’s Kiss. Let the cookies cool for about 5 minutes before pressing in the chocolate. Press too early and the chocolate melts too much; wait too long and it won’t stick properly.
- This recipe can easily be doubled or tripled. Perfect for big holiday cookie trays or gifting.
Make ‘em Mini!
Roll the dough into 1-teaspoon balls, coat in sugar, and bake for 5 to 7 minutes, or until the tops are puffed. Let the cookies cool for 2 minutes, then press a chocolate chip into the center of each one.
(If you wait too long—like I did on my first batch!—the cookies will crack too much when you try to add the chocolate.)
Freezing and Storage Instructions
This dough freezes beautifully (which is especially handy during the holiday baking rush!). Freeze the sugar-coated dough balls in an airtight container or freezer zip-top bag for up to 2 months. When you’re ready to bake, let the dough balls sit at room temperature while the oven heats, then bake as directed—adding 1 to 2 extra minutes if needed.
Baked peanut butter kiss cookies freeze really well, too! Freeze them in a single layer until solid, then transfer to an airtight container. Thaw at room temperature. (You can freeze them with the chocolate kisses already on, but the chocolate may bloom slightly—totally fine, just not as shiny.)
Store completely cooled cookies in an airtight container at room temperature for up to 1 week.
- Buttery Spritz Cookies
- Ginger Molasses Cookies
- Cornflake Christmas Wreaths
- Christmas Pinwheel Cookies
- Chocolate Thumbprint Cookies
- Candy Cane Cookies
- Or any of these 60+ Christmas cookie recipes!
Ingredients
For the cookies:
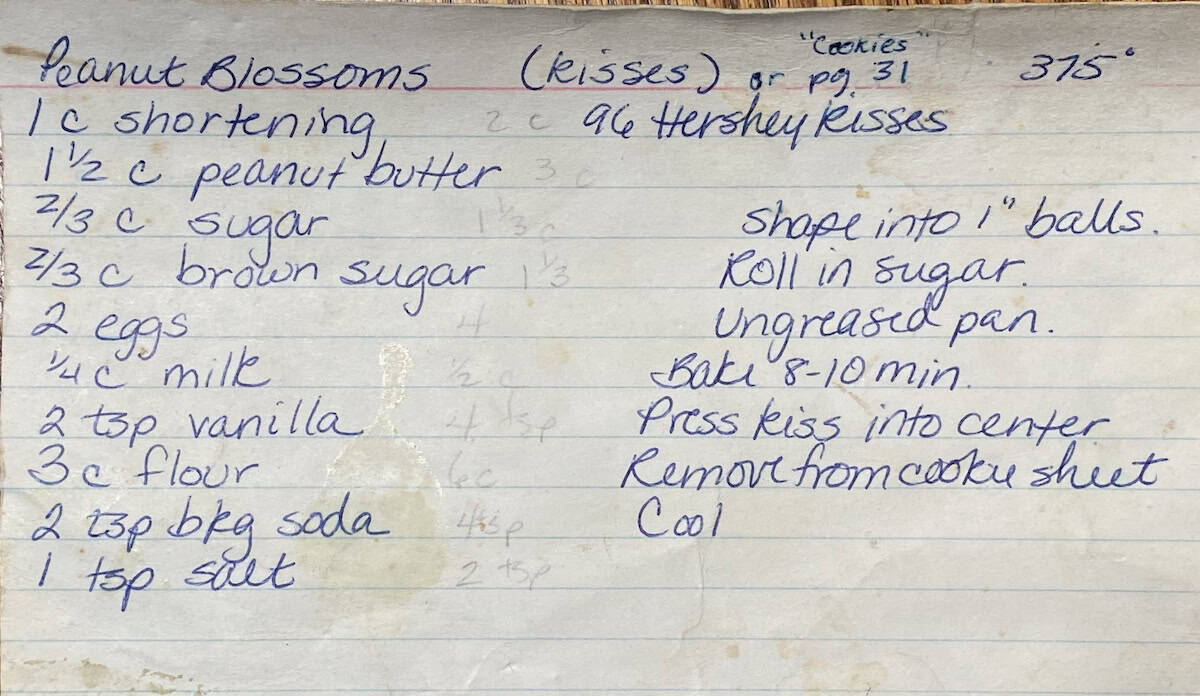
- 1 1/2 cups all-purpose flour
- 1 teaspoon baking soda
- 1/2 cup unsalted butter, at room temp
- 1/3 cup sugar
- 1/3 cup packed light brown sugar
- 1 large egg
- 3/4 cup creamy peanut butter
- 2 Tablespoons whole milk
- 1 teaspoon vanilla extract
- 24 Hershey's Kisses, unwrapped
For the coating:
- 1/2 cup sugar
Instructions
- Preheat the oven to 350°F. Line two baking sheets with parchment paper.
- In a medium bowl, whisk together the flour, baking soda and ½ teaspoon kosher salt. Set it aside.
- In the bowl of a stand mixer fitted with the paddle attachment, cream together the butter, sugar and brown sugar until light and fluffy, about 2 minutes. Add the egg then beat in the peanut butter, milk and vanilla extract.
- Add the flour mixture to the stand mixer, beating just until combined.
- Scoop out 2-tablespoon portions of the dough and roll it into balls.
- Add the ½ cup sugar to a small bowl then roll the cookie balls in the sugar and arrange them on the baking sheets, spacing them 2 inches apart.
- Bake the cookies until they are set, 8 to 10 minutes, then remove them from the oven and let them cool for 5 minutes.
- Press a Hershey Kiss into the center of each cookie. Let the cookies finish cooling then serve.
Kelly’s Notes
- For best results, use a no-stir peanut butter like Jif or Skippy. Natural peanut butter can cause the cookies to spread.
- To freeze the dough: Freeze the sugar-coated dough balls in an airtight container or freezer zip-top bag for up to 2 months. When ready to bake, let them sit at room temperature while the oven heats, then bake as directed, adding 1–2 extra minutes if needed.
- To freeze baked cookies: Freeze the cookies in a single layer until solid, then transfer to an airtight container. Thaw at room temperature. (You can freeze them with the chocolate kisses on, but the chocolate may bloom slightly—totally fine, just less shiny.)
- To store: Store completely cooled cookies in an airtight container at room temperature for up to 1 week.
- ★ Did you make this recipe? Don’t forget to give it a star rating below!
Nutrition
Did you try this recipe?
Leave a comment below with your star rating!
This post may contain affiliate links.


What does the 0.67 for the sugars equal cup wise please
Hi Barbie! 0.67 in cups?
A bunch of ladies from my neighborhood are putting together cookie boxes and I decided to make this recipe. I doubled it, and because I didn’t have time to make them all in one day, I covered the dough and put it in the fridge overnight. The cookies baked up perfectly and taste absolutely amazing (a few may or may not make it to the cookie boxing event today!). Thank you for sharing this recipe!
Love reading this, Heidi!
Doesn’t say how much salt to use so I had to guess
Great catch, Val! Just noted it in the Instructions (1/2 teaspoon kosher salt). Happy baking!
My favorite cookies!
So glad you enjoyed them, Brenda!
Saw the mini ones and had to try. They are dangerously good!!!
So glad you enjoyed the recipe, Theresa!
Truly the best peanut butter blossoms!
So glad you enjoyed the recipe!