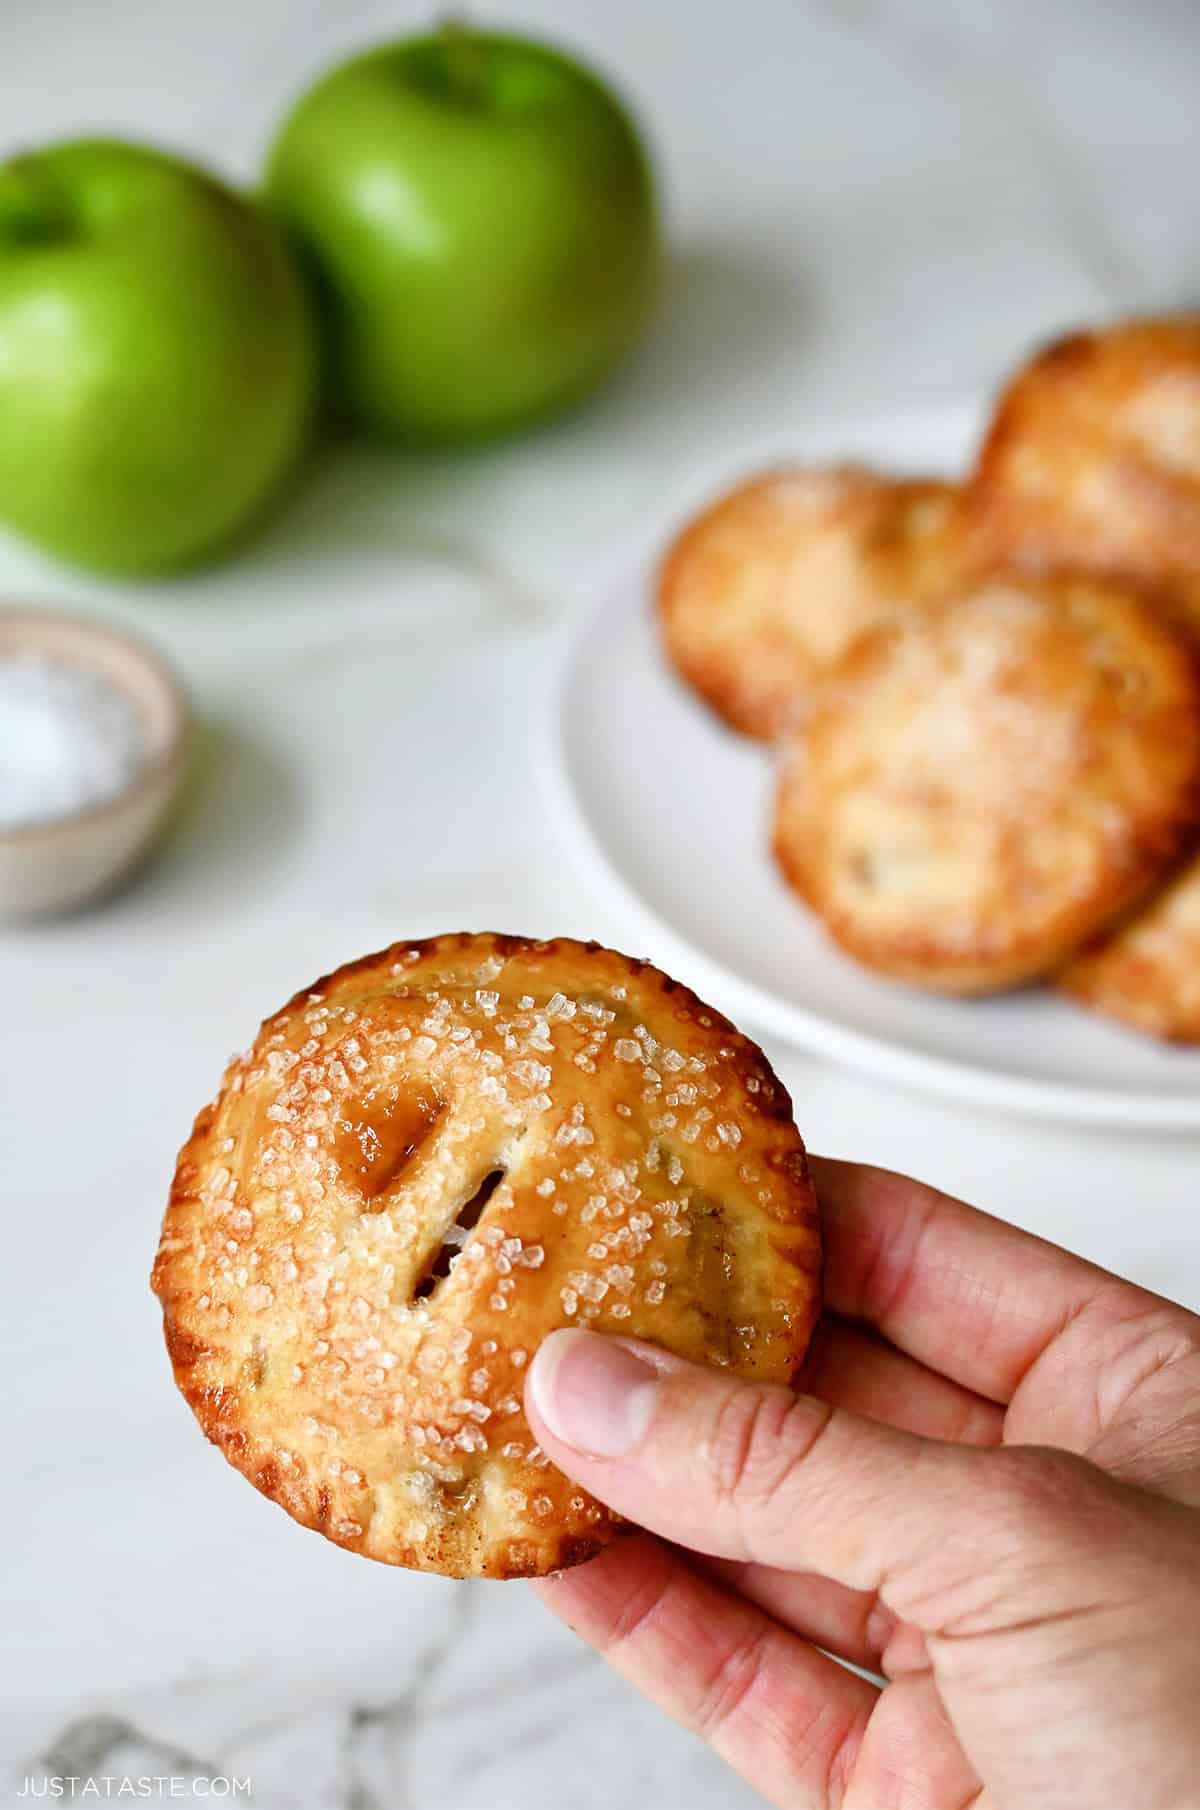
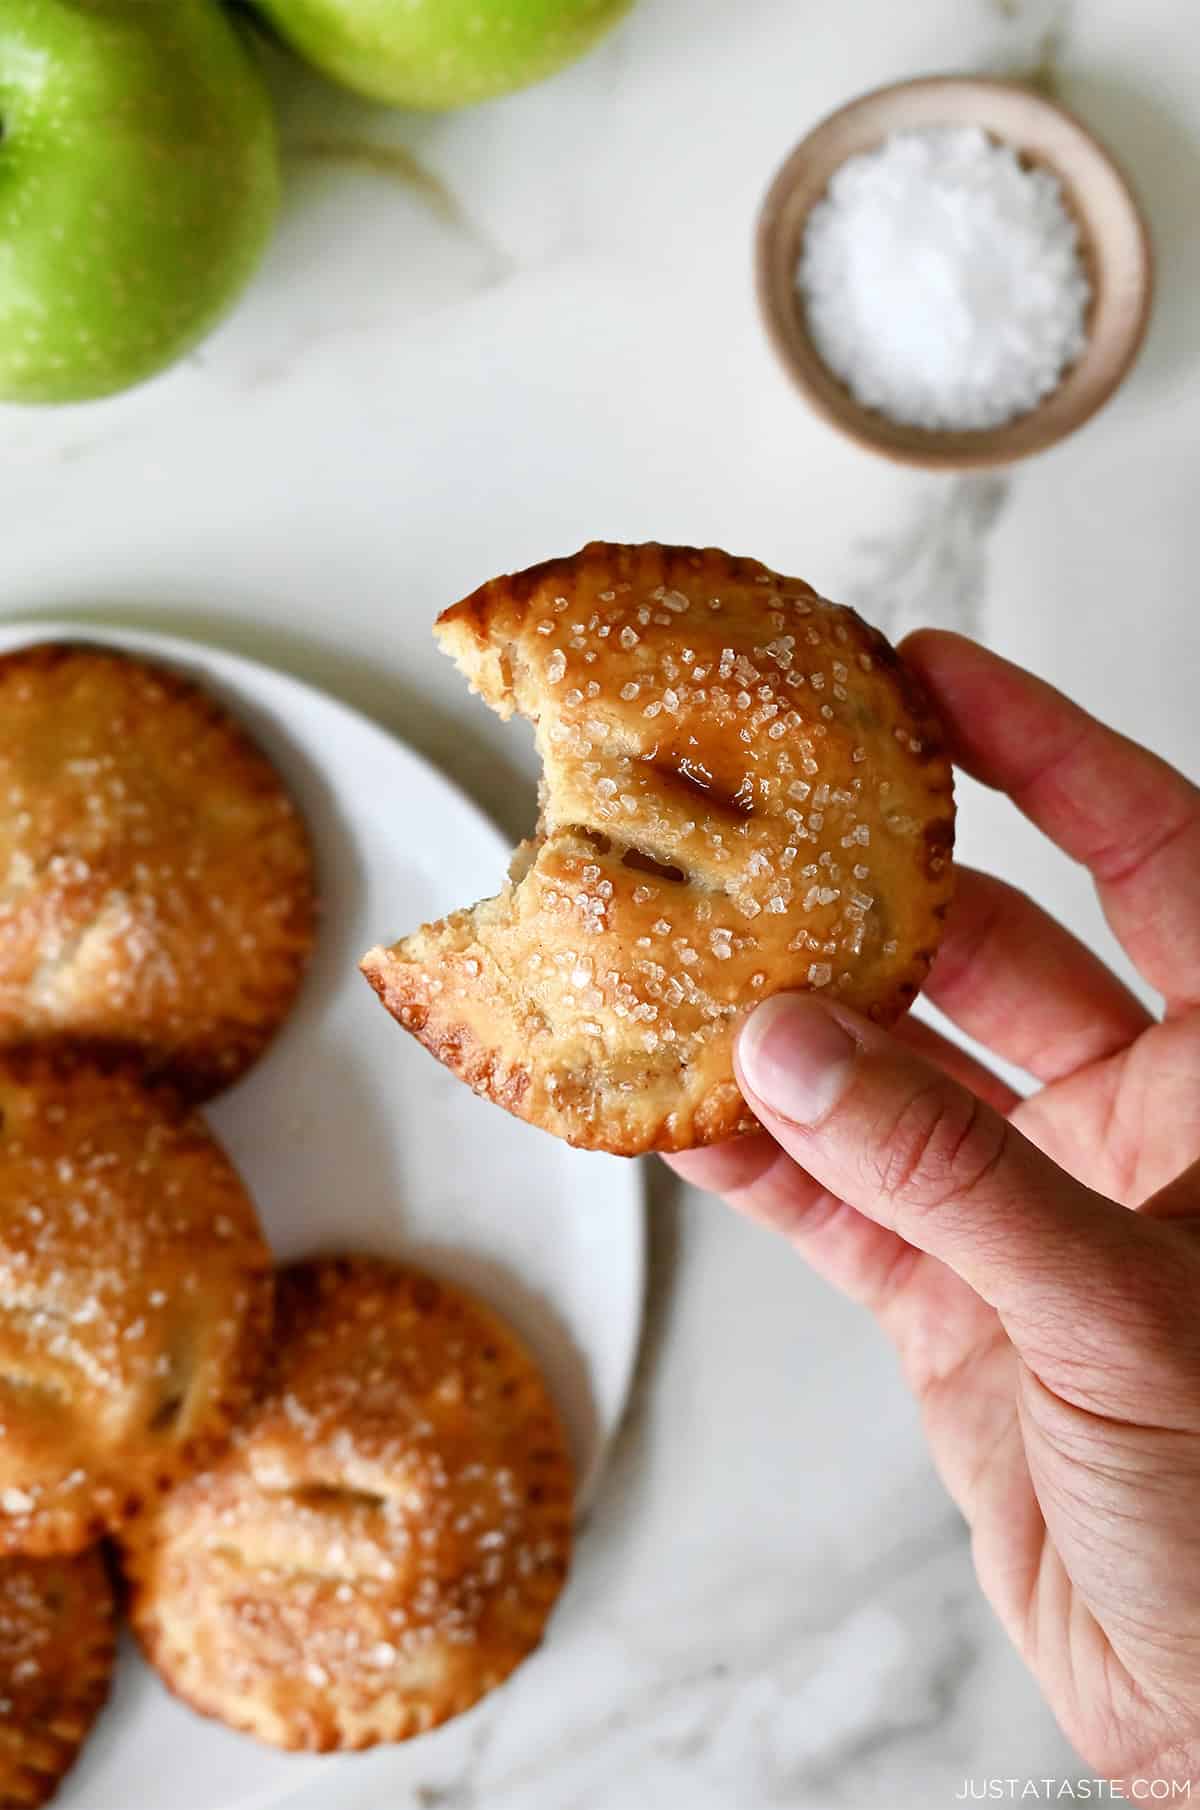
This Salted Caramel Apple Hand Pies recipe stars a homemade sour cream pie dough that’s flaky and buttery wrapped around a flavor-packed apple pie filling of cinnamon, gooey caramel and a touch of sea salt. They bake up in just 15 minutes, making them perfect for fall, the holidays or anytime you’re craving apple pie!
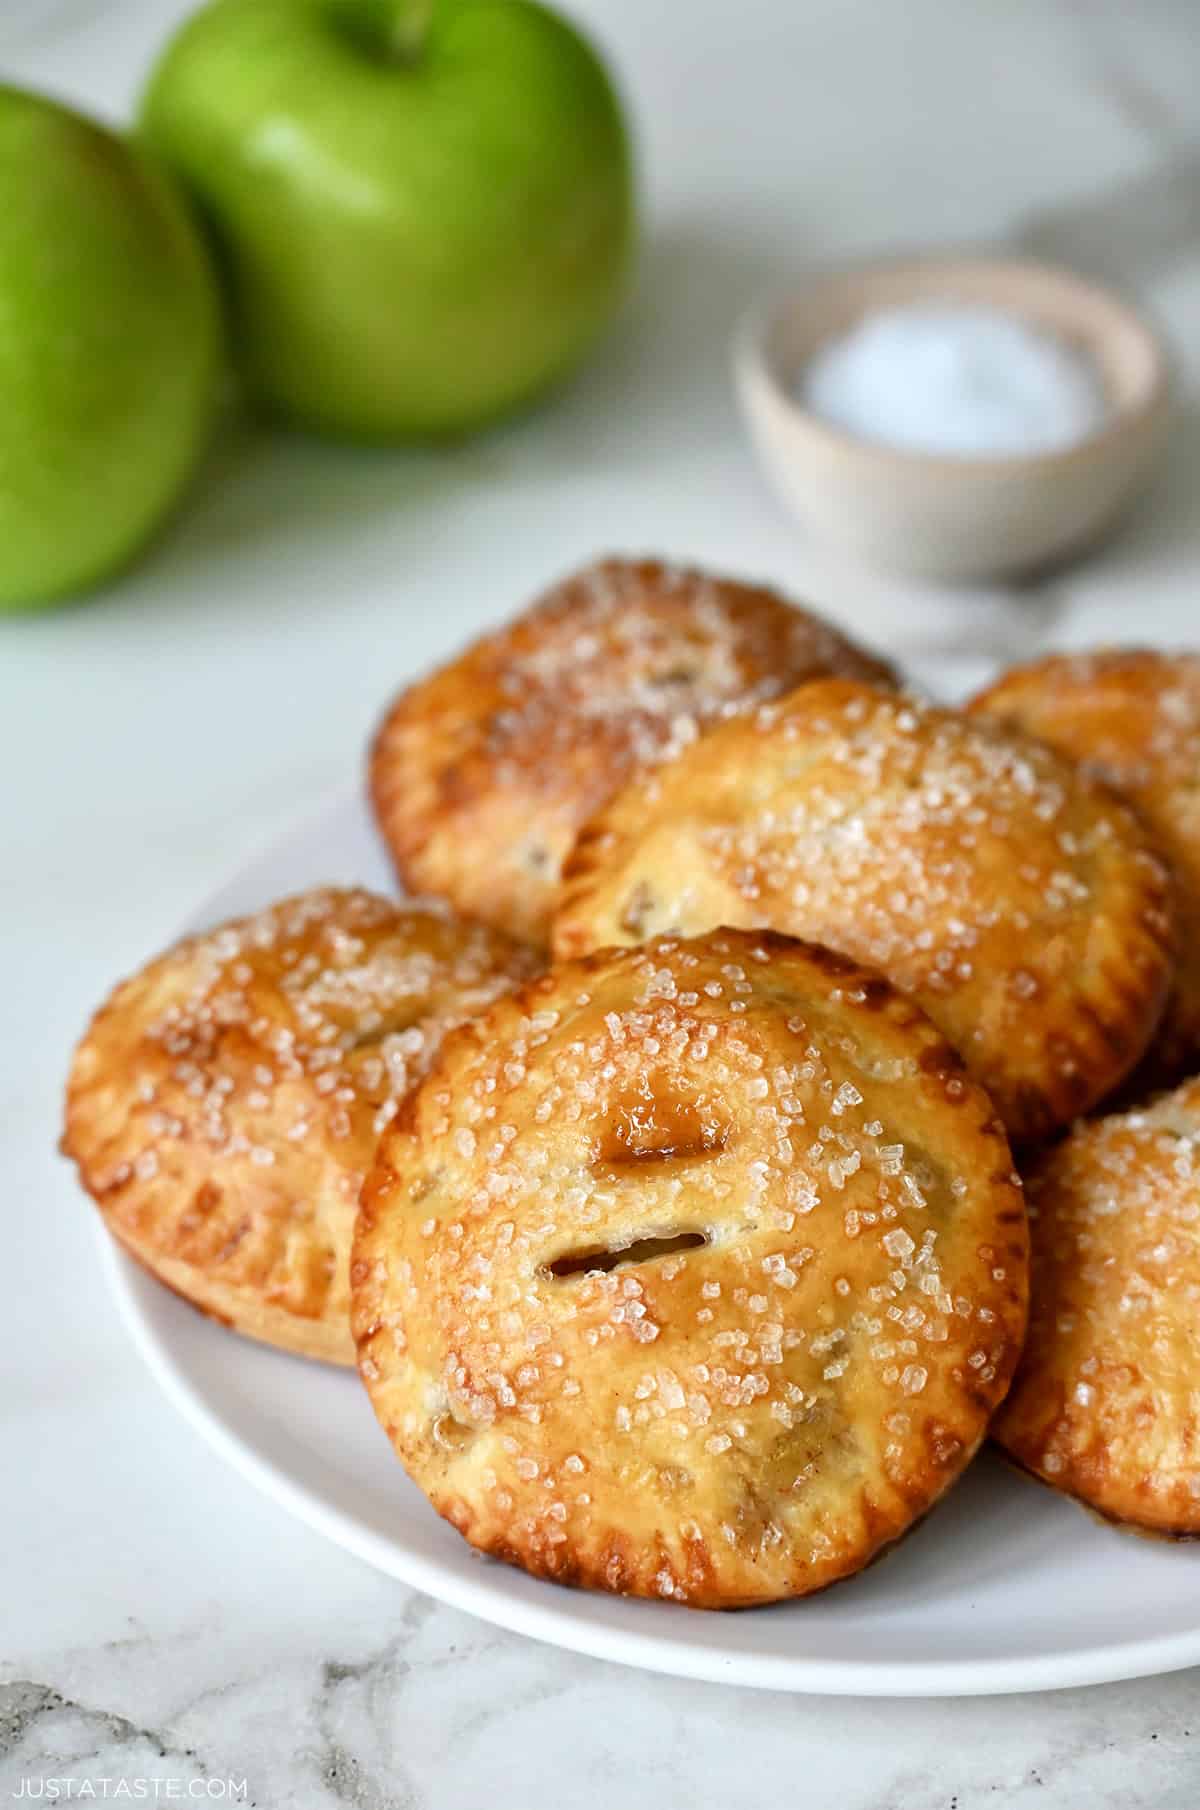
Table of Contents
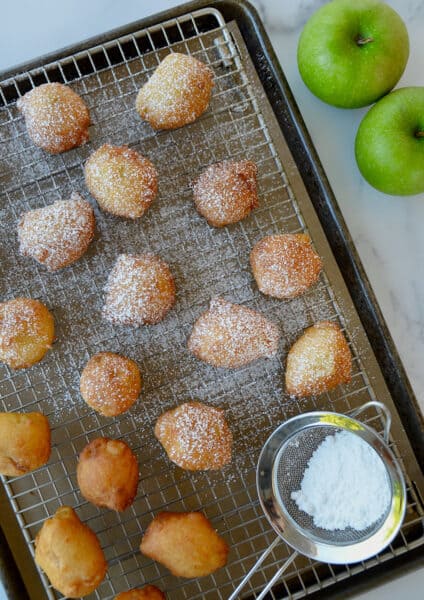
September → Apples → Caramel Apples → Salted Caramel → Ice Cream → Pie → I Hate Sharing Dessert → Salted Caramel Apple Hand Pies.
And there you have it—a glimpse into the thought process behind this hand pies recipe. The critical link in the above chain is “I Hate Sharing Dessert,” which is what inspired me to transform a pie for 10 people into 10 personal pies. While sharing may be caring, it also happens to be impairing … to satisfying my sweet tooth.
These apple hand pies can be as rustic or refined as you desire. No cookie cutter? No problem! Use a sharp knife or glass to cut out precise (or not-so-precise) circles, squares, triangles or any other shape that suits your fancy.
A pinch of sea salt lends a savory balance to these handheld treats that ooze fresh fruit flavor and silky smooth caramel. It’s a dynamic dessert duo, and it’s all wrapped up in a finger-friendly package. No forks, no plates, no sharing required!
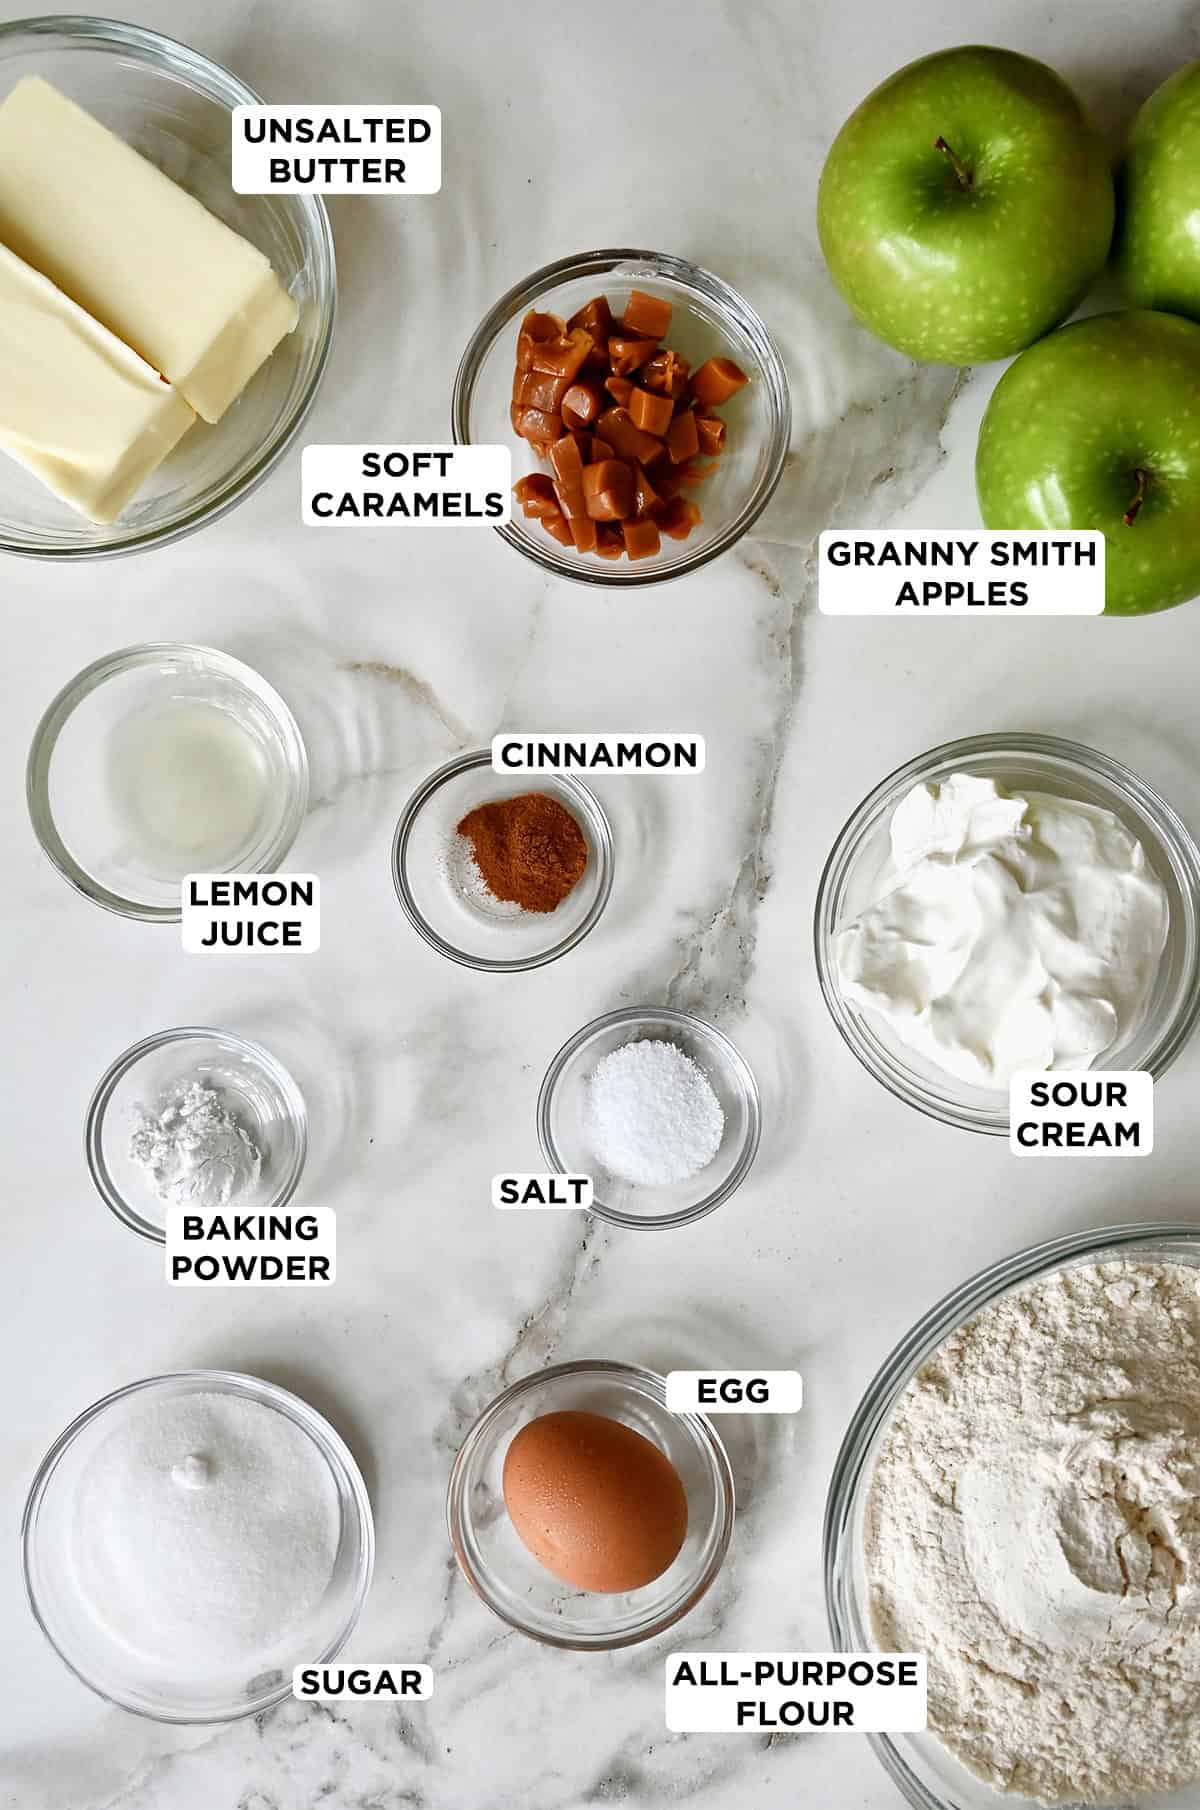
- Pie crust: Made with flour, salt, baking powder, butter and sour cream. I’ve detailed exactly how to make this homemade pie dough with step-by-step photos below, plus all my tips for success. Want to save time in the kitchen? You can absolutely use store-bought pie dough for this recipe!
- Apples: I prefer Granny Smith apples for their tartness but use your favorite variety. Honeycrisp apples are another one of my favorite kinds to use in this filling.
- Lemon juice: Adds brightness and prevents the apples from browning.
- Cinnamon and sugar: Adjust to your taste! Swap granulated sugar for brown sugar if you want an even richer caramel flavor.
- All-purpose flour: Helps thicken the filling as it bakes to prevent it from getting too runny.
- Soft caramels: Chopped caramel candies melt into a gooey, delicious center. I like using Werther’s Soft Caramels, but any brand will work.
- Large flake sea salt: A pinch of sea salt adds that irresistible sweet-salty contrast. My go-to is Maldon Salt, which you can find in most supermarkets.
See the recipe card for full information on ingredients and quantities.
Best Homemade Pie Dough
The homemade hand pie dough enveloping this mix of tart apples and sweet, salted caramel is part puff pastry, part pie dough. So while there’s just enough butter to form flaky layers of pastry, there’s also a bit of sour cream to guarantee moisture.
Best of all, the recipe yields a puff pastry-like equivalent sans the hours of beating, folding and rolling required of the real deal.
How to Make Pie Dough
- Whisk together the dry ingredients. In a large bowl, whisk together the flour, salt and baking powder.
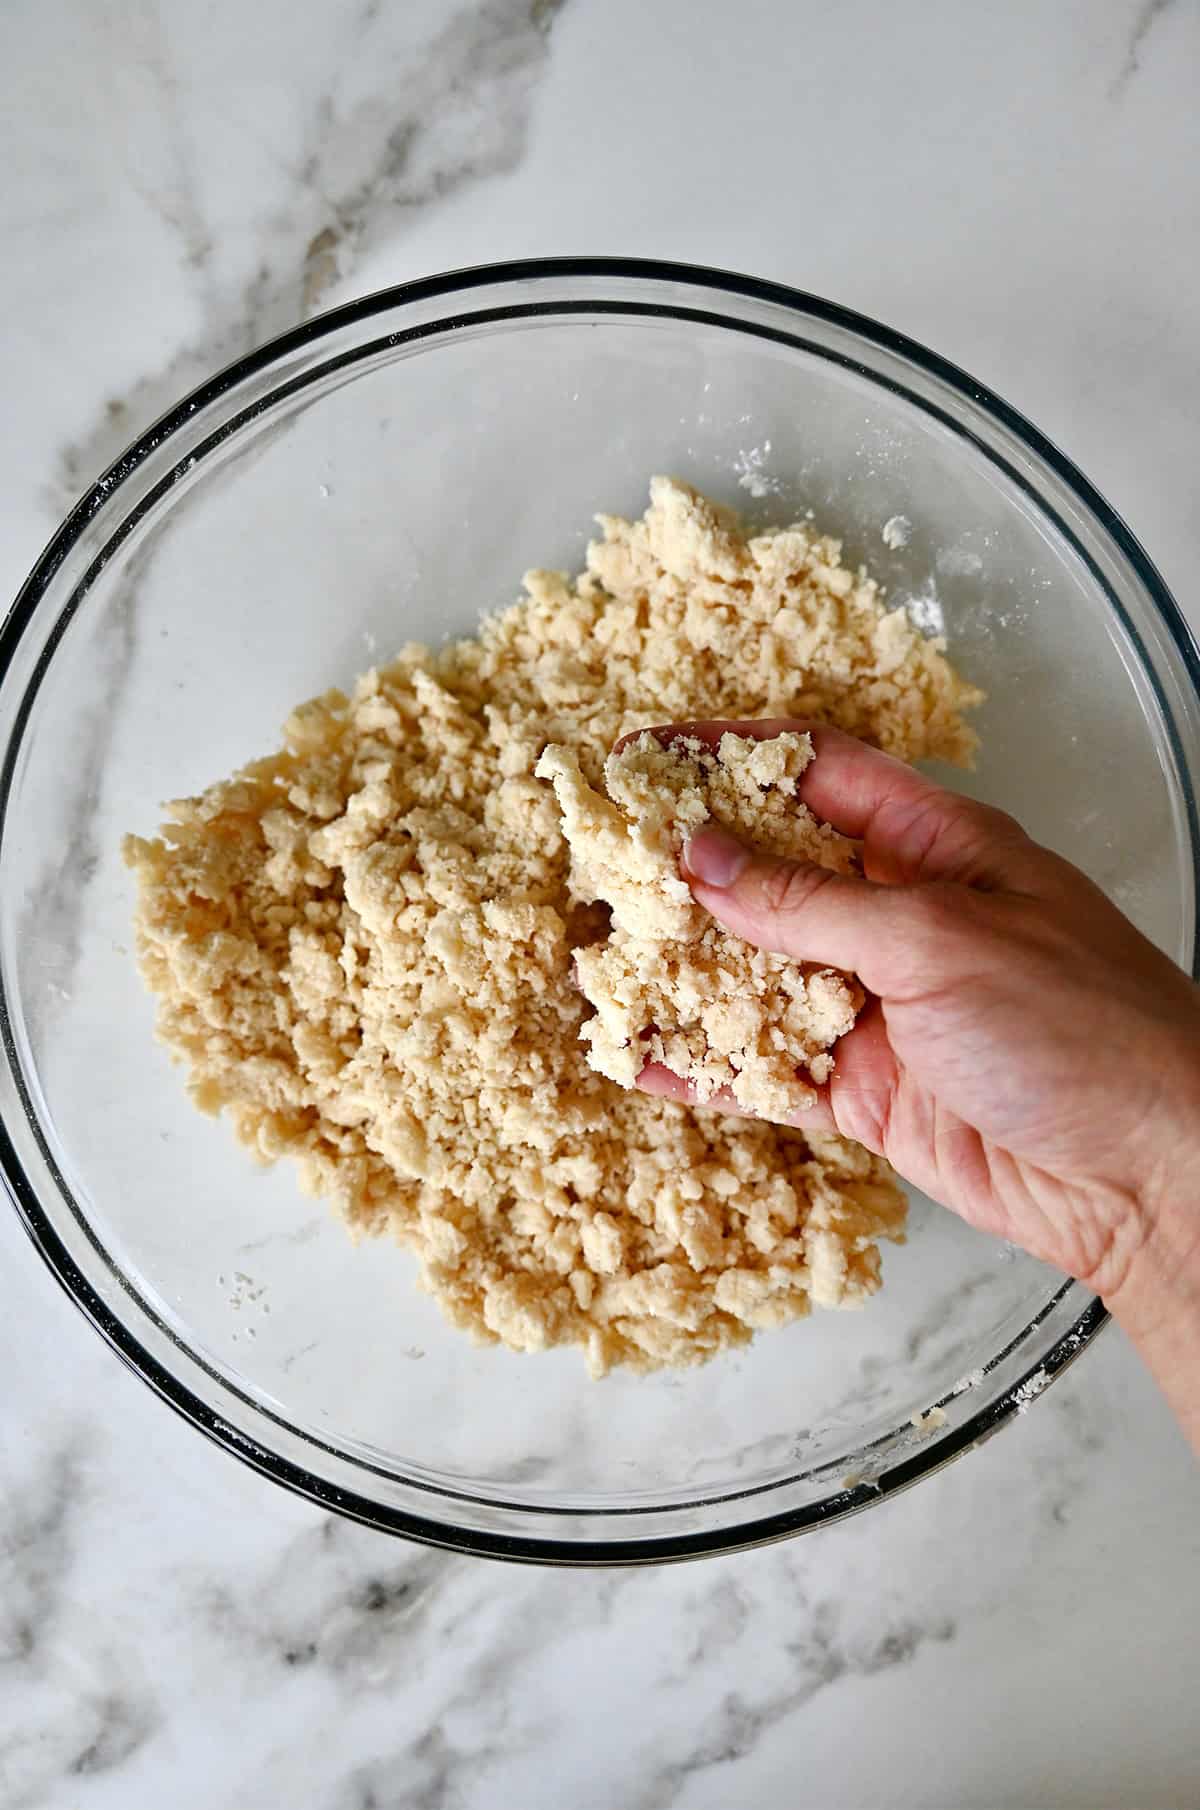
- Add the butter. Add the cubed butter to the flour mixture and use your fingers (or a pastry cutter) to cut it into the flour. You want it to resemble wet sand with some small pea-sized pieces of butter throughout.
- Stir in the sour cream. This will make the dough very wet but don’t worry, this is exactly what you want for a moist, tender crust.
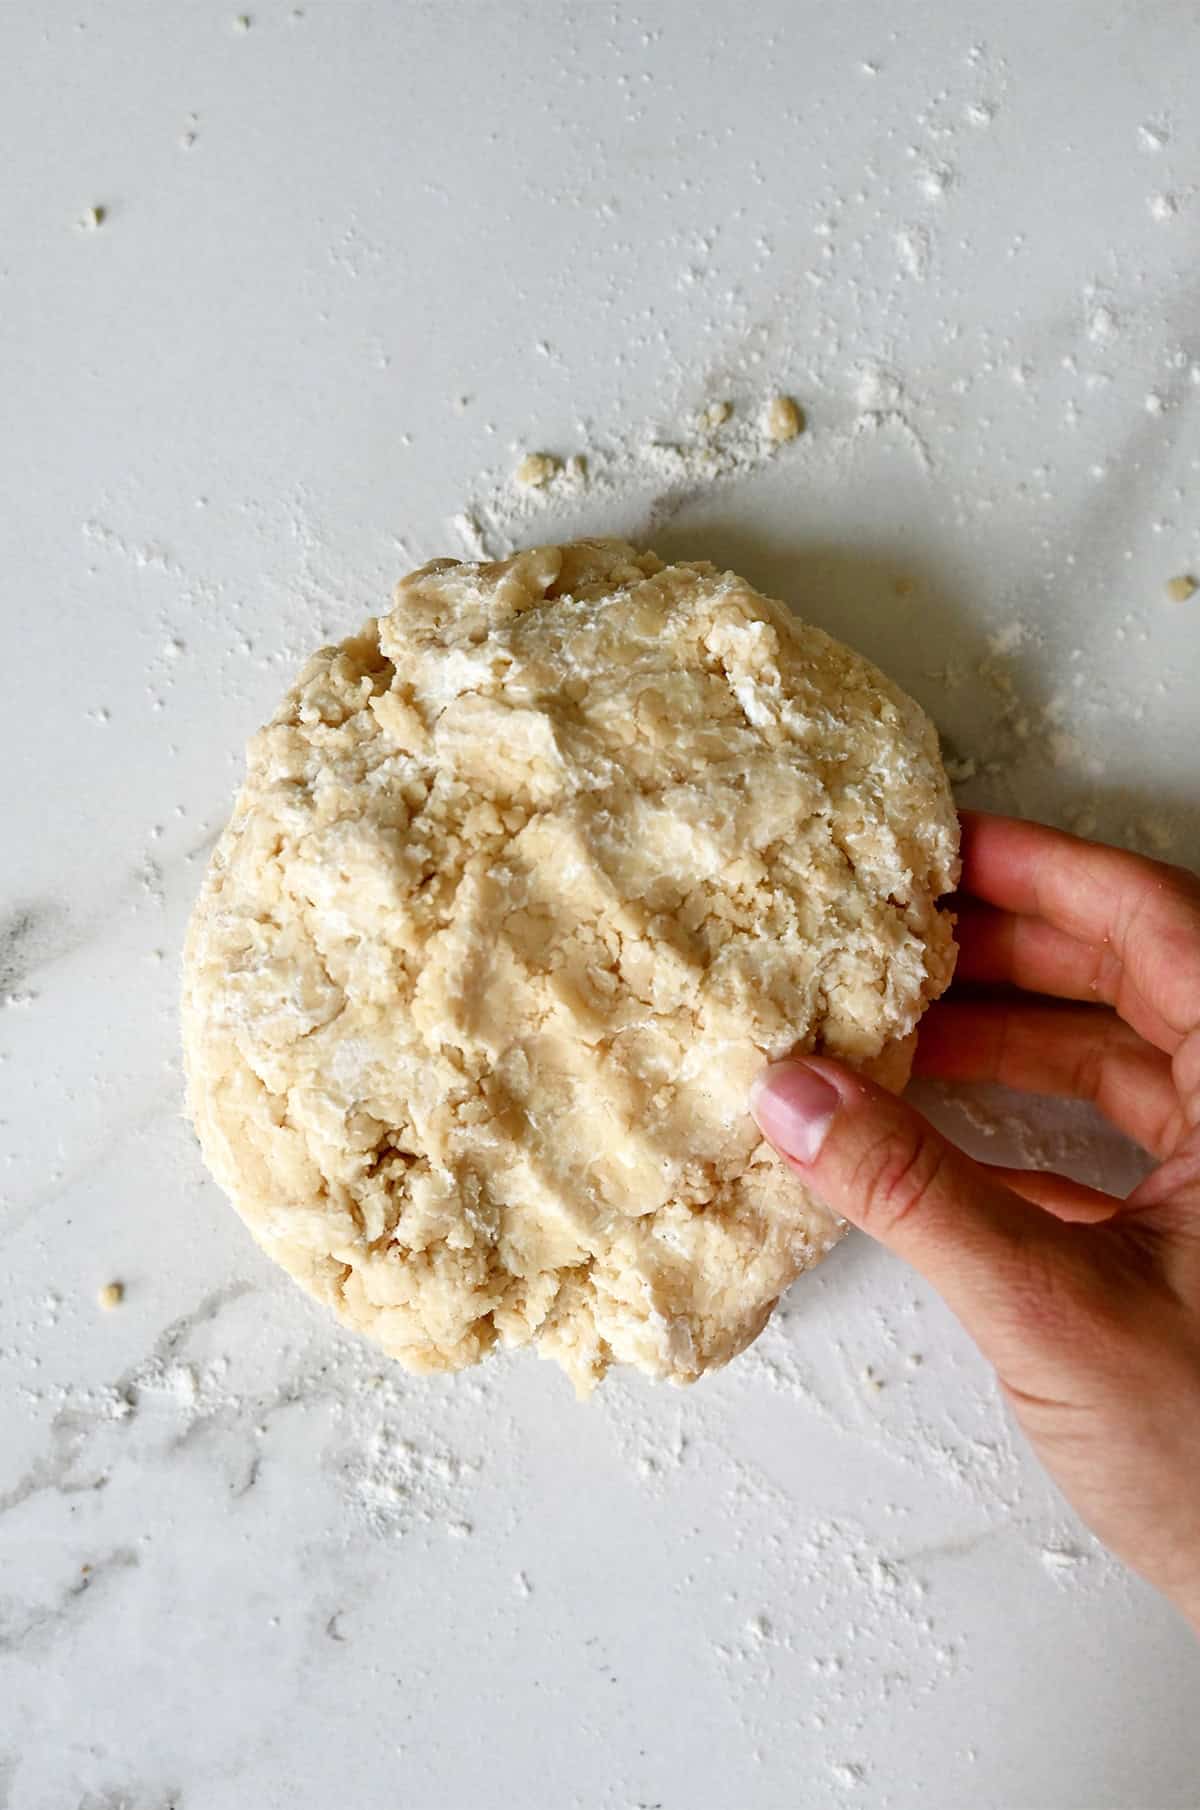
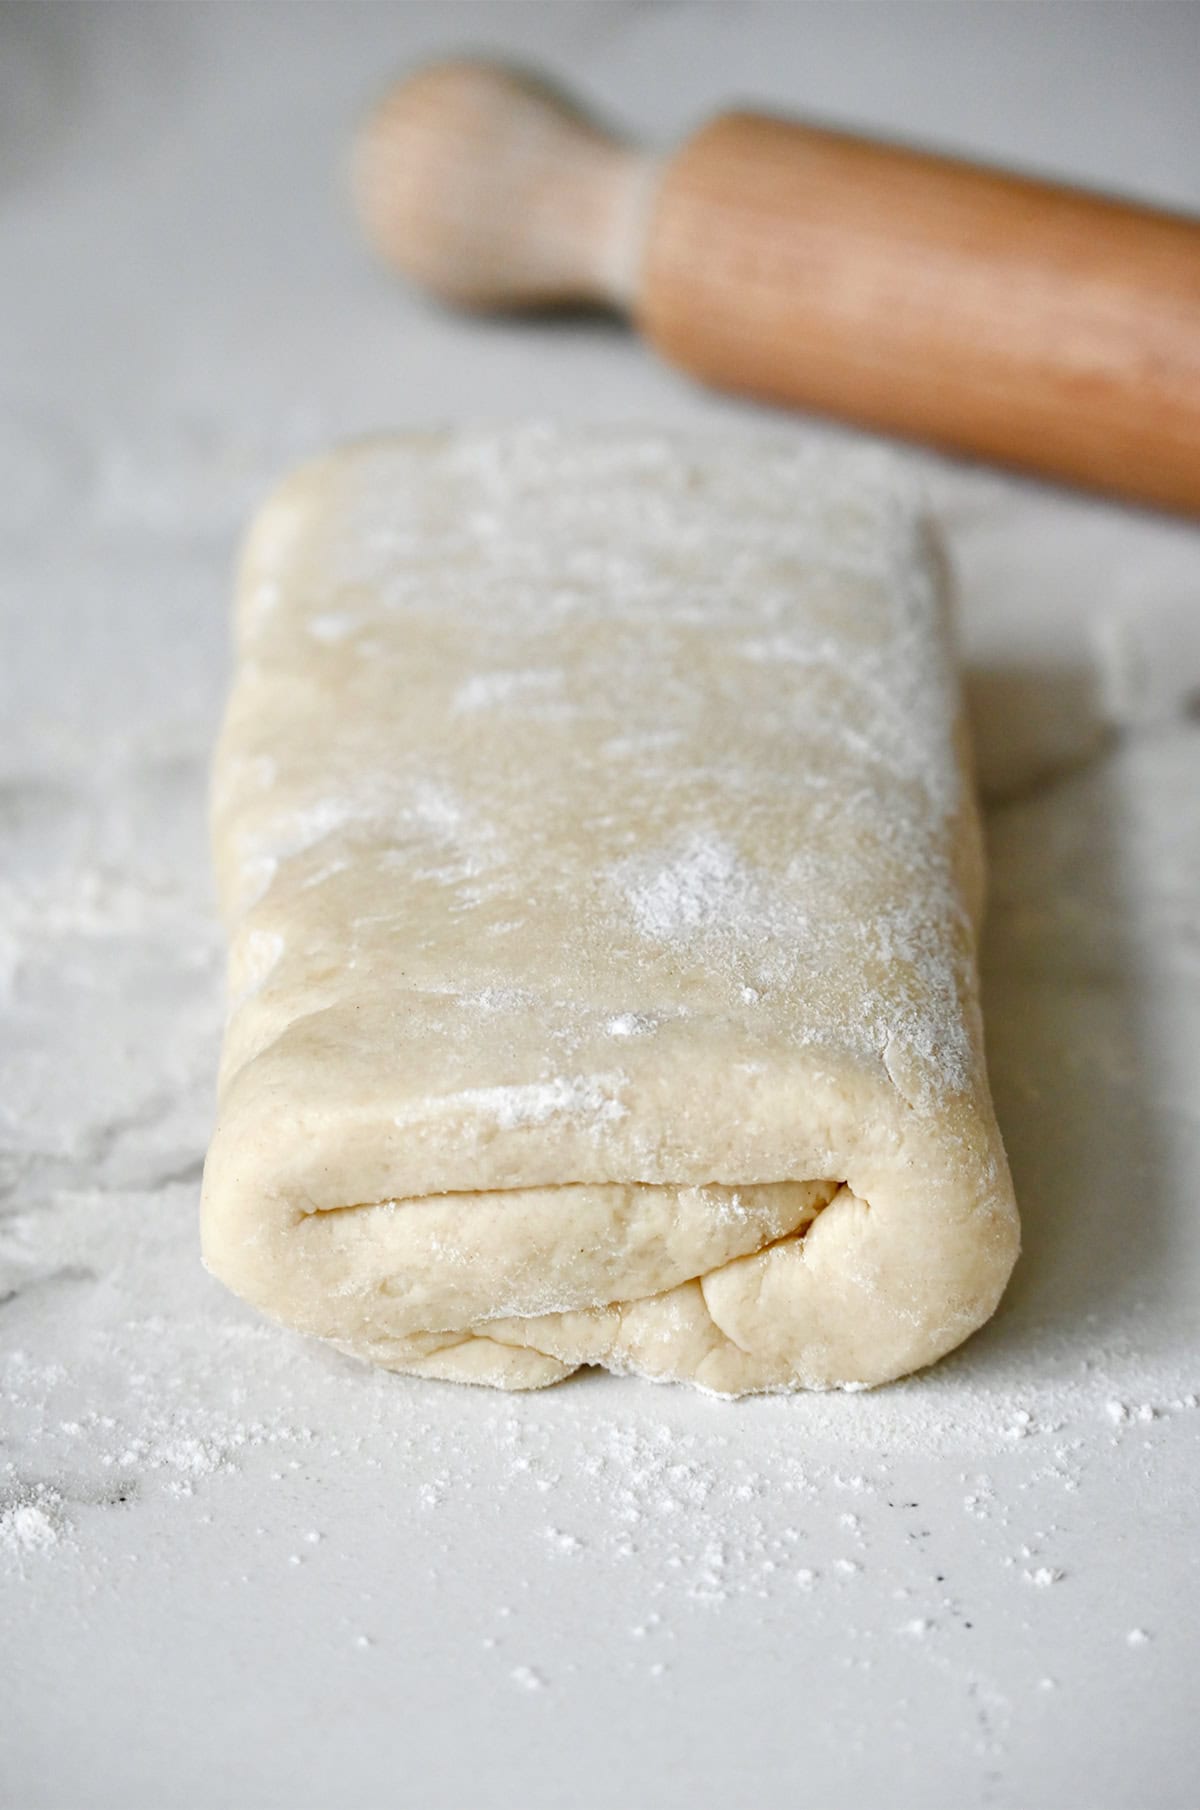
- Shape the dough. Turn the shaggy dough onto a well-floured surface and gently knead it a few times until it comes together. Roll the dough into a rough rectangle, then fold it into thirds like a letter.
- Roll and fold again. Rotate the dough 90 degrees, roll it out into another rectangle, and fold it again into thirds. Wrap it tightly in plastic wrap and refrigerate for at least 30 minutes.

Tips for Perfect Pie Crust
- Use cold butter and sour cream. Keeping the ingredients cold ensures that the butter doesn’t melt before the dough hits the oven, giving you those beautiful flaky layers.
- Specks of butter are a good thing! Those pockets of butter melt during baking, creating extra flaky, buttery layers in your pie crust.
- Don’t overwork the dough. The less you handle the dough, the more tender it will be. Stop kneading as soon as it comes together.
- Chill the dough. After forming the dough, chill it for at least 30 minutes to make it easier to roll and to help the crust hold its shape while baking.
Easy Apple Pie Filling
These apple hand pies feature a simple apple pie filling, combining flavors of classic apple pie with the indulgence of gooey caramel pieces. The result? A perfect balance of sweet, tart and rich flavors in every bite. Best of all, there’s no need to cook the filling on the stovetop—just spoon it right onto your pie dough and bake!
My #1 tip for this apple pie filling is to dice your apples into small pieces, about the size of a corn kernel. This is key to ensuring they become tender during the quick 15-minute bake time.
Now that we’ve outlined the perfect hand pie dough and apple pie filling, let’s dive into how to assemble these mini pies:
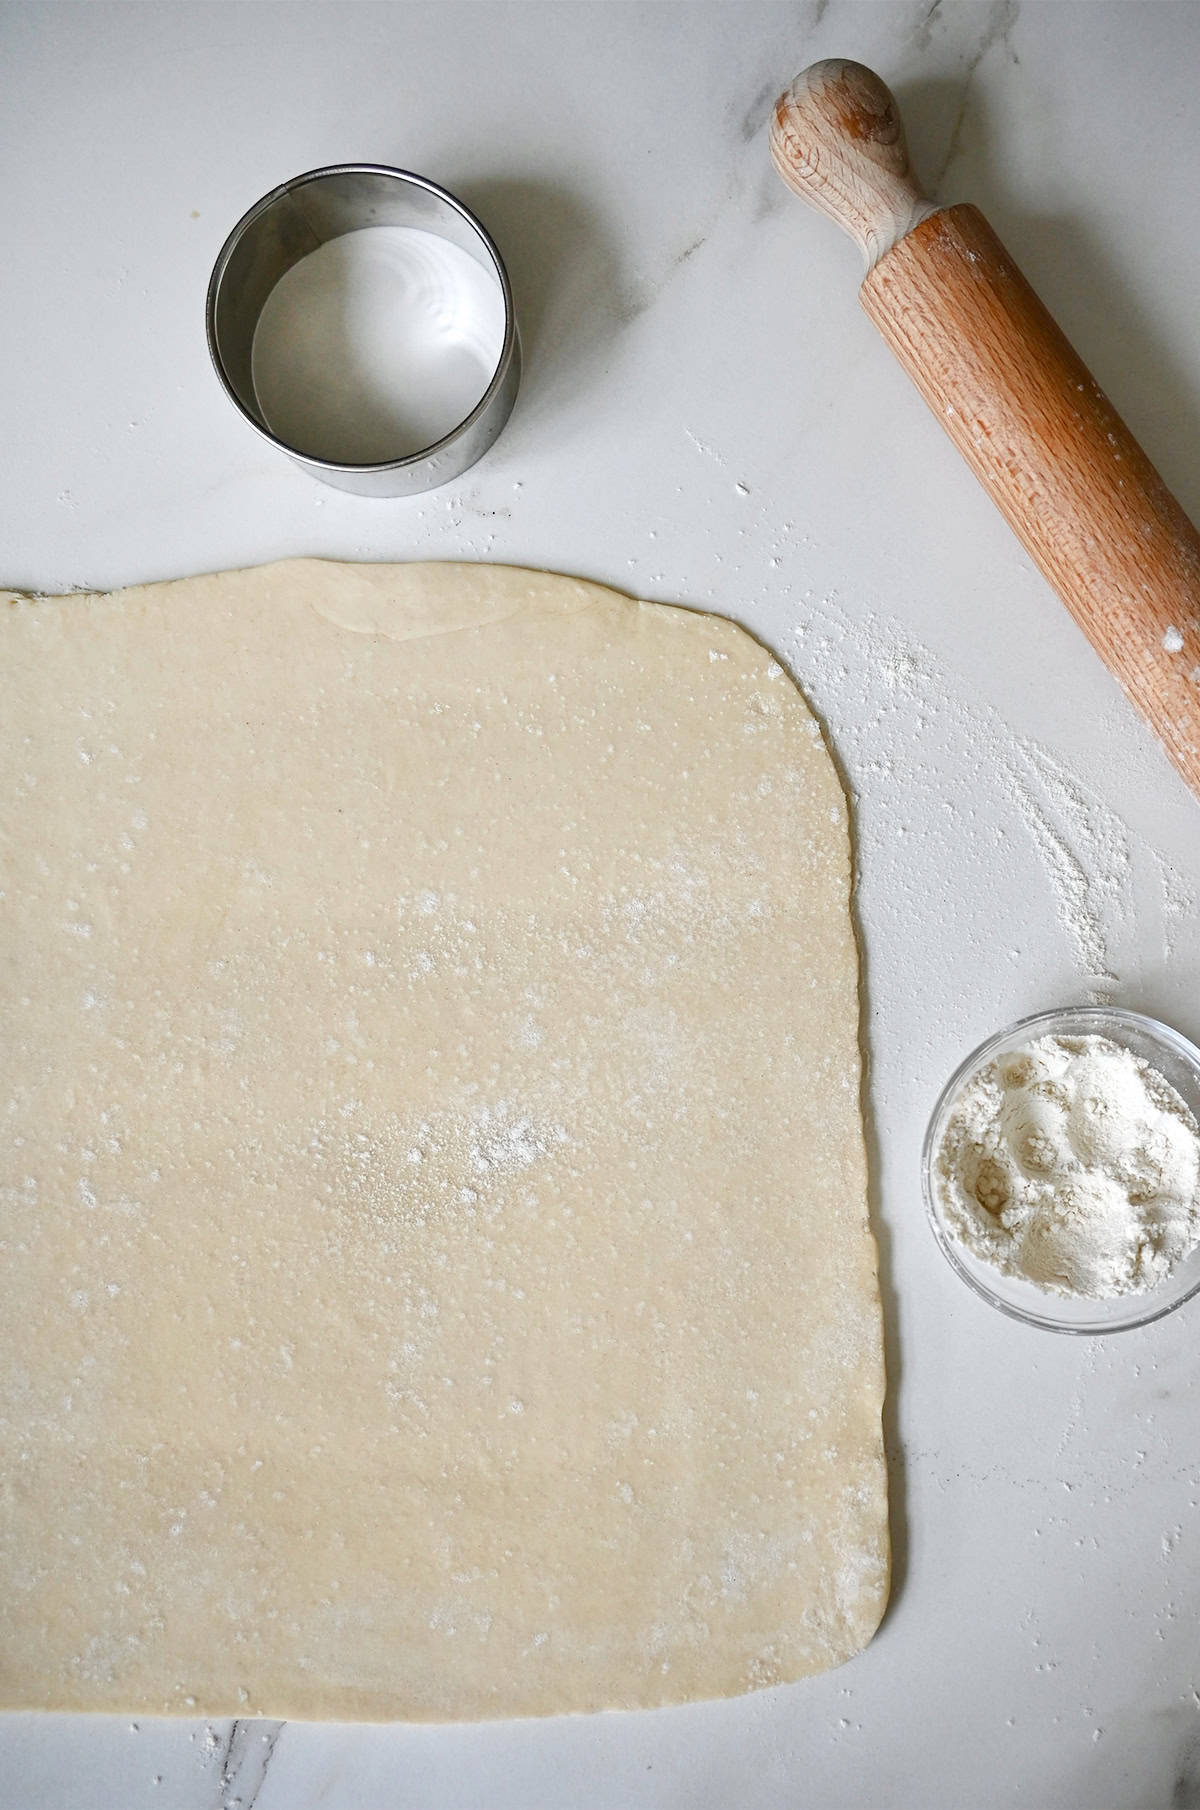
- Roll out the dough. Remove the dough from the refrigerator and unfold it onto a well-floured surface, rolling it out to a 14×14-inch square.
Pro Tip: If the dough is too firm to work with after refrigerating, allow it to sit at room temperature for 10 minutes before cutting out the circular shapes.
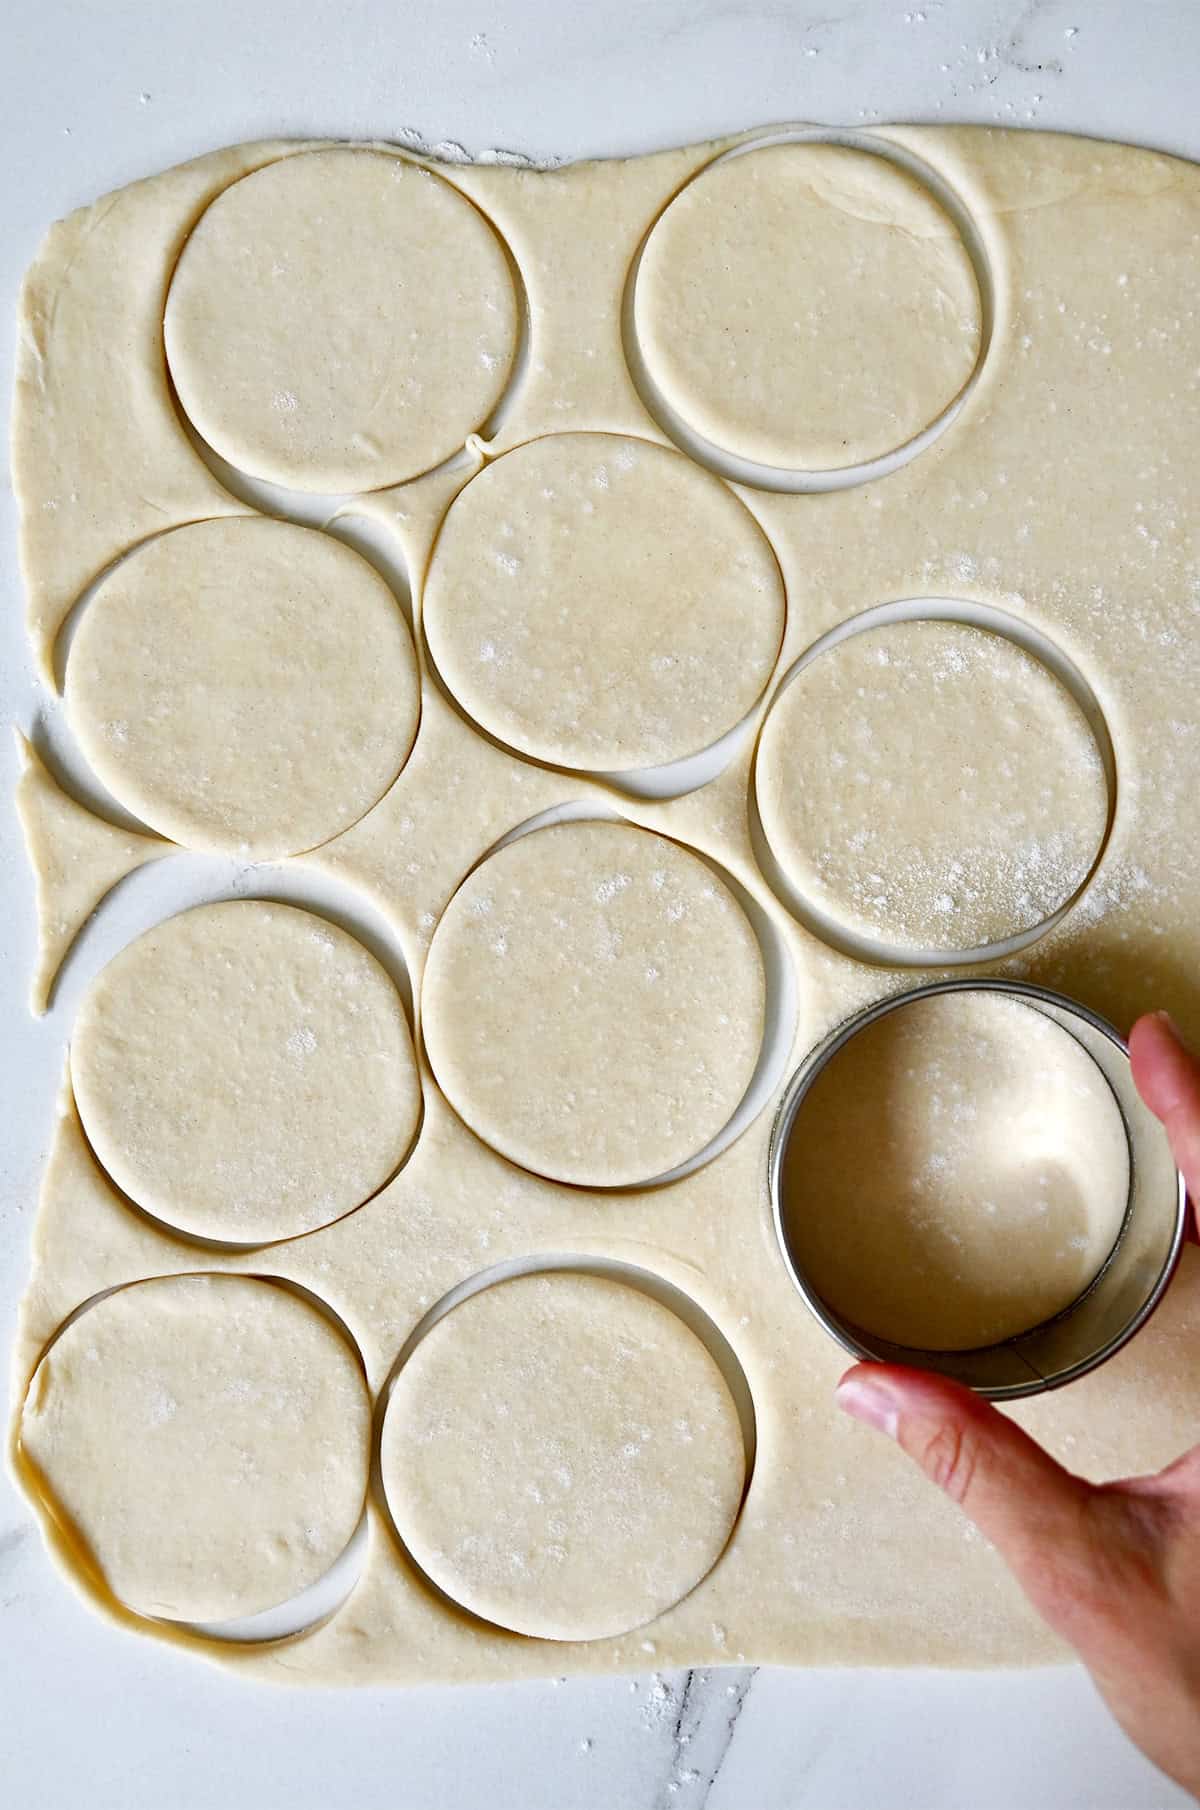
- Cut out circles. Using a 3-inch circular cookie cutter or cup, cut out as many circles as possible. Re-roll the scraps and continue cutting until you have an even number of circles. You should have approximately 20 circles.
- Fill the pies. Place six of the dough circles on a parchment-lined baking sheet. Spoon a small amount of the apple filling into the center of each circle, leaving a border around the edges. Top with a few chopped caramels and a pinch of sea salt.
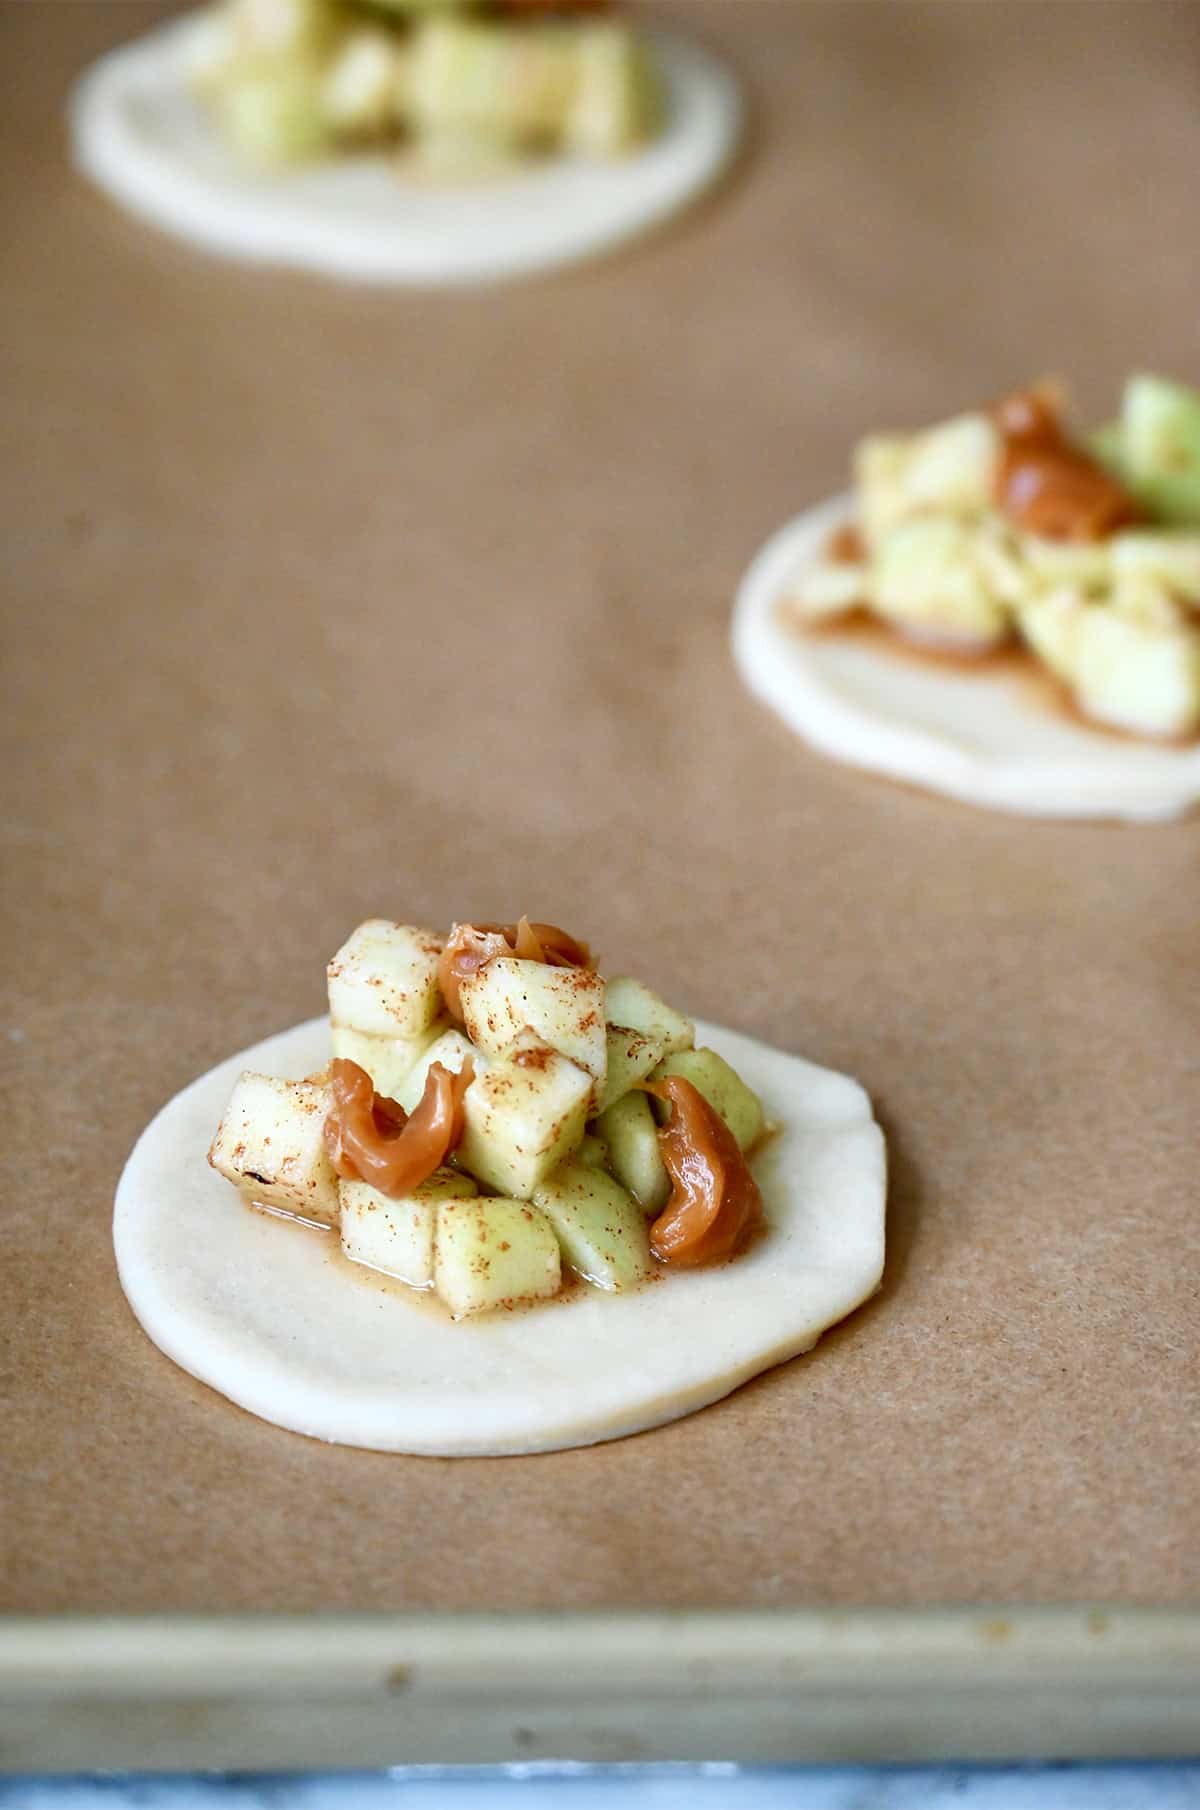
- Seal and crimp. Place a second dough circle over each filled pie. Use a fork to crimp the edges, sealing each pie tightly.
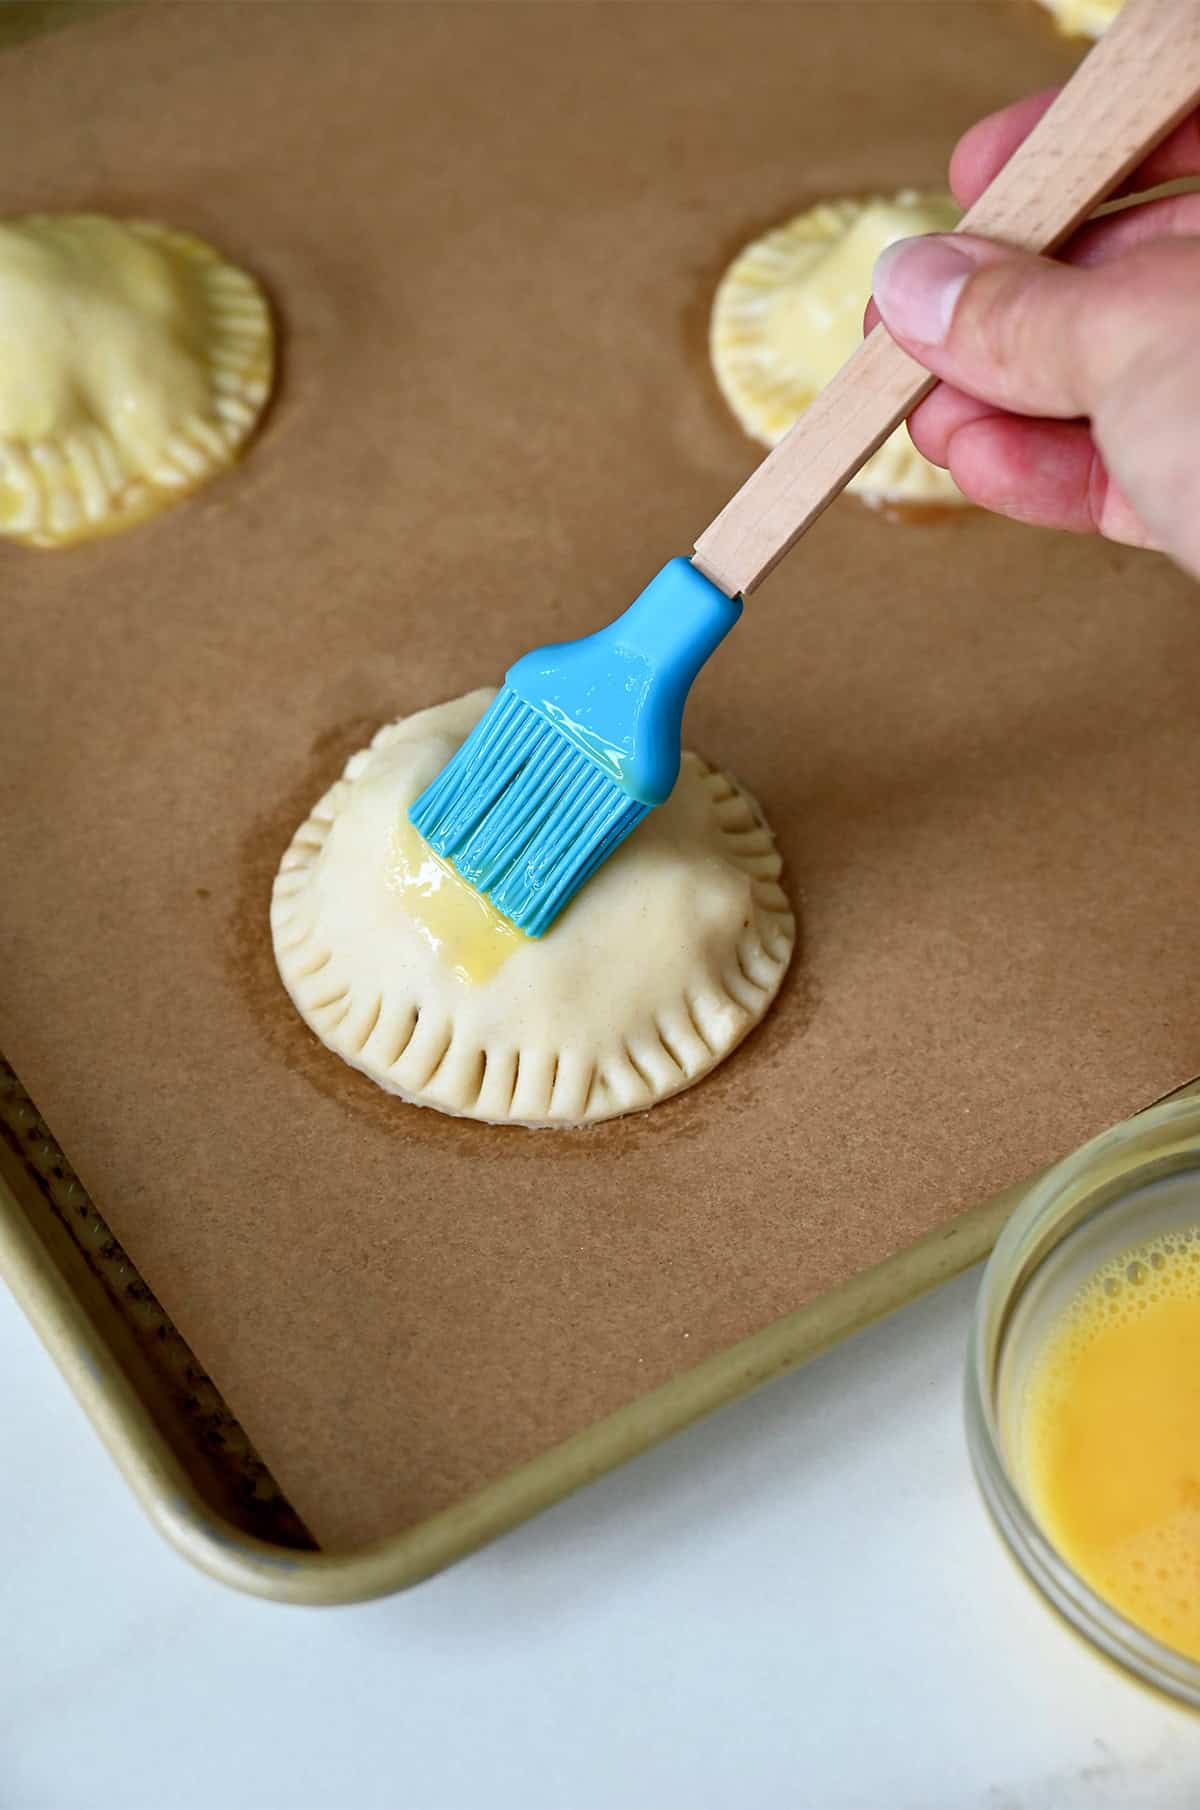
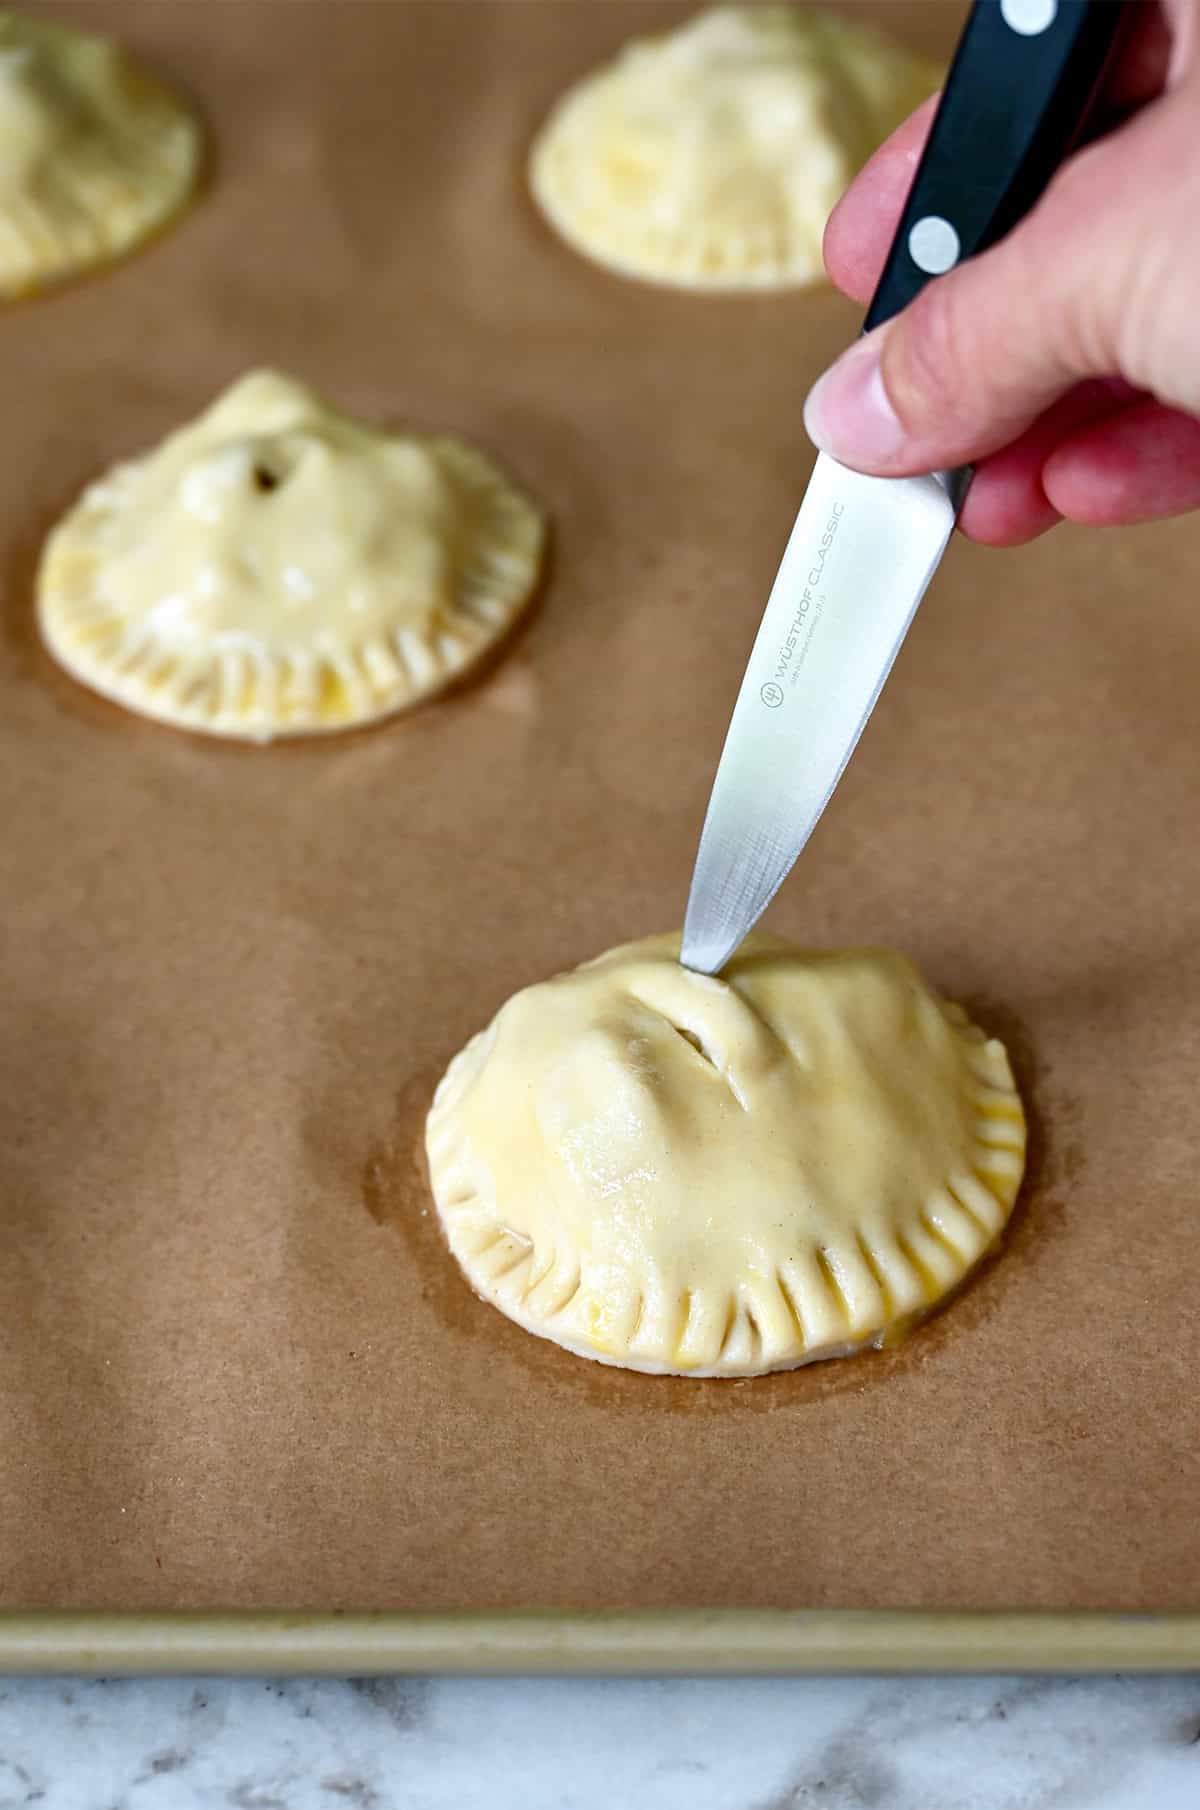
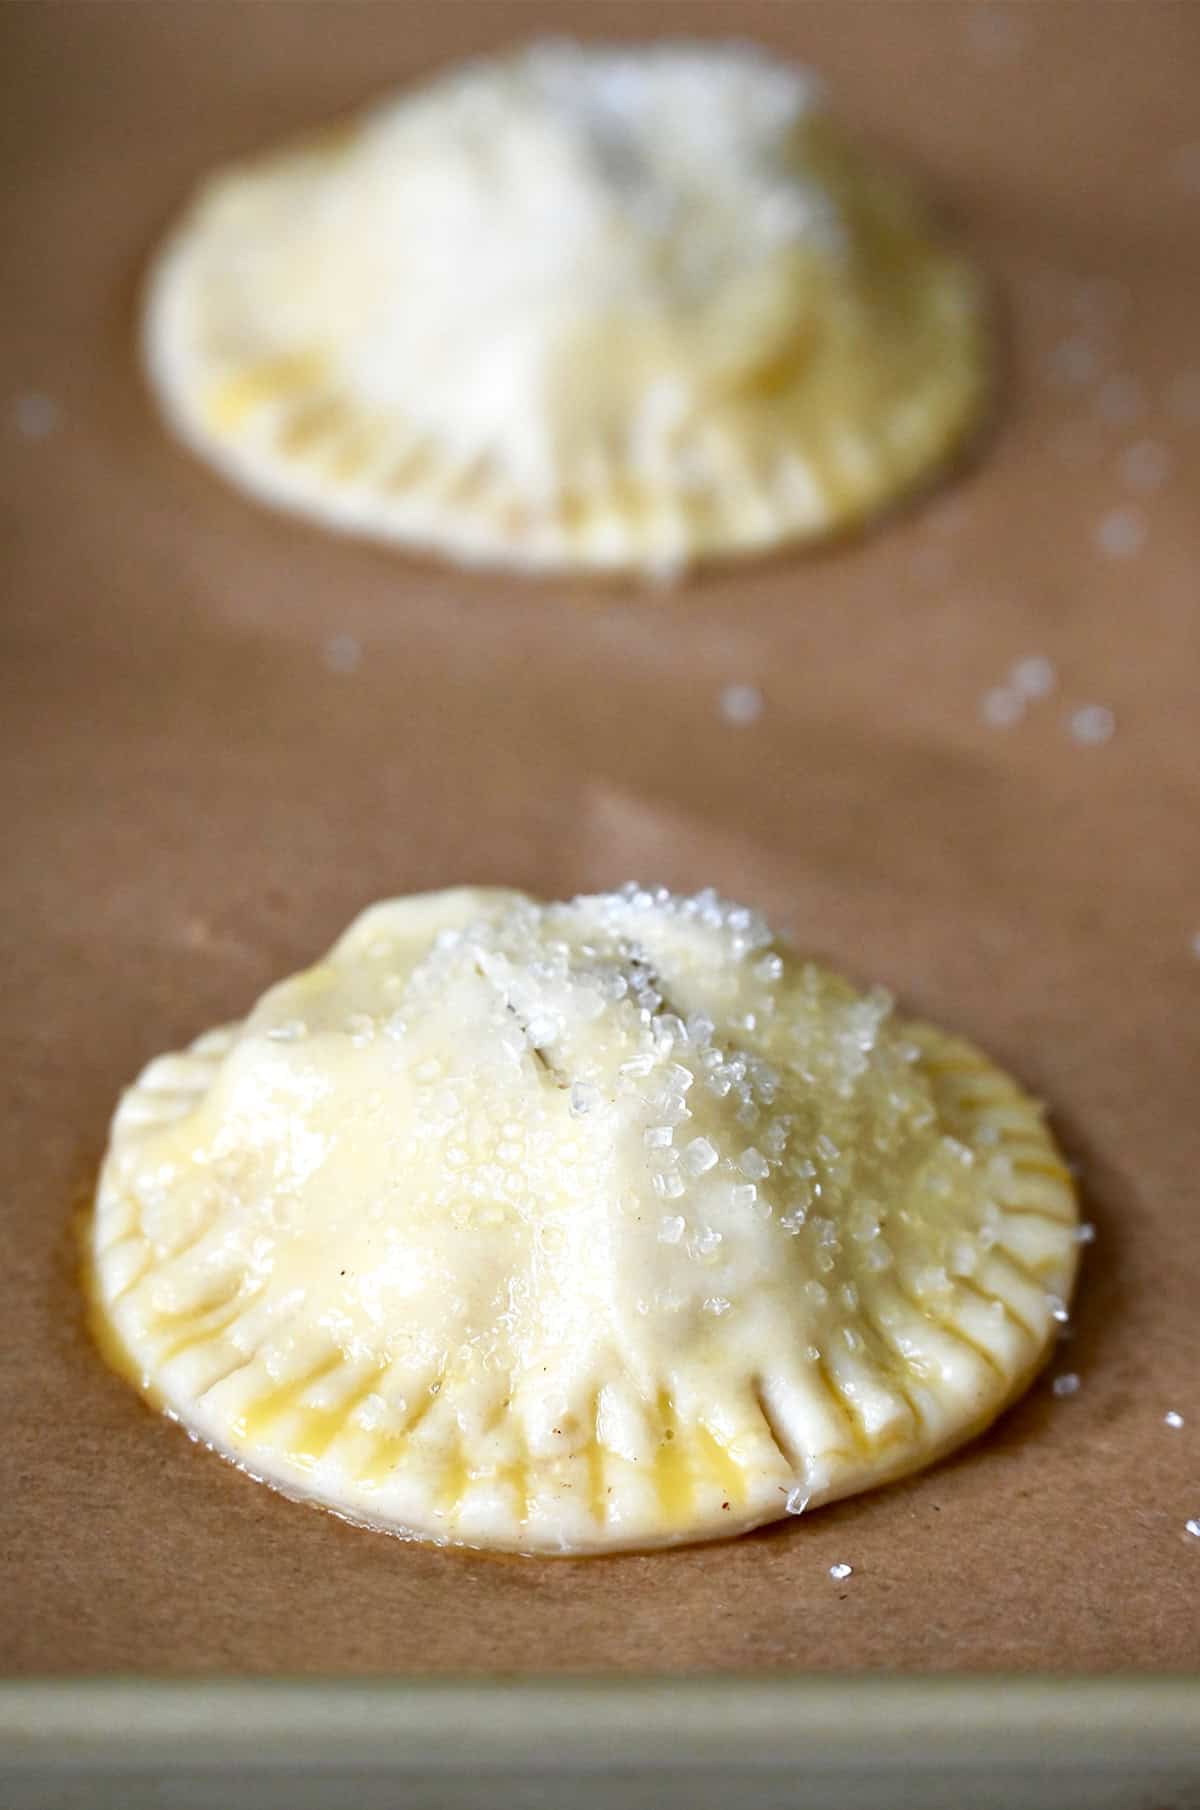
- Brush the tops with egg wash and cut two small vents into the top of each pie. If you like, sprinkle them with sanding sugar for a little sparkle.
- Bake the pies for about 15 minutes, or until they’re golden brown and the filling is bubbling. Allow the pies to rest for about 10 minutes before serving.
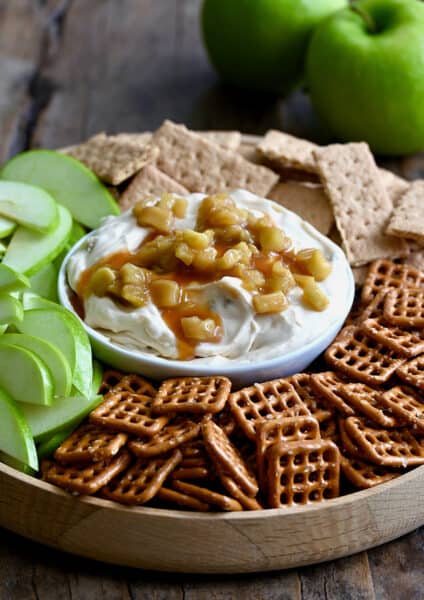
These mini caramel apple pies are delicious on their own, but if you want to up your dessert game, top them with a dollop of homemade whipped cream (which also stars sour cream as my secret ingredient!), a big ol’ scoop of your favorite ice cream or a drizzle of bourbon caramel sauce.
Make-Ahead Tips
For just the dough: You can make this pie dough in advance. After preparing it, wrap it tightly in several layers of plastic wrap and refrigerate for up to 3 days or freeze for up to 2 months. If freezing, let it thaw in the fridge overnight before using.
For filled pies: You can also assemble the salted caramel apple hand pies, then freeze them before baking. Place the unbaked pies on a baking sheet lined with parchment paper, freeze until solid and then transfer them to a freezer bag. When you’re ready to bake, you can bake them straight from the freezer; just add a few extra minutes to the baking time.
If you have any leftovers, I recommend storing them in an airtight container at room temperature for up to two days. To reheat, pop the hand pies in a 350ºF oven for 5-7 minutes or until warmed through. For a quicker option, you can reheat them in the microwave, but the crust won’t be as crisp.
Love apple desserts? Whether you’re craving something traditional or a new twist, I’ve got plenty of apple pie recipes to inspire your next baking adventure!
Ingredients
For the dough:
- 2 cups all-purpose flour
- 1/2 teaspoon salt
- 1/2 teaspoon baking powder
- 1 cup cold unsalted butter, cut into cubes
- 1/2 cup cold sour cream
For the filling:
- 2 cups small diced (peeled) Granny Smith apples (See Kelly’s Notes)
- 2 teaspoons fresh lemon juice
- 1/2 teaspoon cinnamon
- 1/4 cup sugar
- 2 teaspoons all-purpose flour
- 8 store-bought soft caramels, roughly chopped
Finishing Touches:
- Egg wash (1 egg lightly whisked with 1 Tablespoon water)
- Large flake sea salt (See Kelly’s Notes)
- Crystal sanding sugar (optional)
Instructions
Make the dough:
- Whisk together the flour, salt and baking powder in a large bowl.
- Add the cubed butter to the bowl and use your fingers to work the butter into the flour until the mixture is the consistency of wet sand.
- Stir in the sour cream (the dough will be very wet), and then turn the dough out onto a well-floured work surface.
- Knead the dough a few times until it comes together, adding more flour, 1 teaspoon at a time, if the dough is too sticky to handle. Roll the dough into an 8×10-inch rectangle and dust both sides with flour before folding it into thirds as if you were folding a letter.
- Rotate the dough 90º and roll it out again into an 8×10-inch rectangle. Fold the dough again into thirds then wrap it securely in plastic wrap and refrigerate it for at least 30 minutes while you make the filling.
Make the filling:
- In a small bowl, combine the apples, lemon juice, cinnamon, sugar and flour, stirring until thoroughly mixed. Set aside.
Assemble the pies:
- Preheat the oven to 425ºF.
- Remove the dough from the refrigerator and unfold it onto a well-floured surface, rolling it out to a 14×14-inch square. (See Kelly’s Notes.)
- Using a 3-inch circular cookie cutter or cup, cut out as many circles as possible. Re-roll the scraps and continue cutting out circles until you run out of dough, ensuring you end up with an even number of circles. (You should have approximately 20 3-inch circles.)
- Place six of the dough circles on a Silpat or parchment paper-lined cookie sheet. Spoon a small portion of the apple filling into the center of each circle, leaving enough of a border around the filling. Top the apple filling with a portion of the chopped caramels and a pinch of sea salt. Place a second dough circle atop each filled circle then use a fork to crimp the edges together, sealing each pie.
- Brush each pie with the egg wash, and using a sharp knife, cut two or three vents on the top of each pie. Sprinkle the pies with crystal sanding sugar (optional).
- Bake the pies for about 15 minutes, or until they’re golden brown.
- Remove the pies from the oven and allow them to rest for 10 minutes before serving. Repeat the filling and baking process with the remaining dough circles.
Kelly’s Notes
- The cubed apples should be no larger than the size of corn kernels to ensure they become tender during the quick 15-minute bake time
- Large flake sea salt is available in most supermarkets. My preferred brand is Maldon Salt.
- If the dough is too firm to work with after refrigerating, allow it to sit at room temperature for 10 minutes before cutting out the circular shapes.
- If the sour cream in the dough makes it too sticky at any point in the rolling out process, just simply sprinkle a pinch of flour atop the wet areas and continue rolling.
- You can make this pie dough in advance. After preparing it, wrap it tightly in several layers of plastic wrap and refrigerate for up to 3 days or freeze for up to 2 months. If freezing, let it thaw in the fridge overnight before using.
- You can also assemble the salted caramel apple hand pies, then freeze them before baking. Place the unbaked pies on a baking sheet lined with parchment paper, freeze until solid and then transfer them to a freezer bag. When you’re ready to bake, you can bake them straight from the freezer; just add a few extra minutes to the baking time.
- Store leftovers in an airtight container at room temperature for up to two days. To reheat, pop the hand pies in a 350ºF oven for 5-7 minutes or until warmed through. For a quicker option, you can reheat them in the microwave, but the crust won’t be as crisp.
- ★ Did you make this recipe? Don’t forget to give it a star rating below!
Nutrition
Did you try this recipe?
Leave a comment below with your star rating!
This post may contain affiliate links.
Dough recipe adapted from King Arthur Flour.


My son’s favorite dessert
I’m so happy to hear that your son enjoys the recipe, Lisa!
Hello – How and for how long can these be stored? I am making desserts for about 170 and thought these would be a fun addition, but I really need a recipe to make ahead!
Thanks,
Hi Renee – I’ve never made these hand pies that far in advance, so I’m not sure how they would taste.
Kelly,
Your recipes always look so good! Can’t wait to start baking pies for the 4th of July. Thanks for sharing.
You are so welcome, Gayle! I’m thrilled you’ve been enjoying Just a Taste :)
You say that you can use store bought pie crust dough. But can you use store bought puff pastry dough?
That would make these more of an apple turnover, which I have a great recipe for! You can search for “apple turnovers” in the search bar. Enjoy!
Is there somewhere on your recipe site to change to quantities of ingredients to metric? I like weighing my ingredients when baking and find I really get better results in my baked goods.
Hi Diane! I don’t provide metric conversions for my recipes, as I cannot guarantee they would be 100% accurate without being tested. However, you are welcome to use an online converter. :)
So easy to make and so delicious. The whole family loved them
I’m so happy to read this, Kita!
I love these! I usually make them with store-bought caramels, but I currently have home-made caramel sauce. Do you think it will work if I use that?
Hi Loris – It’d most likely be too runny, especially after baking the pies.
I am looking forward to making these tomorrow. If I had spare homemade caramel sauce, I would probably just omit the caramel in the pies and serve them topped with the homemade sauce. Yum.
YUM! I hope you enjoy the recipe, Jennifer!
The flaky-ness and the layering of the pastry is fantastic in this recipe! So surprised! I also made half-moon pies instead of 2 full circles on top of each other, using a 4 inch circle. A double recipe made 33 half moons. I also used Werther’s original chewy caramels, and it did so well. I made them the night before, cooled them completely, and stored in an airtight container. They warm up in the microwave well, too! Caramel did not get too hard either.
I made a double recipe. I had a ton of apple mixture left over though, so I think I might make a pie with it. Thanks for the recipe!
You are so welcome, AC Jones! I’m thrilled you enjoyed the recipe!
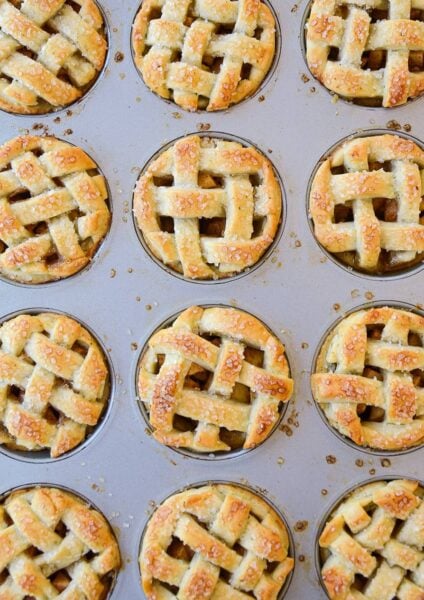
Hi! I’ve made these and absolutely love them. Now I just ran into your muffin tin mini apple pies and want to try that presentation! Can I use this recipe but bake them in the muffin tins?
Absolutely, Loris! I’m not certain what the yield would be on the crust in terms of mini pies (it depends what you do with the lattice on top), but this recipe will definitely work in muffin tins. Enjoy!
Amazing I love it so much.
I’m so glad you enjoyed the recipe, Charlotte!
I love the dough its different from reg pie crust dough. Overall easy to make
I’m so glad you enjoyed the recipe, Kathy!
I loved making them for my family.
I’m so happy to read this, Charlotte!
Can you make these ahead (unbaked)before and bake before serving? Or bake ahead and reward? I’d like to make for thanksgiving and serve warm.
Absolutely! You can make them in the morning then bake right before serving. I worry if you make them and fully assemble them any sooner, the apple filling may start to release liquid and the crust will get soggy.
Very delicious fall dessert very easy to make.
I’m so glad you enjoyed the recipe!
wish there was a print option
Hi Angela – There is a purple print button on the recipe card above. :)
My favorite Apple pie recipe. I always make it. The caramel adds a great taste
So glad you are enjoying it, Sofie!
This recipe is AMAZING! I made them as a Saturday afternoon challenge a few weeks ago and they were an instant hit. I am getting ready to make them again for Thanksgiving. Thank you for sharing such a great and easy to share treat!
You are so welcome, Julia! I’m thrilled you enjoyed the recipe!
Can the dough be made by pulsing in the food processor?
Hi Becky – I haven’t tried that, but I’m concerned it might be a bit wet because of the sour cream. You could also pulse it up through adding the butter and then stir in the sour cream by hand.
Have you ever tried freezing this dough? I’ve made the hand pies a few times (SO good!) and have used the dough for pull size pies. Always a winner among guests. With Thanksgiving coming I’ll, I’d love to make the dough a week ahead and freeze.
Hi Sydney! The dough should freeze well as long as you seal it securely with several layers of plastic wrap. I’m so thrilled you’ve been enjoying the recipe!