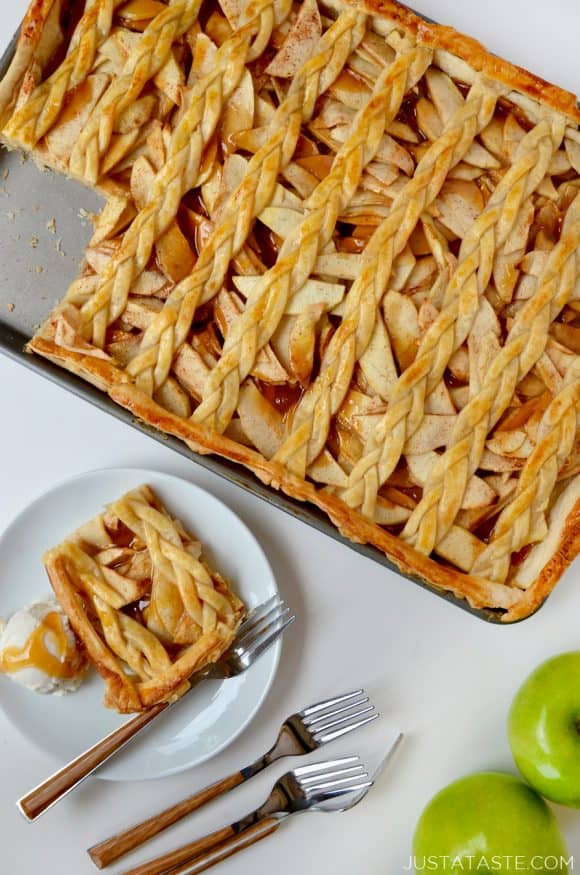
This Caramel Apple Slab Pie is an impressive bakery-style dessert for a crowd. It’s assembled and baked in under an hour using a sheet pan and store-bought pie crust. Gooey and delicious, this pastry has all of the flavors of a caramel apple combined with a traditional apple pie.
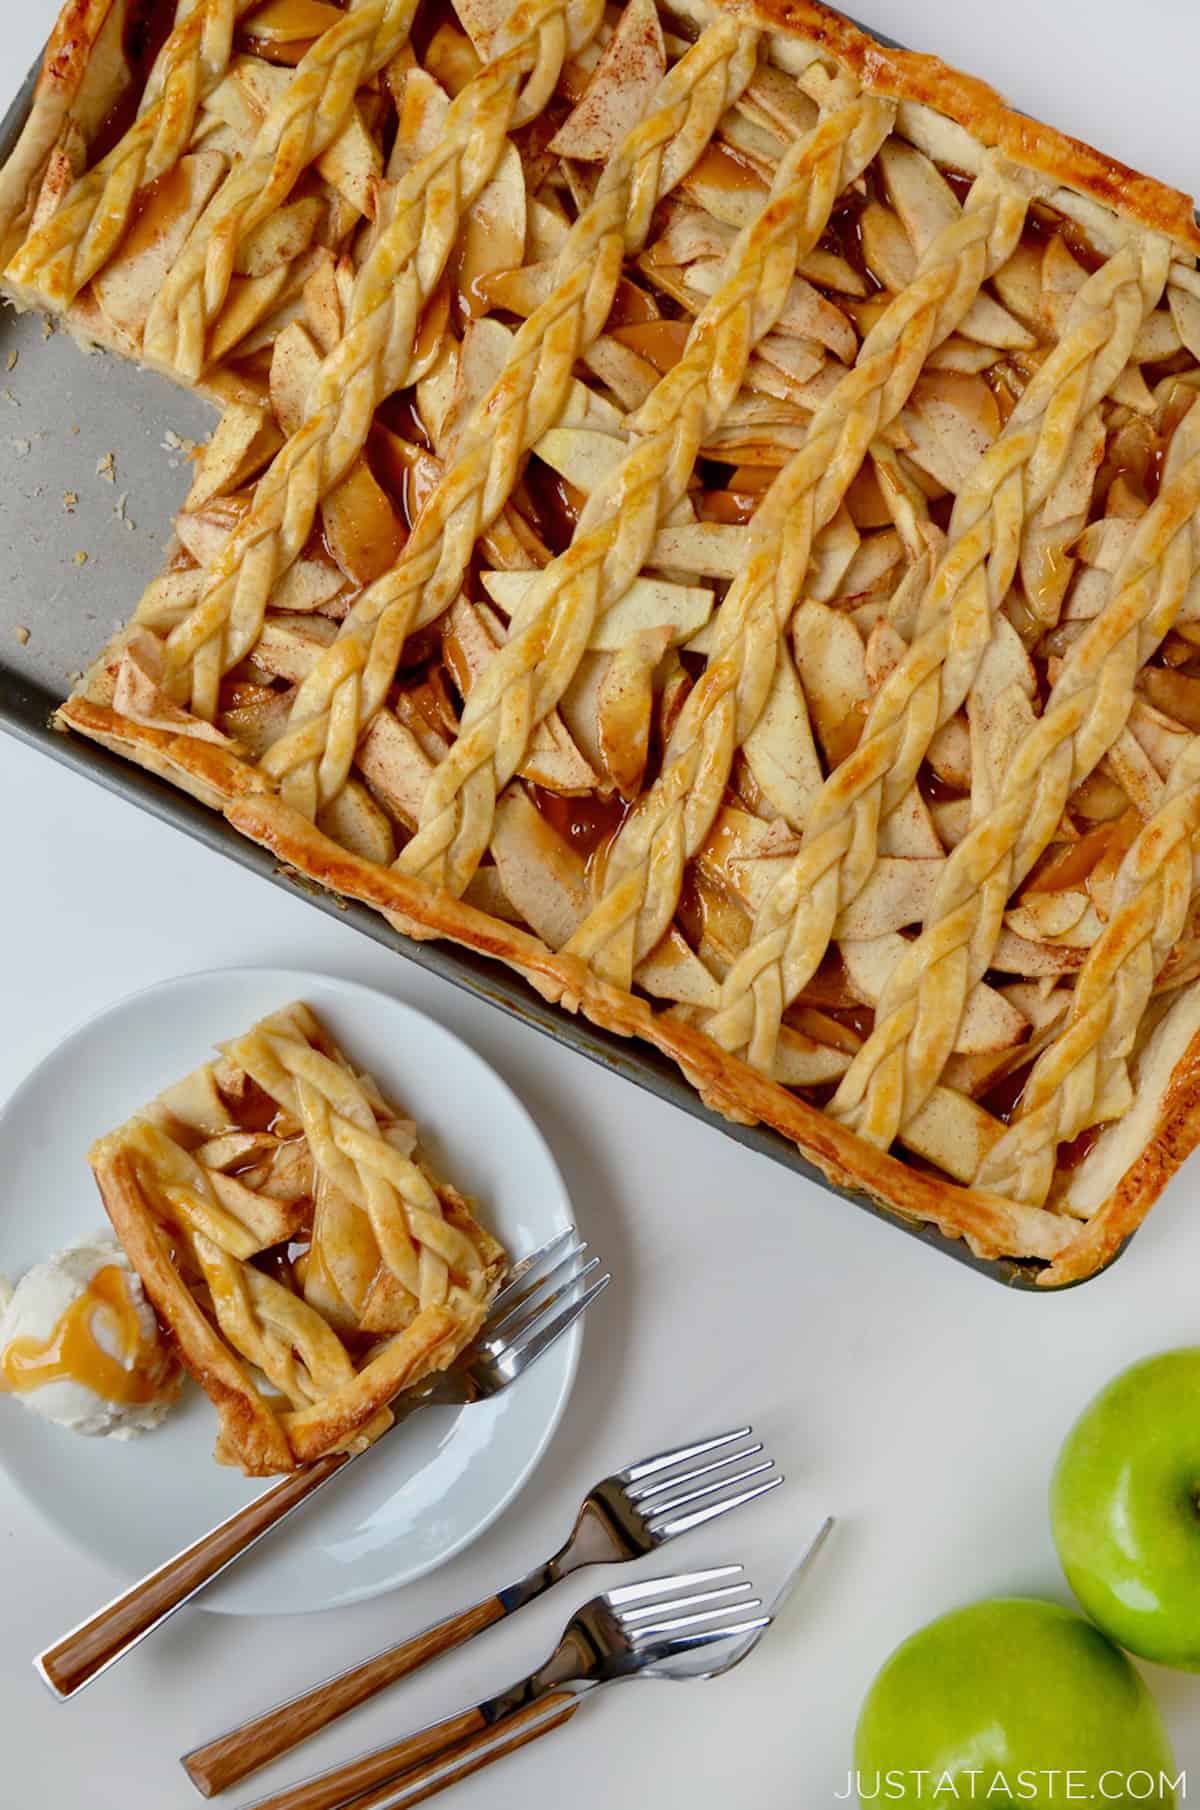
Table of Contents
Out of all the pie recipes, apple pie may one of the most beloved flavors. But what if I told you this apple slab pie was combined with the delicious flavors of caramel apples? I must say it’s pretty amazing, the warm cinnamon sugar flavors of a classic apple filling are made even more decadent with chewy caramel candies.
Now I totally understand making an apple pie from scratch can be intimidating, especially with homemade crust. But I have a secret, this caramel apple slab pie is so easy to make using just a sheet pan as well as a store-bought pie dough. It’s a foolproof dessert recipe that’s just as impressive as a professional bakery with a braided lattice crust.
This ooey, gooey dessert recipe stars store-bought pastry dough, which can be braided, baked and served up by the slice. Feel free to use whatever apples you fancy (one variety, or a mix!), but I love pairing the tanginess of Granny Smith apples with the chewy sweetness of caramel.
Slab pies and I are BFFs. They’re just so simple to make with whatever fruit is in season. I love making both my peach slab pie and strawberry slab pie in the summertime as well.
Kelly’s Note: Use any apples you like (or even a mix) in this recipe! I think it’s best with tart apples like Granny Smith, Honeycrisp or Pink Lady.
Why You’ll Love this Recipe
- Sheet pan treat. A slab pie is made in a sheet pan. I use a standard jelly roll pan that’s 15 x 10-inches. Forget trying to use a pie plate, a sheet pan makes this recipe easy to assemble and perfect for serving to a large group.
- Foolproof crust. Use store-bought pastry dough to cut down on recipe prep time and make a perfect crust every single time.
- Creamy caramel. Store-bought chewy caramels are the secret ingredient to make the apple pie filling rich and sweet. No complicated stove-top recipes here!
- One hour pie recipe. This recipe is simple to make, in fact it takes less than one hour to assemble and bake.
- All-purpose flour: It’s essential to add a dusting of flour to the countertop before rolling out the crust to make sure the dough doesn’t stick to the countertop.
- Store-bought pie crust: A store-bought dough is the key to a guaranteed delicious and perfect recipe every time. I use two boxes, or four rounds, to make this dessert. You can of course make a homemade pie crust, but store-bought helps cut down on prep time.
- Apples: Customize the apple filling with your favorite types of apples. I prefer ones that are tart like Granny Smith, Honeycrisp or Pink Lady.
- Granulated sugar: The key to sweetness in the filling to compliment the natural tartness of the apples.
- Cornstarch: An essential ingredient used to thicken the filling. Cornstarch prevents the juices of the apples from making the filling too soupy. Arrowroot or tapioca flour can also be used, the amount just may need to be altered.
- Ground cinnamon: The signature warming spice for the apple mixture is cinnamon, we couldn’t leave it out!
- Lemon juice: The juice of a lemon adds just enough acid to brighten all of the natural flavors and sweetness of the filling. Apple cider vinegar can also be used here.
- Soft chewy caramels: No need to fuss with tricky stovetop caramel, use store-bought chewy caramels to infuse the dessert with caramel apple flavors.
- Large egg: The trick to getting the perfect golden brown crust. Whisk the egg together then brush it on top of the braided lattice and edges of the pie before baking. You can also use heavy cream here as well if desired.
See the recipe card for full information on ingredients and quantities.
An apple slab pie has endless recipe idea possibilities, and caramel apple is the theme for this version. Here are some variations and tips to add a personal touch to this sweet treat.
- Swap store-bought crust for homemade. Looking to really show off, swap the store-bought pastry dough for a pie crust from scratch, just be sure to double the recipe.
- Change up the apple filling flavors. Try adding ingredients like bourbon, nuts, nutmeg, cardamom, cranberries, pears, or blackberries.
- Make Mini Apple Pies! Grab your muffin tin rather than a sheet pan and make mini caramel apple pies, or forget the pan and make apple hand pies.
- Mini Cookie Cutter: Use a mini cookie cutter instead of a braided lattice to make decorating the top even easier.
This caramel apple pie recipe is so simple and perfect for entertaining a crowd. A beginner baker will look like a pro making this simple pastry that uses basic cooking equipment and store-bought ingredients. Here’s an overview of the process (you’ll find detailed instructions in the recipe card below).
- Preheat the oven. Preheat the oven to 400ºF with the oven rack in the center.
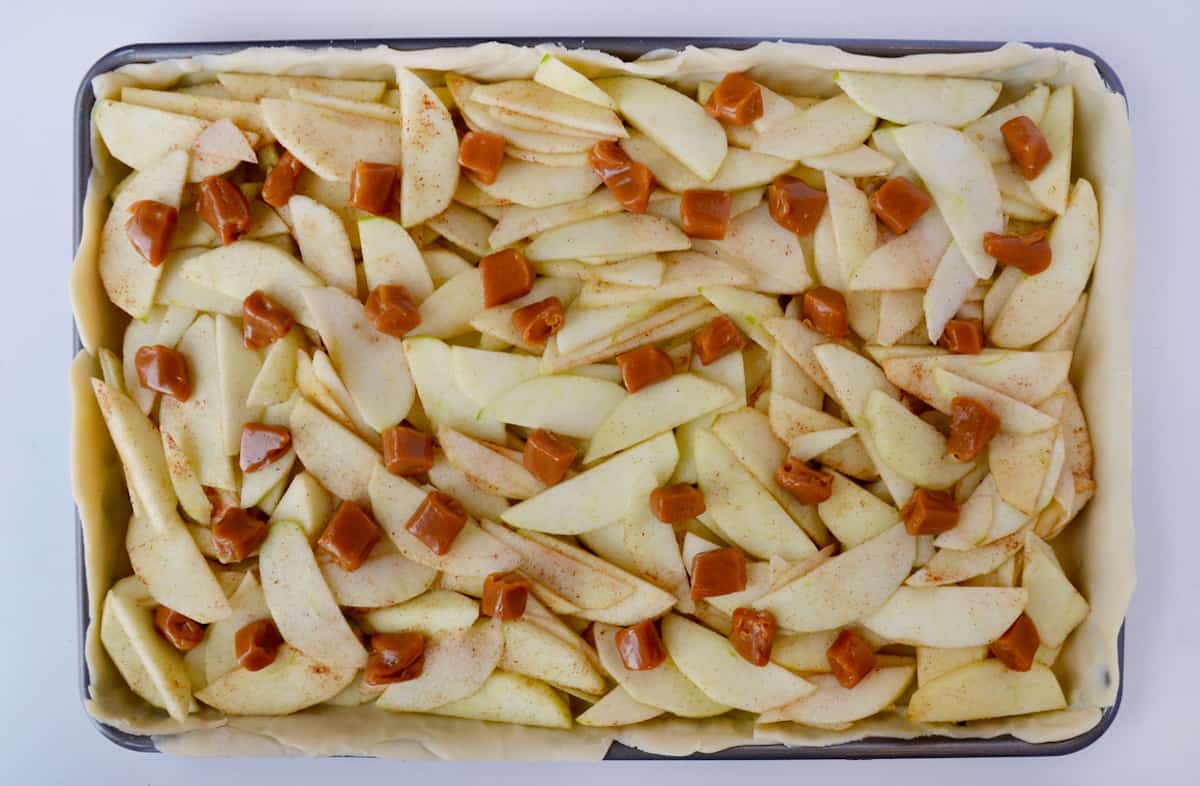
- Prepare the bottom crust. Lightly flour your work surface then stack two of the circular-shaped crusts on top of one another and roll them into a rectangle measuring 17×12-inches. Transfer the dough to a 15×10-inch jelly roll pan, leaving the edges untrimmed.
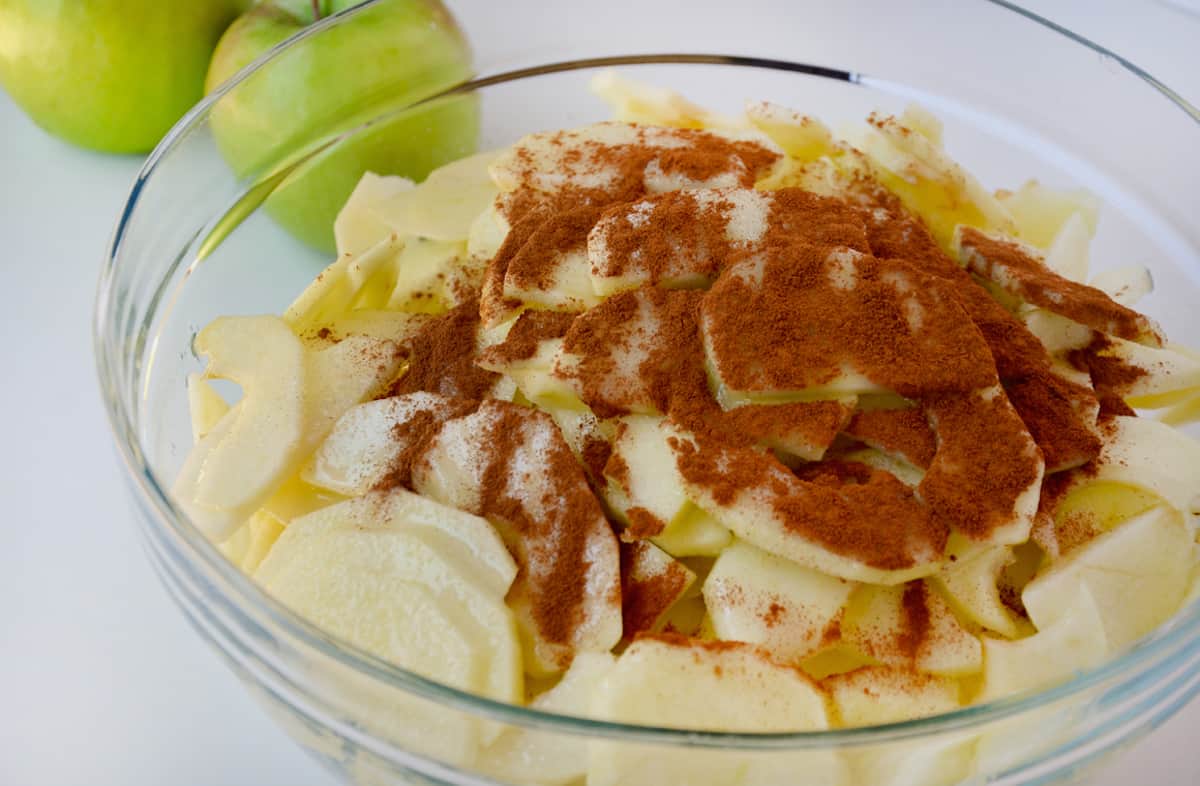
- Combine the apple pie filling. In a large bowl, stir together the sliced apples, sugar, cornstarch, cinnamon and lemon juice.
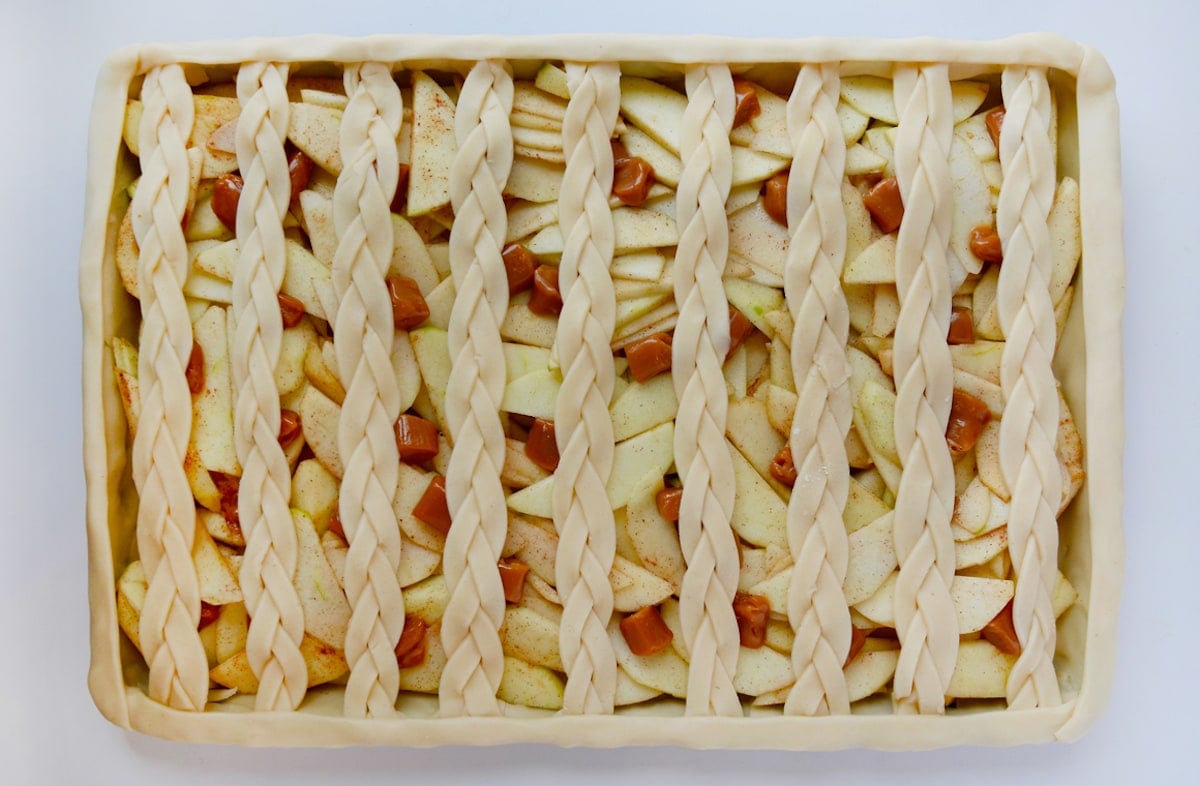
4. Transfer the apple filling. Place the raw apple filling into the prepared crust. Top with the chopped soft caramels.
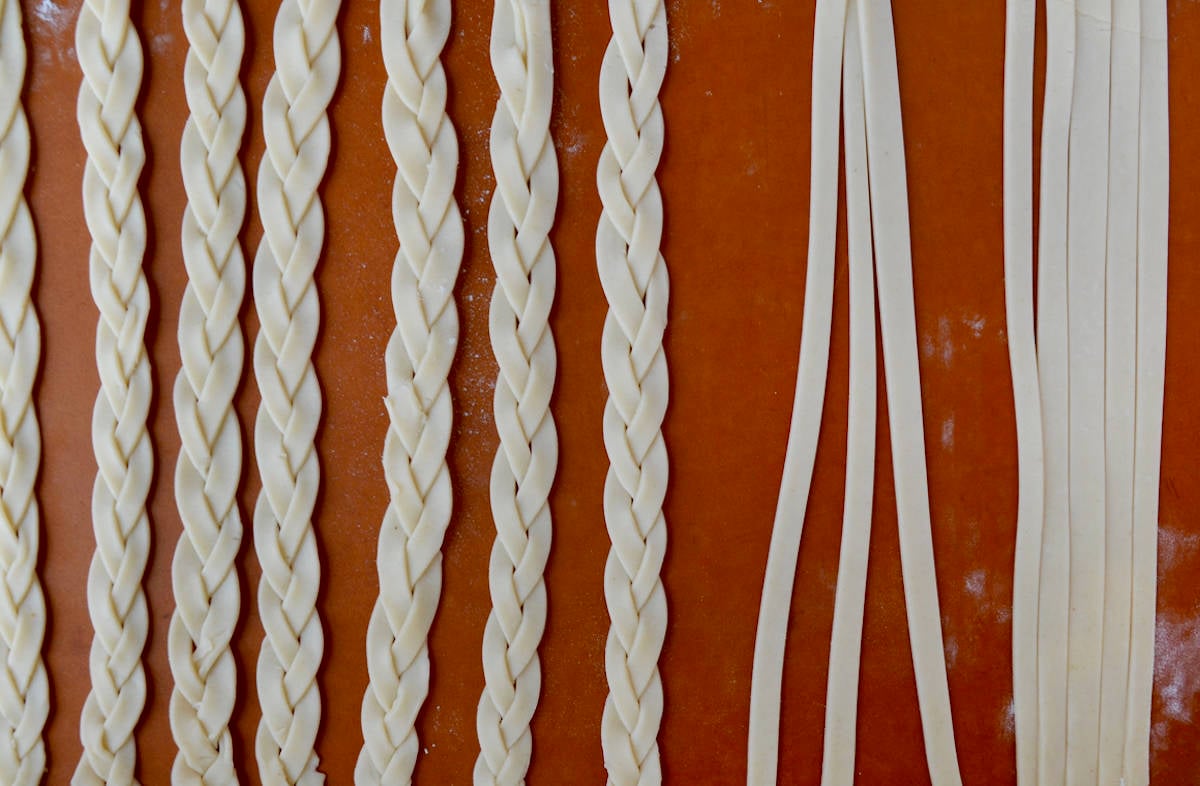
5. Make the braided lattice. Lightly flour your work surface again, then cut the remaining dough into 1/2-inch thick strips. Braid the strips then arrange them across the pie widthwise. (Scraps can be re-rolled.)
6. Crimp the crust. Using your fingers, crimp the crust around the edges.
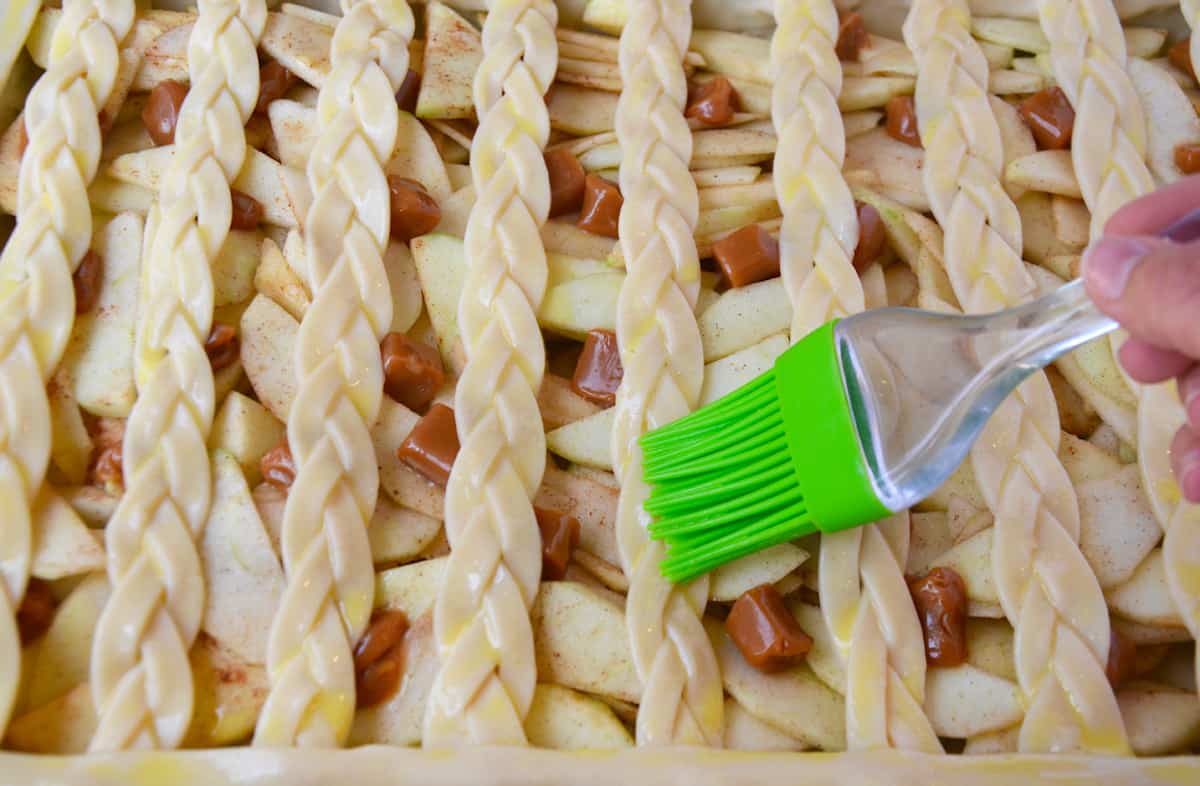
7. Make the egg wash. Whisk the egg, then brush it all over the top and sides of the pastry.
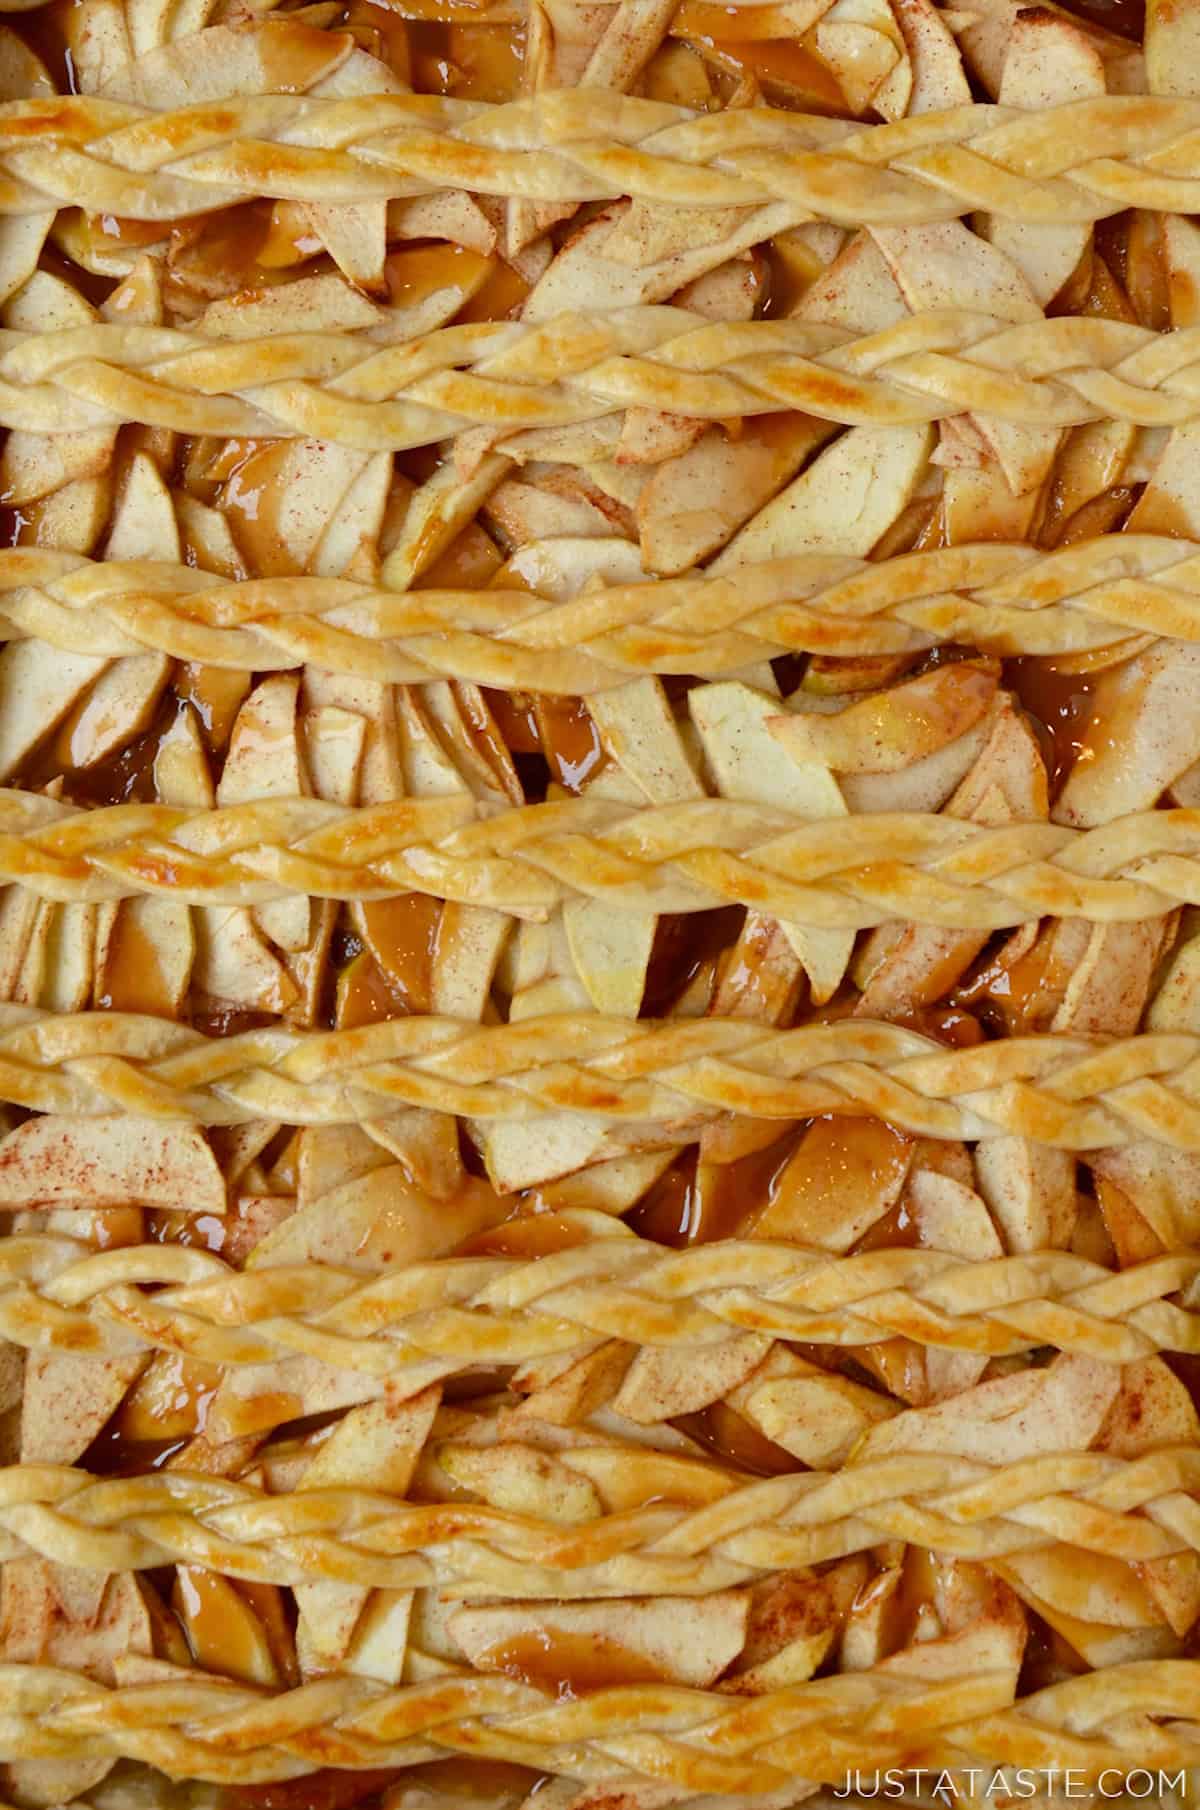
8. Bake the pie. Bake for 28 to 35 minutes or until the crust is golden brown and cooked through.
9. Allow to cool and set. Remove the sheet pan from the oven and let it cool for 30 to 40 minutes until the juices have set. Slice and serve.
Pro Tip: Use a pizza cutter to make cutting the strips for the braided lattice crust easier. You can also use a shaped cookie cutter to cut the dough into decorative shapes to top the pie rather than a lattice.
- Dust with Flour: Be sure to flour your surface well when assembling the braided lattice crust so the pastry dough doesn’t stick.
- Use a Pizza Cutter: For the lattice top, use a pizza cutter or pasta cutter to make cutting the dough into strips easier before braiding.
- Don’t Forget the Egg Wash: The beaten egg wash is the essential trick to making your pastry look golden brown and perfect.
- Cut the Apples Evenly: Be sure to cut the apples the same thickness for even texture in the filling.
Ending a meal with this apple pie is definitely a treat for anyone involved. Now this dessert can be the star of the show, or you can level it up a bit more by serving it with some of these simple toppings.
- Vanilla Ice Cream
- Homemade Whipped Cream
- Vanilla Glaze (omit the lemon zest)
- Powdered Sugar
It’s best to store this slab pie in an airtight container at room temperature for up to four days. I recommend to reheat slices in the oven at 300ºF for about five minutes to prevent a soggy crust. You can also reheat in the microwave for a couple of minutes, but the crust may not be as crisp.
To store the apple pie in the freezer for up to one to two months, follow the steps below:
- Allow to cool completely to room temperature. This is essential to keeping the crust and filling the right texture after freezing.
- Cut into individual servings. This makes it easier to freeze the leftovers and portions into single servings.
- Wrap the slices tightly in plastic wrap. This ensures the slices don’t get freezer burn or too much moisture during freezing.
- Place the slices into a resealable freezer bag or airtight container for more protection against freezer burn.
- Freeze flat. Place the pieces flat in the fridge to freeze initially. Once they are frozen, you can stack them on top of the each other. This step ensures even freezing.
Frequently Asked Questions
You can use any apples or mixture of apples for this recipe. I prefer tart apples, like Granny Smith, Honeycrisp or Pink Lady to compliment the sweet soft caramels.
Be sure to bake the slab pie on the center rack of your oven for a crispy bottom crust. Adding cornstarch to the apple filling or a thickening agent, such as tapioca flour or arrowroot, will help keep the bottom crust crispy. The cornstarch thickens the apple filling while baking so the juices from the apples don’t make the crust soggy.
This isn’t necessary for this recipe since both the filling and top crust also need to be baked. The bottom crust should be baked first when the filling isn’t baked, like a pudding pie, or the filling is baked for a shorter period of time, like a custard pie.
No apples need to be cooked for this recipe! Sometimes you can cook the apples first for a deep dish pie. The beauty of the slab pie is the thinner layer of apples cook perfectly in the bake time of the recipe.
Yes, peeling the apples makes the texture of the filling better than using unpeeled apples.
- Apple Cinnamon Banana Bread
- Apple and Pear Crisp
- Apple Cheesecake Bars
- Apple Fritters
- Caramel Apple Bread Pudding
Ingredients
- All-purpose flour
- 2 (14.1-oz.) boxes store-bought pie crust (4 circular pie crusts total)
- 6 apples, peeled, cored and cut into 1/8-inch-thick slices
- 1/4 cup sugar
- 2 Tablespoons cornstarch
- 2 teaspoons ground cinnamon
- 2 Tablespoons lemon juice
- 1 (4.5-oz.) bag soft caramels, roughly chopped
- 1 large egg
Instructions
- Preheat the oven to 400°F.
- Lightly flour your work surface then stack two of the circular-shaped crusts on top of one another and roll them into a rectangle measuring 12×17 inches. Transfer the dough into a 10×15-inch jelly roll pan, leaving the edges untrimmed.
- In a large bowl, stir together the sliced apples, sugar, cornstarch, cinnamon and lemon juice.
- Transfer the apples into the prepared pie crust. Top with the chopped caramels.
- Lightly flour your work surface again then cut the remaining crusts into 1/2-inch-thick strips. Braid the strips then arrange them across the pie width-wise. (Scraps can be re-rolled.)
- Using your fingers, crimp the crust around the edges.
- Whisk the egg then brush it all over the top and sides of the pastry.
- Bake for 28 to 35 minutes or until the crust is golden brown and cooked through.
- Remove the pie from the oven and let it cool for 30 to 40 minutes until the juices have set. Slice and serve.
Kelly’s Notes
- Be sure to flour your surface well when assembling the braided lattice crust so the pastry dough doesn’t stick.
- Use a pizza cutter or pasta cutter to make cutting the lattice dough into strips easier.
- The beaten egg wash is the essential trick to making your pastry look golden brown and perfect.
- Be sure to cut the apples the same thickness for even texture in the filling.
- Store in an airtight container at room temperature for up to four days. You can reheat individual slices in the oven at 300ºF for about five minutes or in the microwave for a couple of minutes if you prefer to eat the leftovers warm.
- You can freeze individual slices as well. Wrap them tightly in plastic and place in a freezer bag. Freeze laying flat, then stack pieces later for easy storage for one to two months.
- ★ Did you make this recipe? Don’t forget to give it a star rating below!
Nutrition
Shoutout
Did you try this recipe?
Share it with the world! Mention @justataste or tag #justatasterecipes!
This post may contain affiliate links.
Recipe by Kelly Senyei of Just a Taste. Please do not reprint this recipe without my permission. If you'd like to feature this recipe on your site, please rewrite the method of preparation and link to this post as the original source.


This pie was so delicious, I love all the fall flavors, plus it looked impressive and was so easy to make!
Easy and quick. I like that it doesn’t have much sugar in it. The tartness is great.
I’m so thrilled you enjoyed the recipe!
Easy, delicious, and loved by all.
I’m thrilled you enjoyed the recipe, Melissa!
OMG. Kelly. I have already made this dish twice in like 2 weeks, for two different occasions and both times rave rave reviews about the dish. Thanks for making me the hit of the party and tailgate!!
Trey
So glad you’re enjoying it!