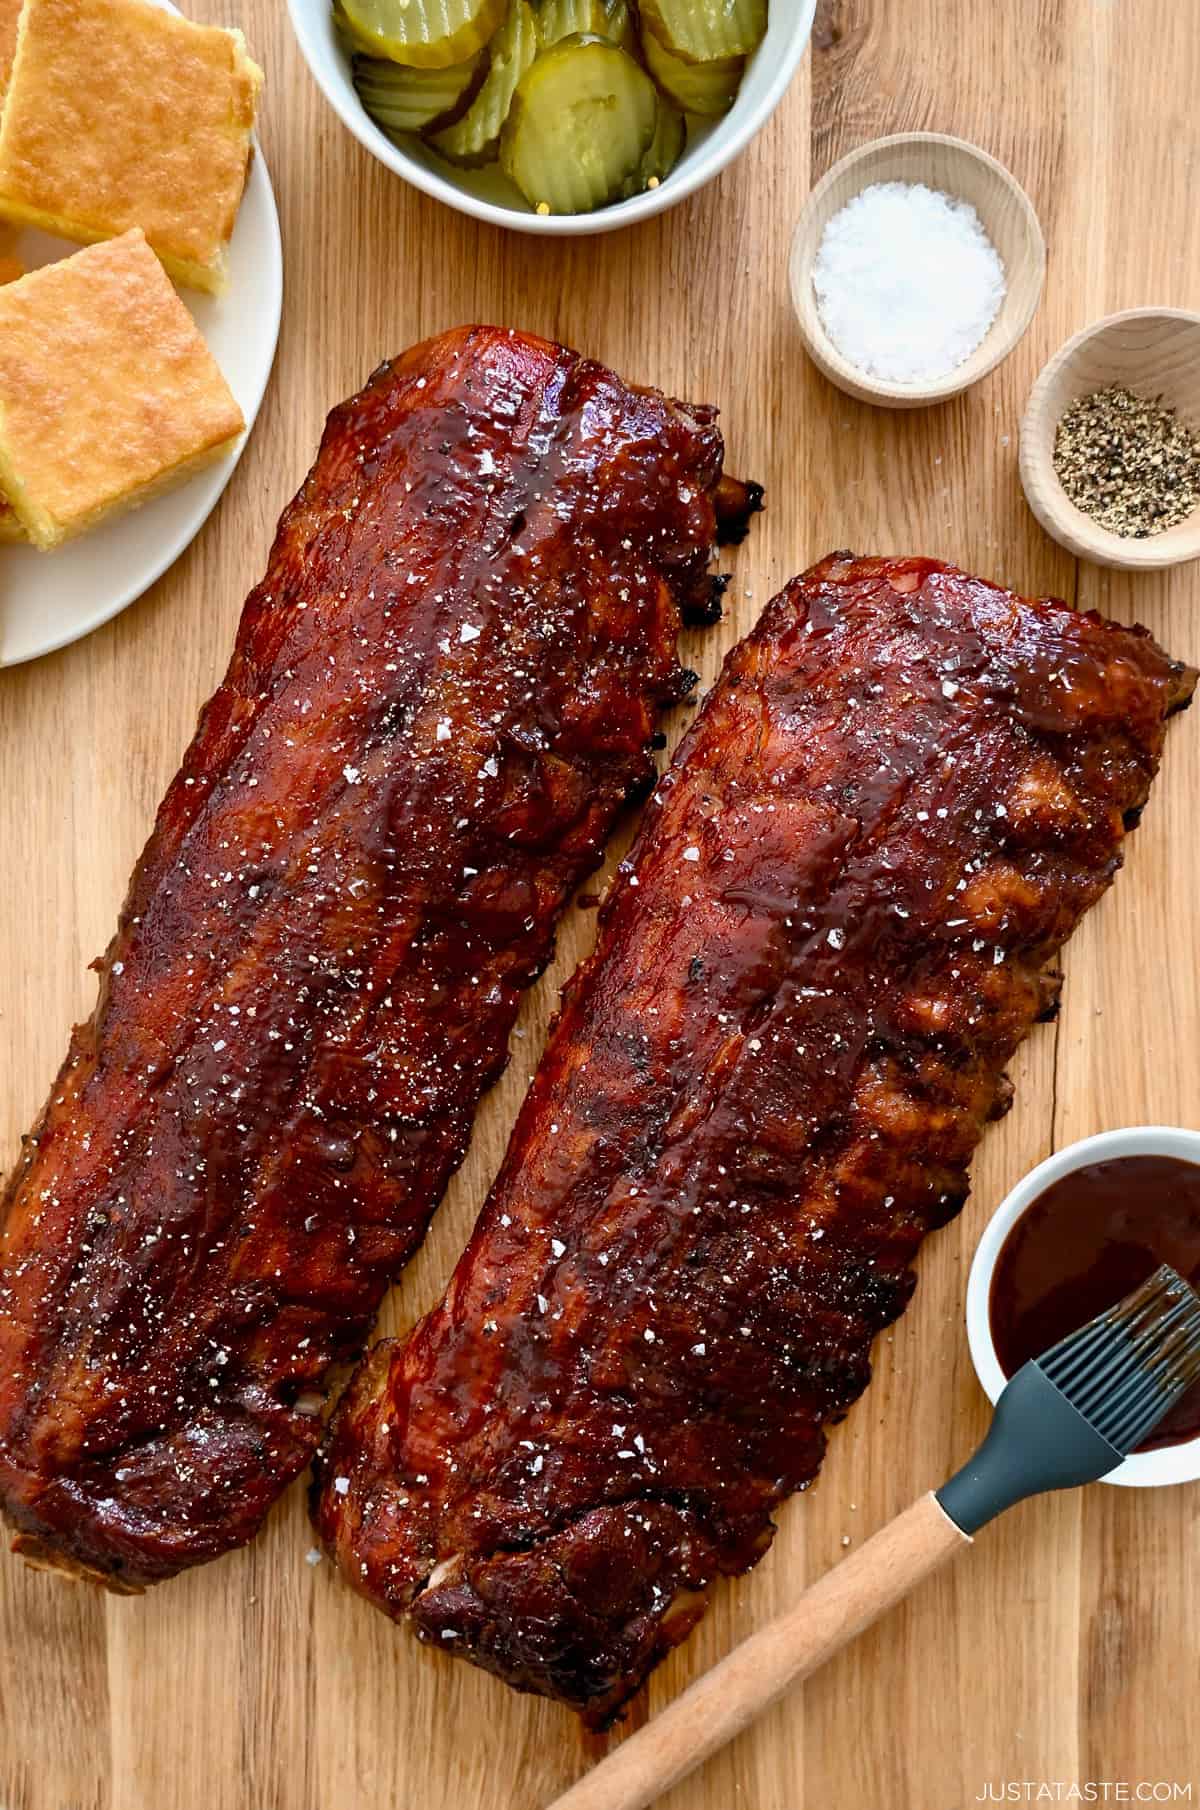
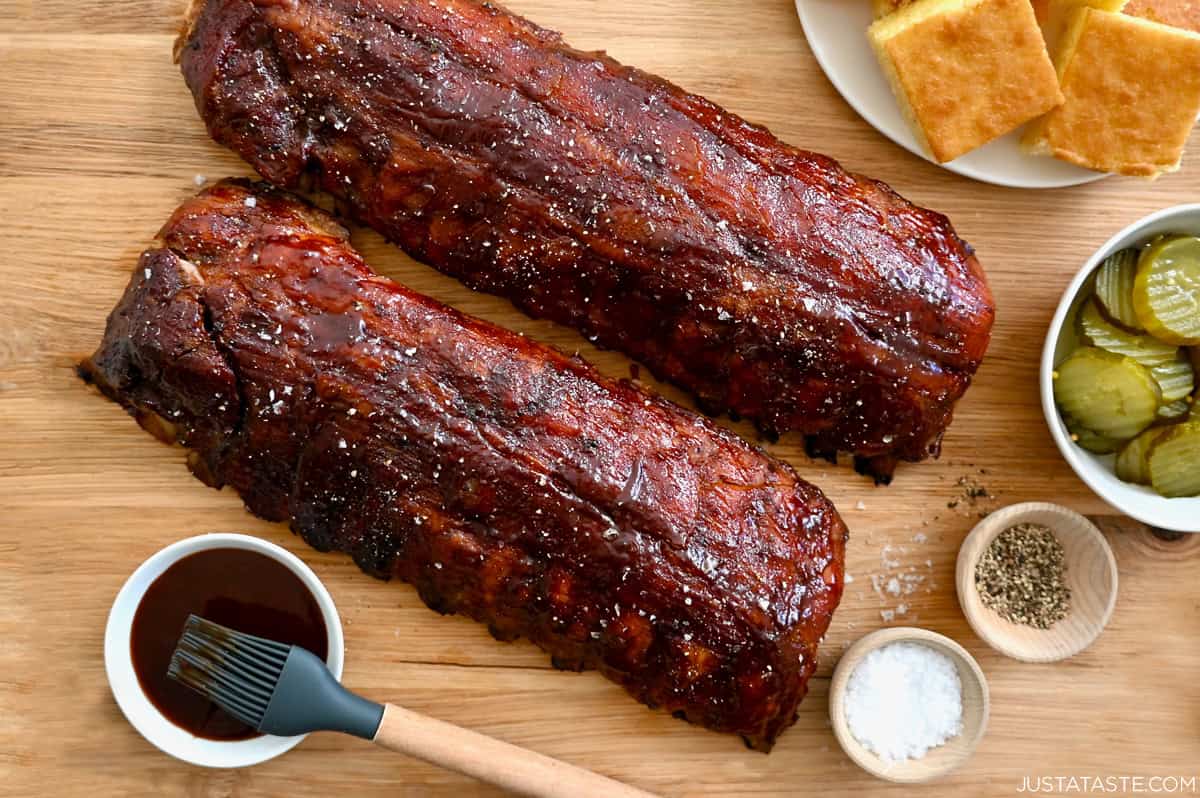
Make the most tender, fall-off-the-bone oven-baked ribs with this easy, foolproof recipe! Slow-cooked at 200°F and sealed in a foil packet for maximum juiciness, these baby back ribs deliver big flavor with minimal effort—and no grill required. My mom has been perfecting this technique for decades, and now I’m sharing her signature spice rub and all the tips you need to make the best ribs right in your oven.
One reader, Ron, said: “If you don’t have time to cook ribs on the smoker this is the way to go! These were the tenderest ribs that I have ever cooked! I use the Barbecue Church honey rub and add a little smoked paprika as well. Using this recipe is so easy – just put it in the oven at 200 and wait five hours. It almost feels like you’re cheating! I promise you won’t be disappointed!⭐️⭐️⭐️⭐️⭐️“
Table of Contents
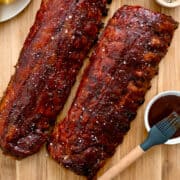
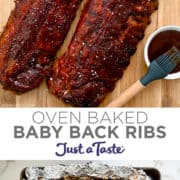
My mom Noni’s baked baby back ribs are legendary. Not just in our house, but in the homes of friends who’ve begged for the recipe over the years. She’s spent decades perfecting her method, and it shows in every tender, fall-off-the-bone bite. Her secret? A low-and-slow oven bake and a DIY foil packet that locks in moisture and makes cleanup a breeze. So click your tongs, and let’s get started!
Why This Is the Best Baked Ribs Recipe
Using your oven almost guarantees you’re going to be digging into some of the best barbecue ribs to ever cross your lips. The even temperature of your oven is way easier to maintain than a grill’s, which means no flare-ups, no babysitting and no risk of dried-out meat.
But what makes my method different?
I bake my ribs low and slow at 200°F for 5 hours, which is even lower than the common 250°F. Why? That extra-low temp gives the collagen in the meat plenty of time to break down, resulting in juicy ribs that are unbelievably tender. Wrapped tightly in foil with a splash of liquid smoke and water, they essentially braise in their own juices until the meat is melting off the bone.
- Pork ribs: I always use baby back ribs because they’re the most tender cut. They’re leaner and cook a bit faster than St. Louis-style or spare ribs. You can use other rib types in this recipe, but baby backs are my top pick for that perfect balance of meatiness and tenderness.
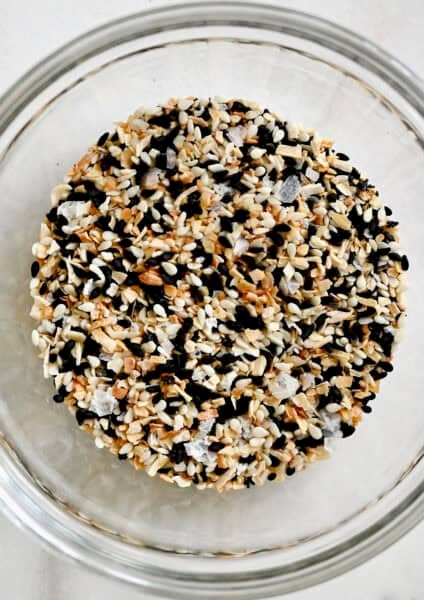
- Seasonings: I use my tried-and-true homemade dry rub starring Lawry’s Seasoned Salt, garlic powder, black pepper and brown sugar. It guarantees a salty-sweet crust that caramelizes beautifully in the oven. This mix guarantees a perfectly salty, yet sweetly caramelized crust on your ribs.
- Barbecue sauce: You can use your favorite store-bought barbecue sauce, or go all in with my root beer barbecue sauce. It’s sweet, tangy and adds an extra layer of flavor that plays so well with the dry rub.
- Liquid smoke: I like the subtle smokiness and flavor that liquid smoke imparts in the ribs, which mimics the cooked-over-a-flame flavor, but if you aren’t a fan of it, simply omit it from the recipe.
Dry Rub Pro Tip: Customize your rub with flavor-packed additions like coffee grounds, smoked paprika, and even celery salt. The goal is a balanced blend of savory, sweet and smoky flavors.
See the recipe card for full information on ingredients and quantities.
Removing the Membrane (Don’t Skip This Step!)
For tender, fall-off-the-bone ribs, it’s important to remove the membrane (also called silver skin or peritoneum) from the back of the rack before seasoning and baking. This layer can become tough and chewy once cooked.
Flip the rack over so the bone side is facing up. You’ll see a thin, silvery-white layer stretched across the bones—that’s the membrane. Starting at one end, slide a butter knife underneath it to loosen a corner. Gently lift it up, then grab it with a paper towel (for better grip) and peel it off in one piece. If it tears, no worries—just keep working in sections until it’s all removed.
Kelly’s Tip: Not all racks have the membrane fully intact. If your butcher already removed it (lucky you!), you’re good to go.
How to Cook Ribs in the Oven
Smokers use the 3-2-1 method (3 hours smoke, 2 hours wrapped, 1 hour sauced), but for oven ribs, it’s all about low and slow in a foil tent. No grill or complicated steps required.
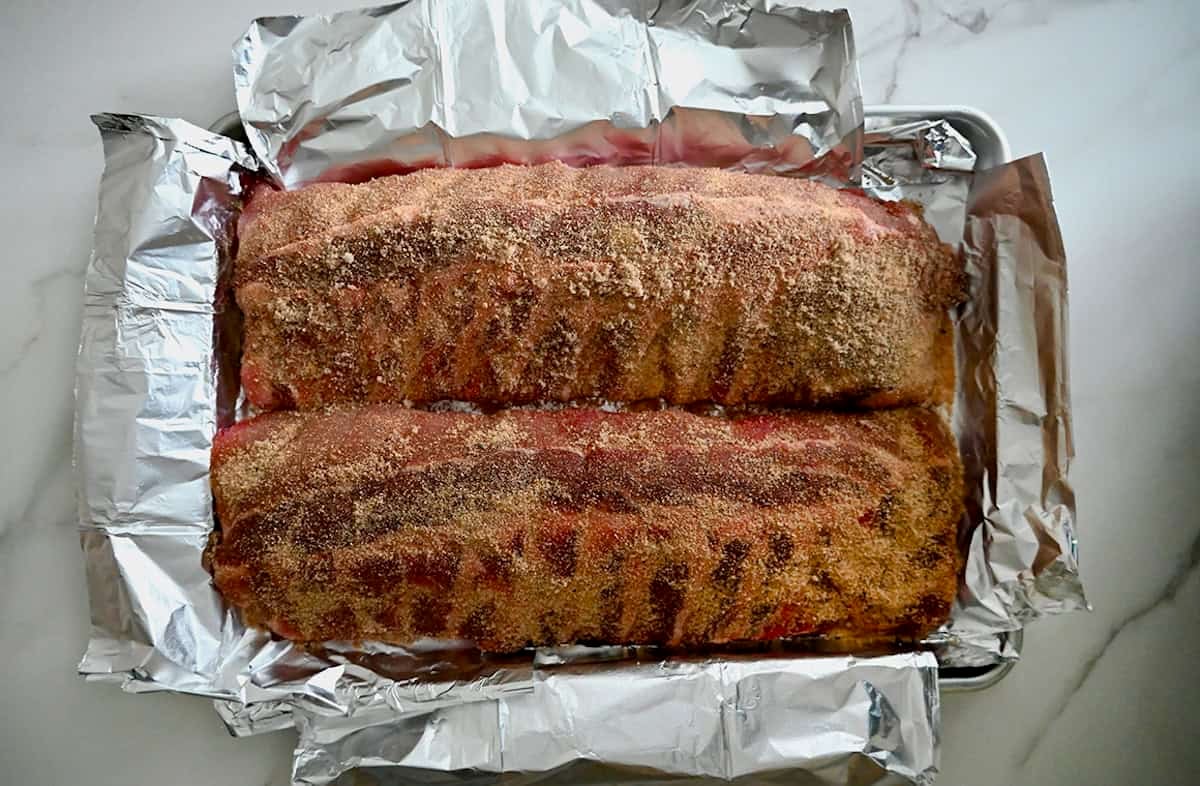
- Preheat the oven to 200°F. Line a large baking sheet with two long sheets of foil, letting them hang over the sides.
- Remove the membrane. Use a knife to loosen the thin silver skin on the back of the ribs, then grab it with a paper towel and peel it off. (This helps the seasoning penetrate and gives more tender results.)
- Season the ribs. Pat the ribs dry with paper towels, then coat both sides generously with your dry rub. Don’t be shy—it’s the foundation of your flavor! Depending on the size of your slabs, feel free to scale up the seasoning mix to ensure full coverage.
- Wrap the ribs. Place the slabs side-by-side on the foil. Fold the foil up around the ribs to form a shallow bowl. Pour the water and liquid smoke around (not on top of) the ribs, then cover with a third piece of foil. Crimp all the edges to create a sealed foil packet.
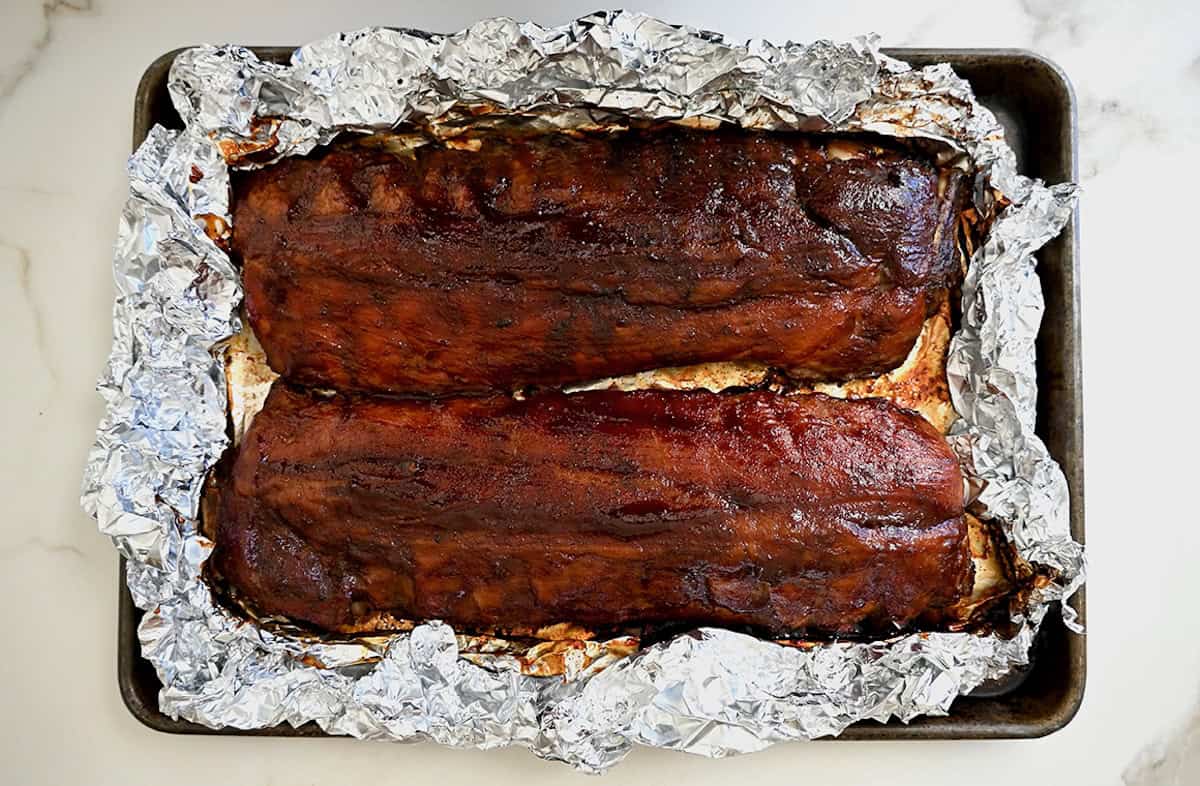
- Bake for 5 hours. The ribs are done when they reach an internal temperature of 190°F to 205°F and a knife slides easily between the bones.
- Baste and broil. Carefully remove the top layer of foil and discard any juices. Change your oven to broil, then brush the ribs generously with barbecue sauce. Broil for about 3 minutes, just until the sauce starts to bubble and caramelize around the edges. Watch closely—sugar burns fast!
- Serve. Remove from the oven, slather with one more layer of sauce, slice between the bones, and serve.
Kelly’s Note: Oven times may vary based on your oven’s calibration and the size of your ribs. Always check for doneness with a thermometer — 190°F–205°F is ideal.
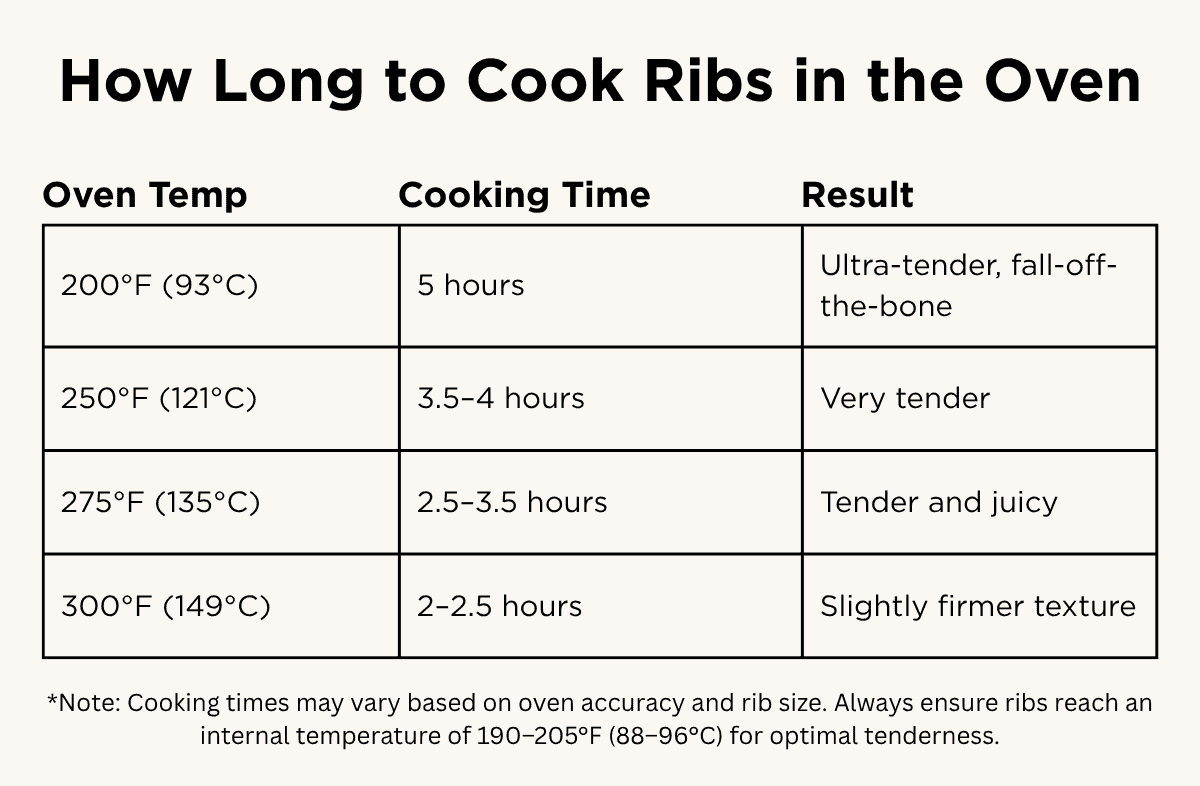
Cooking Times by Temperature
Want to speed things up? Use this handy chart to adjust your oven temperature and cooking time based on your schedule. Baking ribs at 300°F for 3 hours still yields delicious results, but for fall-off-the-bone perfection, 200°F for 5 hours is worth every second.
What Sides to Serve
No plate of ribs is complete without a few classic barbecue sides. I like to keep it simple with a mix of creamy, crunchy, and fresh—think macaroni salad, coleslaw, cornbread, baked beans, and a crisp broccoli salad. Whether you’re going all-out for a backyard cookout or just making dinner for the family, these sides will round out your rib night beautifully:
- Skillet cornbread or buttermilk biscuits
- Black bean and corn salad
- Hungarian cucumber salad
- Stovetop mac and cheese
- Crispy corn fritters
- Watermelon feta salad or fruit salad
- Bread and butter pickles
- German potato salad
Want even more ideas? Check out my favorite cookout side dishes for summer.
FAQs
Nope! Liquid smoke adds a subtle smoky flavor that mimics a grill or smoker, but if you don’t have it, you can skip it. Your ribs will still be incredibly tender and flavorful thanks to the slow bake and seasoning.
Absolutely! Brushing the ribs with a thin layer of yellow mustard before applying the dry rub helps the spices stick and creates a flavorful crust as the ribs cook. Don’t worry — it doesn’t make the ribs taste like mustard.
For the best results, place your ribs meat side up. This lets the fat render down through the meat and helps develop a nice bark (crust) on the top when you finish them under the broiler.
Yes! You can season and wrap your ribs in foil up to a day in advance, then bake them when you’re ready. This makes them perfect for stress-free entertaining.
Ingredients
- 2 slabs baby back ribs
- 2 Tablespoons Lawry’s Seasoned Salt
- 1 Tablespoon garlic powder
- 1 teaspoon pepper
- 2 Tablespoons brown sugar
- 1/4 cup liquid smoke
- 1/4 cup water
- 1 1/2 cups homemade or store-bought barbecue sauce
Instructions
- Preheat the oven to 200°F. (See Kelly’s Notes.) Arrange two large pieces of foil on a baking sheet so that it hangs off on all sides.
- In a medium bowl, whisk together the Lawry’s Seasoned Salt, garlic powder, pepper and brown sugar. Sprinkle the ribs on both sides with the spice rub.
- Place the rib slabs side-by-side on the foil then gather the foil up and over the ribs to make a secure foil packet. Pour the liquid smoke and water into the bottom. Place one more piece of foil on top and press together the edges to seal the foil packet.
- Bake the ribs for 5 hours.
- Remove the ribs from the oven and remove the top piece of foil. The ribs are done cooking when they have reached an internal temperature of 190 – 200°F.
- Change the oven to broil.
- Brush the ribs generously with barbecue sauce then broil them until the edges just begin to crisp, about 3 minutes.
- Remove the ribs from the oven, brush them one more time with barbecue sauce, then serve.
Kelly’s Notes
- I like the subtle smokiness and flavor that liquid smoke imparts in the ribs, which mimics the cooked-over-a-flame flavor, but if you aren’t a fan of it, simply omit it from the recipe.
- To speed up the cooking time, the ribs can also be baked at 300°F for 3 hours.
- Depending on the size of your slabs, feel free to increase the quantity of seasonings and spices.
- For the most tender, fall-apart ribs, remove the clear membrane on the back of the ribs prior to seasoning and baking them.
- ★ Did you make this recipe? Don’t forget to give it a star rating below!
Nutrition
Did you try this recipe?
Leave a comment below with your star rating!
This post may contain affiliate links.


It was amazing. Lots of flavor and tender the meat came off the bones so easy. My husband cooked them it was so easy he said. Thank you for sharing.
So glad you enjoyed the recipe, Jennifer!
1 Rack of baby back
No char which I think is something all ribs should have
Way to much liquid I used 1can of beef B plus some BBQ sauce – do you have portions
Very good flavor – tender fall off – 4 stars
I added andouille sausage came very tender and very tasty
Easy set it an forget it – still evaluating
When you put the third piece of foil on, do you wrap it tight on the ribs or tent it?
Yes indeed! Wrap it tight so the ribs will steam. Enjoy!
I have always been intimidated about making ribs….when I came across this recipe that required oven baking only I decided to give it a try. Was not disappointed. Made them for the 4th of July and one of my guests commented that they were better than the ones he’d prepared using a Traeger with multiple steps and lots of babysitting. I used Kelly’s bbq sauce recipe as well. Didn’t modify any ingredient or step. They turned out so juicy and fell right off the bone. I’m making them again tonight! Thanks, Kelly (and Noni!)
Love reading this, Angie! So glad you enjoyed the recipe.
The best ribs I’ve ever had! Flavorful, fall off the bone goodness. I made one small change, I go a bit heavier with the brown sugar and serve with a Carolina vinegar sauce. Porky perfection!!
I’m so glad you enjoyed the recipe, Karen!
I have 1 slab cooking now and forgot to add the water! I don’t like liquid smoke and just forgot altogether. I put a rub on the ribs and let it sit overnight. Hoping they come out okay with no moisture in the foul!
I hope you enjoyed the ribs, Maybell!
Can you leave the rub off one and use rub on the other? I have used mustard to rub down the ribs to help the seasoning stick to the ri BB s. Also, does the meaty side of the ribs go on the top or bottom?
Hi Warren! The meaty side of the ribs should be facing up.
If you don’t have time to cook ribs on the smoker this is the way to go! These were the tenderest ribs that I have ever cooked! I use the Barbecue Church honey rub and add a little smoked paprika as well. Using this recipe is so easy – just put it in the oven at 200 and wait five hours. It almost feels like you’re cheating! I promise you won’t be disappointed!
Love, love, LOVE reading this, Ron! I’m so thrilled you enjoyed the recipe!
How is the sodium measured for the ribs. They are delicious, but since I made them I’ve been put on a low sodium diet.
Hi Marti – Nutritional info is only an estimation. Please use the amount of salt preferred for your diet.
SO easy and turned out great! I used ready made rub, but still very good.
I’m so glad you enjoyed the recipe, Sue!
I haven’t made the ribs yet but if you don’t use the liquid smoke do you increase the water? Also do you pour the liquid outside or inside the foil packet?
Hi Brenda! You can simply omit the liquid smoke from the recipe, there’s no need to add any additional water. And the liquid goes inside the foil packet. :) Looking forward to reading your results!
Followed the directions as written. Added coffee to the rub, cooked at 300 on the grill for 4 hours. Topped off with bourbon BBQ sauce on the finish.
These were the BEST ribs ever. Thanks for sharing this recipe.
Woohoo! I’m so thrilled you enjoyed the recipe, Dennis!
145 degrees? Ribs are supposed to be cooked from 190-200 degrees.
Thanks for catching this, Samantha! Just updated :)
It still says 145 in the description. Glad I saw this post!
Just fixed! Thanks, Craig :)
These are the only oven baked ribs I make. They are terrific. I use apple juice instead of water for a little sweetness.
Woohoo! I’m so thrilled you’ve been enjoying the recipe, Shelley!
I made these for dinner last night and was honestly shocked how easy and spectacular they were! The meat just falls right off the bone. INCREDIBLE! Would give these 10 stars if I could. Great, simple, fool-proof recipe that’s going in our regular rotation!
I’m so glad you enjoyed the recipe, Janie!
Amazing recipe! I followed it exactly and the ribs turned out perfectly. My husband went back for seconds… and thirds! thank you!
I’m so thrilled you and your husband enjoyed the recipe, Pam!
How long would you bake just 1 slab of baby back ribs?
Thanks, Nancy
Hi Nancy! I’d do the exact same prep and bake it the same amount of time as directed. Enjoy!
Do u rub the seasonins Into the ribs.
Yes! You can sprinkle it on top and then rub it in or just leave it, as it’ll absorb.
We really like SBR Hickory/Brown sugar BBQ sauce. I know it subjective, but with brown sugar in the seasoning, do you think that will be too sweet? Or over powering in brown sugar?
Thanks for any suggestions!!
Wanna try it this weeknd, first time making ribs.
Hi Chris! I don’t think it’d be overpowering at all! Sounds absolutely delish. Let me know how they turn out!
They were great!! Couldn’t figure out the film/membrane that should be removed. But still great awesome. Glad the recipe was randomly in my FB feed.
I’m so glad you enjoyed the recipe, Chris!
Can I use a binder like mustard or even kewpie on the ribs before I sprinkle with the dry rubs?
Sure, Tom! Sometimes I use yellow mustard :)
Can the recipe be made without the liquid smoke? I do not like the taste it leaves. Thank you!
Absolutely! You can just leave it out.
Could you do these in a airfryer to cut cooking time
Absolutely! I haven’t timed that cooking method out but it’ll definitely work. I’d start on the lower side (around 300°F).
Lillian Jenkins July 9,2022
I tried recipe today it was easy and very tasty thank you
I’m so glad you enjoyed the recipe, Lillian!