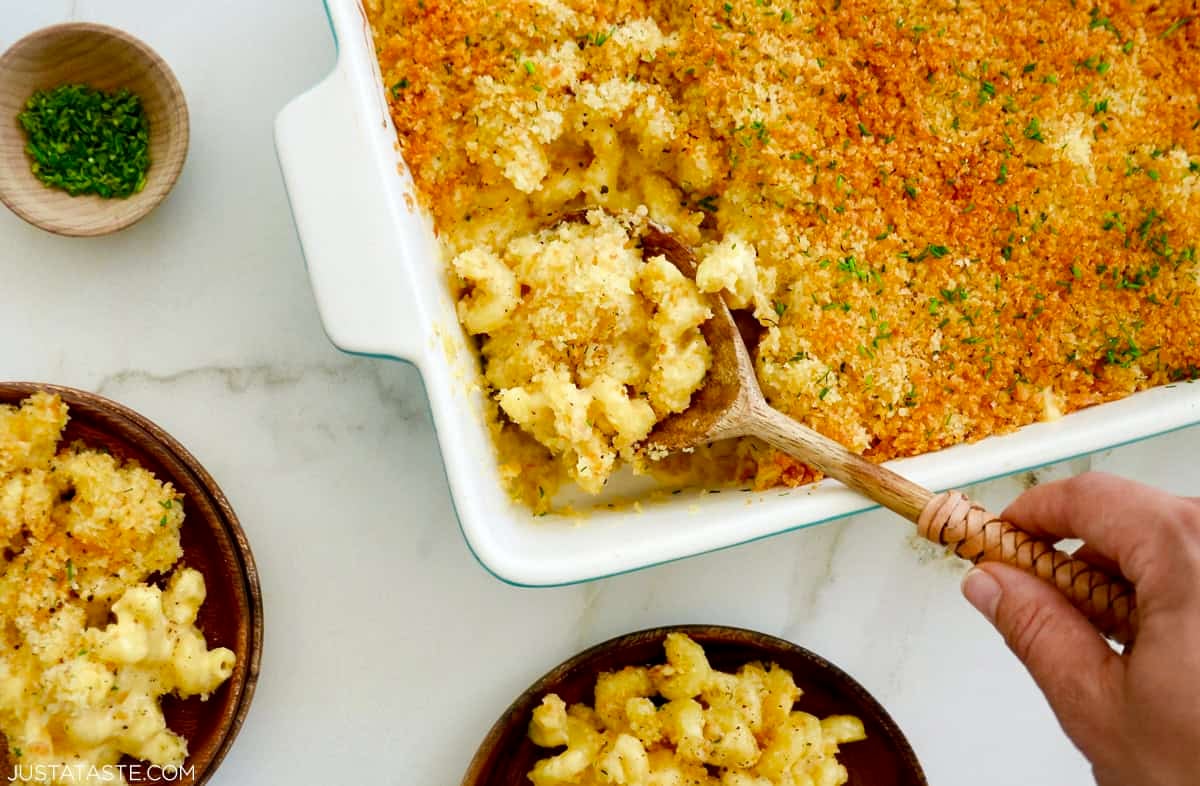
This easy baked mac and cheese recipe is ultra-creamy, loaded with roasted garlic, and topped with buttery golden breadcrumbs for next-level flavor. It’s rich, cheesy, and guaranteed to steal the show at any dinner table or holiday feast. A family favorite since 2015!
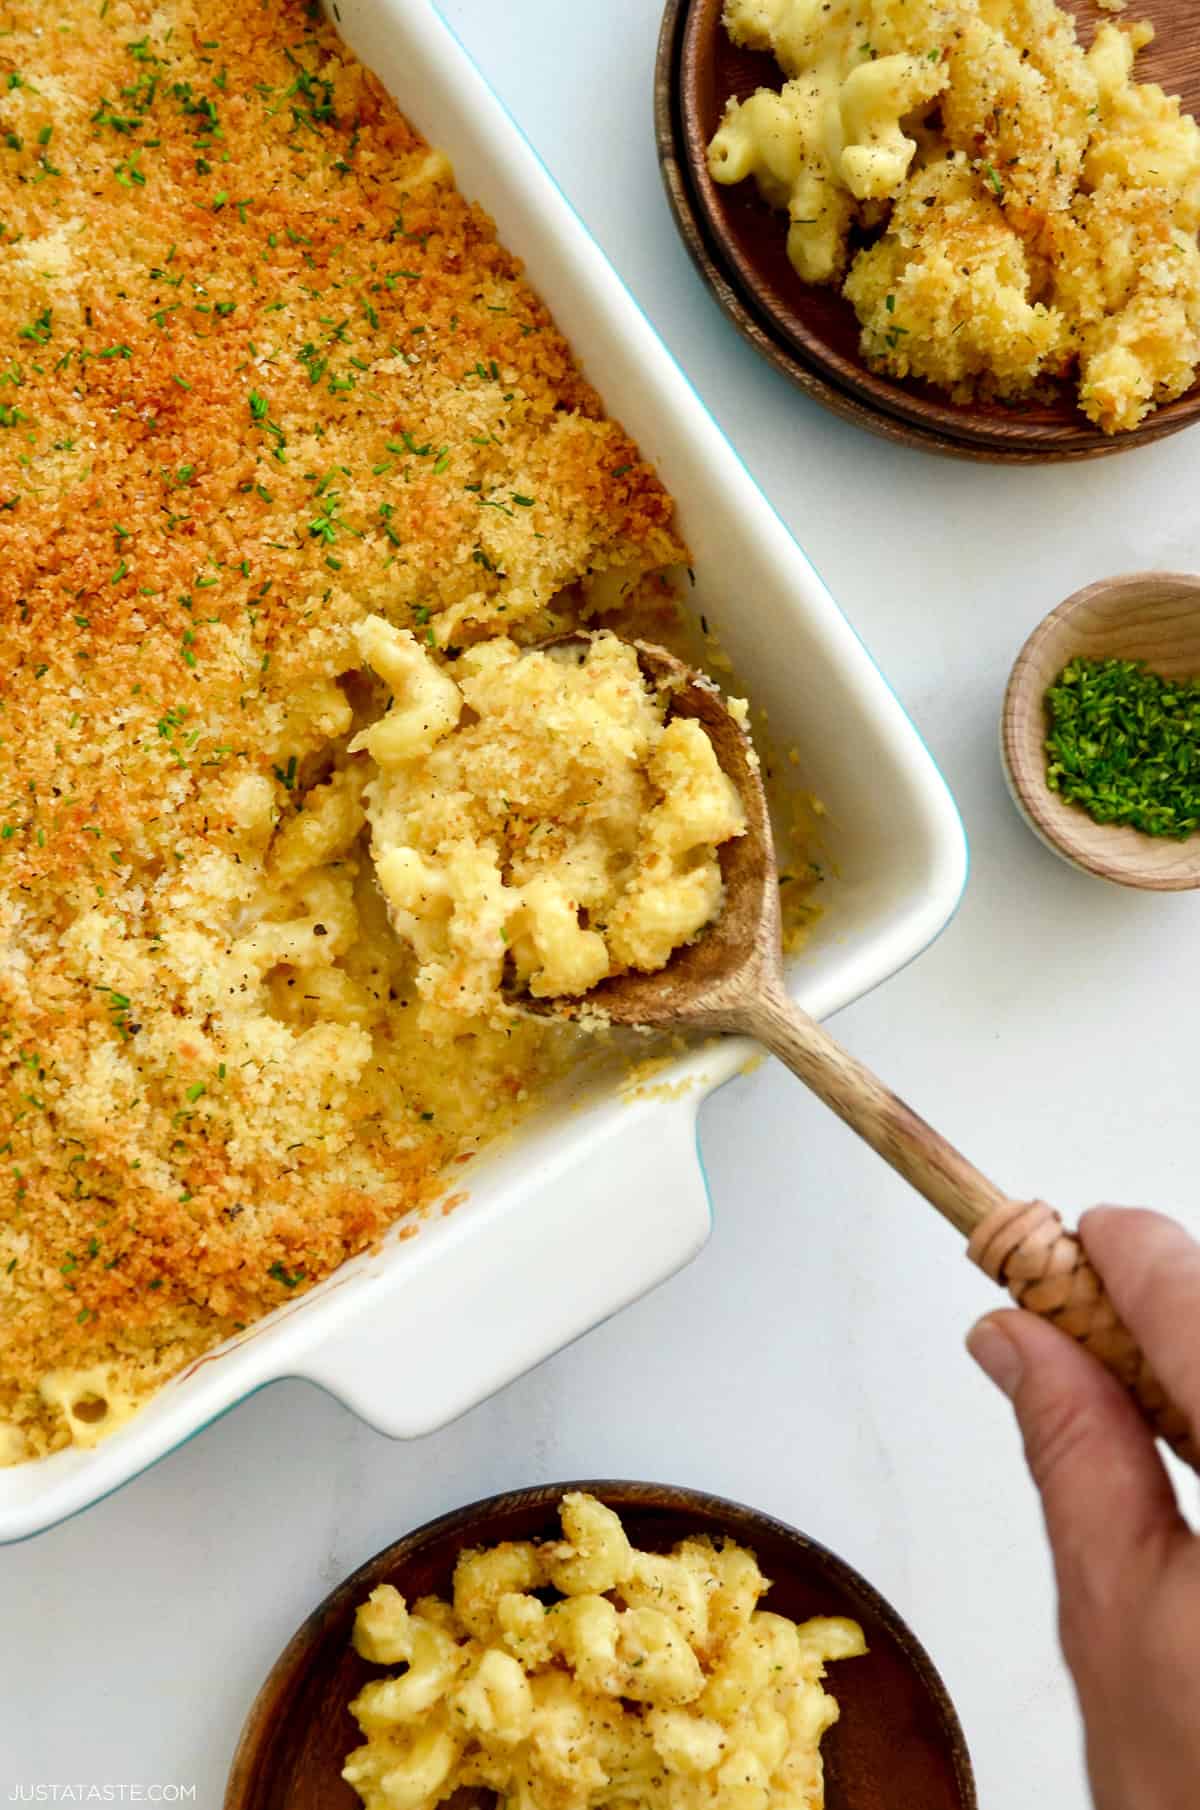
Table of Contents
Why you’ll love this family favorite recipe!

As a mom of four, mac and cheese is undoubtedly a food group in our house. We’ve tested just about every version imaginable, from classic stovetop mac and cheese to white cheddar macaroni (my fave!) and even pumpkin mac and cheese. But this baked version? This is the recipe I come back to again and again.
It’s creamy, garlicky, and topped with buttery breadcrumbs that bake up golden and crisp. In other words: comfort food perfection in a casserole dish.
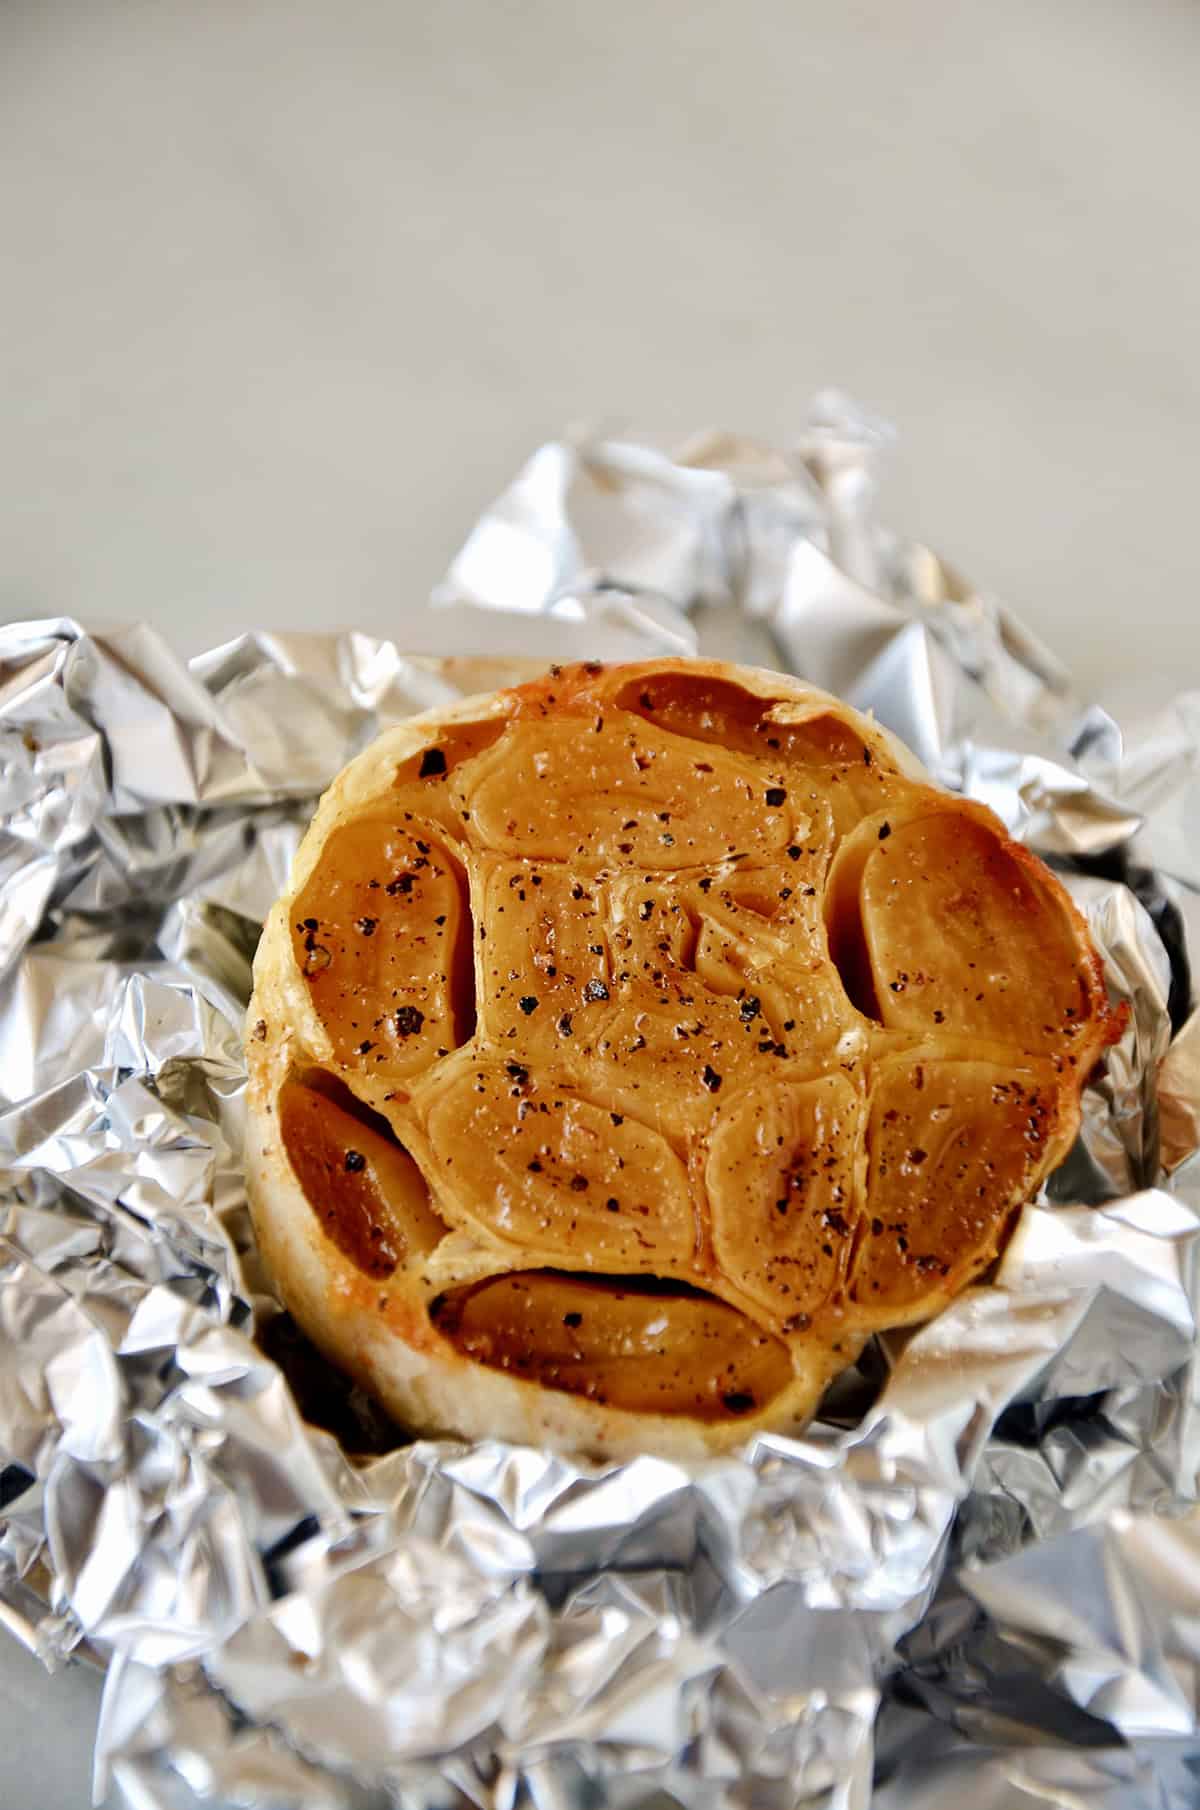
On a scale of 1 to 10, how would you rank your love of garlic? I’m a strong 14. Love it, cannot get enough of it, always double it in every recipe I am making. If you’re a garlic fan, you’ll love this homemade baked macaroni and cheese! Someone cue the whole head of roasted garlic. Yes, an entire head of garlic that’s roasted, mashed and then whisked into the easiest, cheesiest cheddar sauce.
The beauty of roasting the garlic before whisking it into the cheese sauce is that it both mellows the sharpness and intensifies the earthy richness of the garlic flavor. It’s subtle but oh-so-complementary to ooey, gooey noodles and cheese.
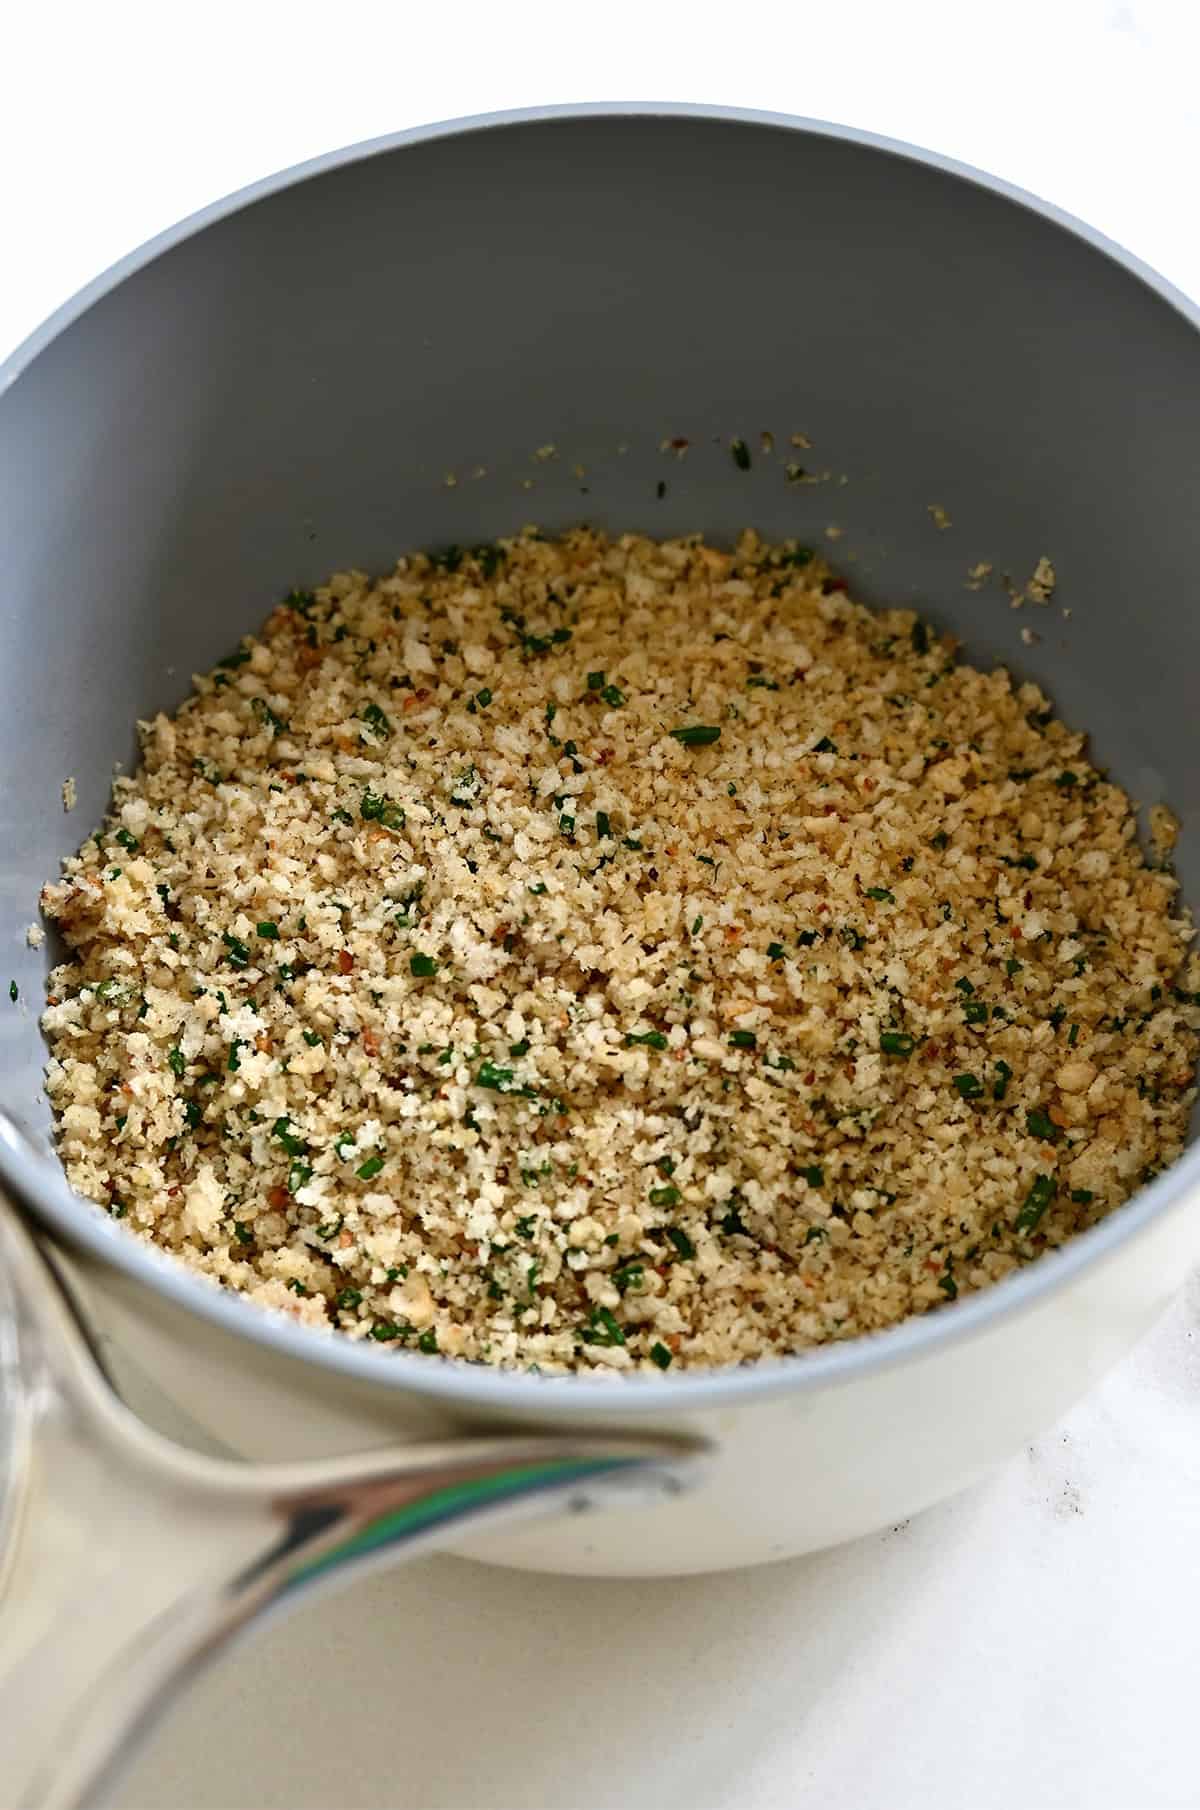
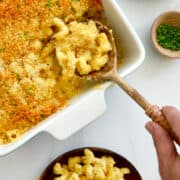
And about that topping? I love the added textural contrast of crispy, toasted breadcrumbs atop a bed of creamy mac and cheese. A simple mix of Japanese panko (superbly crunchy!), unsalted butter, and freshly chopped chives makes for the ultimate golden crust.
See the recipe card for full information on ingredients and quantities.
#1 Tip for the Creamiest Mac and Cheese
Grate your cheese by hand! Pre-shredded cheese is coated in anti-caking agents that keep it from melting smoothly, which can make your sauce grainy. It takes a few extra minutes, but it’s absolutely worth it for the best homemade mac and cheese.
I love using a blend of sharp cheddar for bold flavor and Parmesan for that salty, nutty kick. The combo melts beautifully and gives you a sauce that’s velvety, flavorful and perfectly balanced.
How to Make This Baked Mac and Cheese
Ready to get cooking? Bring the water to a boil and read on for my go-to recipe for creamy baked mac and cheese that can be made in advance and baked until bubbling right before serving.
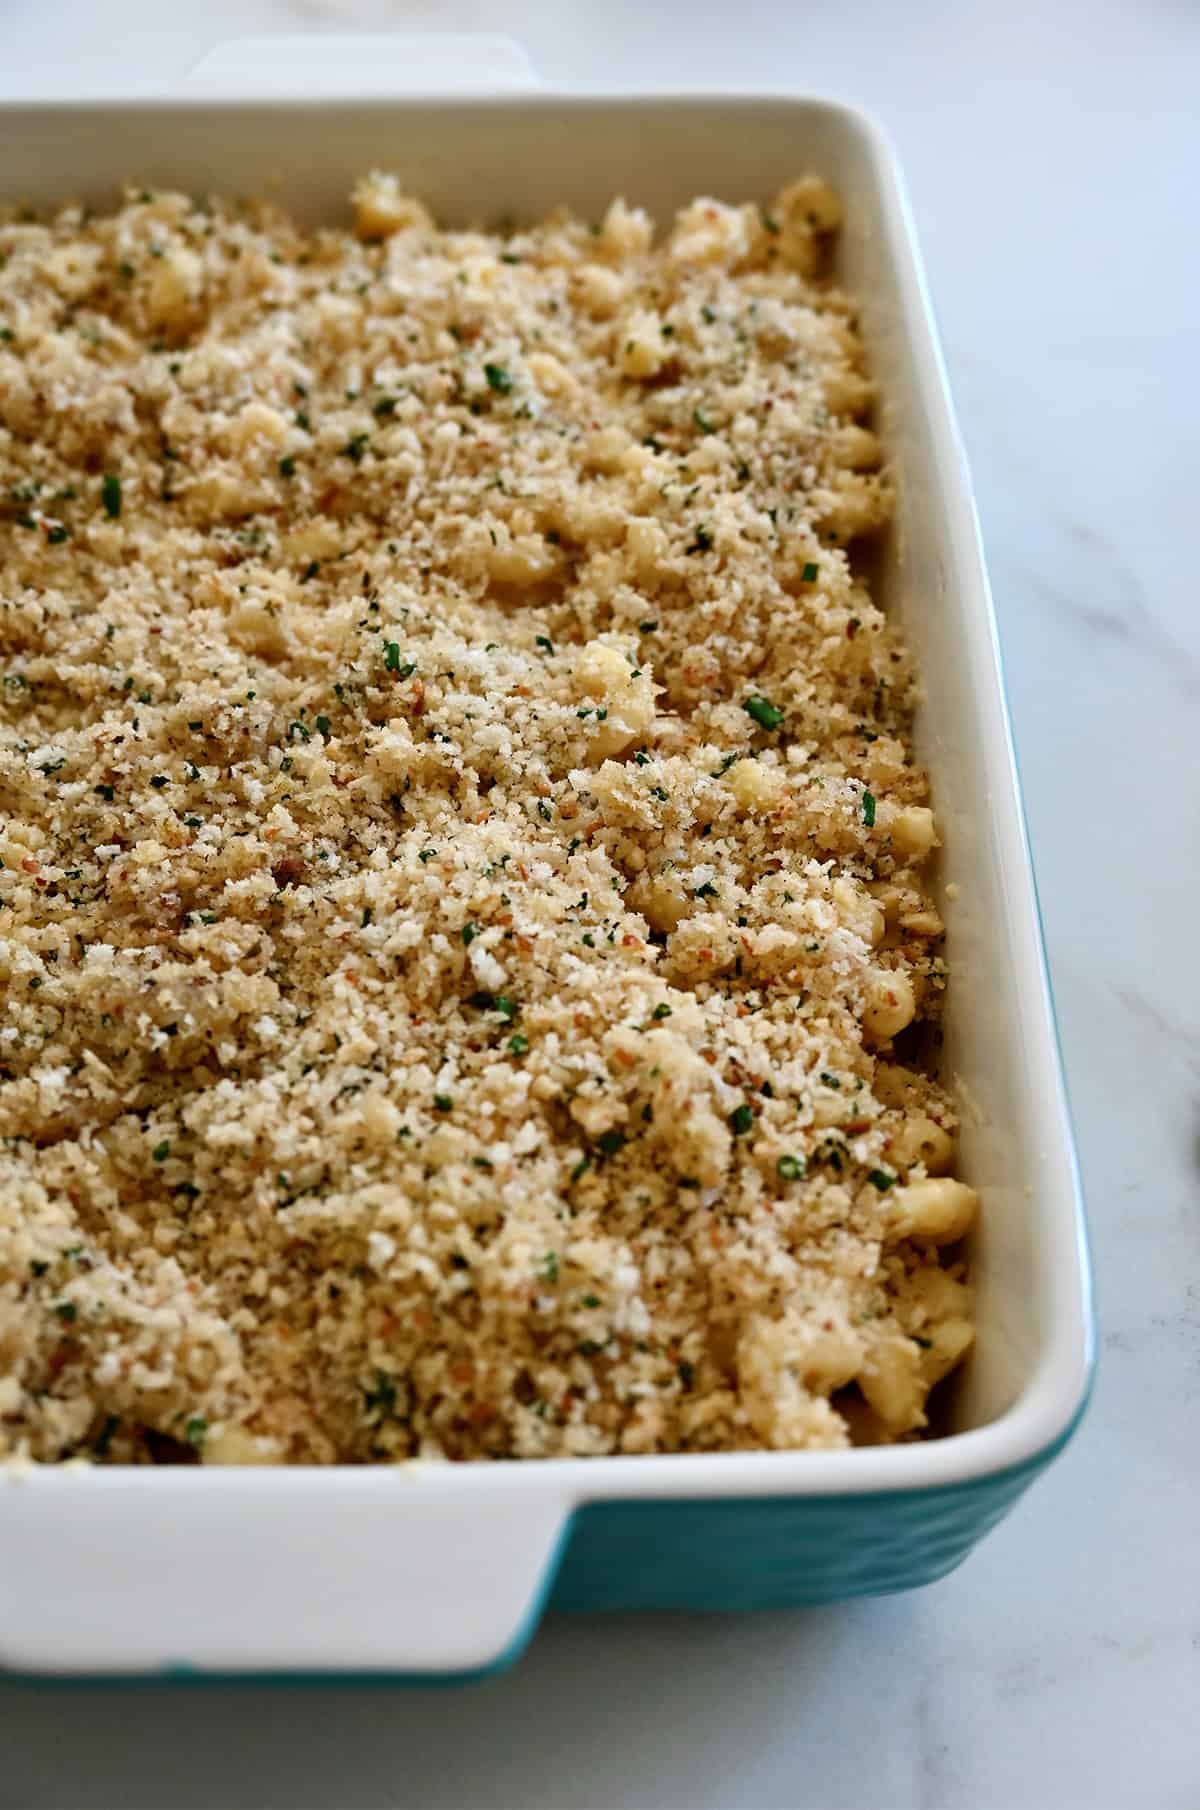
- Make the breadcrumb topping. Toasting the breadcrumbs first adds a nutty flavor and keeps them crisp once baked. Transfer to a bowl and set aside.
- Roast the garlic for 45 minutes at 400ºF. Slice the top third off a whole head of garlic, drizzle the exposed cloves with olive oil, and season with salt and pepper. Place the top back on, wrap in foil, and roast until golden and soft. Cool slightly, then squeeze the cloves into a bowl and mash into a smooth paste.
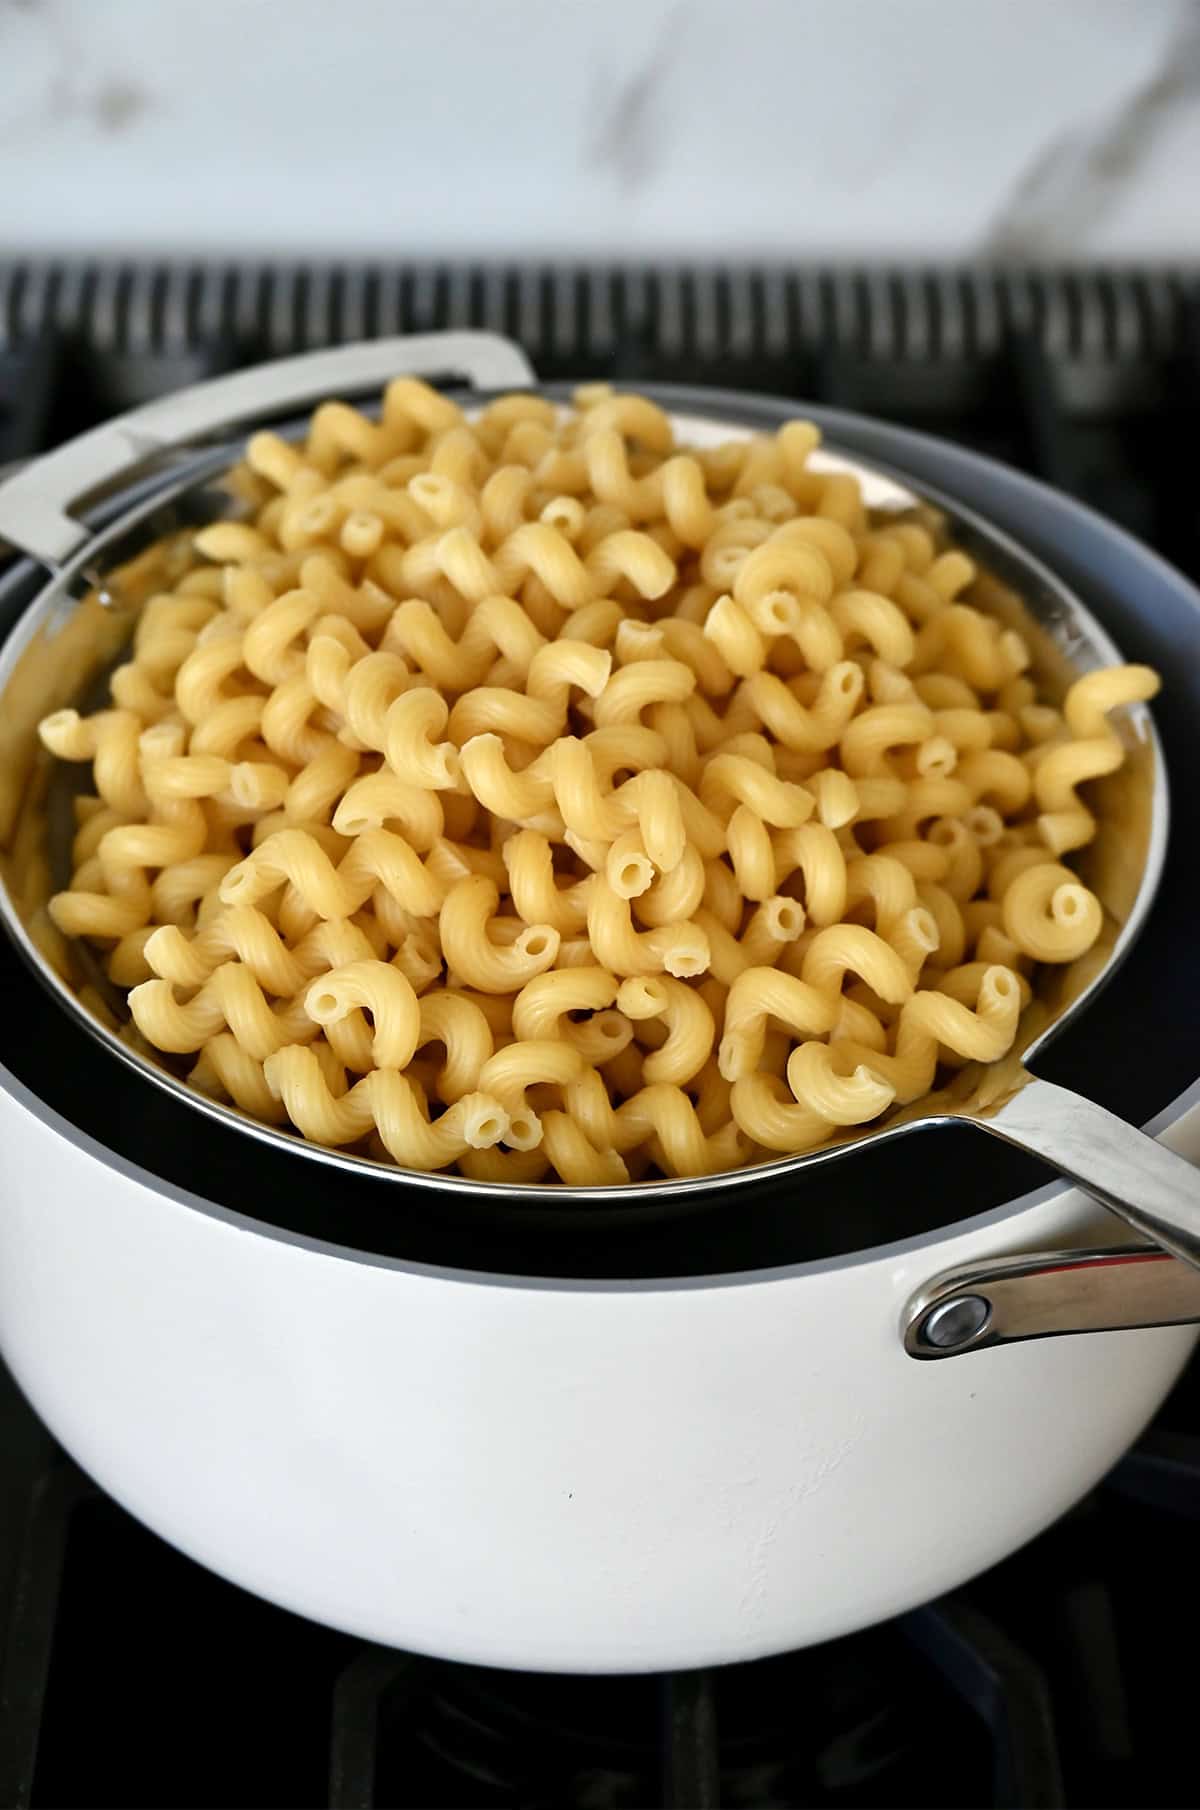
- Cook the pasta just until al dente. Drain, reserving ½ cup of the pasta water.
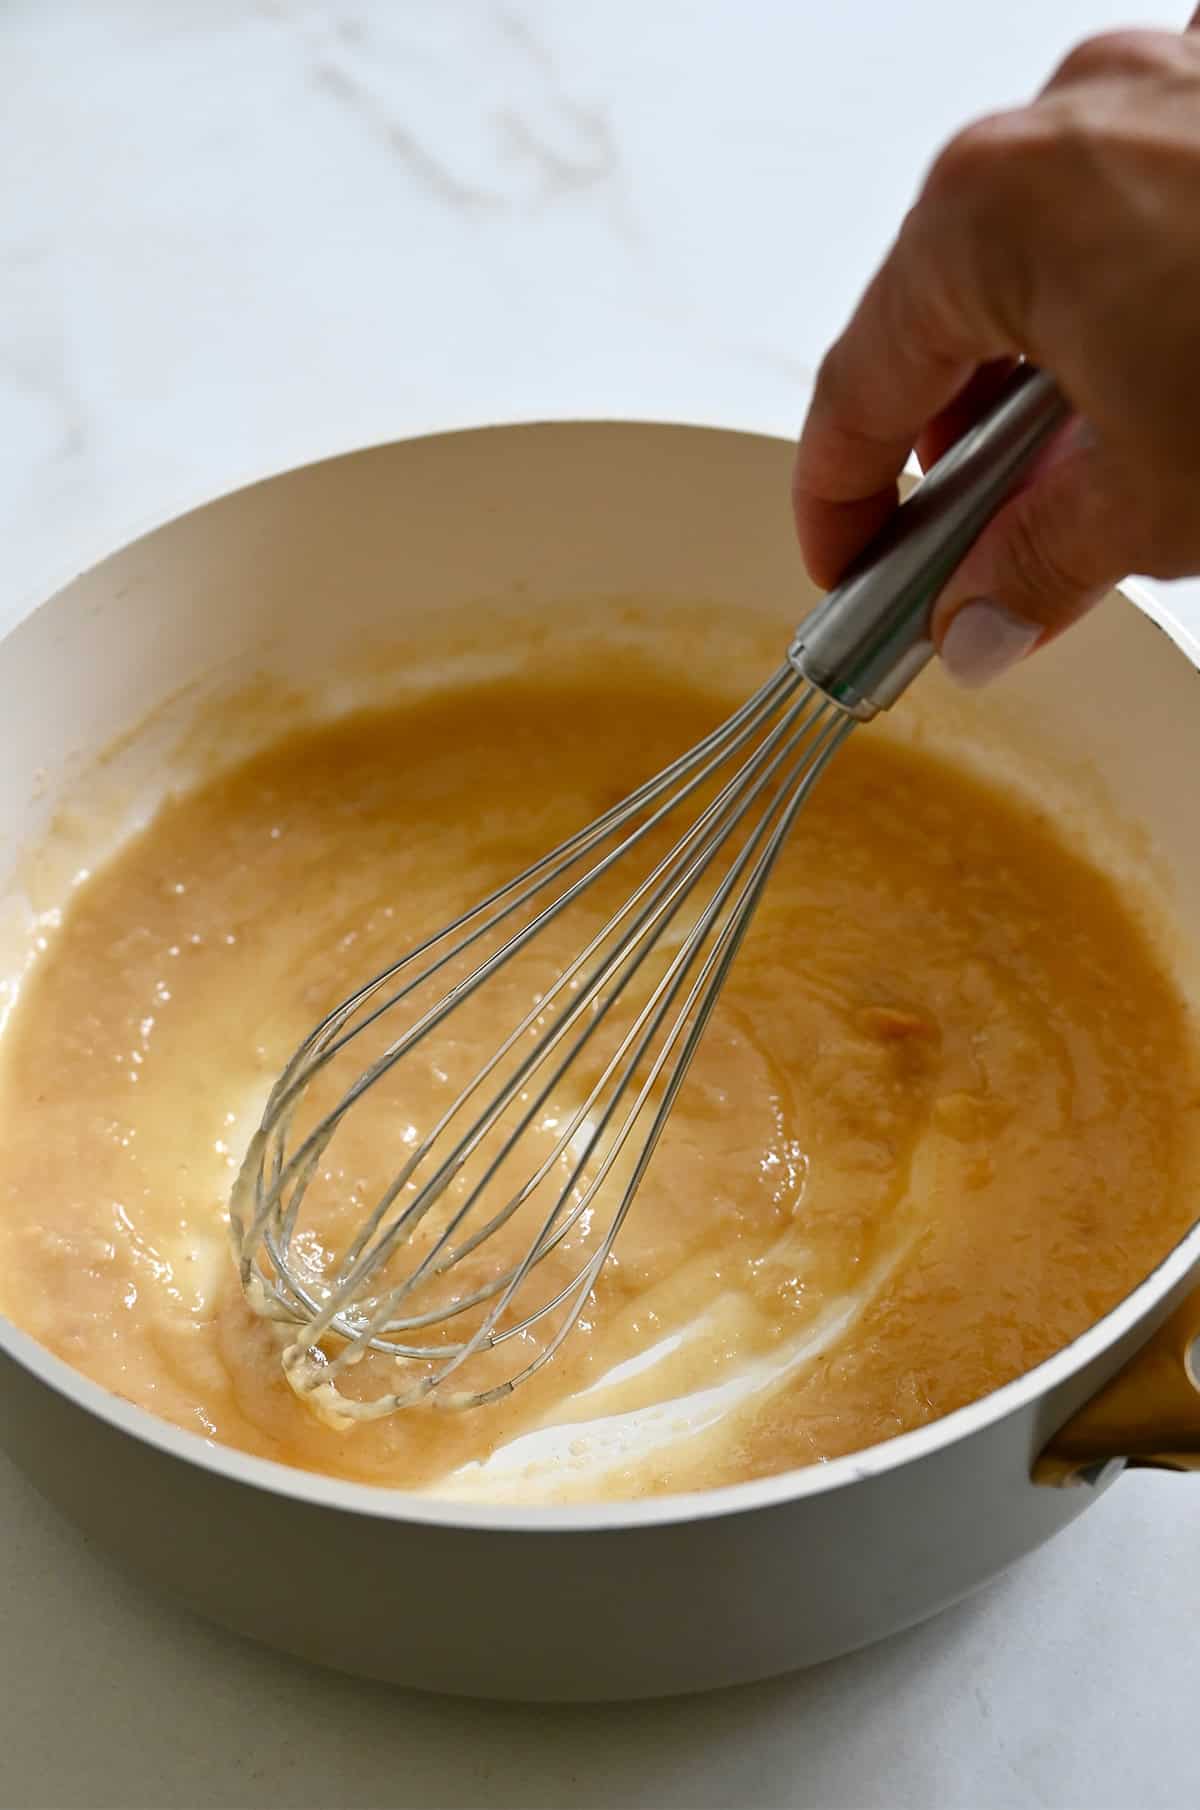
- Make a roux. In a large, heavy pot (like a Dutch oven), melt 1 stick of butter over medium-low heat. Stir in the flour and roasted garlic paste to create a roux, then cook for about 3 minutes until golden and fragrant.
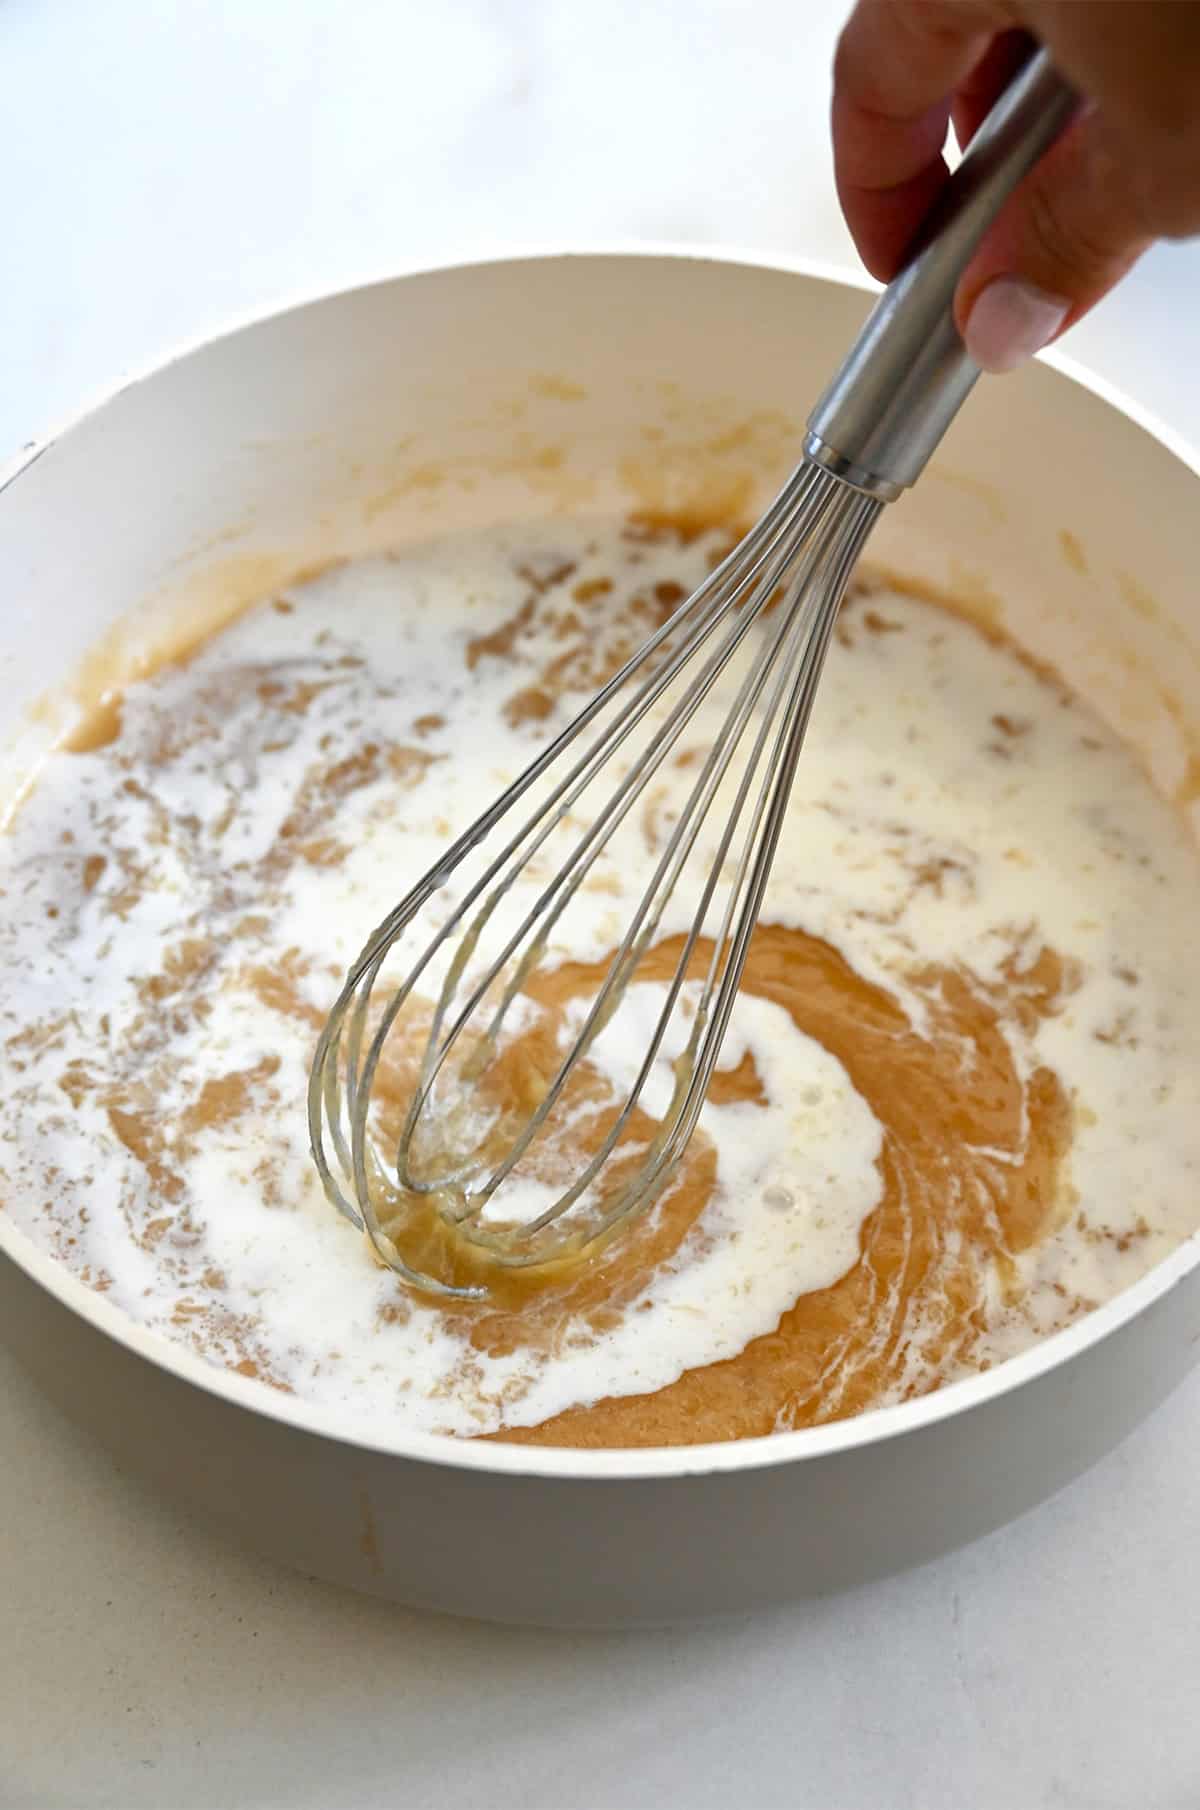
- Slowly whisk in the milk and bring to a gentle boil, whisking constantly. Reduce to a simmer and cook 2 to 3 minutes until slightly thickened.
Kelly’s Tip: For the smoothest sauce, keep the heat low and your whisk moving. If you stop whisking, the flour in the roux can settle and make the texture lumpy.
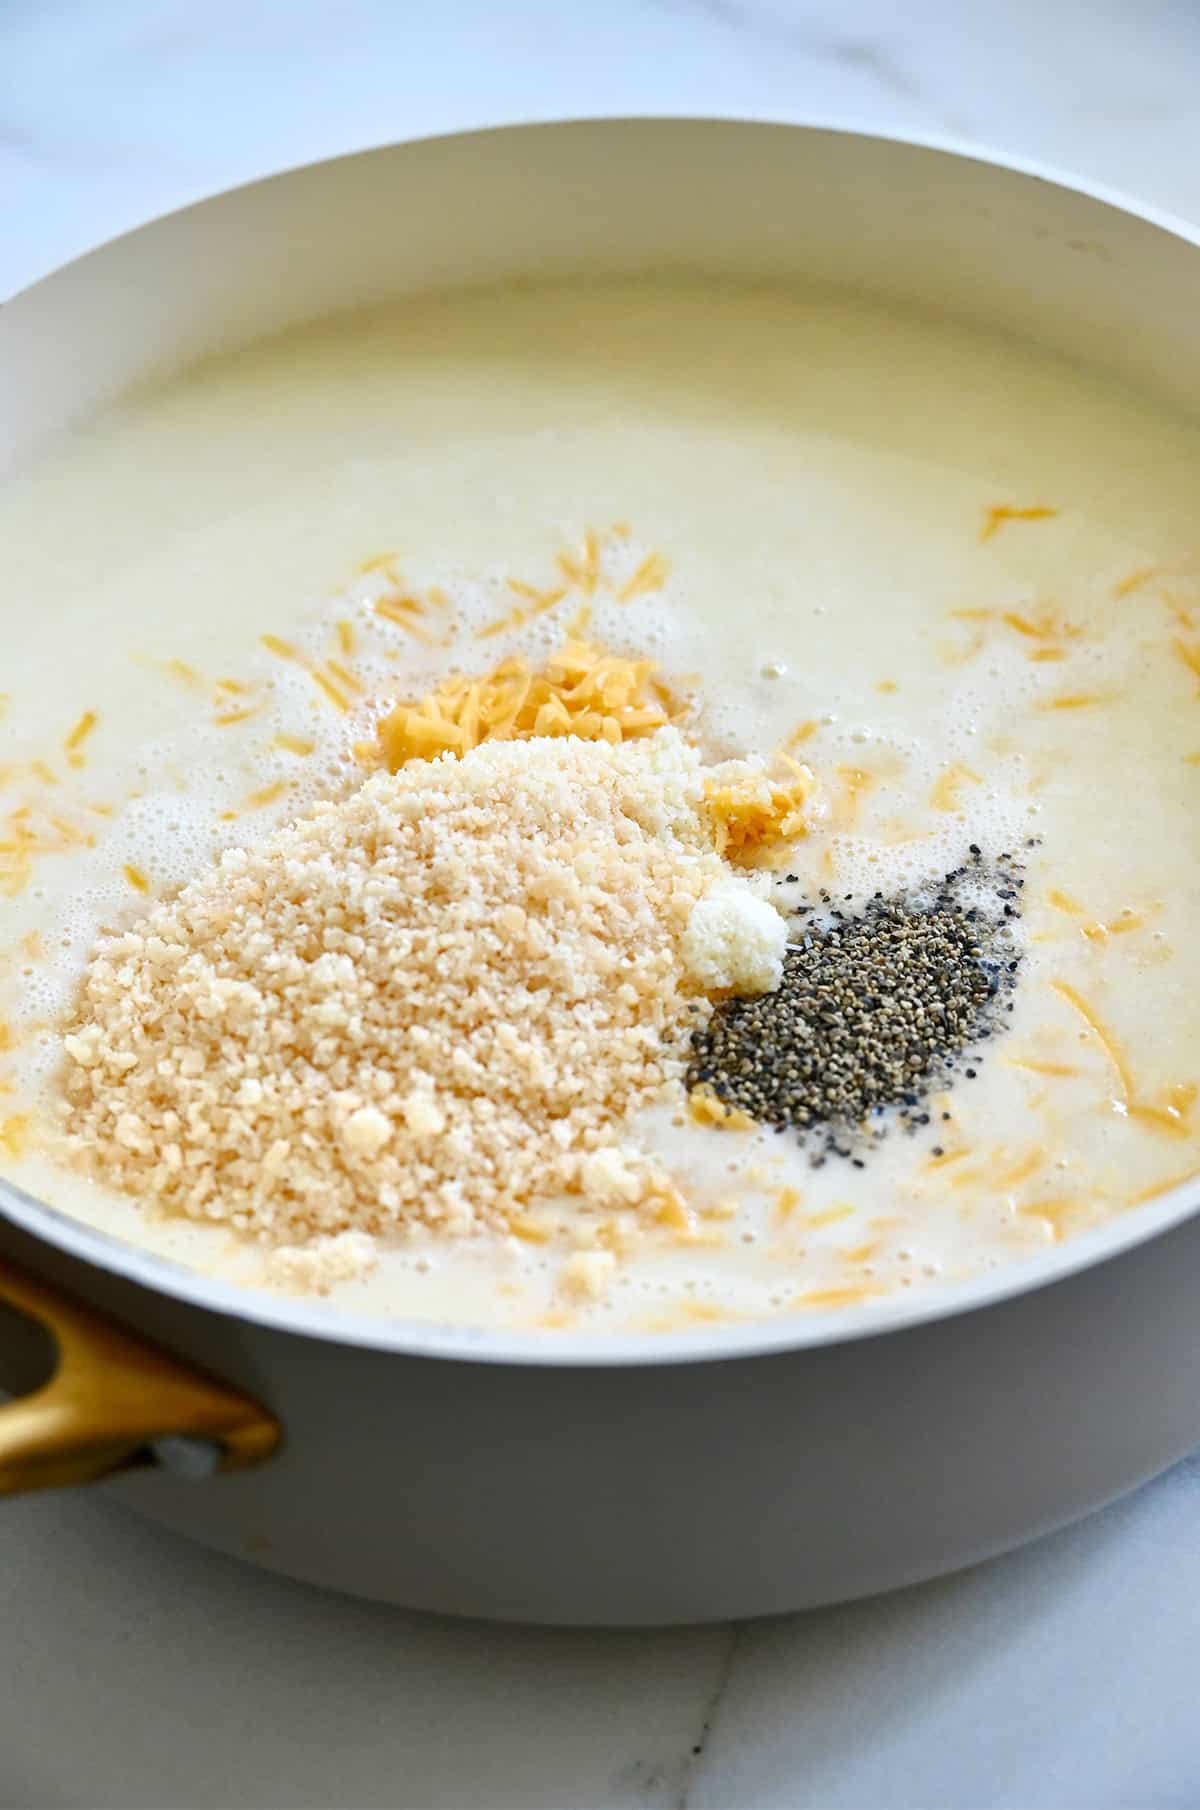
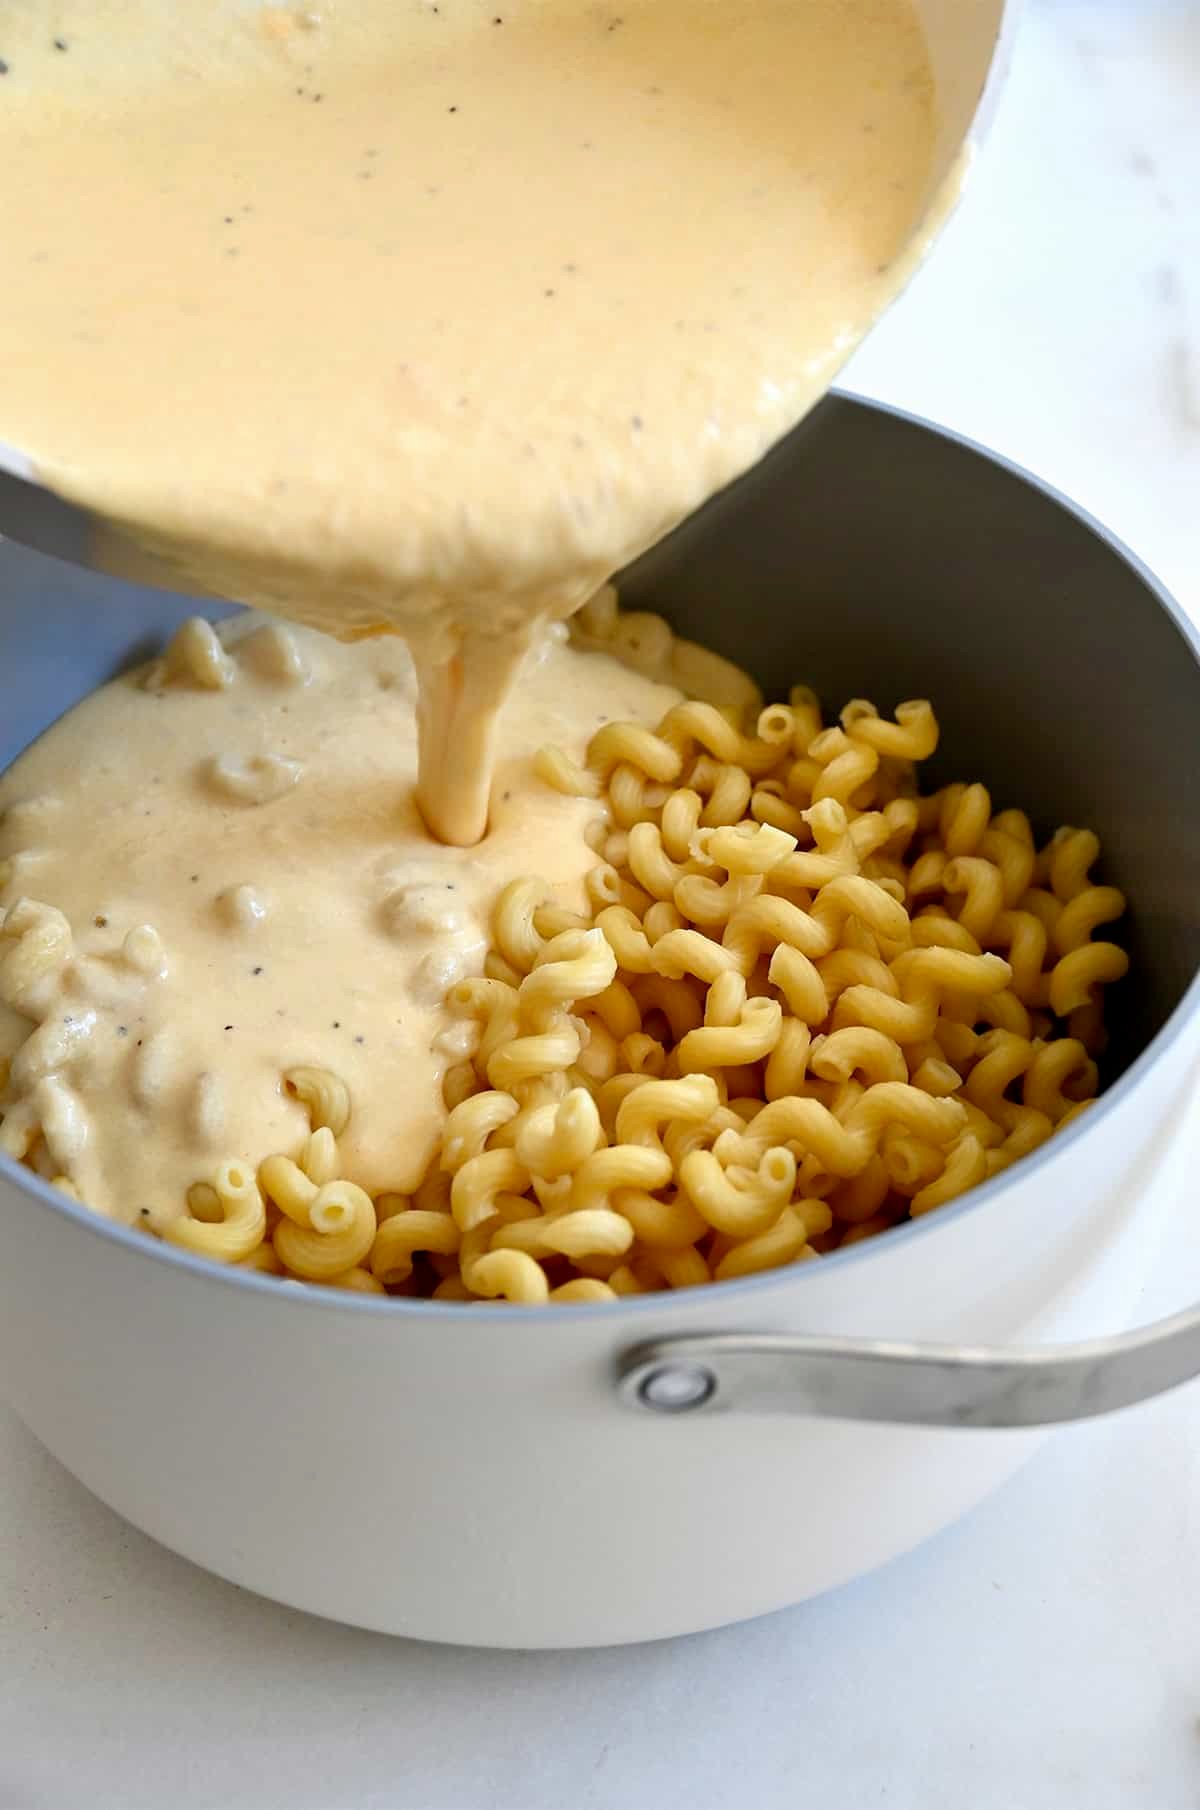
- Build the cheese sauce. Gradually stir in the shredded cheddar and Parmesan, along with the mustard powder, salt and pepper. Add the cheese a handful at a time, whisking between each addition until fully melted before adding more. The sauce should coat the back of a spoon and have a glossy sheen.
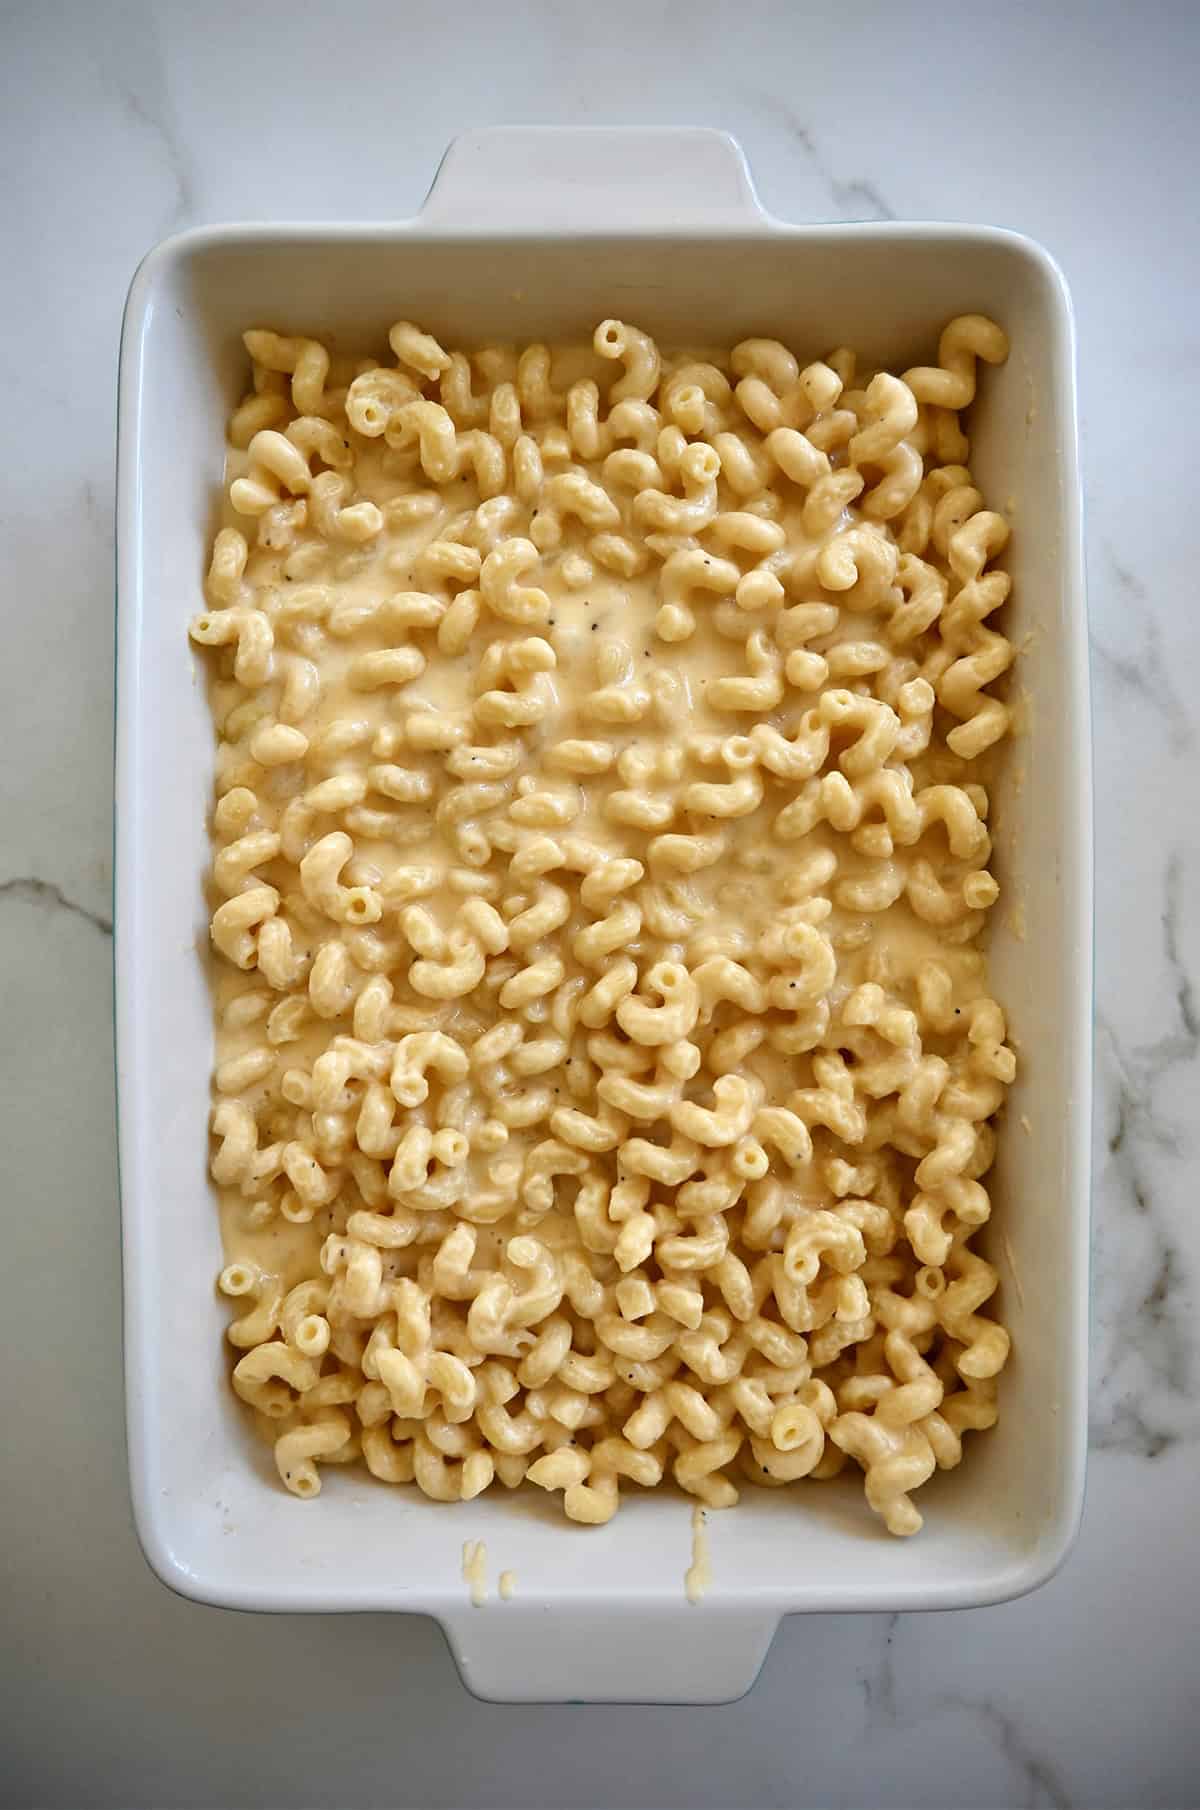
- Combine the pasta and sauce. Stir the cooked pasta and reserved pasta water into the cheese sauce. It will look a little soupy—don’t worry, this is normal! The sauce will thicken as it bakes and cools slightly.
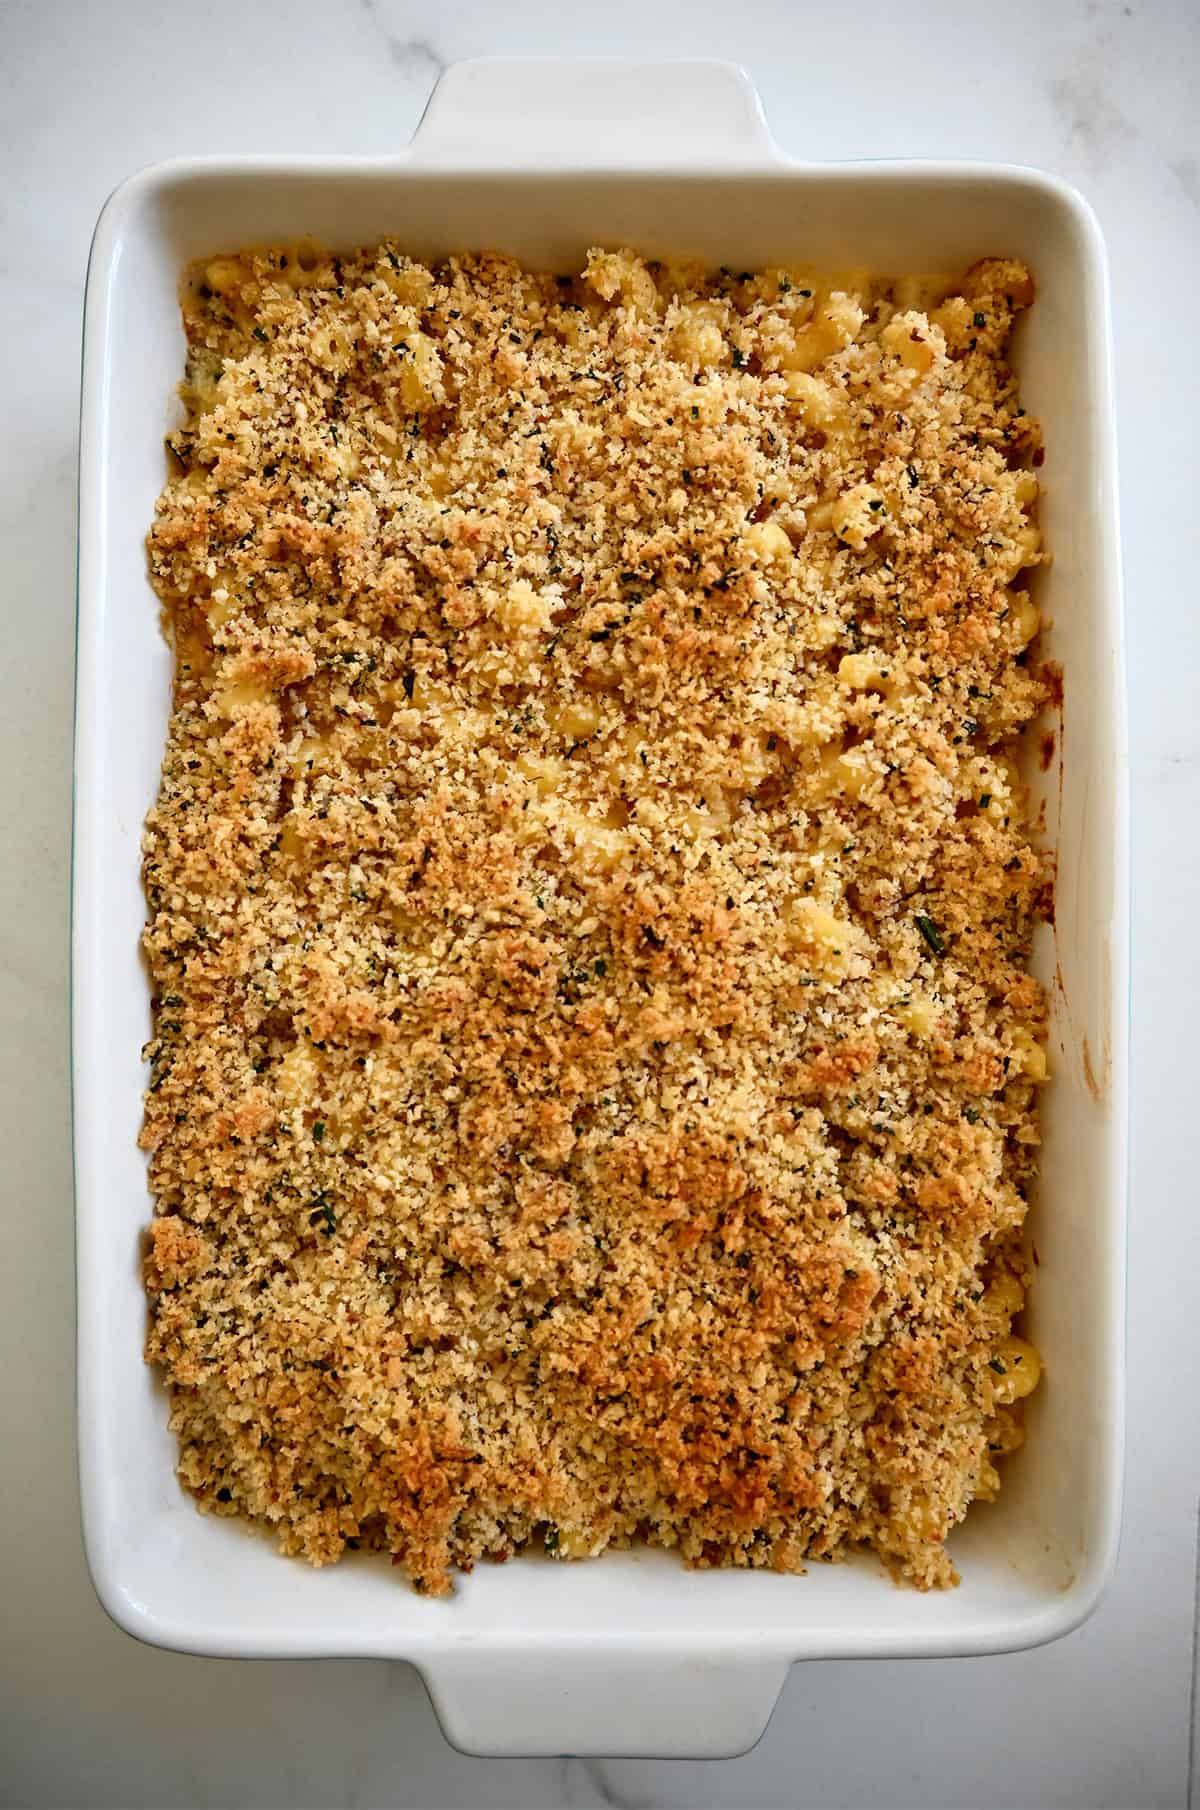
- Assemble and bake. Pour the cheesy pasta into a buttered 9×13 baking dish, then sprinkle the toasted breadcrumbs evenly on top. Place the casserole dish on a baking sheet (just in case it bubbles over) and bake for 20 to 25 minutes, or until golden brown and bubbling around the edges.
Let the mac and cheese rest for 5 to 10 minutes before serving so the sauce can set slightly. This makes for perfectly creamy (not runny!) scoops.
Make-Ahead & Storage Tips
One of the reasons I love this baked mac and cheese recipe (aside from the roasted garlic, of course!) is how well it holds up when made ahead.
- To make ahead: Assemble the mac and cheese up to the point of baking, but don’t add the breadcrumb topping yet. Let it cool completely, cover tightly with foil, and refrigerate for up to 2 days. When you’re ready to bake, sprinkle on the topping and bake as directed, adding about 10 extra minutes if it’s coming straight from the fridge.
Kelly’s Tip: If you’re prepping ahead, undercook the pasta by 1 to 2 minutes. It’ll continue to cook as it bakes, so this trick keeps it from turning mushy.
- To store leftovers: Cover and refrigerate for up to 4 days. Reheat individual portions in the microwave or warm the entire dish in a 325°F oven until heated through. You may want to stir in a splash of milk before reheating to keep the sauce smooth and creamy.
- To freeze: Let the baked mac and cheese cool completely, then wrap tightly in plastic wrap and foil. Freeze for up to 2 months. Thaw overnight in the fridge, then reheat covered at 325°F until warmed through. After freezing and reheating, the topping may soften slightly. For that just-baked crunch, pop it under the broiler for 1 to 2 minutes before serving.
My Favorite Pairings
This creamy, garlicky macaroni cheese can totally hold its own as a main dish, but it also makes the ultimate side for holidays (hello, new favorite Thanksgiving side dish!) or weeknights alike. Here are a few of my favorite pairings:
- Crispy chicken cutlets (Noni’s style, of course!), pan-seared steak or roasted chicken
- Green veggies like roasted Brussels sprouts, roasted green beans, or a simple salad with lemon vinaigrette
- BBQ favorites, from Instant Pot pulled pork to oven-baked ribs
- Homemade garlic knots (my fave!)
Ingredients
For crumb topping:
- 4 Tablespoons unsalted butter
- 2 cups Panko Japanese bread crumbs
- 3 Tablespoons chopped fresh chives
For pasta and sauce:
- 1 head garlic
- Olive oil
- 1 pound uncooked pasta (such as cavatappi, shells or rigatoni)
- 8 Tablespoons unsalted butter
- 6 Tablespoons all-purpose flour
- 5 cups whole milk
- 5 1/2 cups coarsely shredded cheddar cheese (white, yellow or a mix of both)
- 1/2 cup grated Parmesan cheese
- 1/2 teaspoon ground mustard powder
- 1 1/2 teaspoons salt
- 1 teaspoon ground black pepper
Instructions
Make the crumb topping:
- Melt the butter in a medium saucepan over medium heat. Add the breadcrumbs and chives, stirring to combine. Cook for 1 to 2 minutes until toasted slightly. Transfer to a small bowl and set aside.
Make the pasta and sauce:
- Preheat the oven to 400ºF.
- Slice the top one-third off the head of garlic. Place the bottom portion on a piece of foil, drizzle it with olive oil, and season it with salt and pepper. Place the top portion back on the head of garlic and crumple the foil to create a sealed packet. Roast the garlic until golden and soft, about 45 minutes.
- Remove the roasted garlic from the oven and squeeze the cloves into a bowl. Using a fork, mashing the cloves into a paste. Set aside.
- Cook the pasta in a large pot of well-salted water until al dente. Drain the pasta, reserving ½ cup of the cooking water. Butter a 13×9-inch shallow baking dish.
- In a large, heavy saucepot (such as a Dutch oven), melt 1 stick butter over medium-low heat. Stir in the flour and reserved garlic paste. Cook the roux, stirring constantly, for 3 minutes until golden. Whisk in the milk. Bring the sauce to a boil, whisking constantly, then reduce it to a simmer and let it cook for 3 minutes. Stir in the shredded cheddar cheese, Parmesan cheese, mustard powder, salt and pepper until well combined.
- Add the pasta and the reserved ½ cup of pasta water to the pot, stirring to combine. (It will be soupy.) Transfer the macaroni and cheese to the buttered baking dish. Sprinkle it with the reserved crumb topping and place it on a sheet tray (in the event it bubbles over while baking). Bake the macaroni and cheese for 20 to 25 minutes until it’s golden brown and bubbling.
Kelly’s Notes
- The garlic head can be roasted, and the garlic gloves mashed, 1 day in advance. Store the garlic paste, covered, in the fridge.
- The macaroni and cheese can be baked in a large baking dish or several smaller ramekins for individual servings.
- ★ Did you make this recipe? Don’t forget to give it a star rating below!
Nutrition
Did you try this recipe?
Leave a comment below with your star rating!
This post may contain affiliate links.
Recipe inspired by Epicurious.


Wow wow wow!! Made it for Thanksgiving and still enjoying the leftovers. Spectacular flavor and super easy to make. Whole fam gobbling it up.
So glad you all enjoyed it, Stephanie!
Unfortunately I couldn’t taste the garlic at all, and neither could anyone in my family. That was disappointing. The roasted garlic flavor was so mild that the cheese subsumed it all. I would maybe try three heads next time? Surprised nobody mentioned this.
Sorry you didn’t enjoy it, Sandy. Feel free to add additional garlic (or garlic powder) next time.
I wish I could post a picture of the delicious monster I made from this. Wholeheartedly, thank you!
So thrilled you enjoyed it, Blayne!
I found this recipe soooo many years ago and it has been a dish for thanksgiving and Easter for us! Huge crowd pleaser!
Love reading this!
My favorite mac & cheese recipe, hands down! So creamy and delicious. Sometimes I add 3/4 lb of crumbled bacon and when I do, I add nearly a cup of the pasta/cooking water.
I’m so happy to hear that you enjoy the recipe, Cathy and with bacon sounds great!
A friend made this for a party and I was so blown away I had to get the recipe. Now making it for the 2nd time for a Friendsgiving. I use a mix of three cheddars (regular, sharp, and Irish) and gruyere. Adore this recipe, thank you! :)
Hi Kelly!!
I want to make this recipe for about 20 people as a Thanksgiving side dish. Would you say to quadruple the recipe? (About 4 one-pound boxes of pasta). Or is that too much?
Hi! I think 3x the recipe would be plenty!
Hi Kelly,
I made two boxes, and it made so much that I only brought one huge pan of it with me and there were STILL leftovers because all the other food that everyone brought!
So, first of all, the recipe was a HUGE hit! My only self-criticism was that I put too much panko crumbs on the dish. Next time, I’ll use more of a dusting of them.
Second, what is the best way to reheat this? Is there a way to get the mac and cheese “gooey” again? I think it actually tasted better before I put it in the oven!
So glad you enjoyed the recipe, Dave! Best way to reheat it is either on the stovetop over low heat (in a pan; you can add a splash of milk to moisten it and cook it low and slow) OR in the microwave, stirring after every 30-second increment. Enjoy!
The best garlic macaroni recipe I’ve ever made! I make this for every family event and company party, all my friends request it for their birthdays. Definitely an absolute favorite of mine+
Love, love, LOVE reading this, Jessica! I’m so thrilled you’ve been enjoying the recipe!
Fantastic! My son wanted Disneyland garlic Mac and cheese (DCA food festival) for his birthday – I swapped out 1 cup of cheddar for smoked Gouda. He said it is perfect! Just like Disney! In fact he thinks i asked for their recipe. I think they swiped it from you! This is a wonderful recipe. Clear, complete directions. Creamy and favor packed. Really the best Mac and cheese recipe I have ever made. My son is very grateful for making his birthday meal dreams come true. Thank you!!
I’m so thrilled to read this, Jennifer!
This was absolutely delicious. So much so, that we had it for dinner and I had it for leftovers for lunch and dinner the next day ( can’t let good food go to waste you know). I’d recommend it to anyone who loves tasty recipes. Thank you for this wonderful recipe! Thanks!
I’m so glad you enjoyed the recipe, Sonia!
Thank you for this superb recipe Kelly ! It came out perfect. Loved the garlic flavor in it too !
Have 2 queries for you :
1. My cheese curdled a bit when melting it in the pot . The milk was hot enough when I added the cheese, and I was stirring it consistently .
Why do you think it curdled ? Is it because the cheese I used was a bit cold due to being in the fridge ? Or the milk being too hot ?
2. My oven temp limit is 400 F. So every 7/8 mins it shuts off due to the temp slightly crossing 400 F. I had to restart the cooking a couple of times due to this . So would it be okay if I cooked it at a slightly lower temp, e.g. 380 F, but for a slightly longer period ?
Hi there! Make sure you’re using whole milk, as lower fat milks are more likely to curdle, especially if the sauce is brought to a boil. And yes, feel free to cook at a slightly lower temp until it’s golden brown and bubbling.
WOW this is an unreal recipe! I’ve always made homemade mac and cheese with DISMAL results and this is the first one that has been unreal good! I think it’s a combination of the amazing added flavour of the roasted garlic (vs the powdered that most recipes call for) and the extra liquid that’s added from the pasta water. This was AMAZING!
I also added some broccoli to my recipe (cooked it in the last few minutes with the pasta) so I felt like I was at least getting SOME veggies!
Thanks so much for the recipe! I will definitely be making again!
Woohoo! I’m so thrilled you enjoyed the recipe, Allison! And I love your addition of broccoli :)
I absolutely love your recipe! I am writing vegetarian recipe round ups on my blog in 2019 for people who are trying to make more meat-free meals (everyone has to start somewhere). I would love to feature you. You can check out my blog (for beginner environmentalists) Sunshine Guerrilla. Is it alright if I share this link to your recipe?
Hi Barbara – I’m so thrilled you enjoyed the recipe! Yes, you may share a link back to this recipe.
I used this recipe to make a vegan mac and cheese and it turned out sooo freaking YUM! Used Earth Balance vegan butter, Califia almond milk and Follow Your Heart cheddar and parmesan cheese to replace all the dairy ingredients. It was my first time making it from scratch but your recipe was so quick and easy to follow I shocked myself with how good it was lol. Thank you!
Woohoo! I’m so thrilled to hear you enjoyed the recipe!
Could I possibly make this entirely a day ahead and refrigerate, and then bake before serving?
Hi Patty! I’ve never tried that before but I think as long as you keep it covered securely with plastic (so it doesn’t dry out), it should work. Would love to hear your results if you give it a shot!
This recipe was simple and delicious! I’ve tried a lot of I LOVE roasted garlic macaroni with garlic recipes, and with this one I feel like I finally hit gold! Full taste, beautiful colour, perfect salt, That is exciting! I am so happy for you!Thank you for this delicious recipe.
So glad you enjoyed the recipe!
Made this last night, my husband and I LOVED it! The garlic was such a delicious touch. I plan on making this for Christmas this year mmm!
I’m so thrilled you enjoyed the recipe, Kelly!
Quick question: would you be able to make these the night before, and reheat the next day? I would wait to put the breadcrumbs on top until I was reheating them. Thanks!
Hi Kelly – I’ve never tried that before, but I think as long as you keep it covered securely with plastic (so it doesn’t dry out), it should work to make it, refrigerate it and then bake it. Let me know if you give it a shot!
My hubby and I LOVED this recipe. Thank you!!!!
SO glad you enjoyed the recipe, Rachel!