
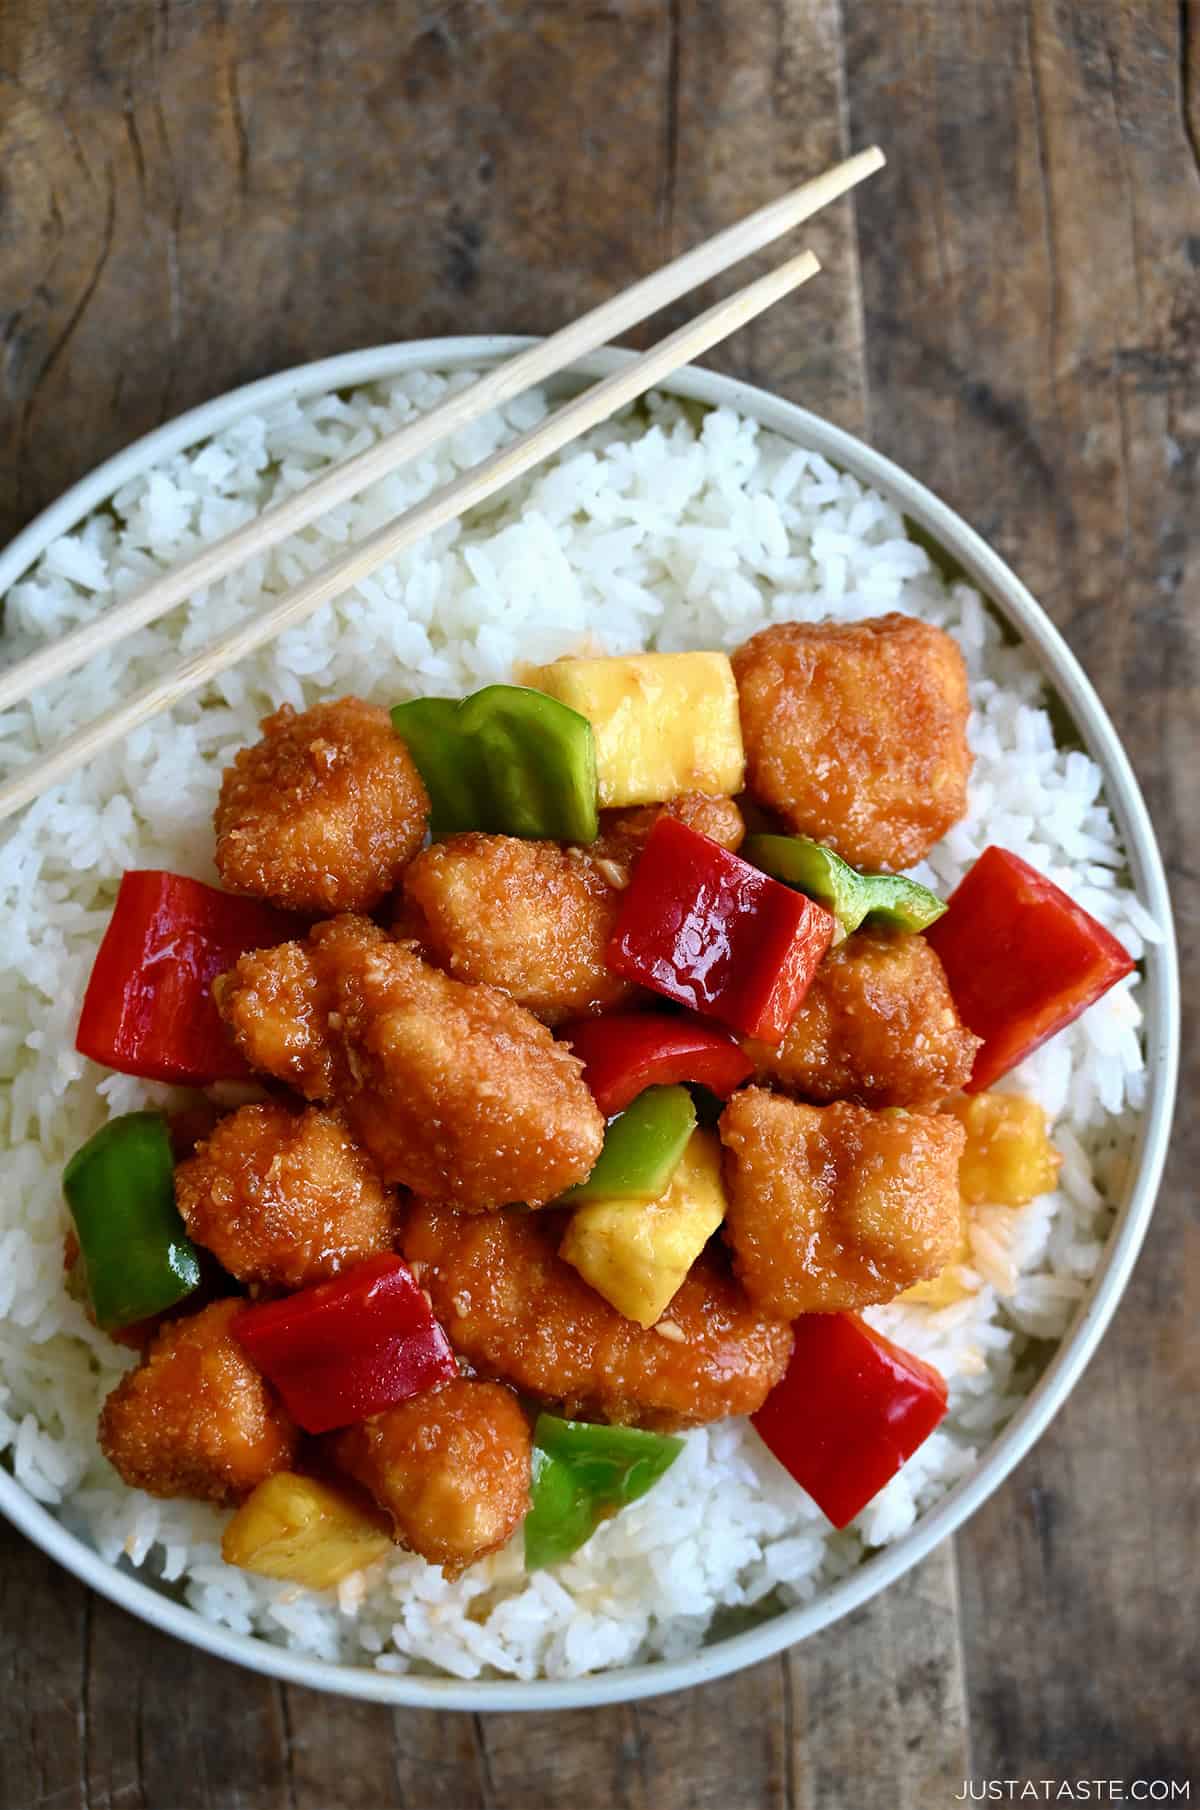
Ditch the takeout menus in favor of this easy homemade sweet and sour chicken starring crispy battered chicken, juicy pineapple, and colorful bell peppers tossed in a quick-fix DIY sweet and sour sauce. Serve it over rice, and dinner is done!
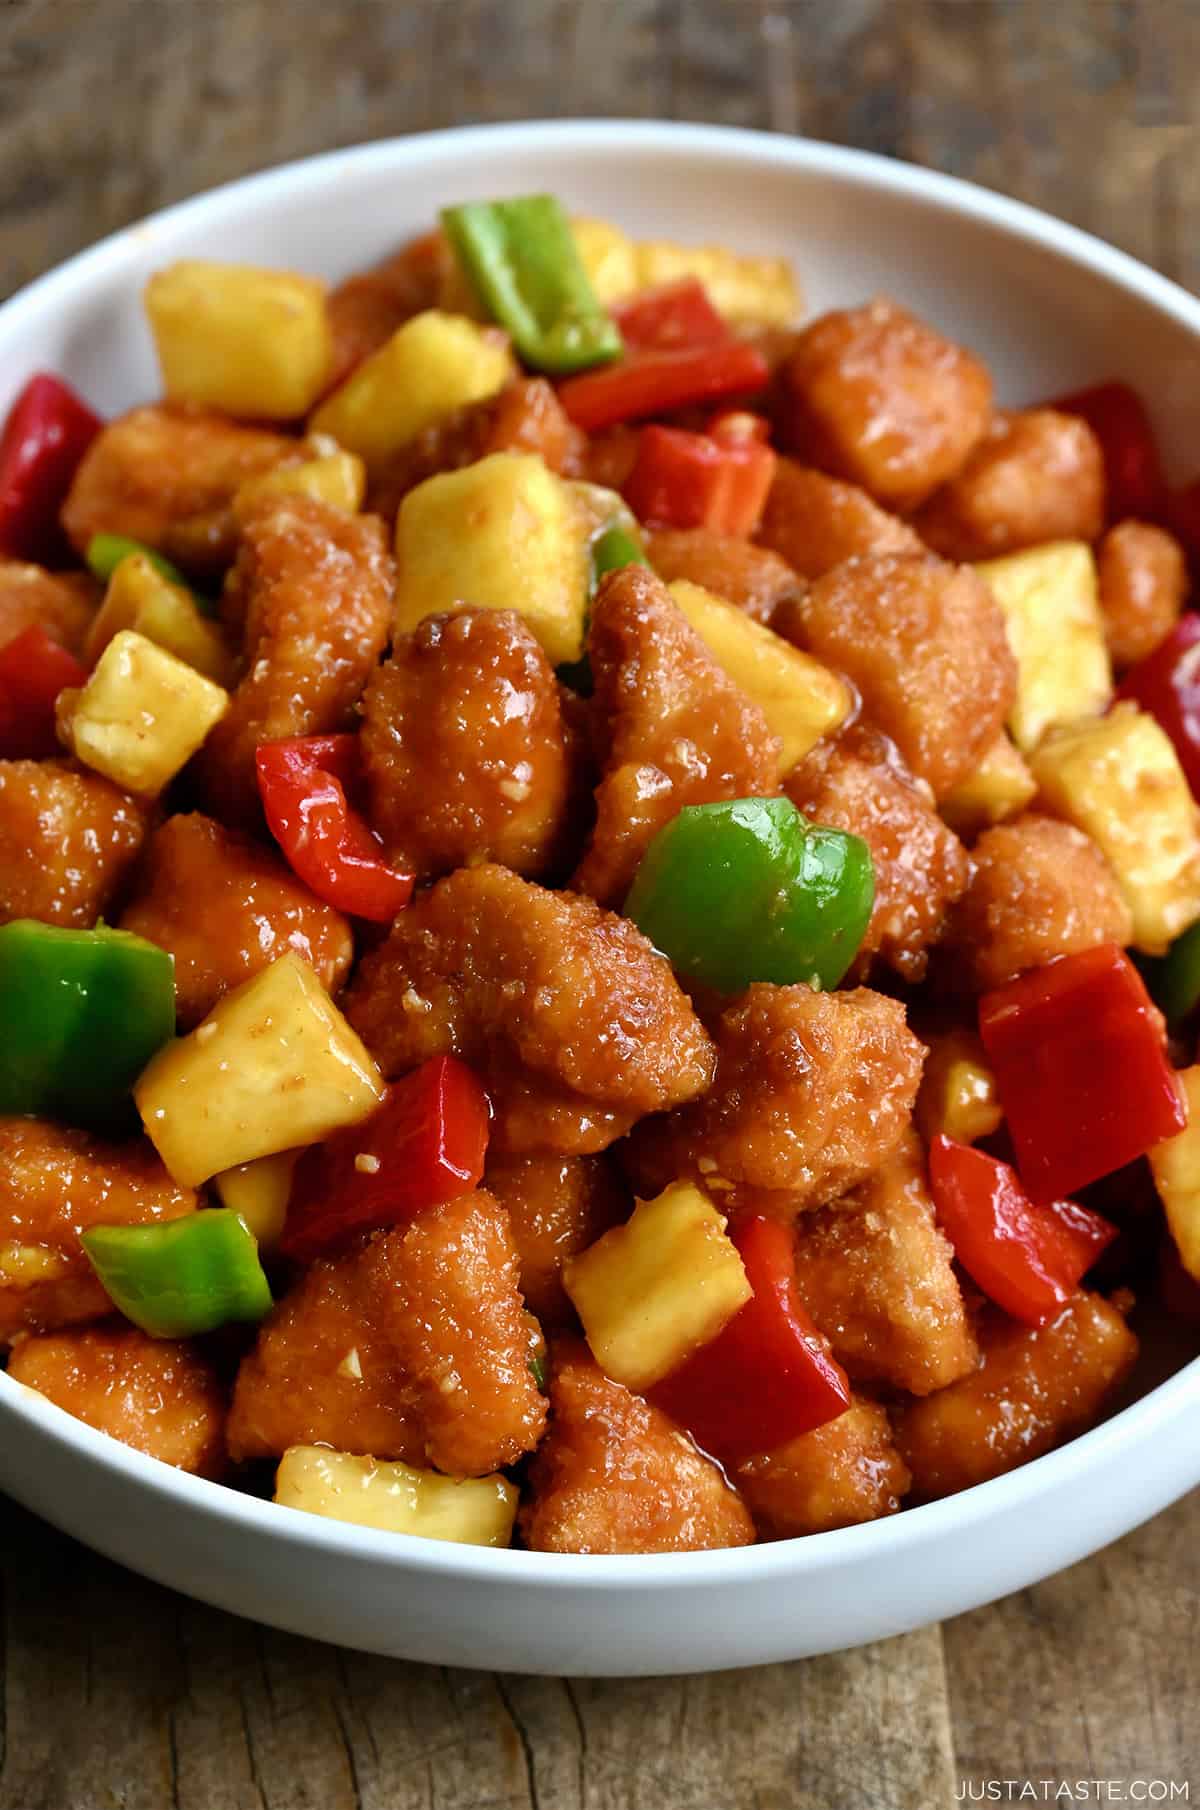
Table of Contents

Takeout-inspired recipes have been a longtime favorite around here, so it was about time I added one of my all-time favorites to the lineup. Welcome to the takeout-fakeout party, sweet and sour chicken!
The setup here couldn’t be easier: bite-sized pieces of chicken get a light Panko coating, then take a quick dip in hot oil until golden and crispy. While the chicken fries, you’ll whip up a simple homemade sweet and sour sauce that’s actually balanced—not cloyingly sweet or overly sour.
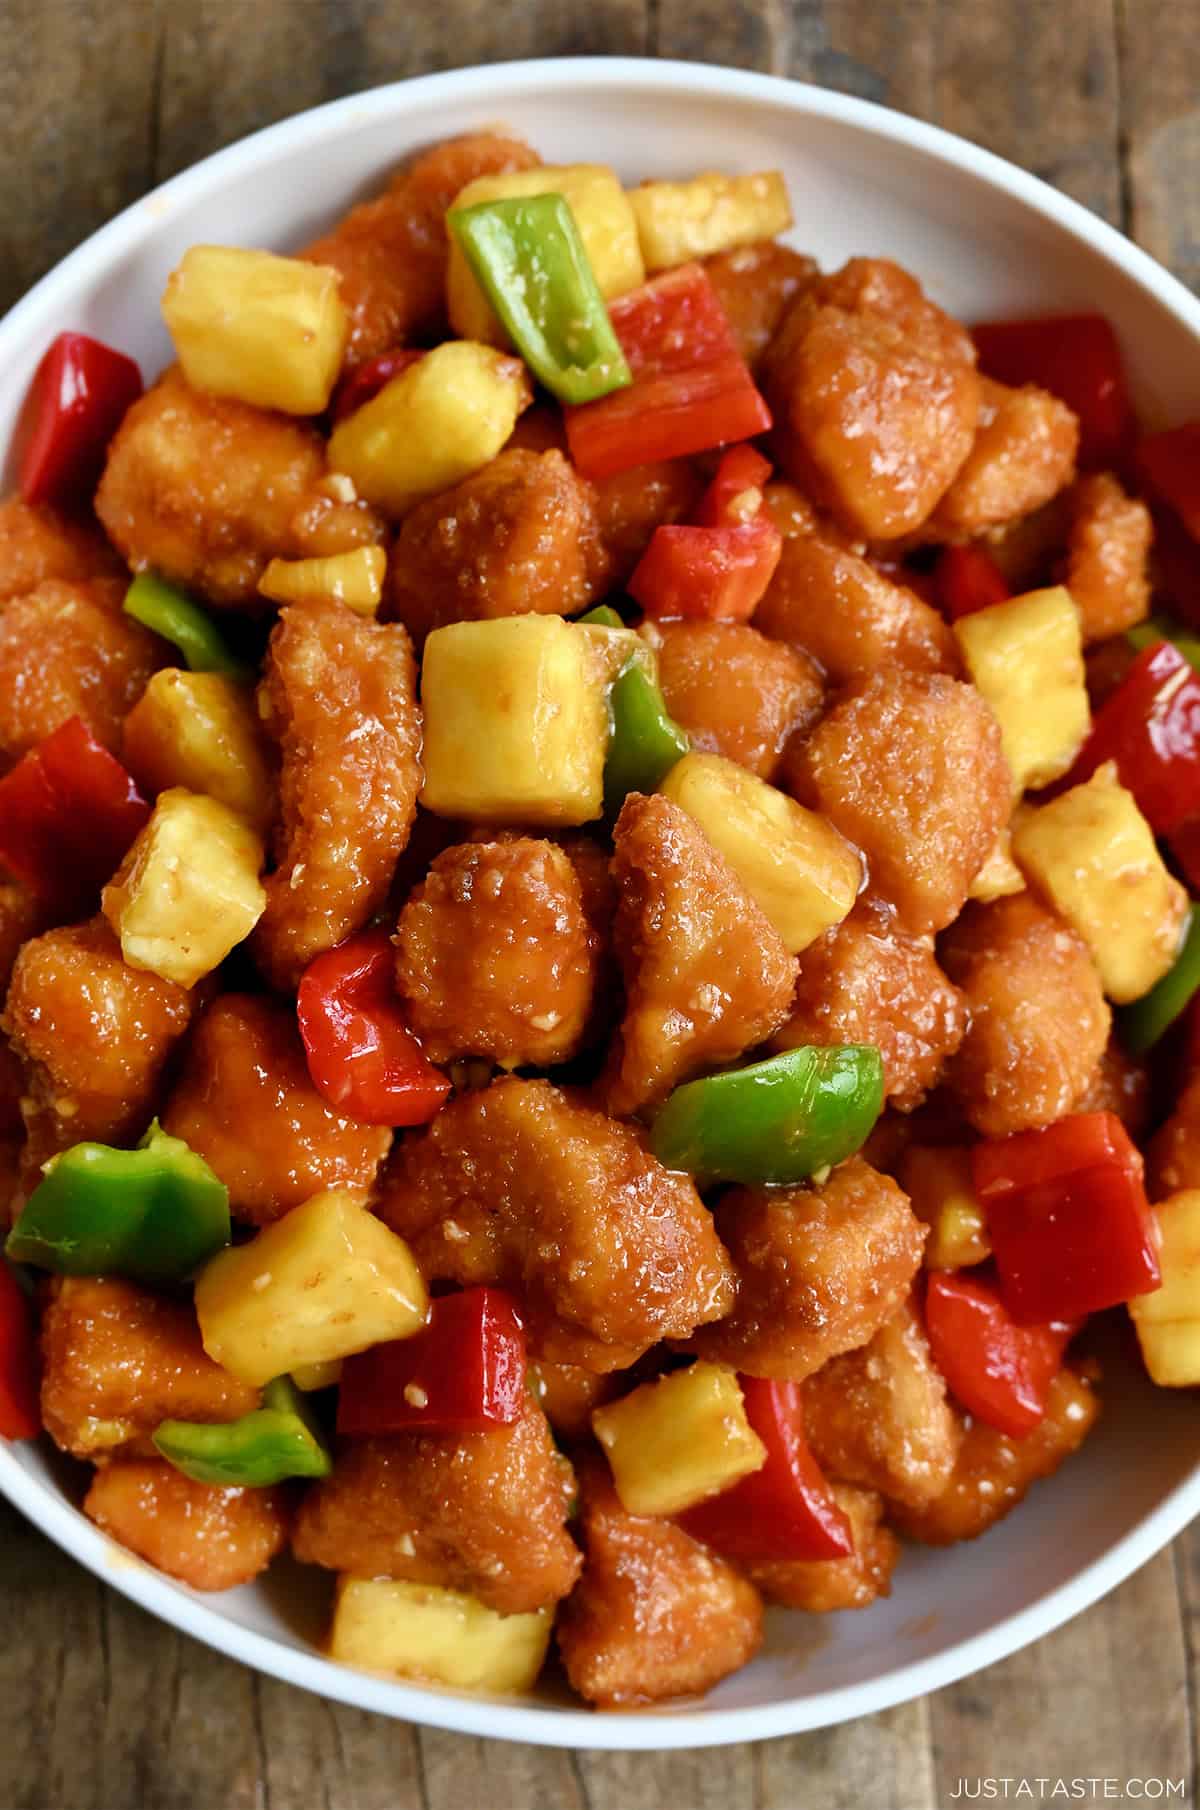
Once everything’s ready, the crispy chicken gets tossed with juicy pineapple and colorful bell peppers, before it all gets coated in that glossy, DIY sauce. The result? Crispy, saucy, sweet-and-sour perfection that tastes exactly like your favorite Chinese takeout.
Serve it over steamed white rice (or alongside bacon and egg fried rice if you’re feeling extra), and you’ve got a takeout-fakeout dinner that’s faster, fresher and way more satisfying. No delivery fees, no mystery ingredients, and no fighting over the last crispy piece… OK, maybe there will be fighting, because this sweet and sour chicken is that good!
Here’s what you’ll need to make sweet and sour chicken at home:
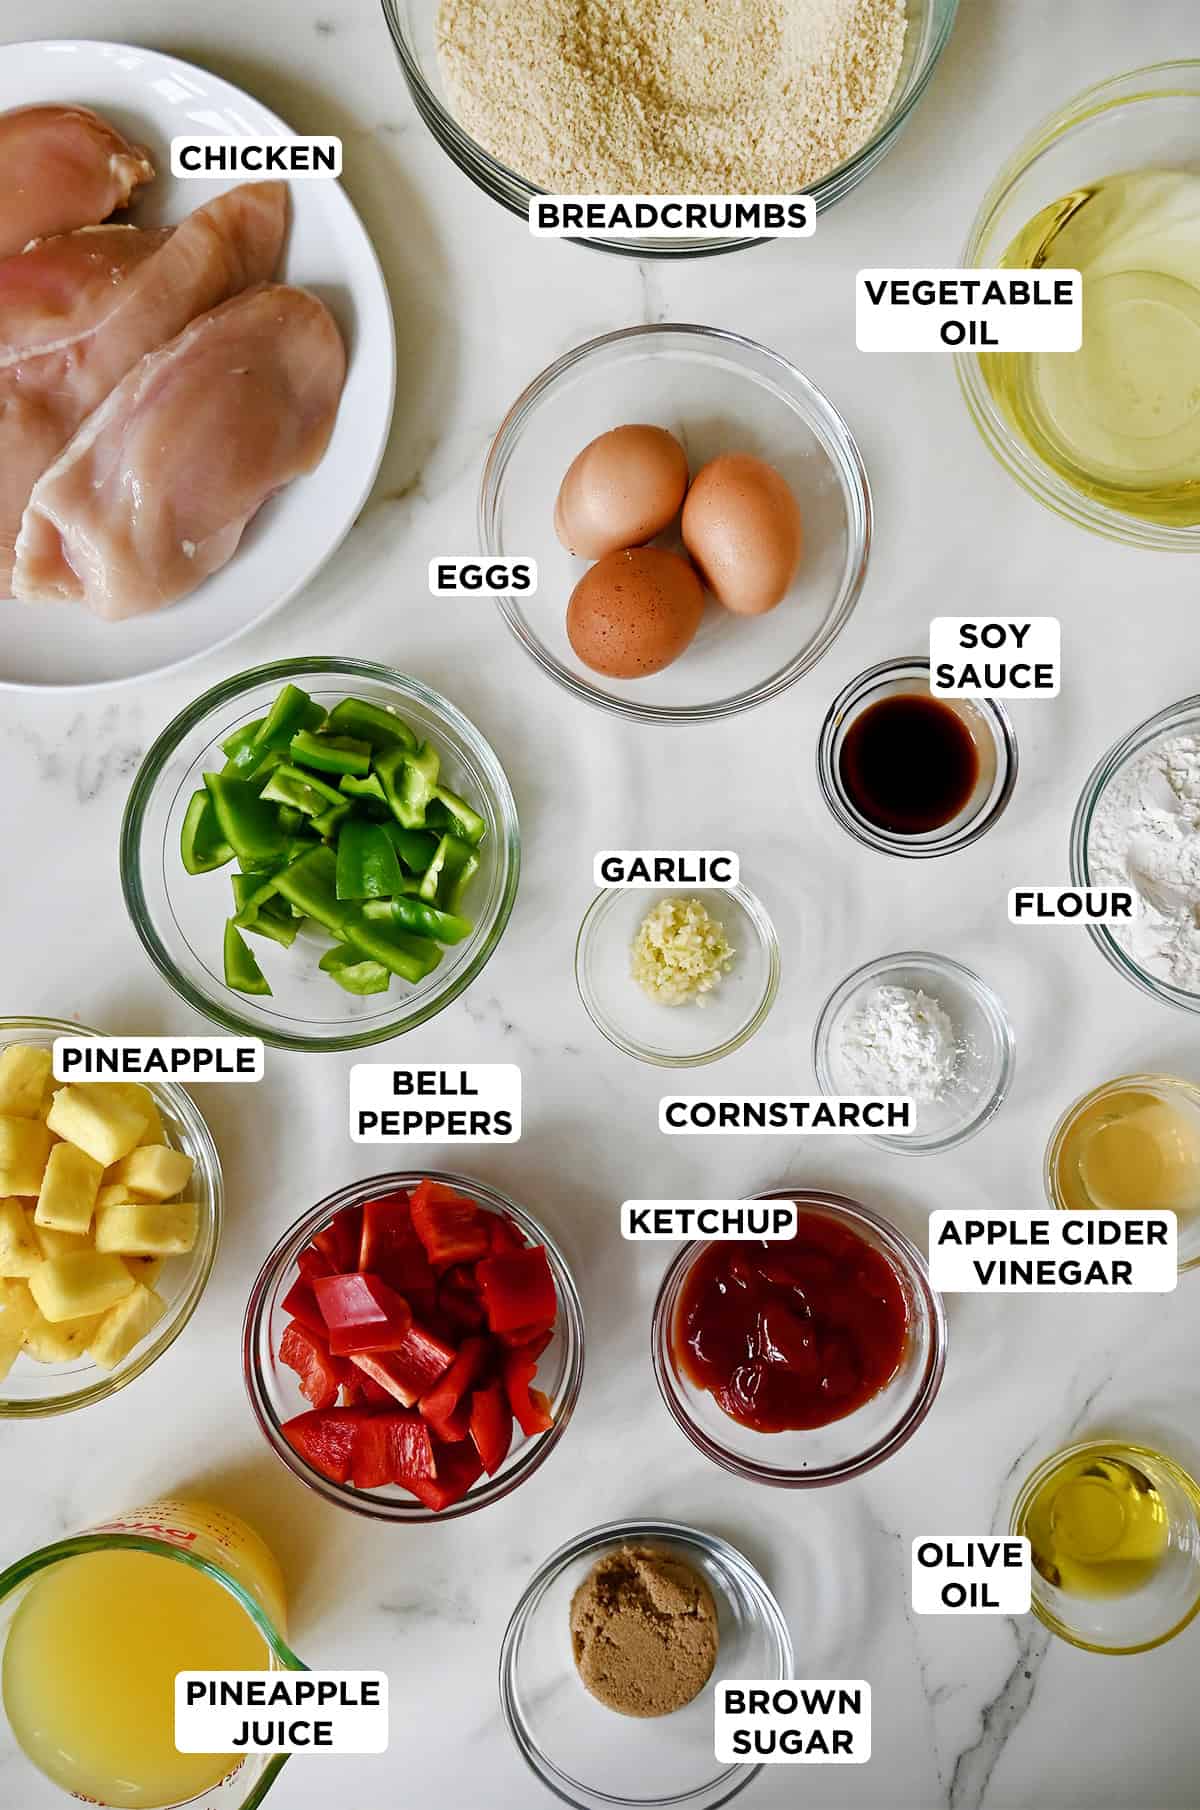
- Chicken: I developed this sweet and sour chicken recipe using boneless, skinless chicken breasts to keep it light and lean. If you prefer a more traditional takeout-style result, chicken thighs are a great option and stay especially tender. It all comes down to personal preference.
- Flour, eggs & Panko breadcrumbs: This three-step coating is what gives the chicken its ultra-crispy exterior. Flour helps the egg stick, the egg acts as the glue and Panko breadcrumbs are the secret to extra crunch. I’ve tested versions without Panko, and while they’re fine, they don’t deliver that shatteringly crisp texture you expect from great Chinese takeout.
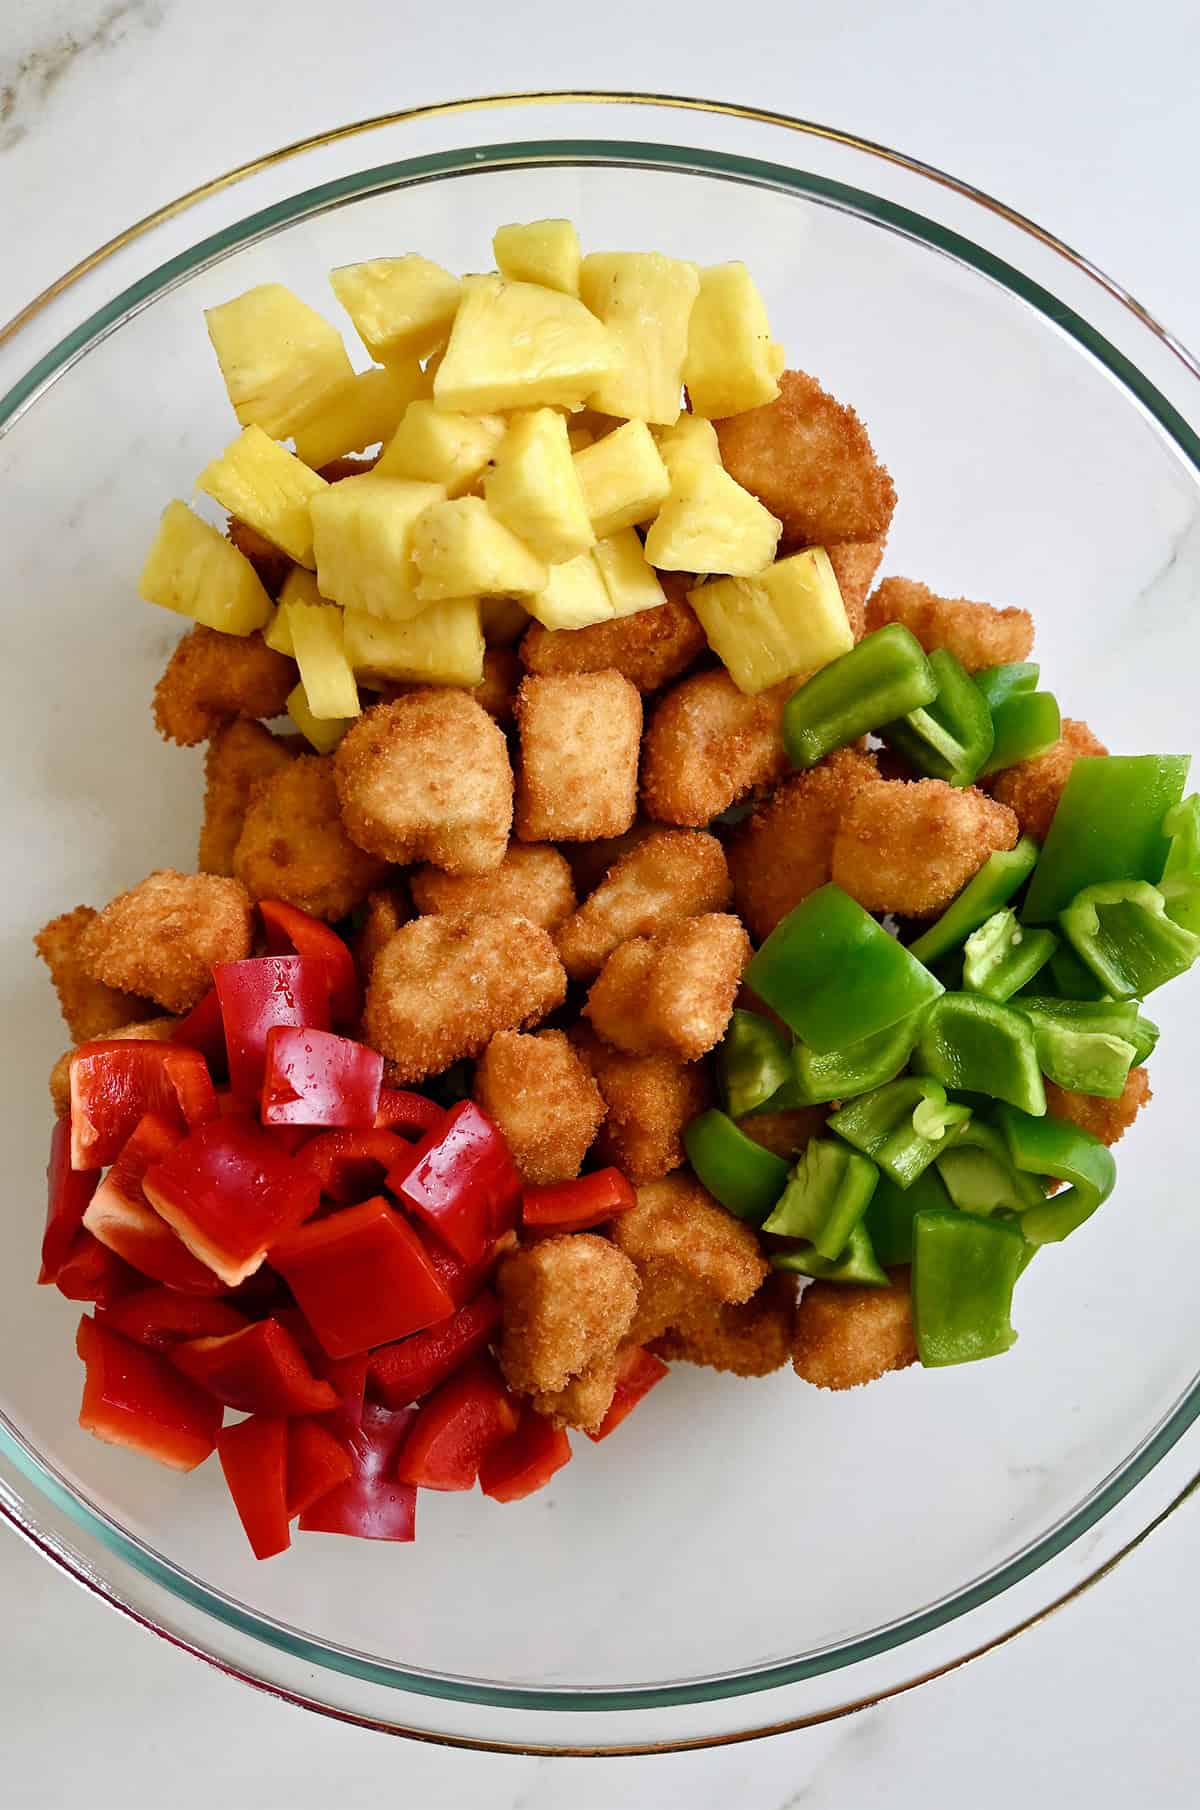
- Bell Peppers: Red and green bell peppers add color, crunch and balance to the dish. I stir them in after frying the chicken so they stay crisp instead of turning soft.
- Pineapple: Adds sweetness, acidity, and that signature sweet-and-sour contrast. You’ll need fresh or canned pineapple chunks, plus pineapple juice for the sauce.
- Ketchup: Ketchup might sound surprising, but it’s a classic sweet and sour sauce base. It adds sweetness, acidity and body all in one ingredient.
- Apple cider vinegar: This is where the “sour” comes in. Apple cider vinegar adds brightness without overpowering the sauce. Rice vinegar works too, but apple cider vinegar gives the most balanced flavor.
- Soy sauce: Adds salt and umami, keeping the sauce from tasting flat or overly sweet.
- Cornstarch: Thickens the sauce. Whisk it with water first to avoid lumps—don’t skip this step.
See the recipe card for full information on ingredients and quantities.
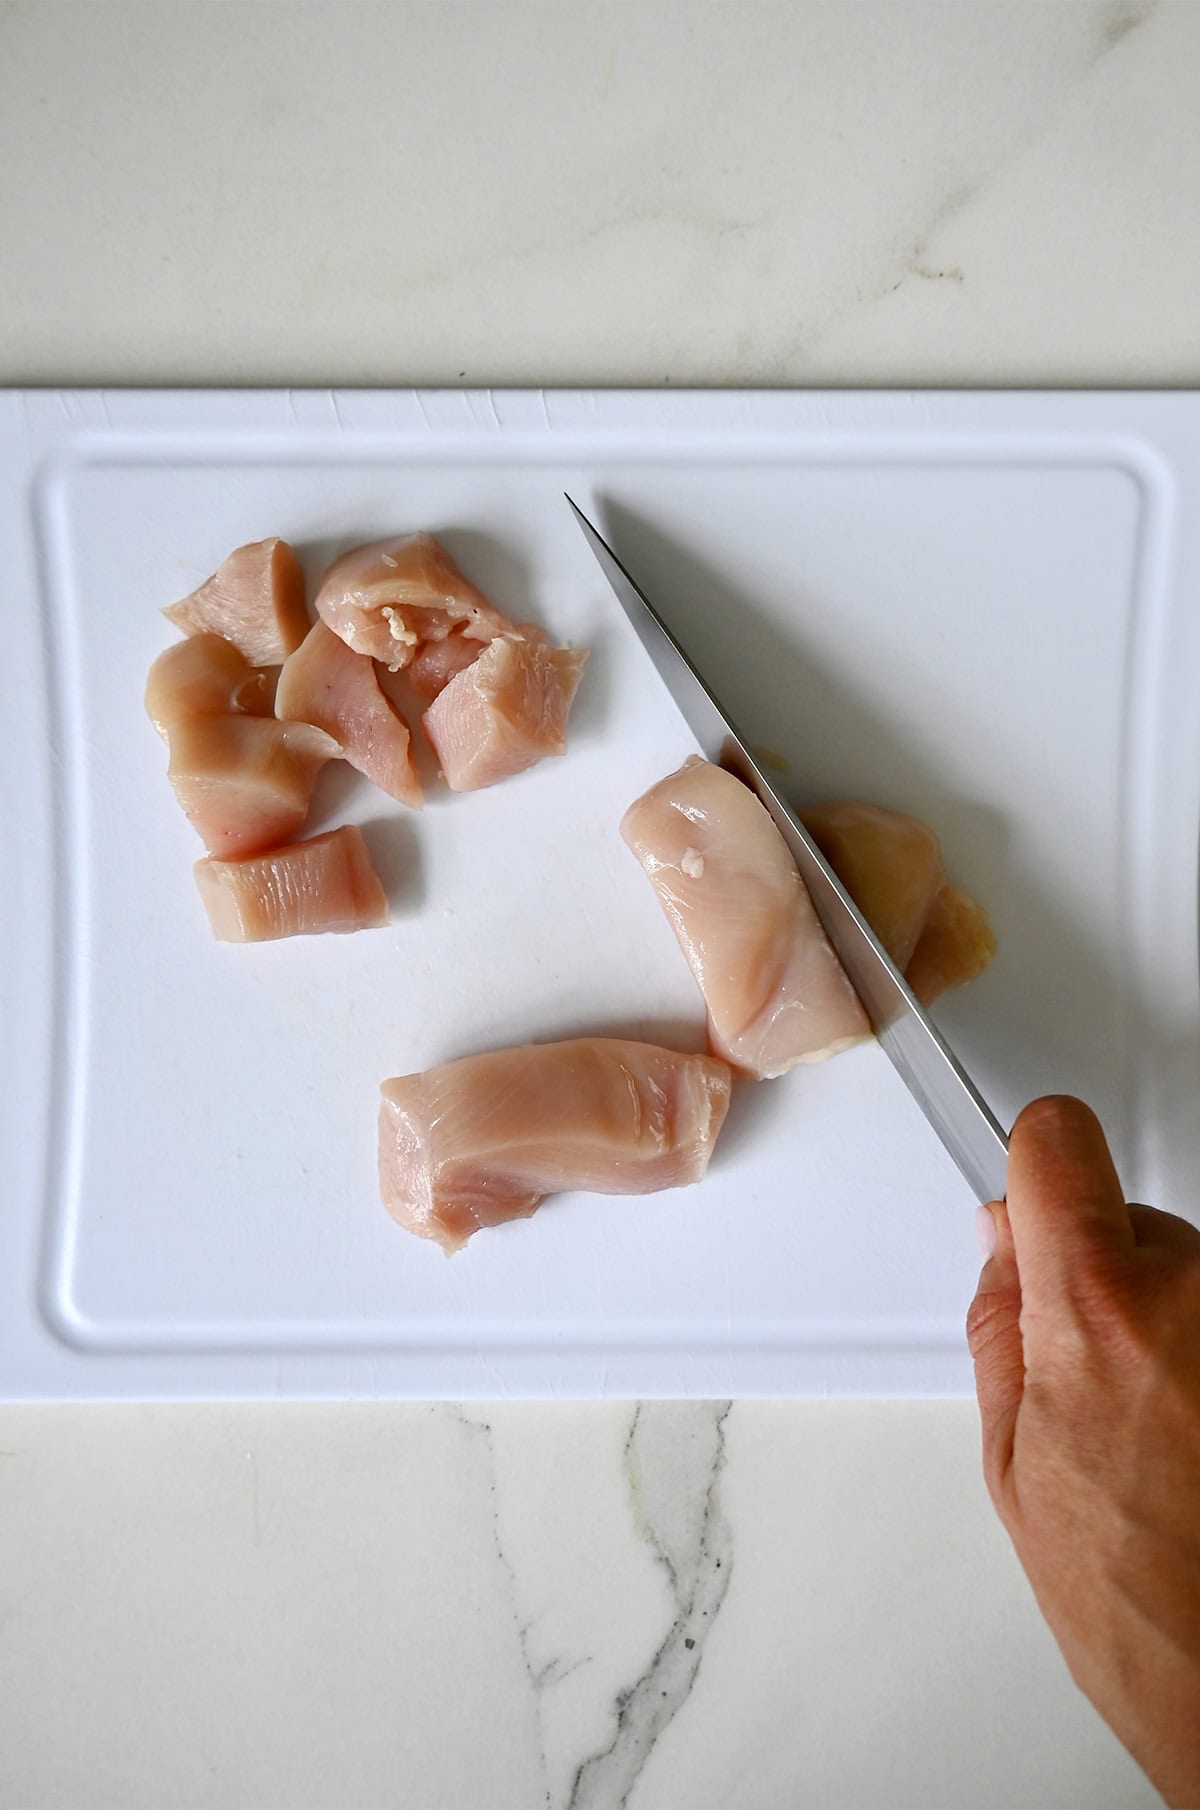
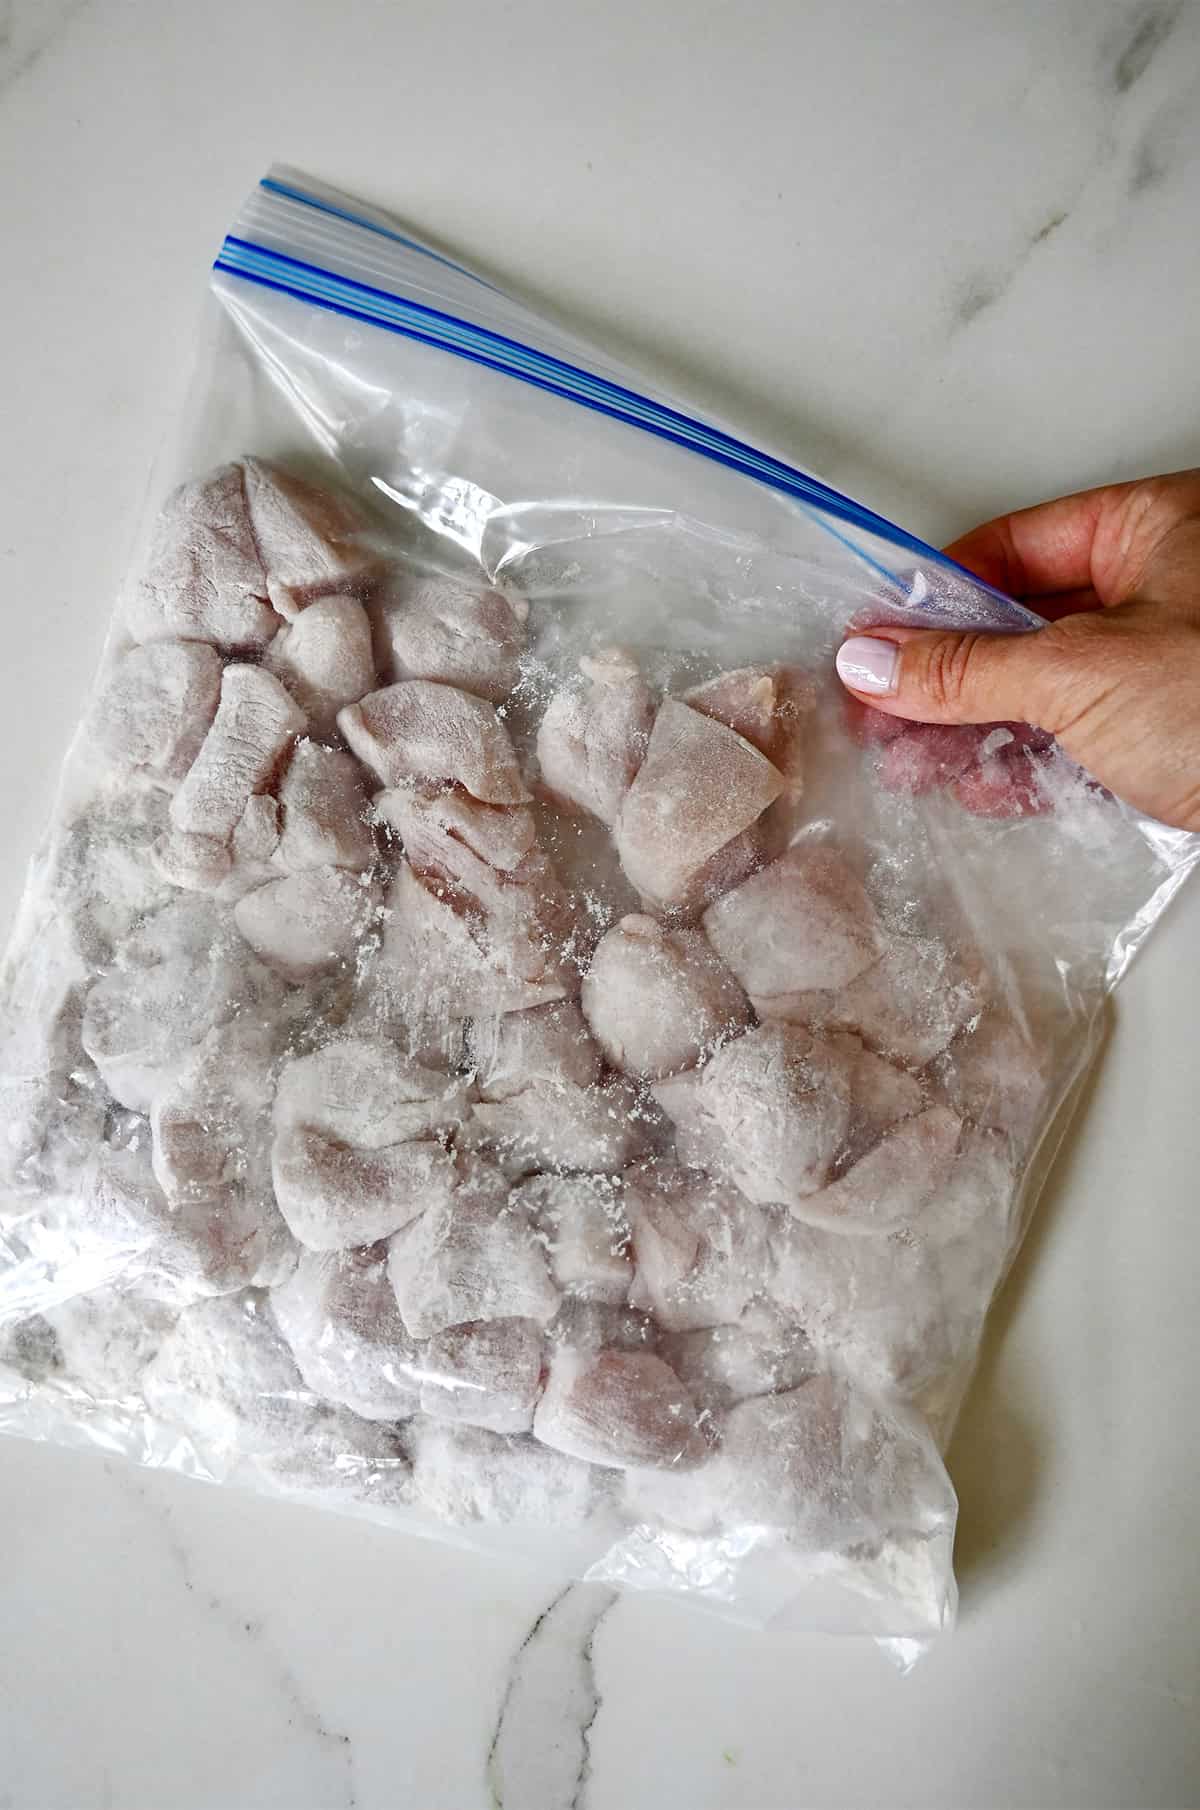
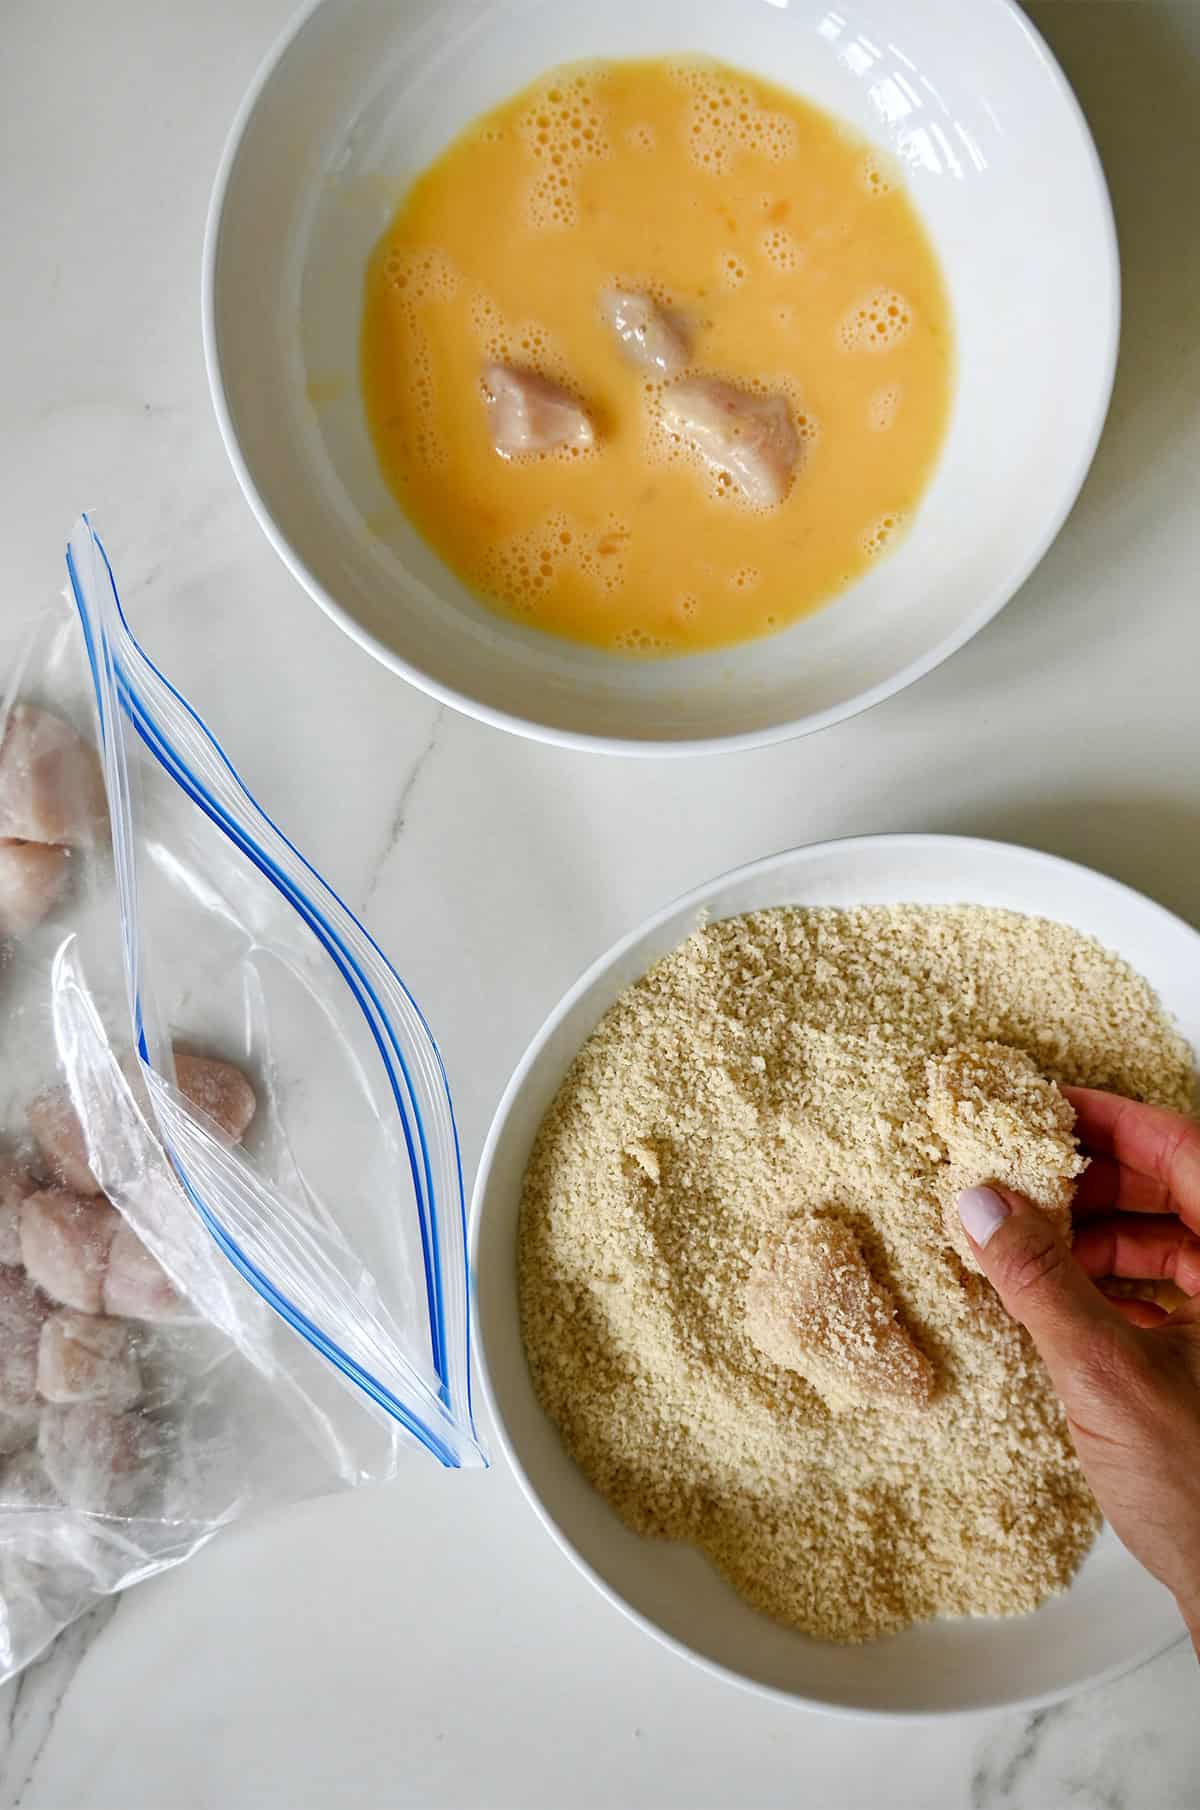
If you’ve made my General Tso’s chicken or baked orange chicken before, this process will feel familiar. Start by cutting the chicken into 1-inch pieces. They don’t need to be perfectly uniform—the goal is bite-sized nuggets so everything cooks quickly and evenly. Add the chicken to a resealable bag with the flour, seal it, and give it a good shake until every piece is coated.
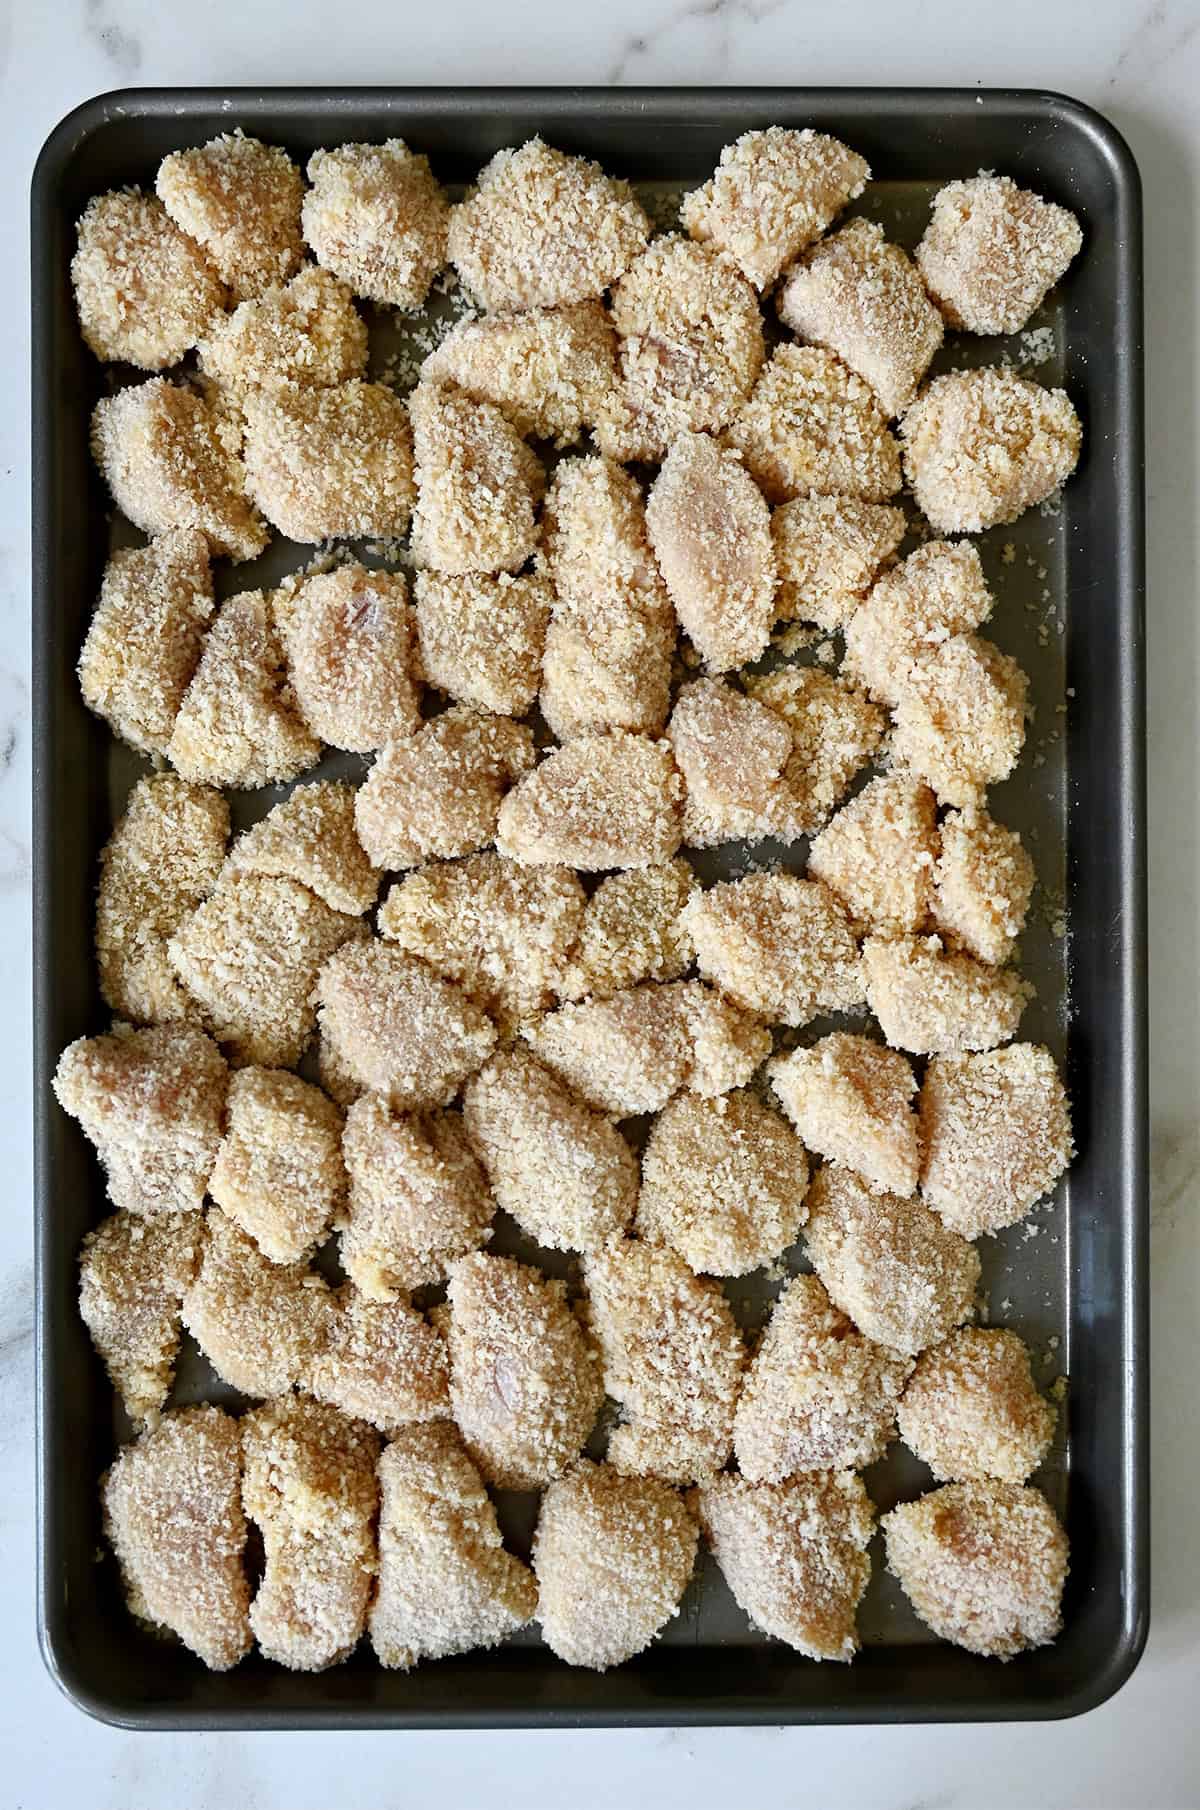
Set up a simple dredging station with whisked eggs in one shallow dish and Panko breadcrumbs in another. Working one piece at a time, shake off any excess flour, dip the chicken into the eggs, then press it into the breadcrumbs so it’s fully coated. Repeat with the remaining chicken and set the pieces aside while you heat the oil.
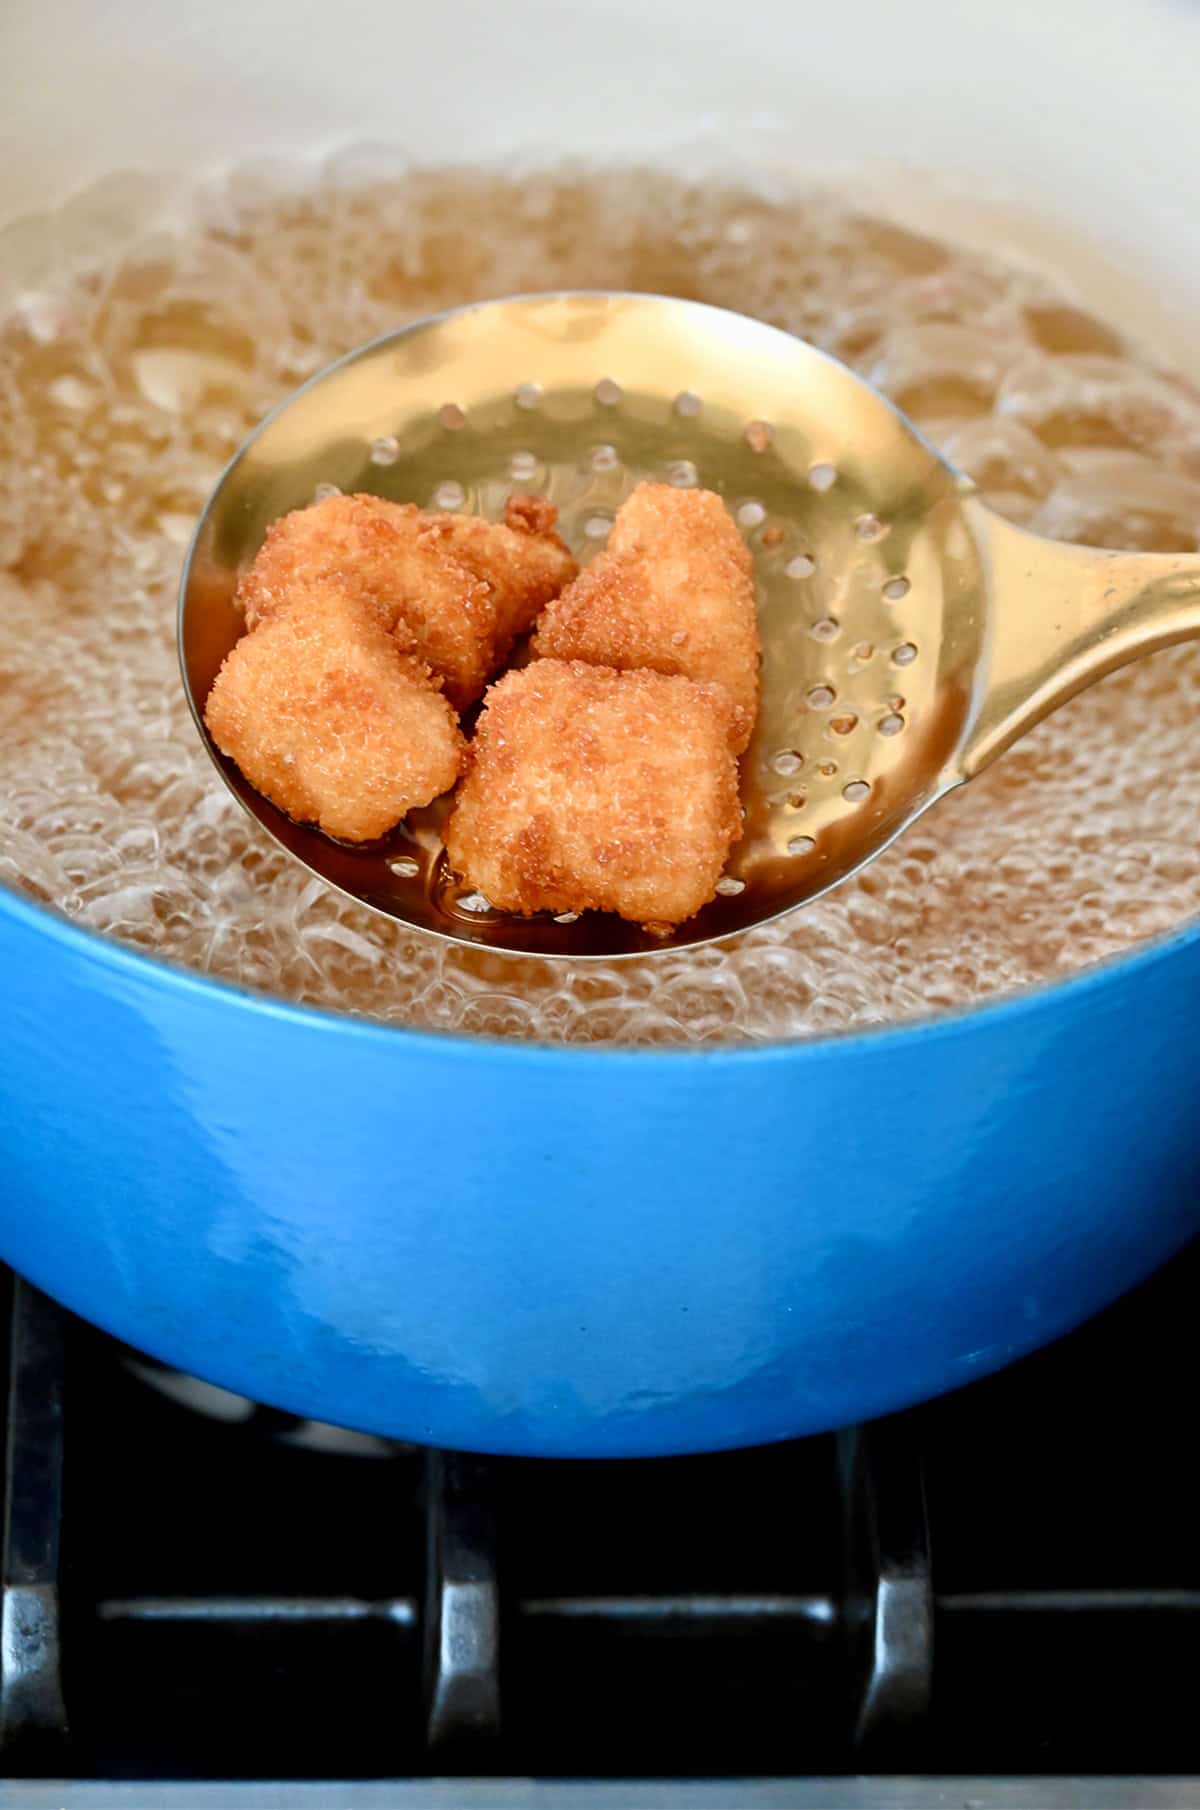
Pour at least 2 inches of vegetable oil into a heavy-bottomed pot, I use my Dutch oven, and heat it to 360°F. A neutral oil like vegetable oil is important here—it has a high smoke point, which means it won’t burn during frying.
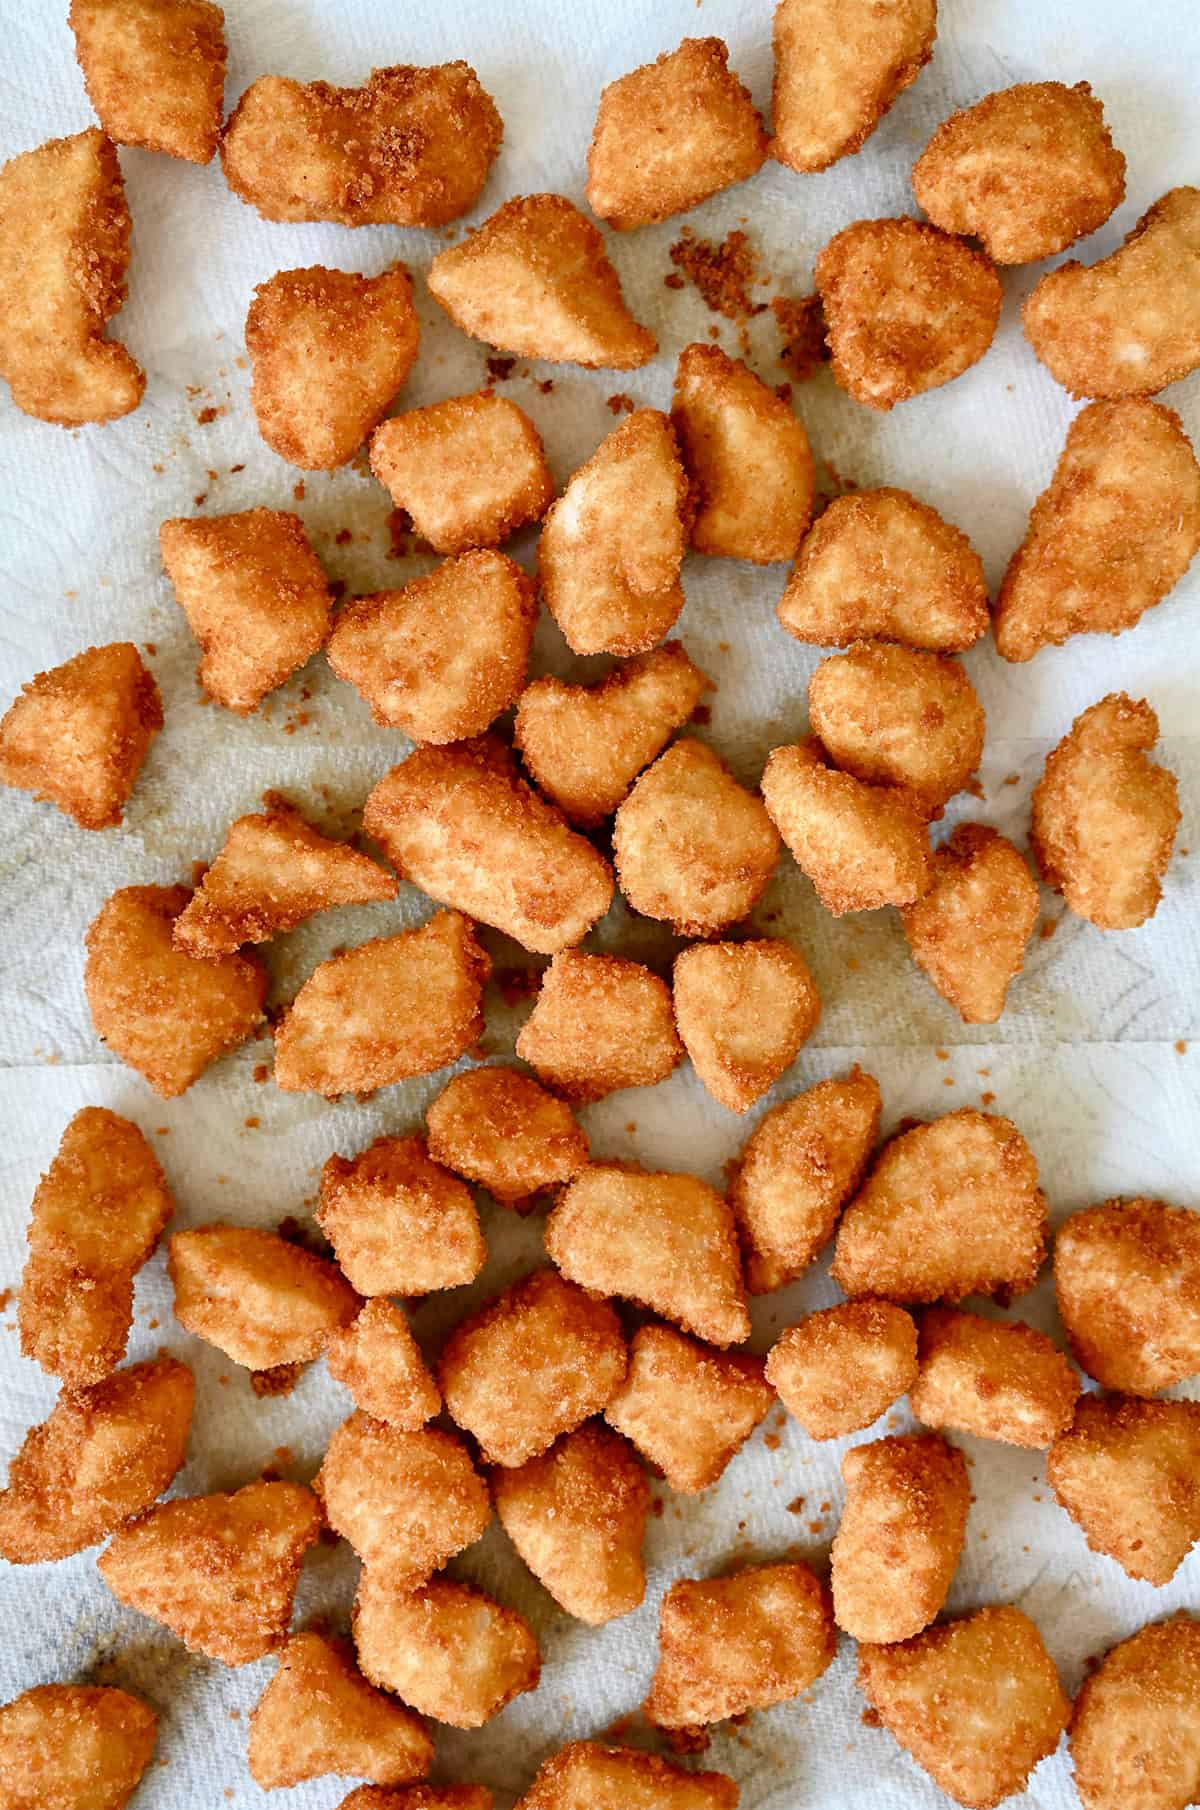
Fry the chicken in batches, flipping occasionally, until golden brown and cooked through, about 2 minutes per batch. Transfer the cooked chicken to a paper towel–lined baking sheet and return the oil to temperature before frying the next batch.
Once all the chicken is fried, transfer it to a large bowl and add the red and green bell peppers along with the pineapple chunks. Don’t toss just yet—the sauce comes together quickly, and you want to coat everything while it’s hot.
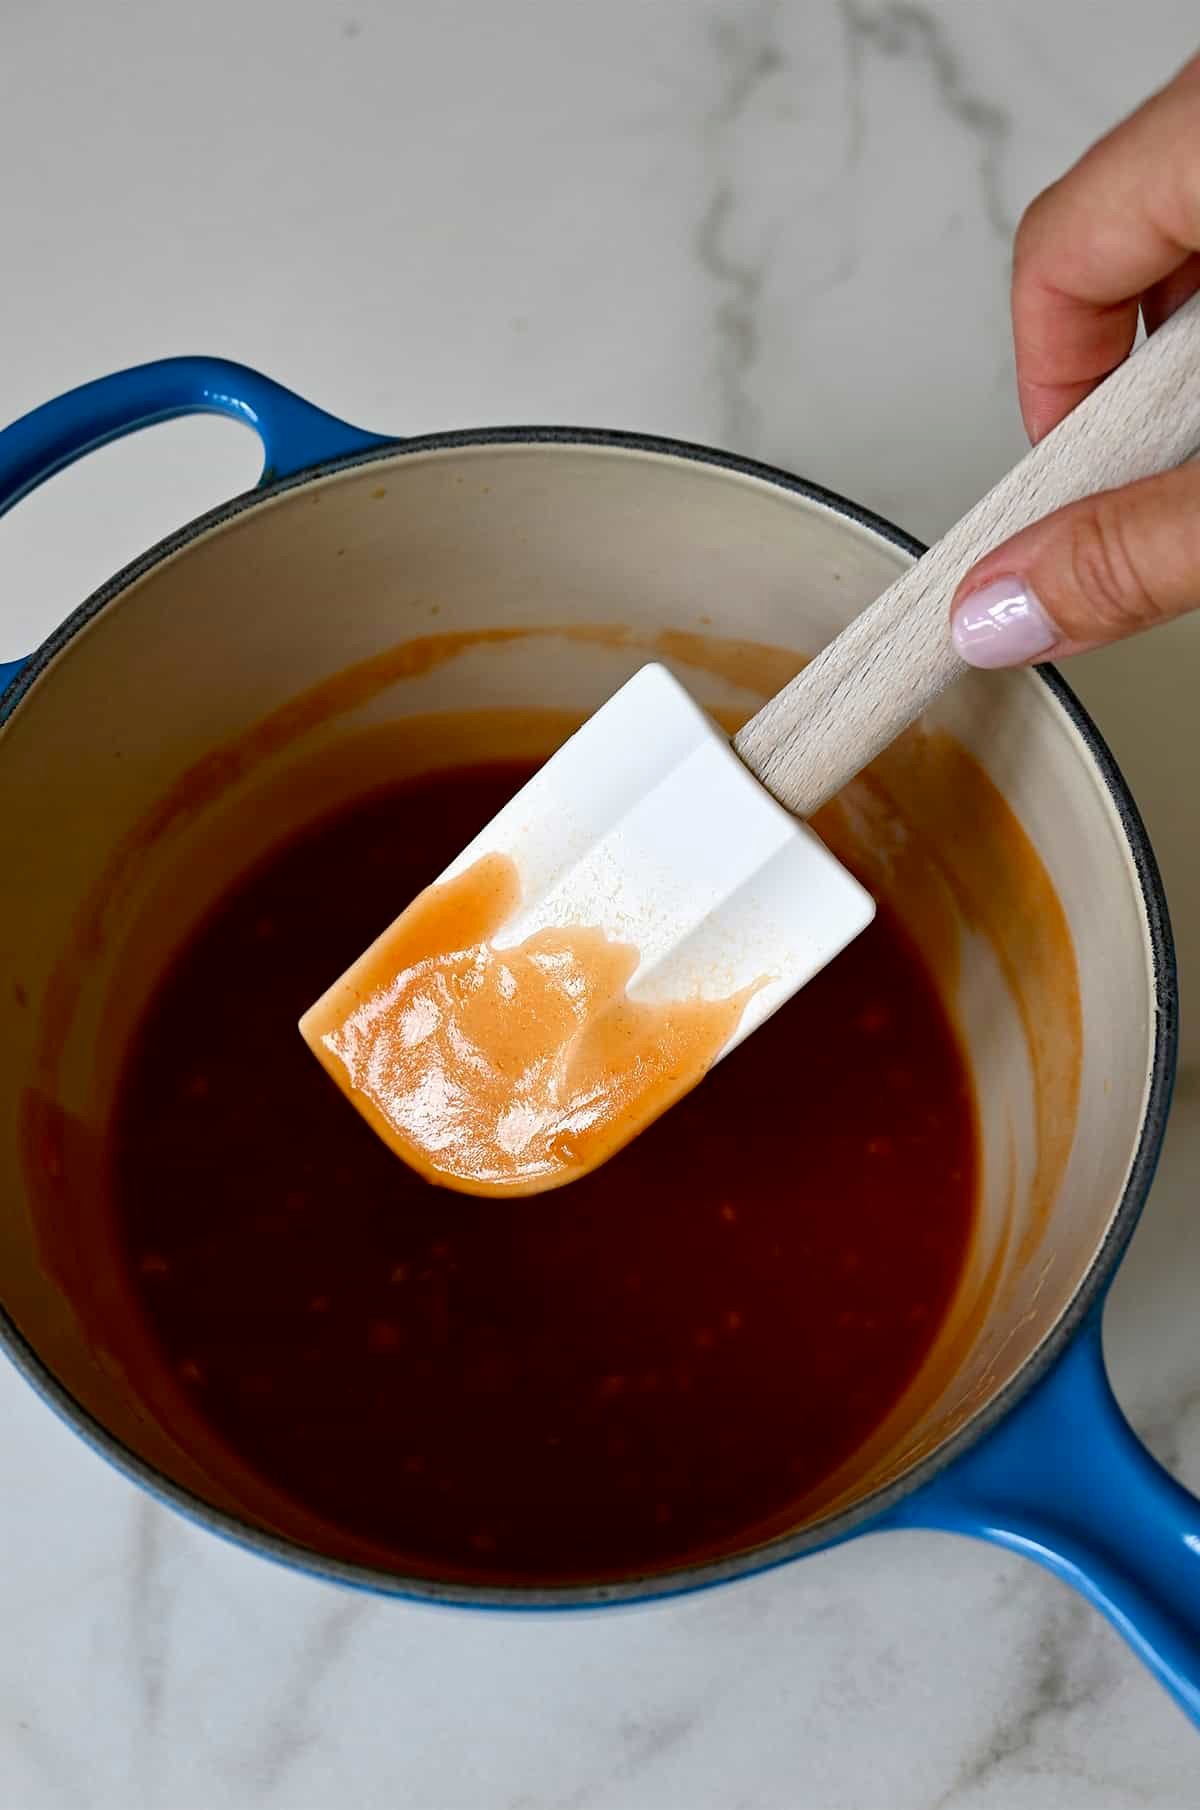
To make the sweet and sour sauce, heat the olive oil in a saucepan over medium-low heat. Add the garlic and cook just until fragrant and lightly golden. Whisk in the pineapple juice, ketchup, apple cider vinegar, brown sugar, soy sauce, and the cornstarch slurry. Bring the mixture to a boil and cook until thick, glossy, and syrupy, about 3 to 5 minutes. Keep in mind the sauce will continue to thicken slightly as it cools.
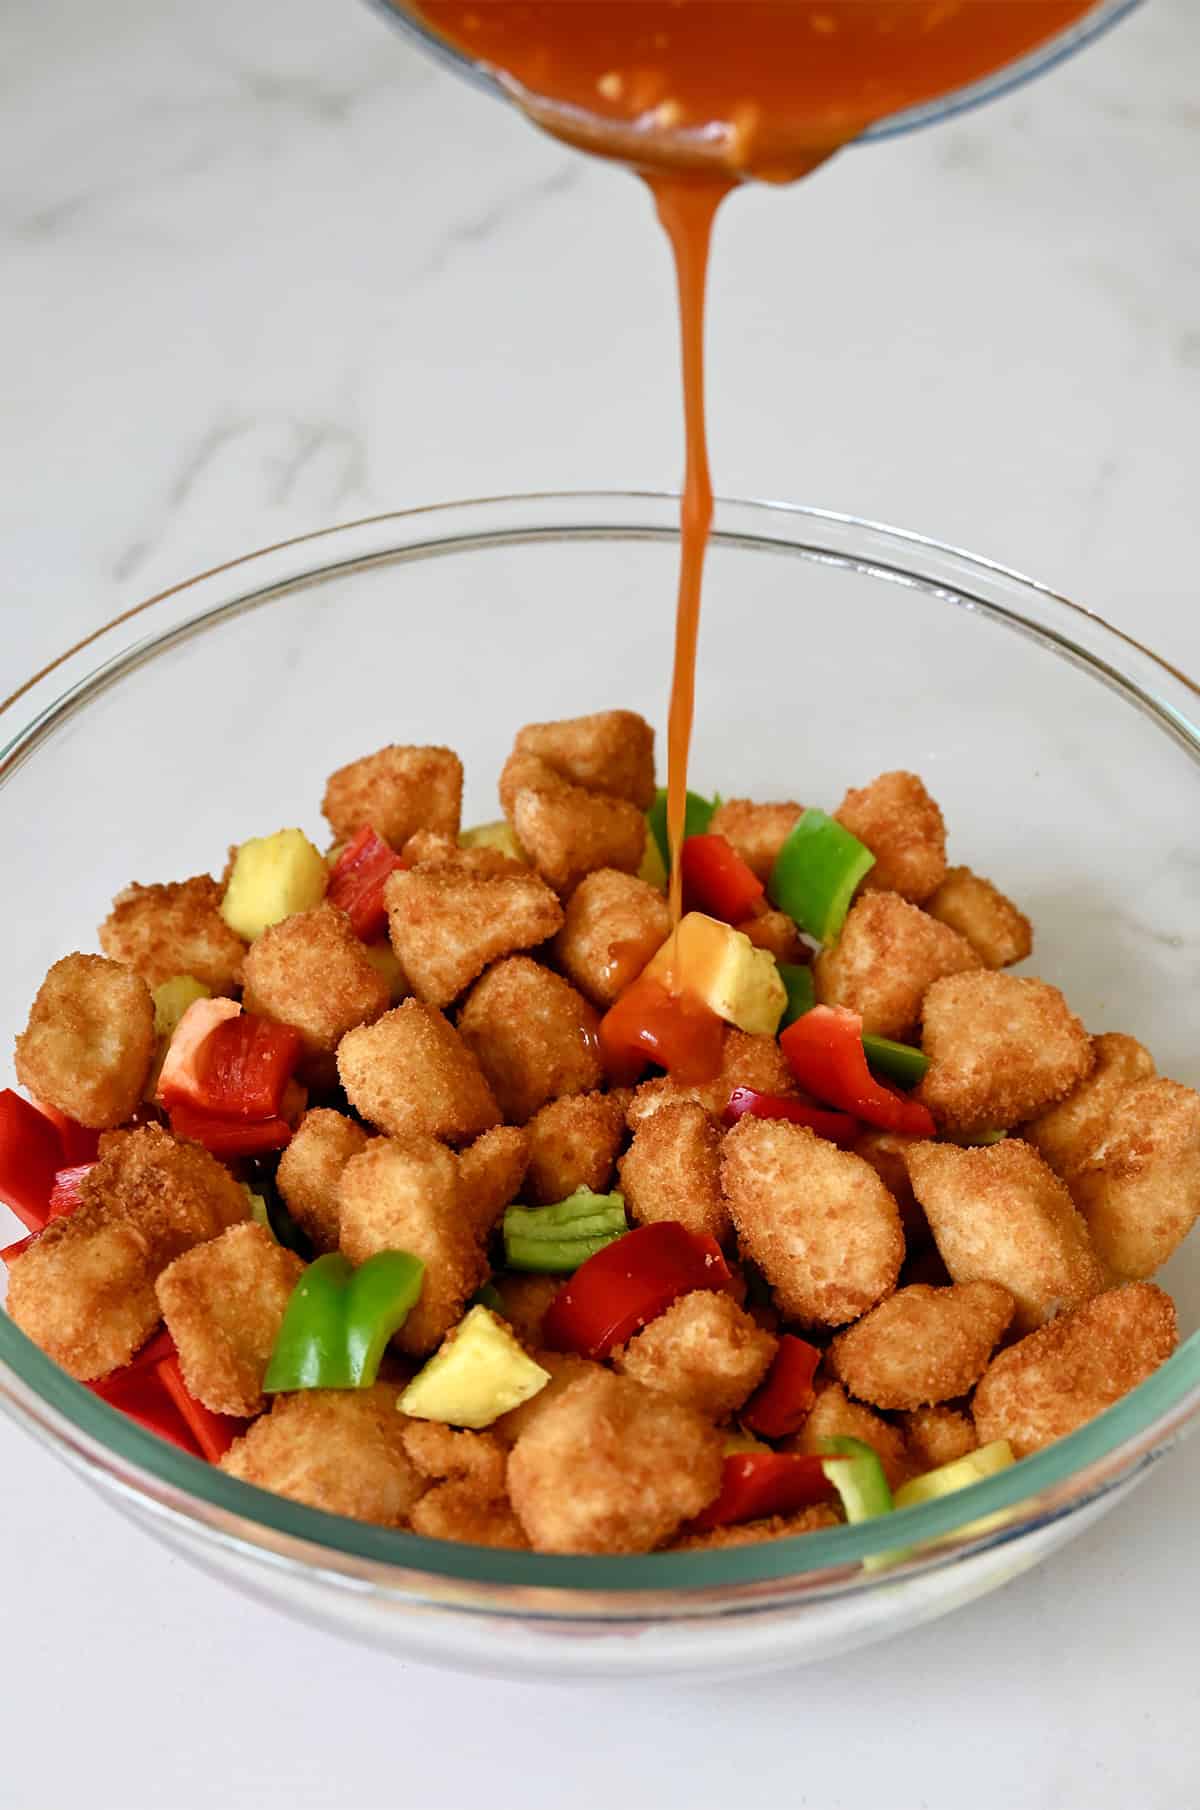
Pour the warm sauce over the chicken, peppers and pineapple, then toss gently to coat. Serve immediately over steamed white rice. I’ll often round out the meal with a few more takeout-inspired favorites—crab Rangoon, egg drop soup and homemade fortune cookies are always requested by my kids.

Tips from the Test Kitchen
- Keep the oil hot. Maintaining an oil temperature around 360°F is key for crispy, not greasy, chicken. If the oil is too cool, the coating absorbs oil and turns heavy. I recommend using a deep-fry thermometer and letting the oil return to temperature between batches.
- Fry in batches. Crowding the pot drops the oil temperature fast and leads to soggy chicken. Frying in small batches keeps the coating crisp and evenly golden.
- The sauce needs to boil. For the sweet and sour sauce to thicken properly, it needs to come to a boil. Once it does, the sauce should be thick enough to coat the back of a spoon.
- Serve immediately. Sweet and sour chicken is at its absolute best right after it’s tossed with the sauce. If you’re making it for a group, keep the chicken and sauce separate until just before serving to preserve that crunch.
Storage and Reheating
Store any leftovers in an airtight container in the refrigerator for up to 3 days. Keep in mind that once the chicken is coated in sauce, it will lose some of its crispiness over time—this is completely normal for sauced fried chicken.
For reheating, the microwave works for convenience, but for the best texture, I recommend warming it gently in a skillet over medium heat or spreading it on a baking sheet and reheating in a 350°F oven until heated through. An air fryer works, too, though it won’t quite bring back that just-fried crunch.
I don’t recommend freezing the finished dish. That said, if you’re looking to prep ahead, you can freeze the fried chicken and the sweet and sour sauce separately. I recommend adding the pineapple and bell peppers fresh when you’re ready to serve—they keep their texture and crunch much better than if frozen. Let everything cool completely, then store each in airtight containers for up to 2 months. Thaw overnight in the fridge, reheat them separately, then toss together just before serving. The chicken won’t be quite as crispy as day one, but it’s still a great option when you want dinner on the table fast.
FAQs
Once fried chicken is tossed in sauce, the coating will soften—this is true of every sweet and sour chicken recipe. To keep it as crisp as possible, make sure your oil is hot enough when frying and wait to toss the chicken with the sauce until just before serving. Frying in batches also helps maintain texture.
This recipe is designed for frying to achieve perfectly crispy chicken. However, if you prefer a baked or air-fried option, you can follow the baking or air-frying instructions from my baked orange chicken recipe, then toss the cooked chicken in the sweet and sour sauce from this recipe just before serving.
Absolutely. If you like a tangier sauce, add an extra teaspoon or two of apple cider vinegar. Prefer it sweeter? A little extra brown sugar will do the trick. I recommend making small adjustments and tasting as you go.
Serving Ideas for Your Takeout-Fakeout Dinner
Sweet and sour chicken is perfect served over steamed white rice or my family’s favorite creamy coconut rice (according to my kids, rice can be no other way in my house!) to soak up all that glossy sauce. I also love pairing it with simple sides like Chinese garlic green beans or garlic bok choy.
For a full takeout-inspired dinner, start with an appetizer like avocado egg rolls or chicken potstickers, and serve family-style with other favorites like beef with broccoli and chow mein.
Equipment
Ingredients
For the chicken:
- 1 1/2 pounds boneless, skinless chicken breasts
- 2/3 cup all-purpose flour
- 3 large eggs
- 3 cups Panko breadcrumbs
- Vegetable oil, for frying
- 1 red bell pepper, cut into 1-inch pieces
- 1 green bell pepper, cut into 1-inch pieces
- 1 cup cubed pineapple
For the sauce:
- 1 Tablespoon extra-virgin olive oil
- 2 teaspoons minced garlic
- 1 cup pineapple juice
- 1/2 cup ketchup
- 2 Tablespoons apple cider vinegar
- 1/4 cup packed brown sugar
- 1 Tablespoon soy sauce
- 2 teaspoons cornstarch, whisked with 1 Tablespoon water
Instructions
Make the chicken:
- Cut the chicken breasts into 1-inch pieces.
- Add the flour to a sealable plastic bag then add the chicken and seal the bag. Shake the bag until the chicken is coated all over.
- Whisk the eggs in a shallow dish. Add the breadcrumbs to a second shallow dish.
- Remove each piece of chicken from the bag, shake off any excess flour, then dip it in the eggs then breadcrumbs. Repeat the coating process with all of the chicken pieces.
- Heat at least 2 inches of oil in a large heavy-bottomed stock pot set over medium-high heat. Once the oil reaches 360°F, add a portion of the chicken and cook, flipping occasionally, until golden brown and cooked through, about 2 minutes.
- Using a slotted spoon, transfer the chicken to the paper towel-lined baking sheet then repeat the cooking process with the remaining chicken, returning the oil to 360°F between batches.
- Transfer all of the chicken to a large bowl then stir in the red and green peppers and pineapple.
Make the sauce:
- Add the olive oil to a medium saucepan set over medium-low heat. Once the oil is hot, add the garlic and cook, stirring, until golden brown, about 2 minutes.
- Whisk in the pineapple juice, ketchup, apple cider vinegar, brown sugar, soy sauce and cornstarch mixture. Bring the mixture to a boil and cook until the sauce is thick and syrupy, 3 to 5 minutes. (It will thicken as it cools.)
- Pour the prepared sauce over the chicken and toss to combine. Serve immediately.
Kelly’s Notes
- Boneless, skinless chicken breasts keep this dish lighter, but chicken thighs work great, too, for a more traditional takeout-style result.
- For the crispiest chicken, keep the oil around 360°F and let it return to temperature between batches.
- Store leftovers in an airtight container in the refrigerator for up to 3 days. Gently reheat in a skillet over medium heat or spread it on a baking sheet and reheat in a 350°F oven until heated through. An air fryer works, too.
- Serve over steamed white rice or creamy coconut rice.
- ★ Did you make this recipe? Don’t forget to give it a star rating below!
Nutrition
Did you try this recipe?
Leave a comment below with your star rating!
This post may contain affiliate links.


This is amazing! My family went back for seconds and even thirds! Served with your rice recipe. Thank you!
So glad you enjoyed the recipe, Isabel!
Could the chicken be made in an air fryer? If so, what temp and time would you recommend?
Absolutely, Linda! You can air-fry the chicken nuggets at 400° for 8 to 10 minutes or until the chicken is cooked through. Enjoy!
Why are eggs flour and bread crumbs needed just for sweet and sour chicken?
Can this be made without those?
Hi Alex! Sweet and Sour Chicken is traditionally fried using some sort of batter and/or a cornstarch coating. My recipe replicates the coating with a standard breading. Hope that helps!