Easy Cream Cheese Danish is a simple but impressive breakfast (or snack!) that takes 30 minutes to make and can be topped with any type of fruit. These handheld pastries star store-bought puff pastry and a lemony cream cheese filling. It’s quick and easy to whip up these buttery, flaky treats in your home kitchen!
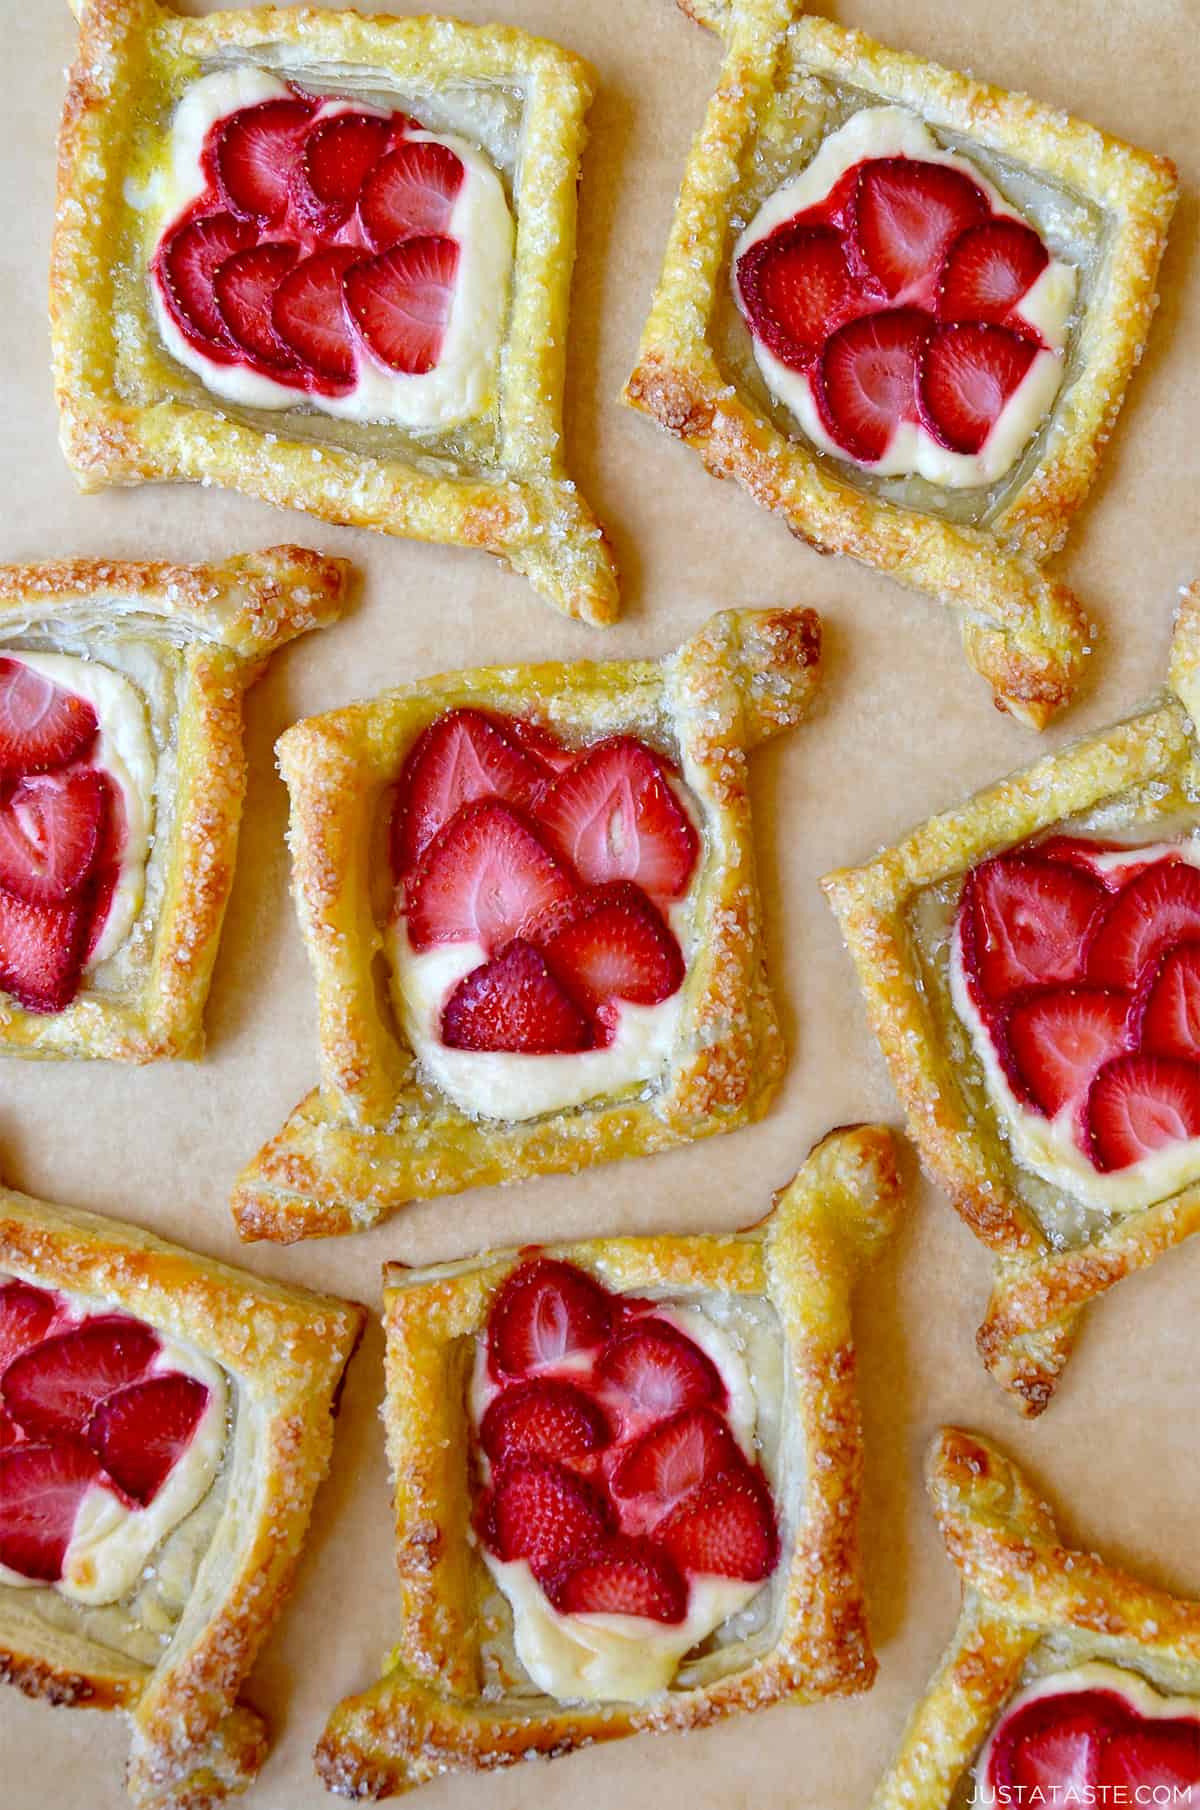
Table of Contents
Peanut butter and jelly. Strawberries and chocolate (hello, chocolate-covered strawberry brownies!). Cheese and wine. Chip and Joanna. Some things are just meant to be together. And while it may not be the first duo to pop into your head, dare I add puff pastry and cream cheese to the list?
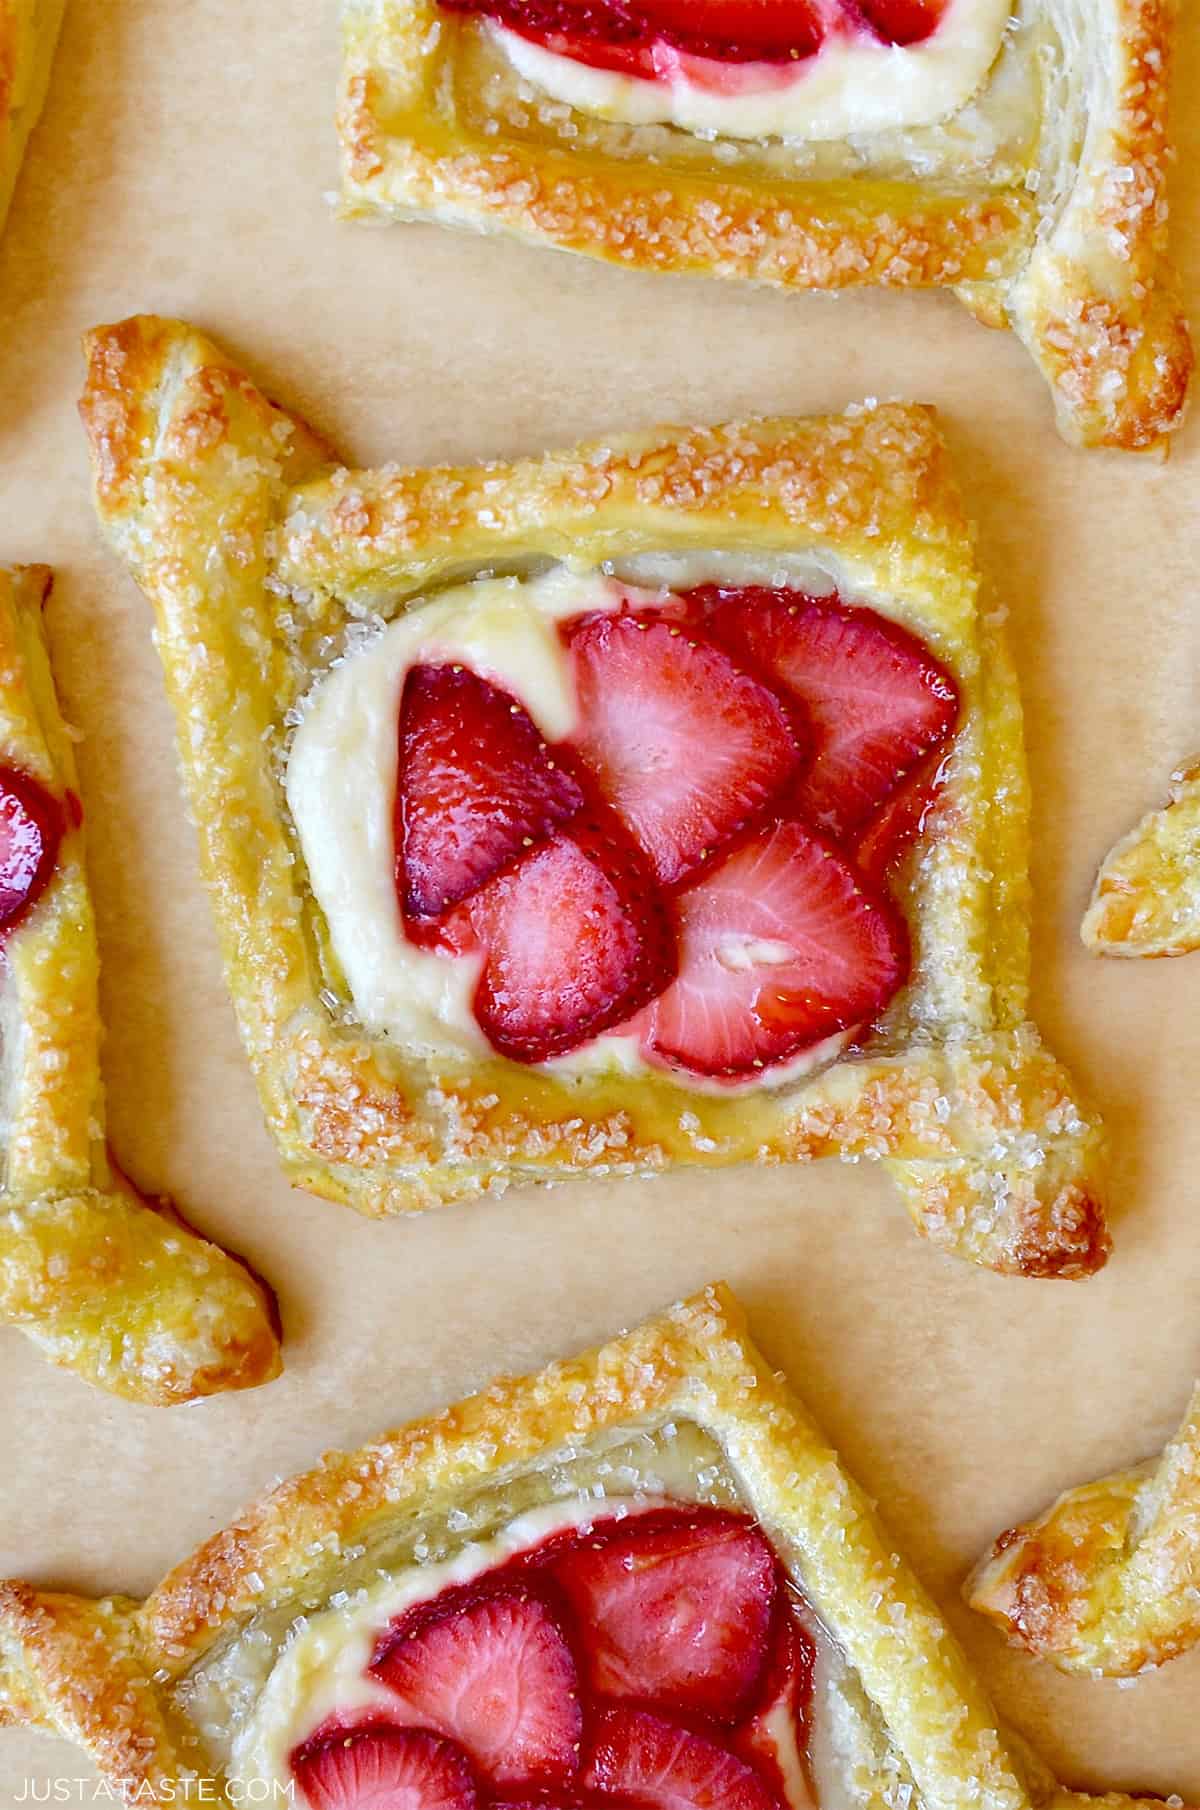
Golden, flaky, buttery layers of puff pastry topped with a luscious cream cheese filling and fresh fruit–count me in! In fact, count me in times three because that’s how many of these fruit and cream cheese Danish I ate straight off the baking sheet.
Whether enjoyed with a cup of coffee in the morning or as a tasty treat any time of day, this easy cheese Danish recipe is sure to become a beloved favorite in your baking repertoire.
What’s to Love
- Just 8 simple ingredients.
- Made with buttery store-bought puff pastry and topped with a creamy, sweetened cream cheese filling.
- Ready in 30 minutes or less.
- Easily customizable with your favorite fruit.
- Looks impressive but is actually really easy to make! Don’t let the fancy shape fool you. If you can slice a strawberry, you can make these bakery-worthy beauties. Step-by-step pics await!
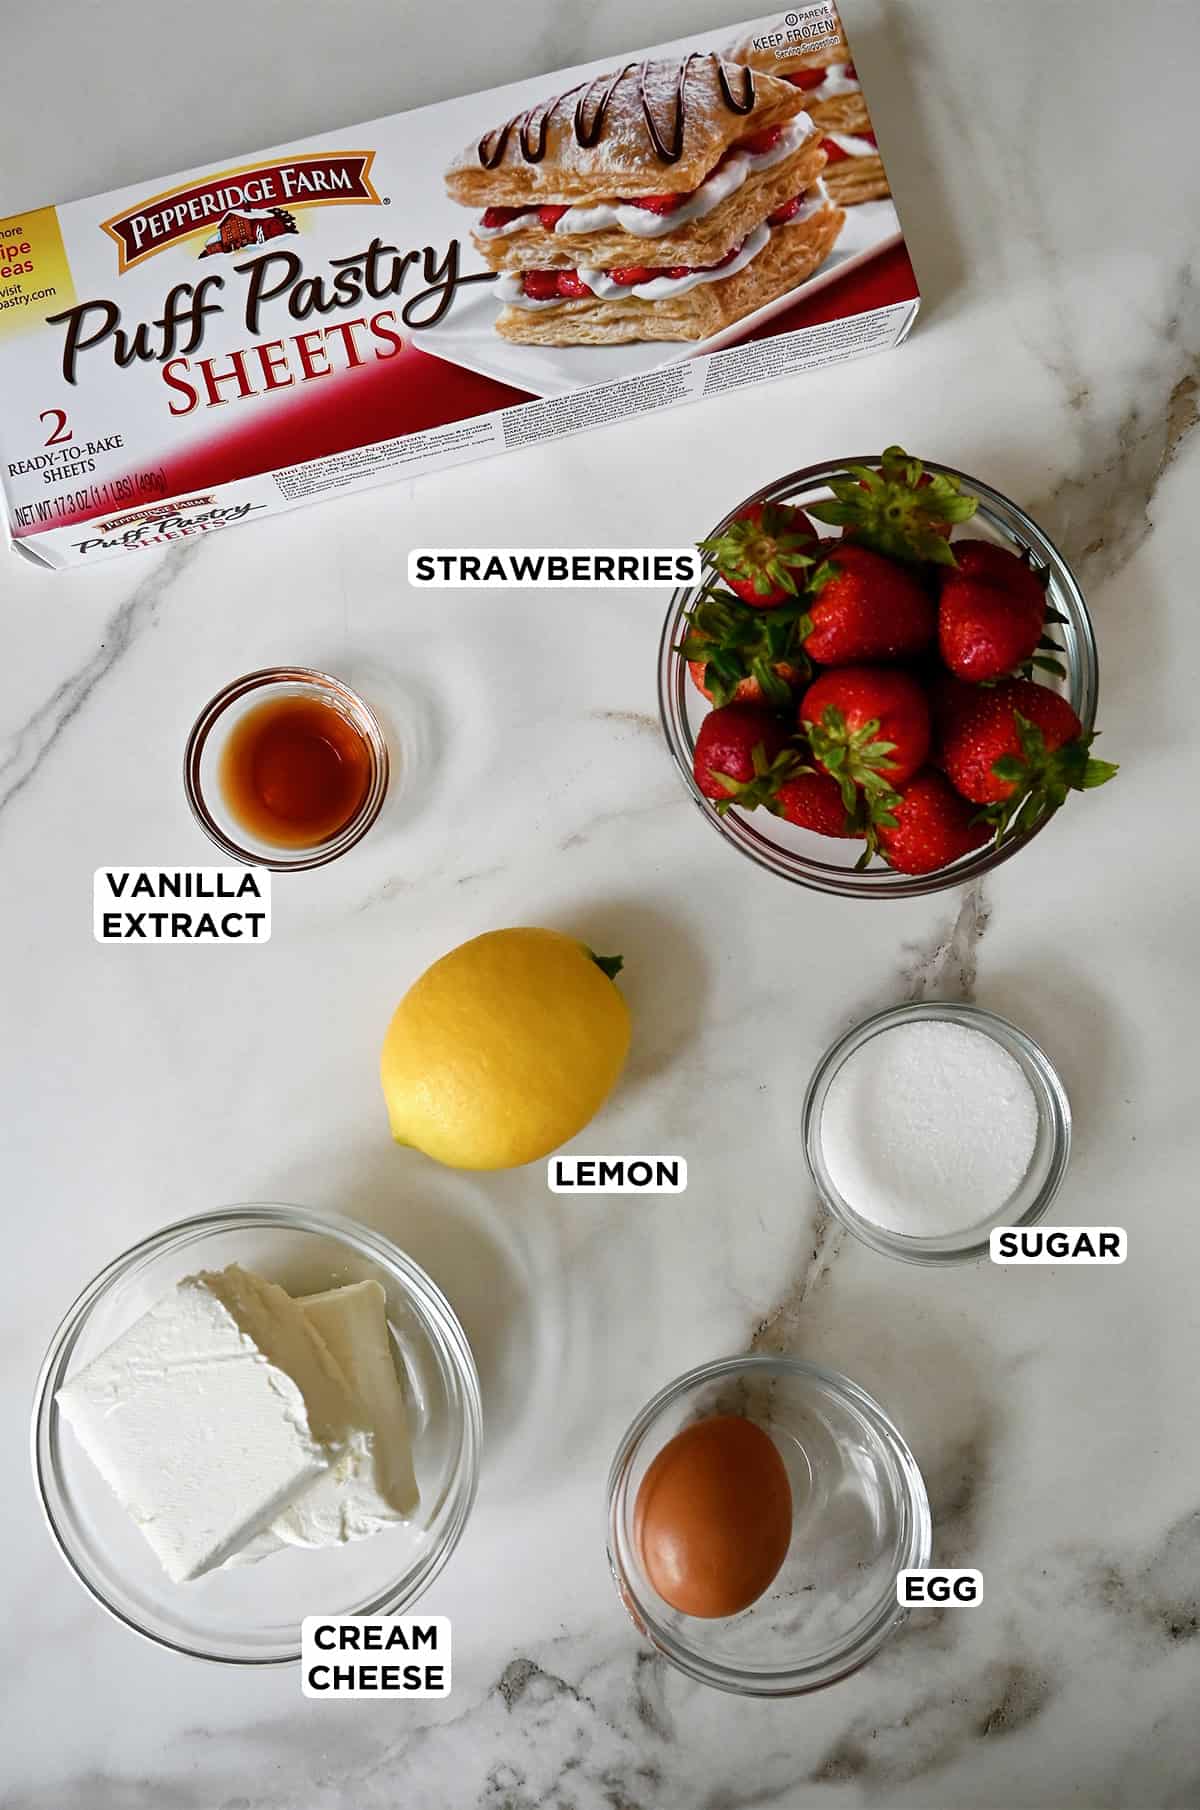
- Cream cheese: For the richest and creamiest filling, choose full-fat cream cheese. To ensure a smooth texture without any lumps, make sure it’s completely softened to room temperature before using. Pro Tip: You can speed up the softening process by cutting the cream cheese into smaller pieces and letting it sit at room temperature for about 30 minutes.
- Fresh lemon juice and zest: These citrusy ingredients add brightness and a subtle tang to the cream cheese filling. Use a microplane grater to zest the lemon, being careful to only grate the outer yellow layer to avoid the bitter white pith.
- Vanilla extract: Enhances the overall flavor. Pure or homemade vanilla extract is best.
- Sugar: Adds sweetness to the cream cheese filling.
- Frozen puff pastry: I always have a box (or three!) of this versatile ingredient stashed in my freezer for last-minute guests and get-togethers. Thaw it according to the package instructions before using; cold puff pastry is difficult to work with and may tear.
- Fruit: I used sliced strawberries, but you can use any fresh fruit. However, I’d steer clear of frozen fruit as it’ll release too much moisture and cause your pastries to be soggy and the cream cheese mixture to be too loose and separate. See below for my favorite fruit variations.
- Egg: Used for egg wash to brush over the puff pastry before baking, giving the danishes a golden brown and shiny finish. Swap: Brush the puff pastry with melted butter or cream for a similar effect.
- Sanding sugar: Coarse sanding sugar is sprinkled on top of the egg-washed puff pastry before baking, which adds a little crunchy texture and sweet sparkle. This is totally optional, but it will make your pastries look like they came straight from the bakery!
See the recipe card for full information on ingredients and quantities.
Don’t let these diamond shapes intimidate you. I’m here to walk you through each slice and fold. And I promise, it’s easier than it looks!
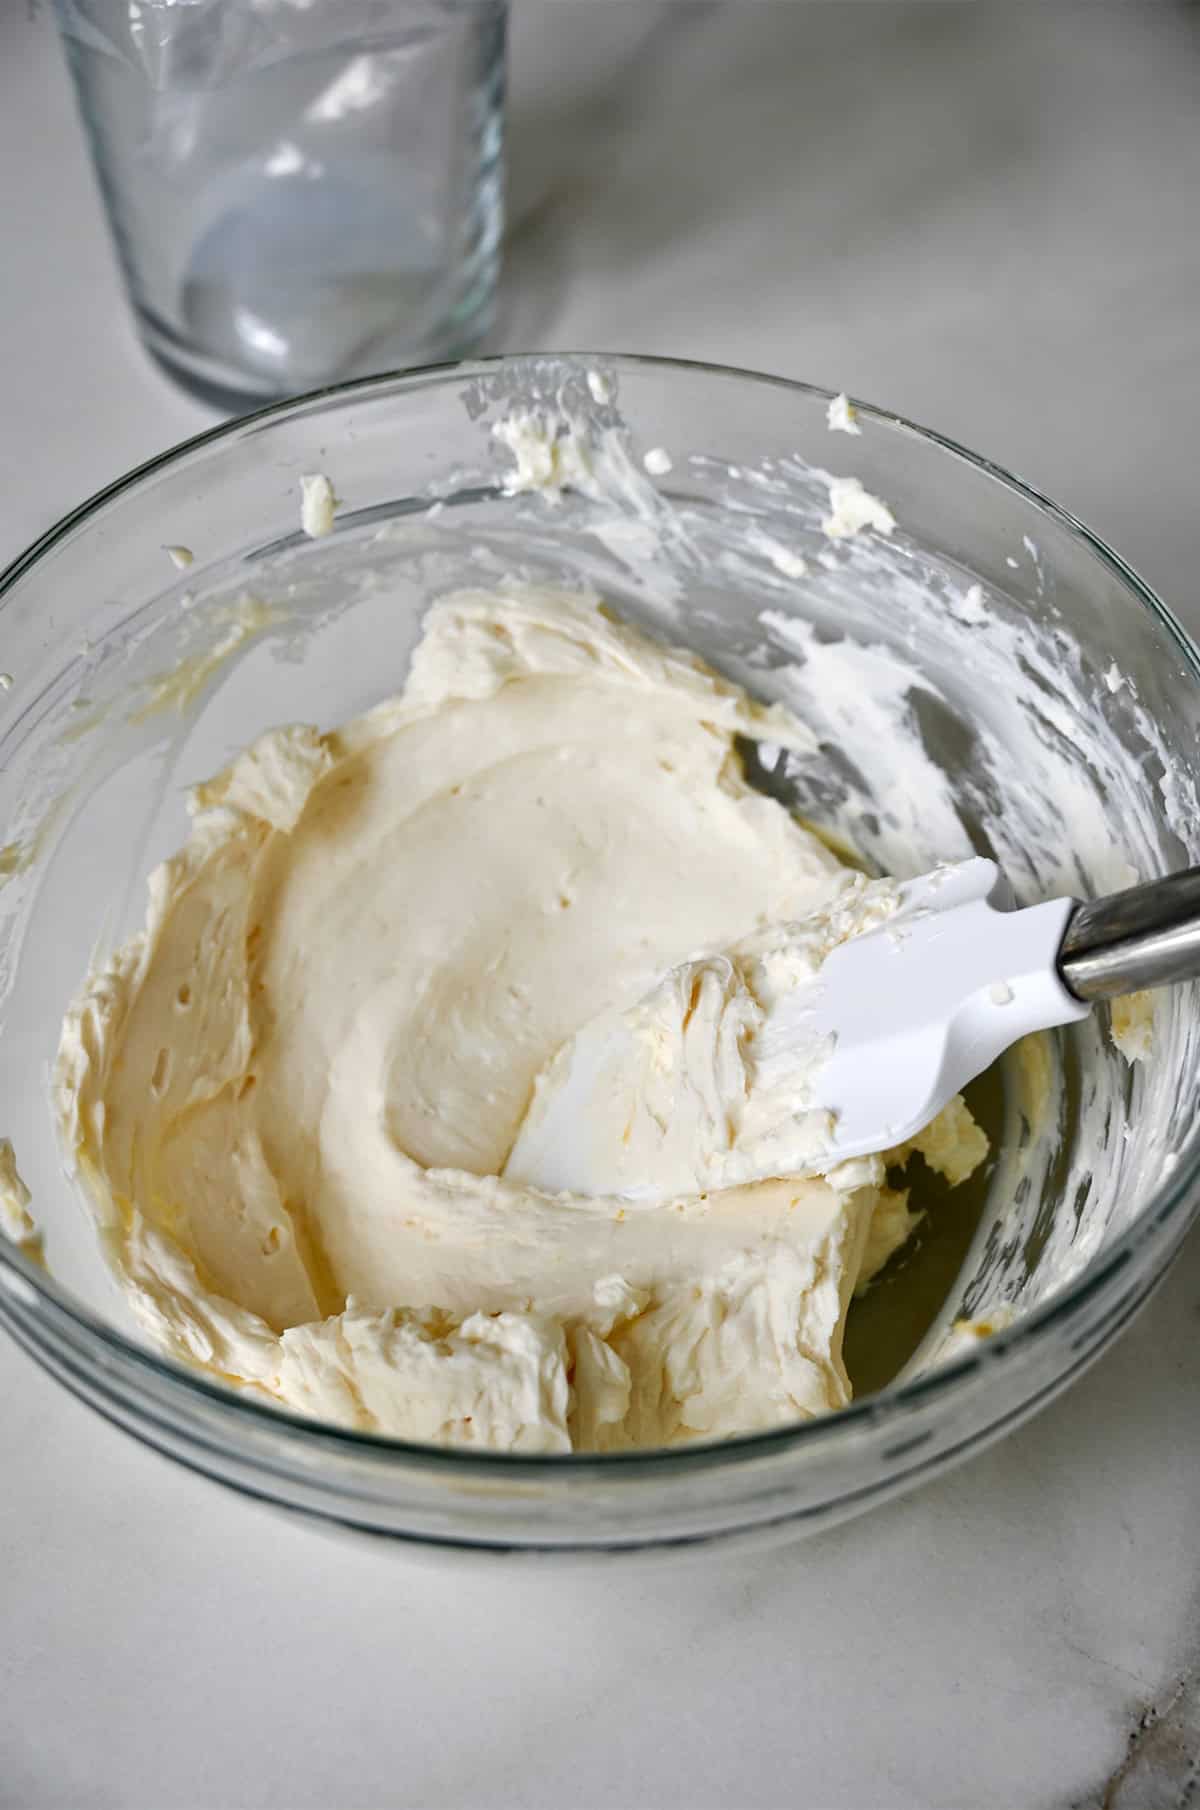
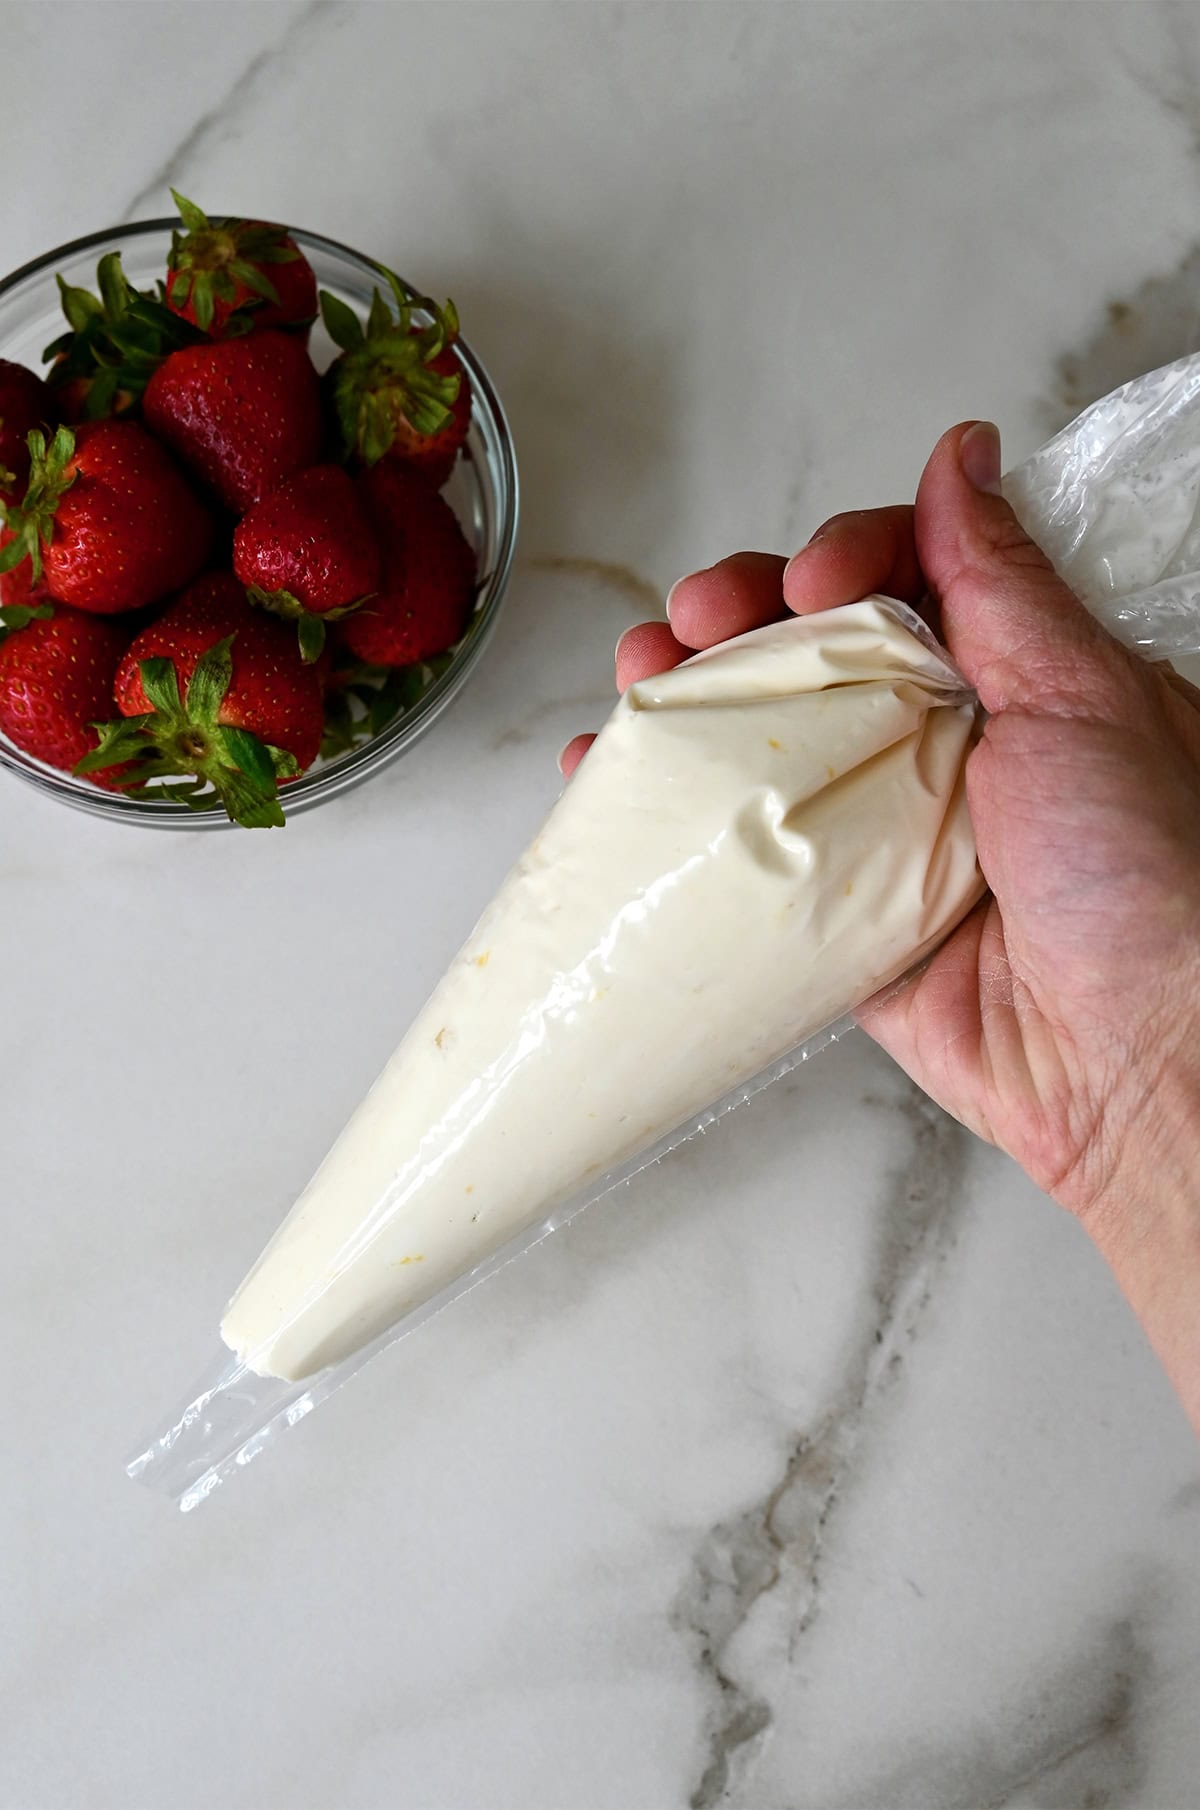
- Start by making the cream cheese filling. Combine the cream cheese, lemon juice, lemon zest, vanilla extract and sugar in a large bowl. Beat until creamy and well combined. Transfer the mixture to a sealable plastic bag or piping bag and set aside while you cut the puff pastry.
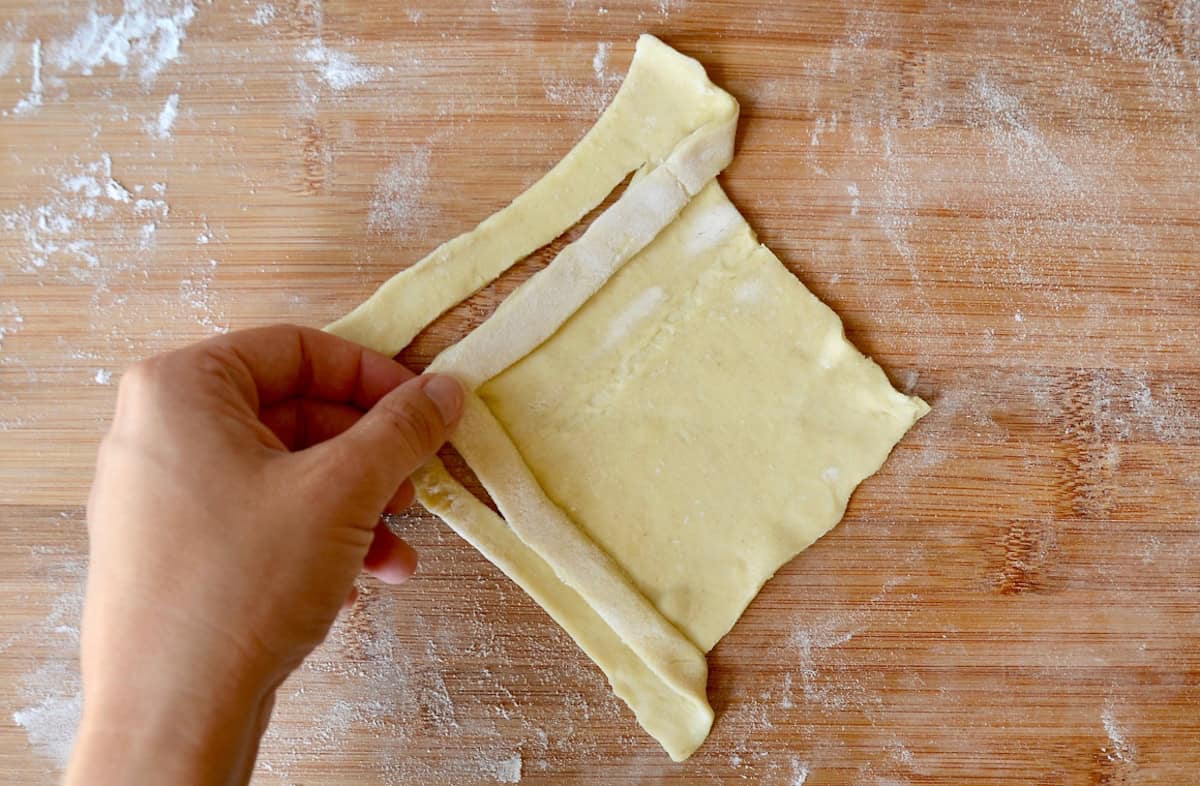
- Now it’s time to cut the pastry. Lightly flour your work surface then unfold each sheet of puff pastry and roll it into a 10-inch square. Cut each square into four smaller squares. To make diamond shapes, fold the squares in half diagonally to make triangles then cut a 1-inch border around the triangles except for the very tip.

The key here is to not cut all the way through the pastry, as shown above. We need that attached corner to use as our base for folding the squares into decorative diamonds.
- Once you’ve made the cuts, it’s only a matter of folding. Open the pastries then grab one side and fold it across, then grab the other side and fold it across. We’re basically criss-crossing the two pieces to form a border.
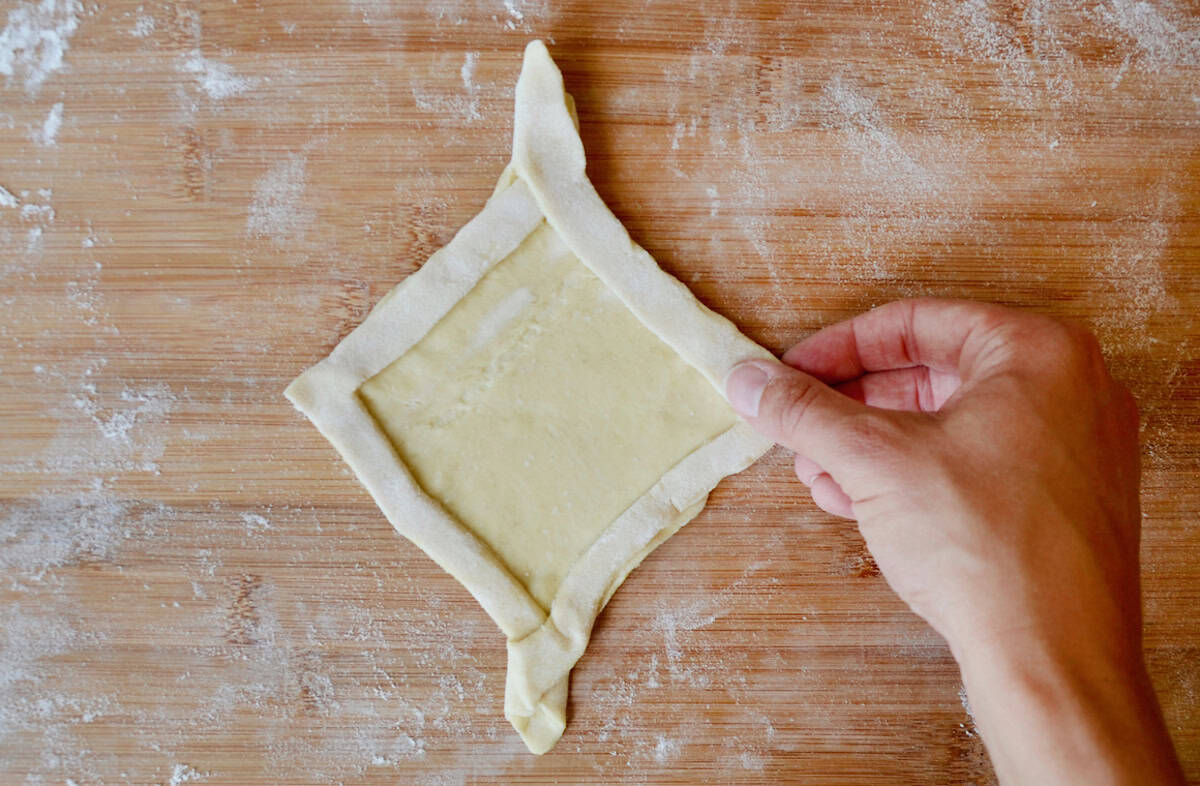
See what we did there? We turned a square into a not-so-fancy-but-still-looks-fancy diamond-shaped Danish with a center well and beautiful borders.
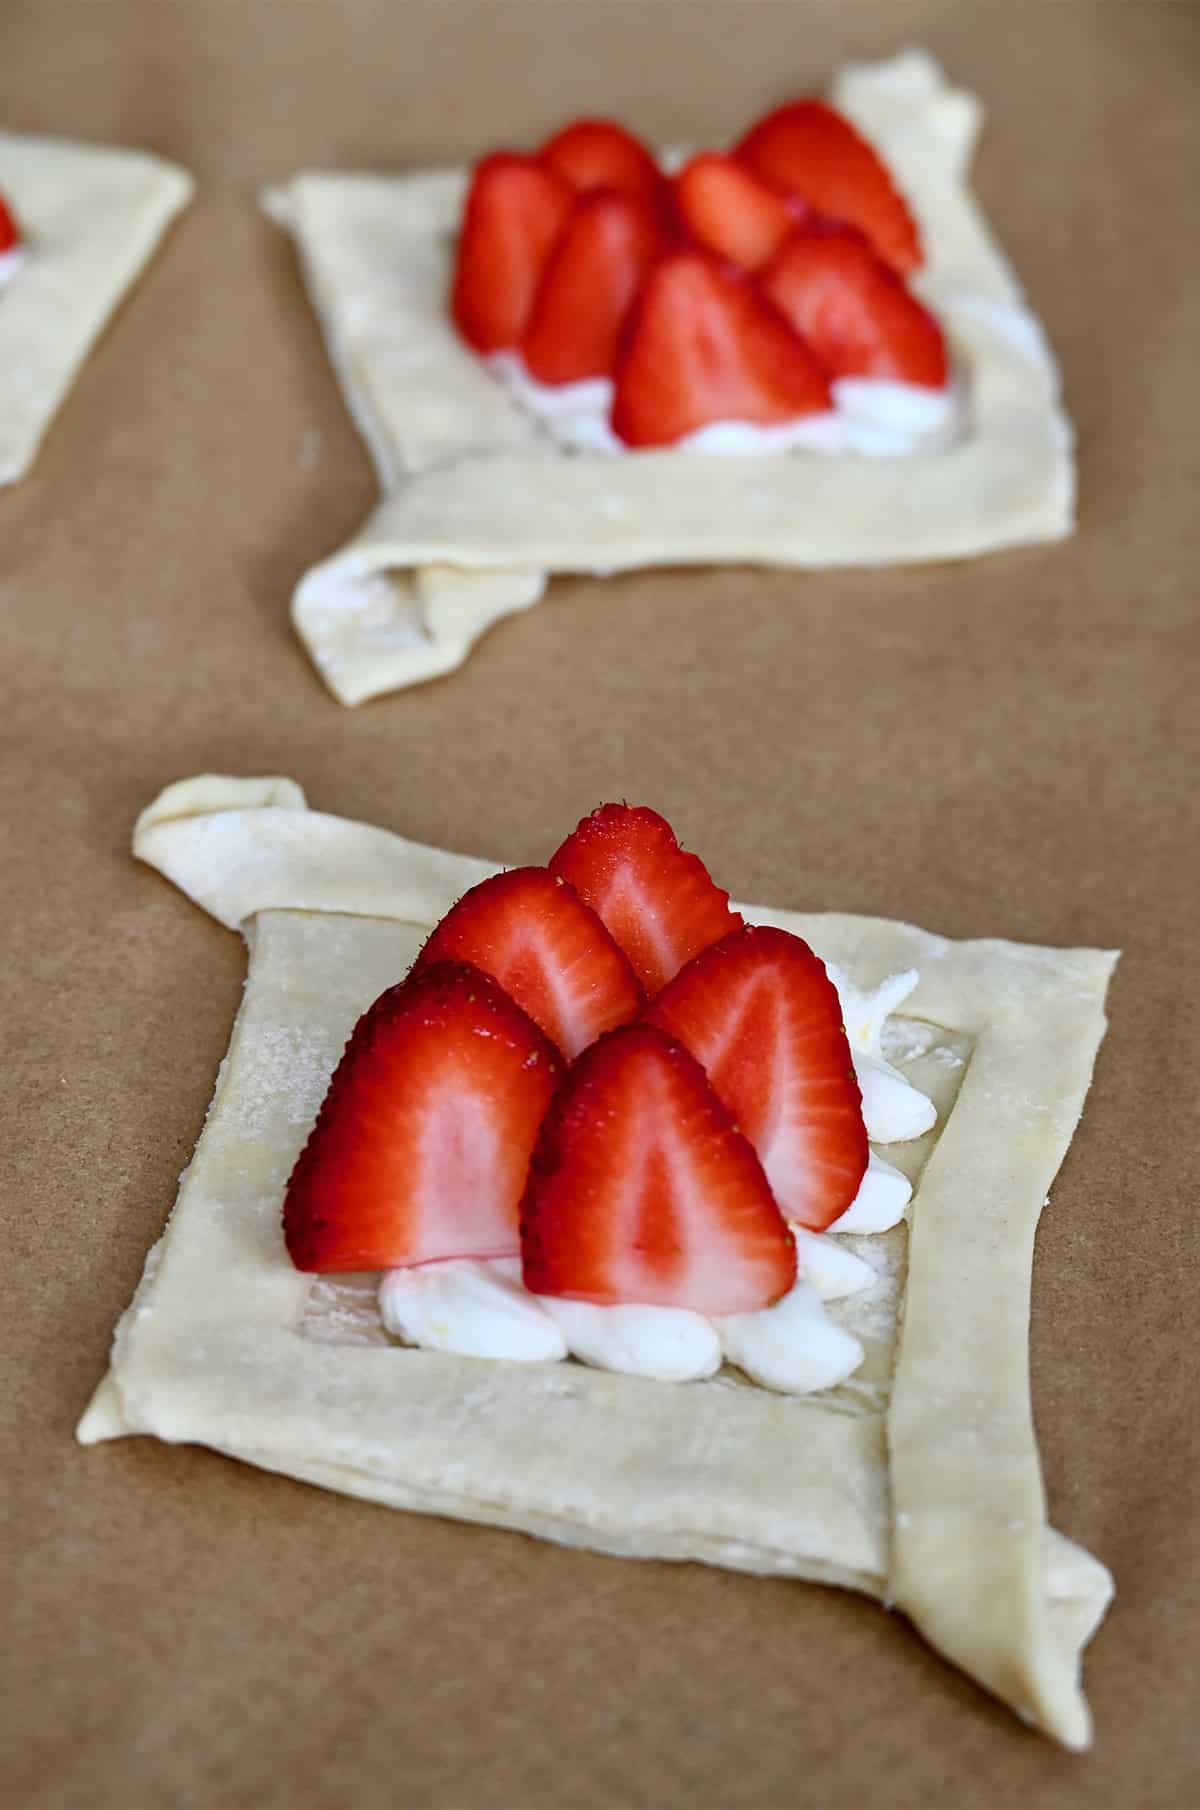
- Time to add the filling and fruit. Here’s your chance to get creative. Stick to my cream cheese filling as the base and then let your seasonal fruit flag fly when it comes to the topping. I go for sliced strawberries year-round, but whatever is in season is your best bet, from pears and peaches to apples and endless berries.
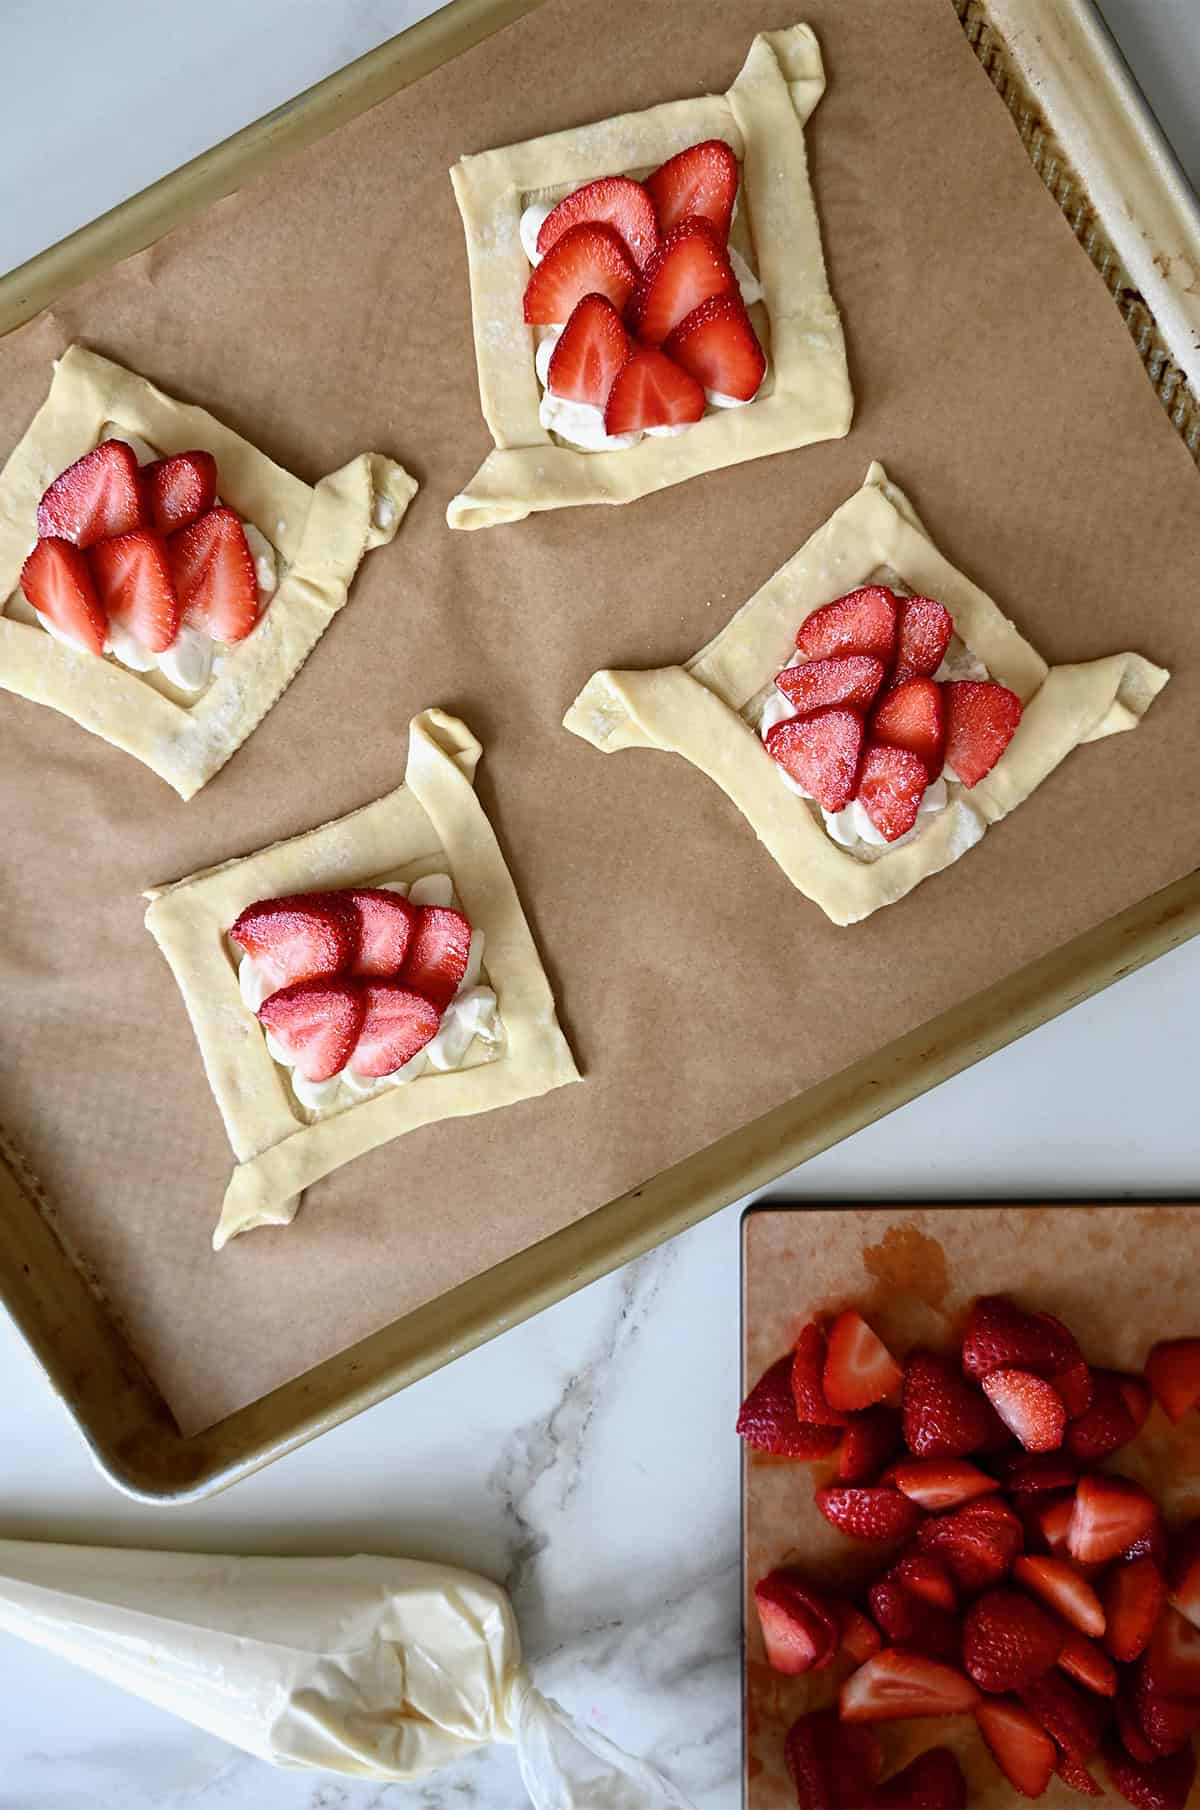
- Brush the edges with egg wash and sprinkle with sanding sugar. The sanding sugar is optional but it gives the pastries that bakery-worthy finish and a touch of crunch.
- Bake the pastries for 15 to 18 minutes or until golden brown and puffed.
Drooling yet? Preheat your oven and get ready to impress your guests with these easy but impressive cream cheese Danish!
- The filling can be made a day in advance and stored in an airtight container in the refrigerator.
- These breakfast pastries are best when enjoyed fresh, however, they can be stored in an airtight container in the fridge for up to 2 days. They’ll still taste great (I’ve eaten them many times 24 hours after making them!). And if you prefer a warm pastry, simply reheat them in a 250°F oven for a few minutes.
From different shapes to different fruit toppings, find inspiration for customizing these cream cheese Danish:
- Raspberry Danish or Blueberry Danish – I used a classic triangle shape for these recipes.
- Blackberry Cream Cheese Danish – This simple twisted rose shape is one of my favorites, and it’s so simple to do!
- Cream Cheese Pinwheel Pastries – Don’t let the impressive shape of these pastries intimidate you! They’re simple to make and have been a reader favorite since 2014.
- Strawberry Cream Cheese Pastries – For the fastest, no-fuss pastry shape, try this recipe starring rectangle-shaped puff pastry.
- Mixed Berry Cream Cheese Danish – Find inspiration for a simple circular shape with this reader-favorite recipe.
Common Questions
For the best results, I highly recommend using fresh fruit, however, if you decide to use frozen fruit, thaw it and pat it dry. Any water will cause the cream cheese mixture to be too loose and separate.
I’ve never tried freezing these cream cheese Danish so I’m not sure what the texture would be like once thawed and how the reheating would work. Cream cheese has a tendency to change in texture when frozen and reheated, which could affect the overall quality of the pastry.
I’ve never tried prepping the Danish in advance but my concern is that the puff pastry would get soggy with the cream cheese mixture resting on it for that length of time. Instead, I’d recommend baking the pastries the night before and storing them in an airtight container in the fridge. They’ll still taste great (I’ve eaten them many times 24 hours after making them!). And if you prefer a warm pastry, you can reheat them at 250°F for a few minutes.
- Greek Yogurt Banana Muffins
- Sour Cream Chocolate Chip Scones
- Raspberry Cream Cheese Coffee Cake
- Homemade Pop Tarts Two Ways
- Strawberry Cream Cheese Crêpes
- Pizza Dough Cinnamon Rolls
- Blueberry Orange Juice Bread
Ingredients
- 1 (8-oz.) package cream cheese, at room temp
- 2 teaspoons fresh lemon juice
- 1 teaspoon fresh lemon zest
- 2 teaspoons vanilla extract
- 2 1/2 Tablespoons sugar
- All-purpose flour, for dusting work surface
- 1 (17.3-oz.) package frozen puff pastry (2 sheets), thawed
- 1 cup sliced strawberries or other fruit
- 1 large egg
- Sanding sugar (optional)
Instructions
- Preheat the oven to 400°F and line two baking sheets with parchment paper or Silpat baking mats.
- In the bowl of a stand mixer fitted with the paddle attachment, combine the cream cheese, lemon juice, lemon zest, vanilla extract and sugar. Beat until creamy and well combined. Transfer the mixture to a sealable plastic bag or piping bag (optional).
- Lightly flour your work surface then unfold each sheet of puff pastry and roll it into a 10-inch square. Cut each square into four smaller squares. To make diamond shapes, fold the squares in half diagonally to make triangles then cut a 1-inch border around the triangles except for the very tip. Open the pastries then invert the folds of dough so they’re opposite of one another. (See photos above.)
- Arrange the pastries on the lined baking sheets, spacing them 2 inches apart. Pipe a portion of the cream cheese filling into the center of each pastry. Top the cream cheese with the sliced strawberries.
- In a small bowl, whisk the egg. Using a brush, generously brush the pastries all over with the egg wash, omitting the area with the cream cheese. Sprinkle the edges of the pastries with the sanding sugar (optional).
- Bake the pastries for 15 to 18 minutes or until golden brown and puffed. Remove them from the oven then transfer them to a rack to cool before serving.
Kelly’s Notes
- Let your seasonal fruit flag fly when it comes to the topping! I go for sliced strawberries year-round, but whatever is in season is your best bet, from pears and peaches to apples and endless berries.
- The filling can be made a day in advance and stored in an airtight container in the refrigerator.
- These breakfast pastries are best when enjoyed fresh, however, they can be stored in an airtight container in the fridge for up to 2 days. They’ll still taste great (I’ve eaten them many times 24 hours after making them!). And if you prefer a warm pastry, simply reheat them in a 250°F oven for a few minutes.
- ★ Did you make this recipe? Don’t forget to give it a star rating below!
Nutrition
Did you try this recipe?
Leave a comment below with your star rating!
This post may contain affiliate links.
Recipe by Kelly Senyei of Just a Taste. Please do not reprint this recipe without my permission. If you'd like to feature this recipe on your site, please rewrite the method of preparation and link to this post as the original source.


Love the recipe! Tried with pineapple, peaches, cherries. One problem: my husband gets up before kids and thinks I made it all just for him.
Ha! I’m so thrilled your family has been enjoying the recipe, Tatyana!
Can you make the filling ahead?
Sure, Jessica! The filling can be made a day in advance and stored in an airtight container in the refrigerator.
My husband has been wanting me to make cheese danishes. Found this recipe. They are fairly easy to make and turned out perfectly!
I’m thrilled to read this, Katie!
These are so good! They came together really quickly and even my picky little ones loved them. Great for adults and kids!
So glad you all enjoyed the recipe, JoAnn!
Looks tasty. Can’t wait to try this!
I hope you enjoy the recipe, Sophon!