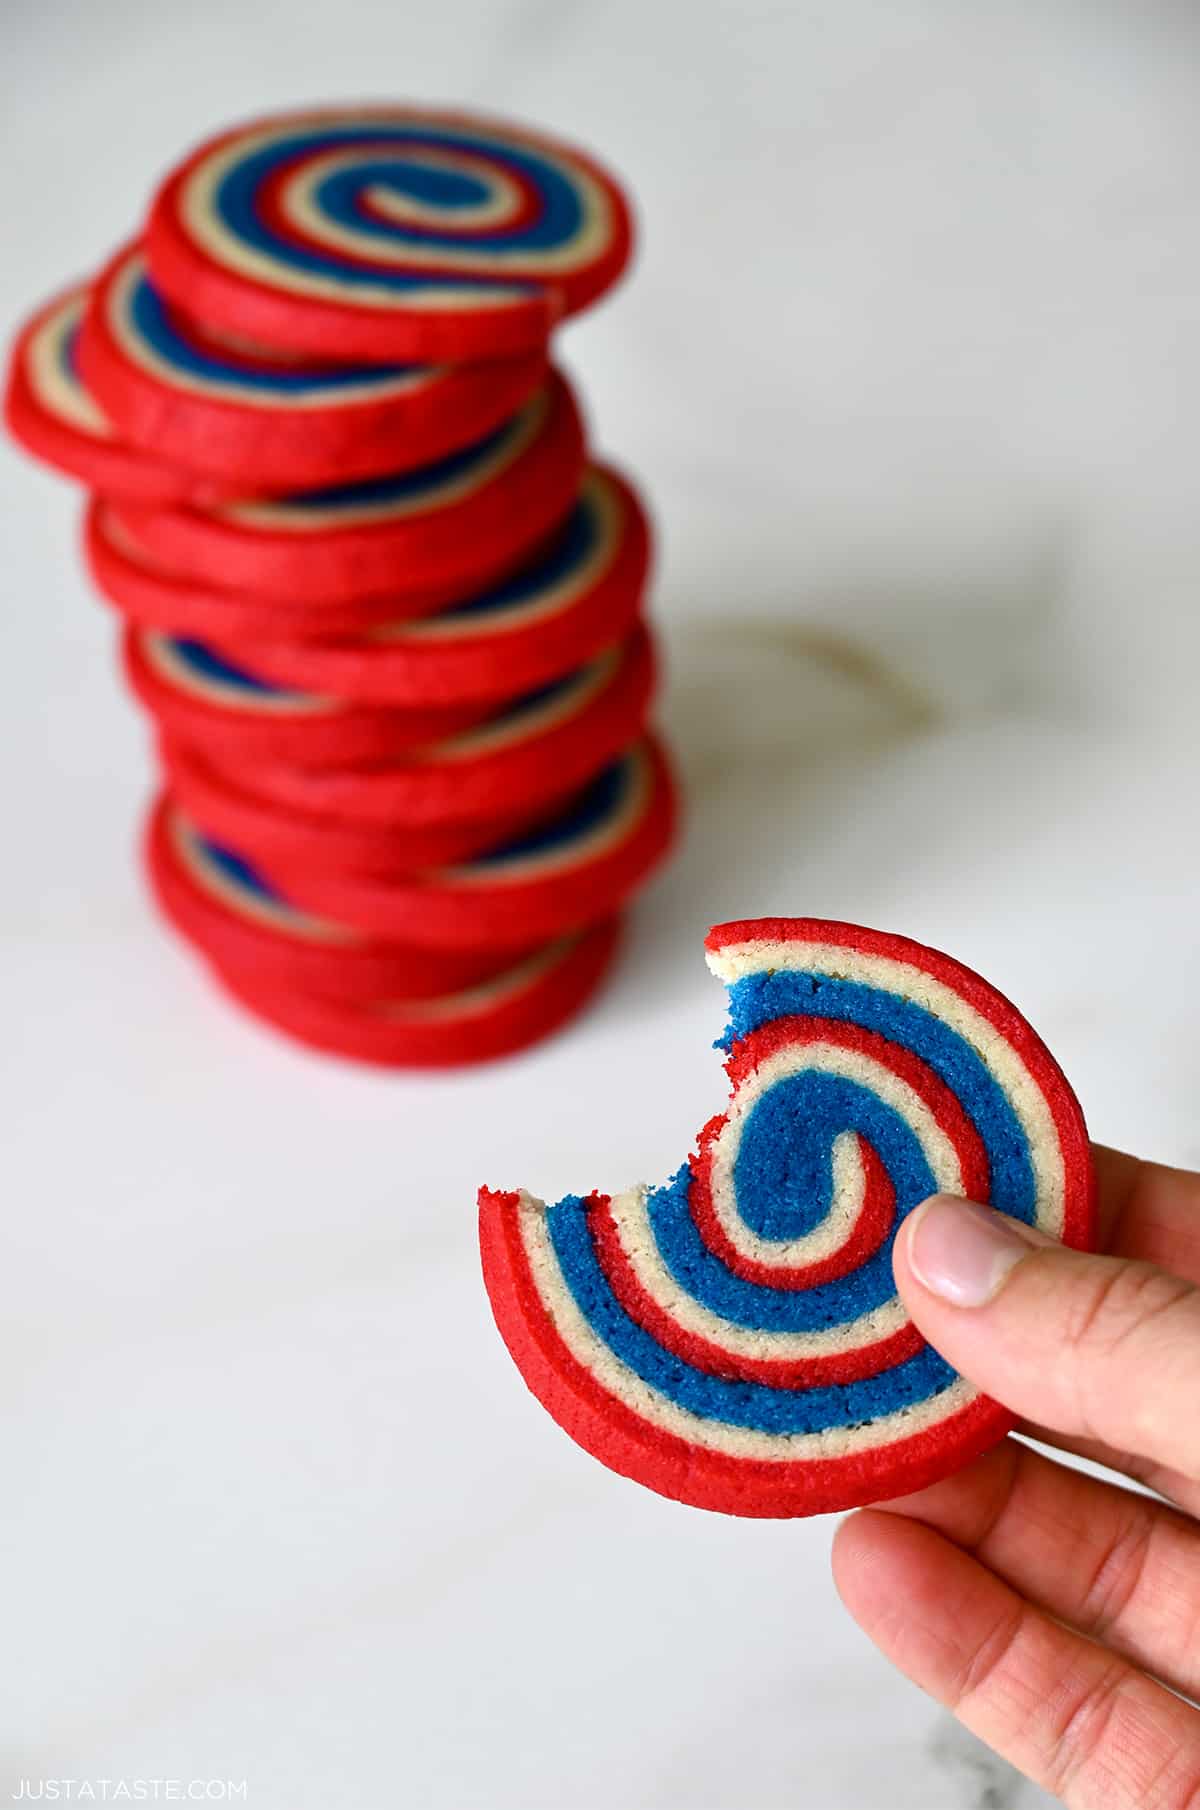
Red, White and Blue Pinwheel Icebox Cookies are the perfect 4th of July dessert! Best of all, these slice-and-bake cookies are made with one dough and basic pantry ingredients (think butter, sugar, eggs and flour).
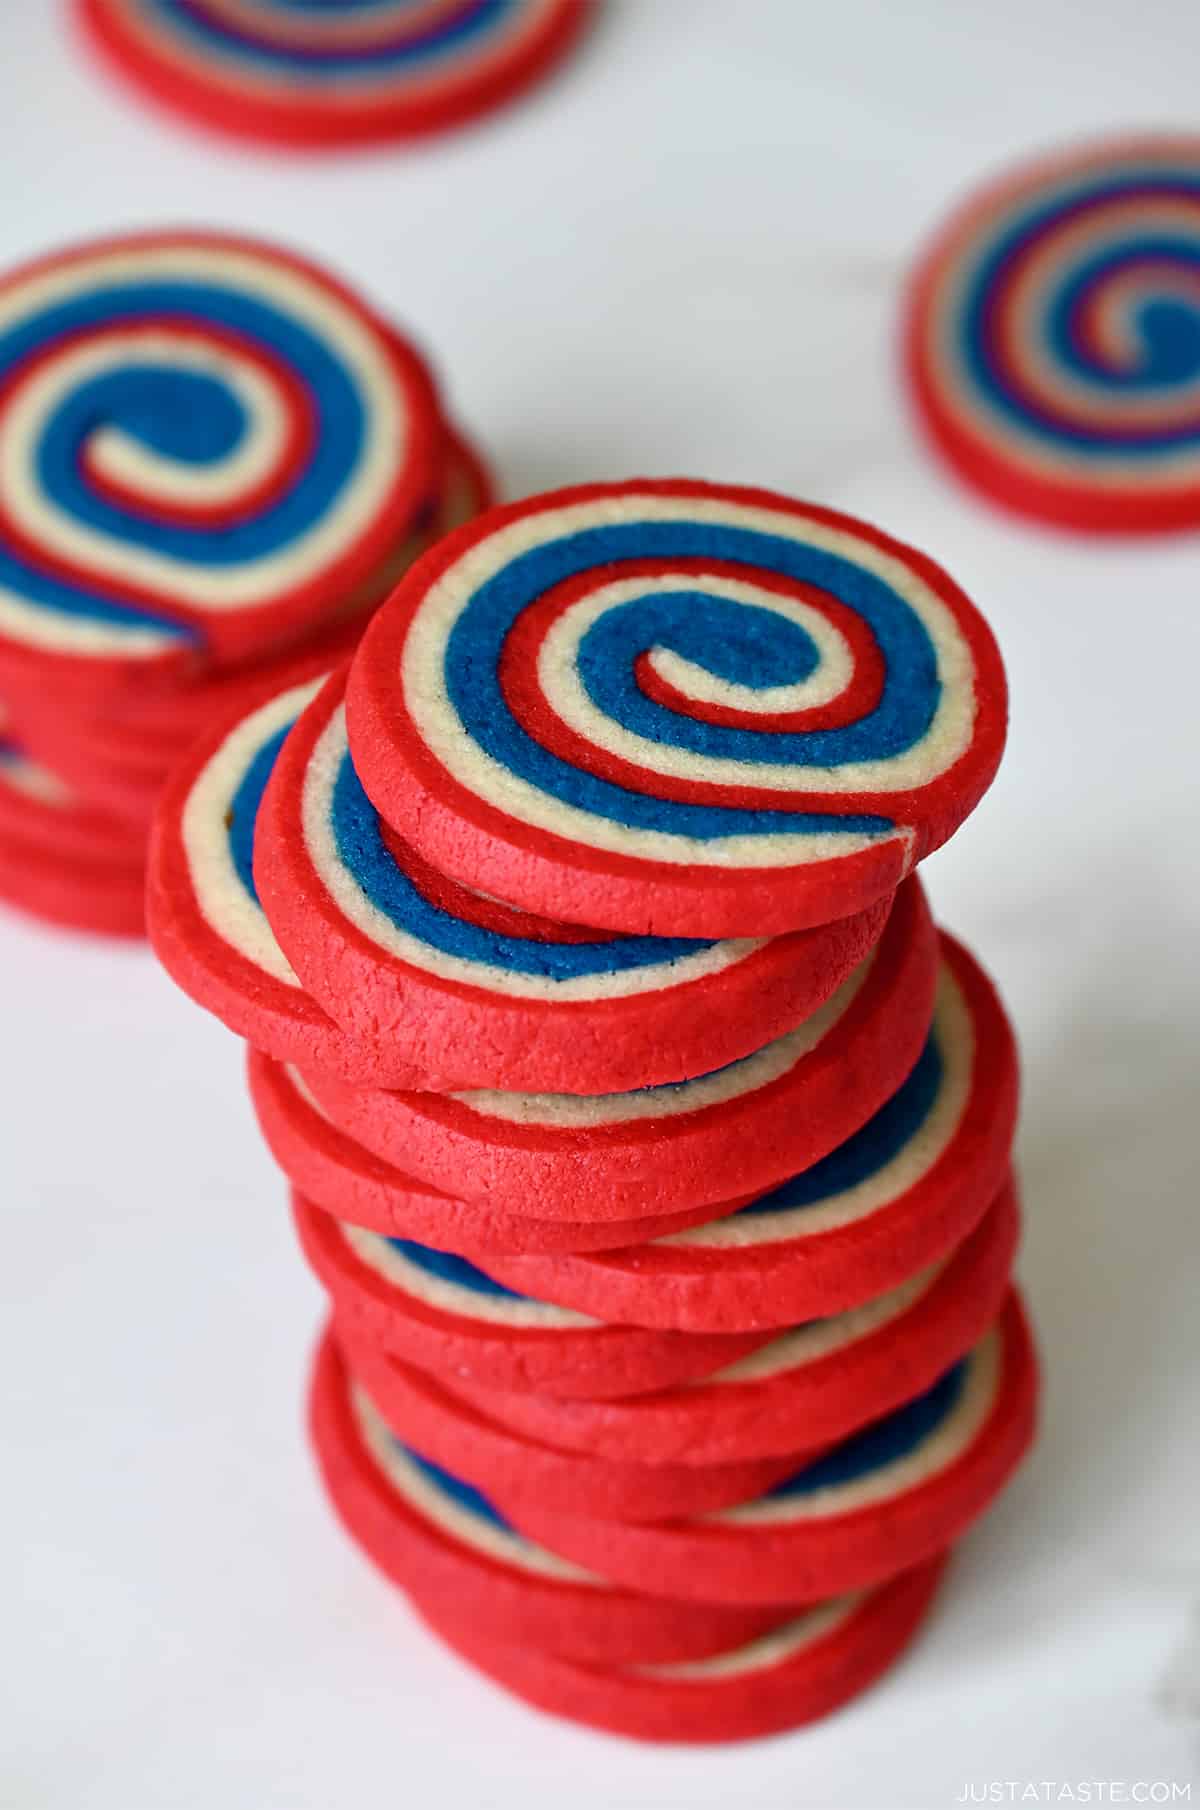
Table of Contents
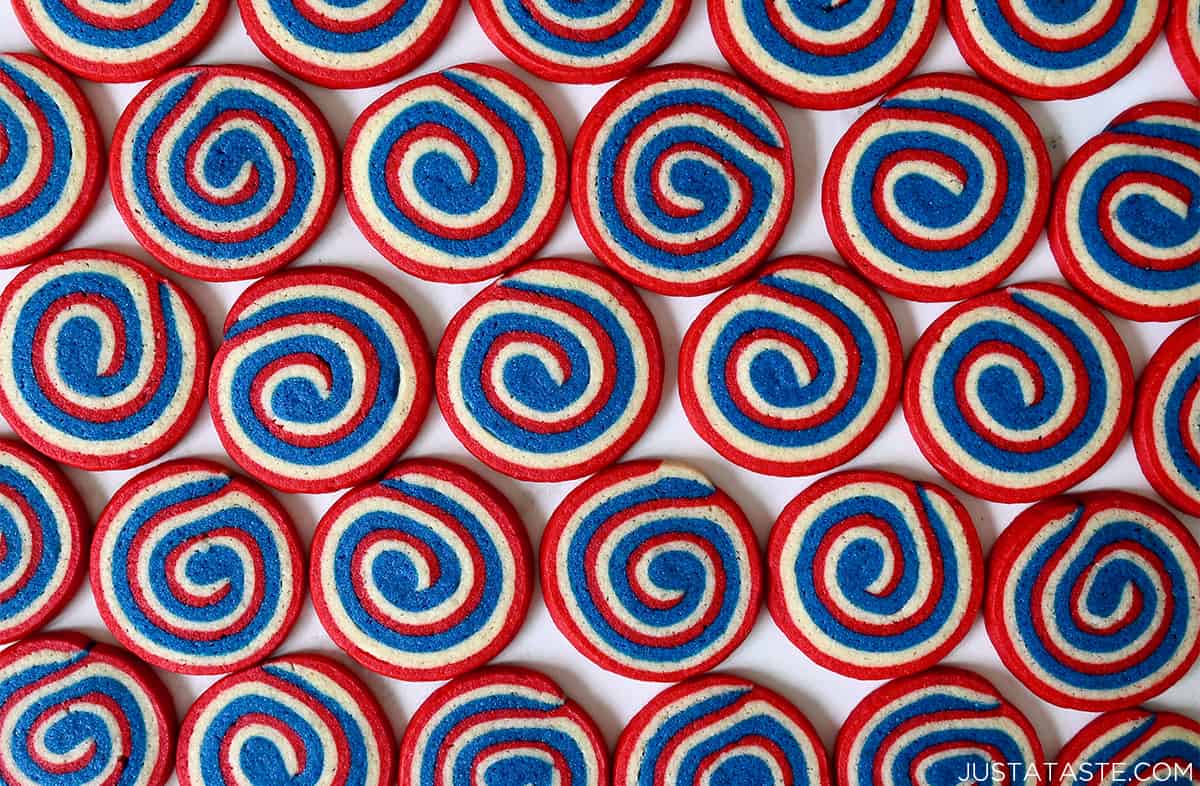
Whether you’re hosting a 4th of July party, Memorial Day picnic or simply want to impress your family and friends, these pinwheel cookies are sure to be a hit. Not only are they totally Instagram-worthy, but they’re surprisingly easy to make (with all of my tips and tricks for success!).
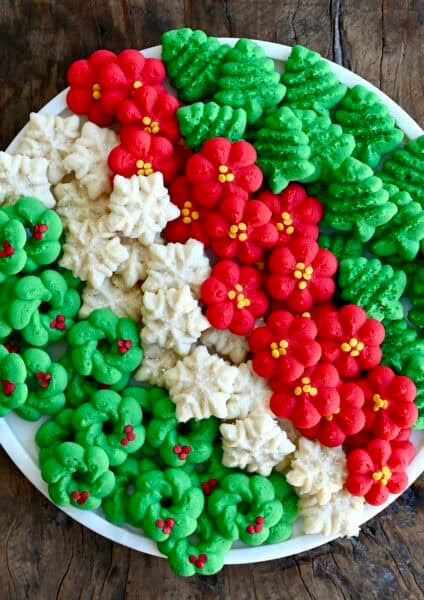
Best of all, you can personalize these icebox cookies to match any party by experimenting with different color combinations and/or adding your favorite sprinkles. For inspiration, check out my recipes for Christmas Pinwheel Cookies, Monster Eye Halloween Cookies and Pink Pinwheel Sugar Cookies. And for a really unique twist, try these Cinnamon Roll Cookies.
So, preheat your oven and get ready to celebrate the red, white and blue with every tasty bite of these patriotic treats!

Why You’ll Love these Cookies
If soft and chewy cookies set off flavor fireworks in your world, then consider your taste buds dazzled.
- Made with ingredients you likely already have in your fridge and pantry.
- Unlike some pinwheel cookie recipes that call for two separate cookie doughs, this recipe simplifies the process by using only a single dough.
- Bakery-worthy yet easy to whip up.
- These cookies not only taste fantastic but also serve as a beautiful centerpiece, adding a touch of patriotic flair to your dessert table.
- The dough can be prepared in advance and stashed in the fridge, so all that’s left to do is slice and bake them as your guests arrive.
Kelly’s Note: Plan ahead! These cookies require a significant amount of chilling time.
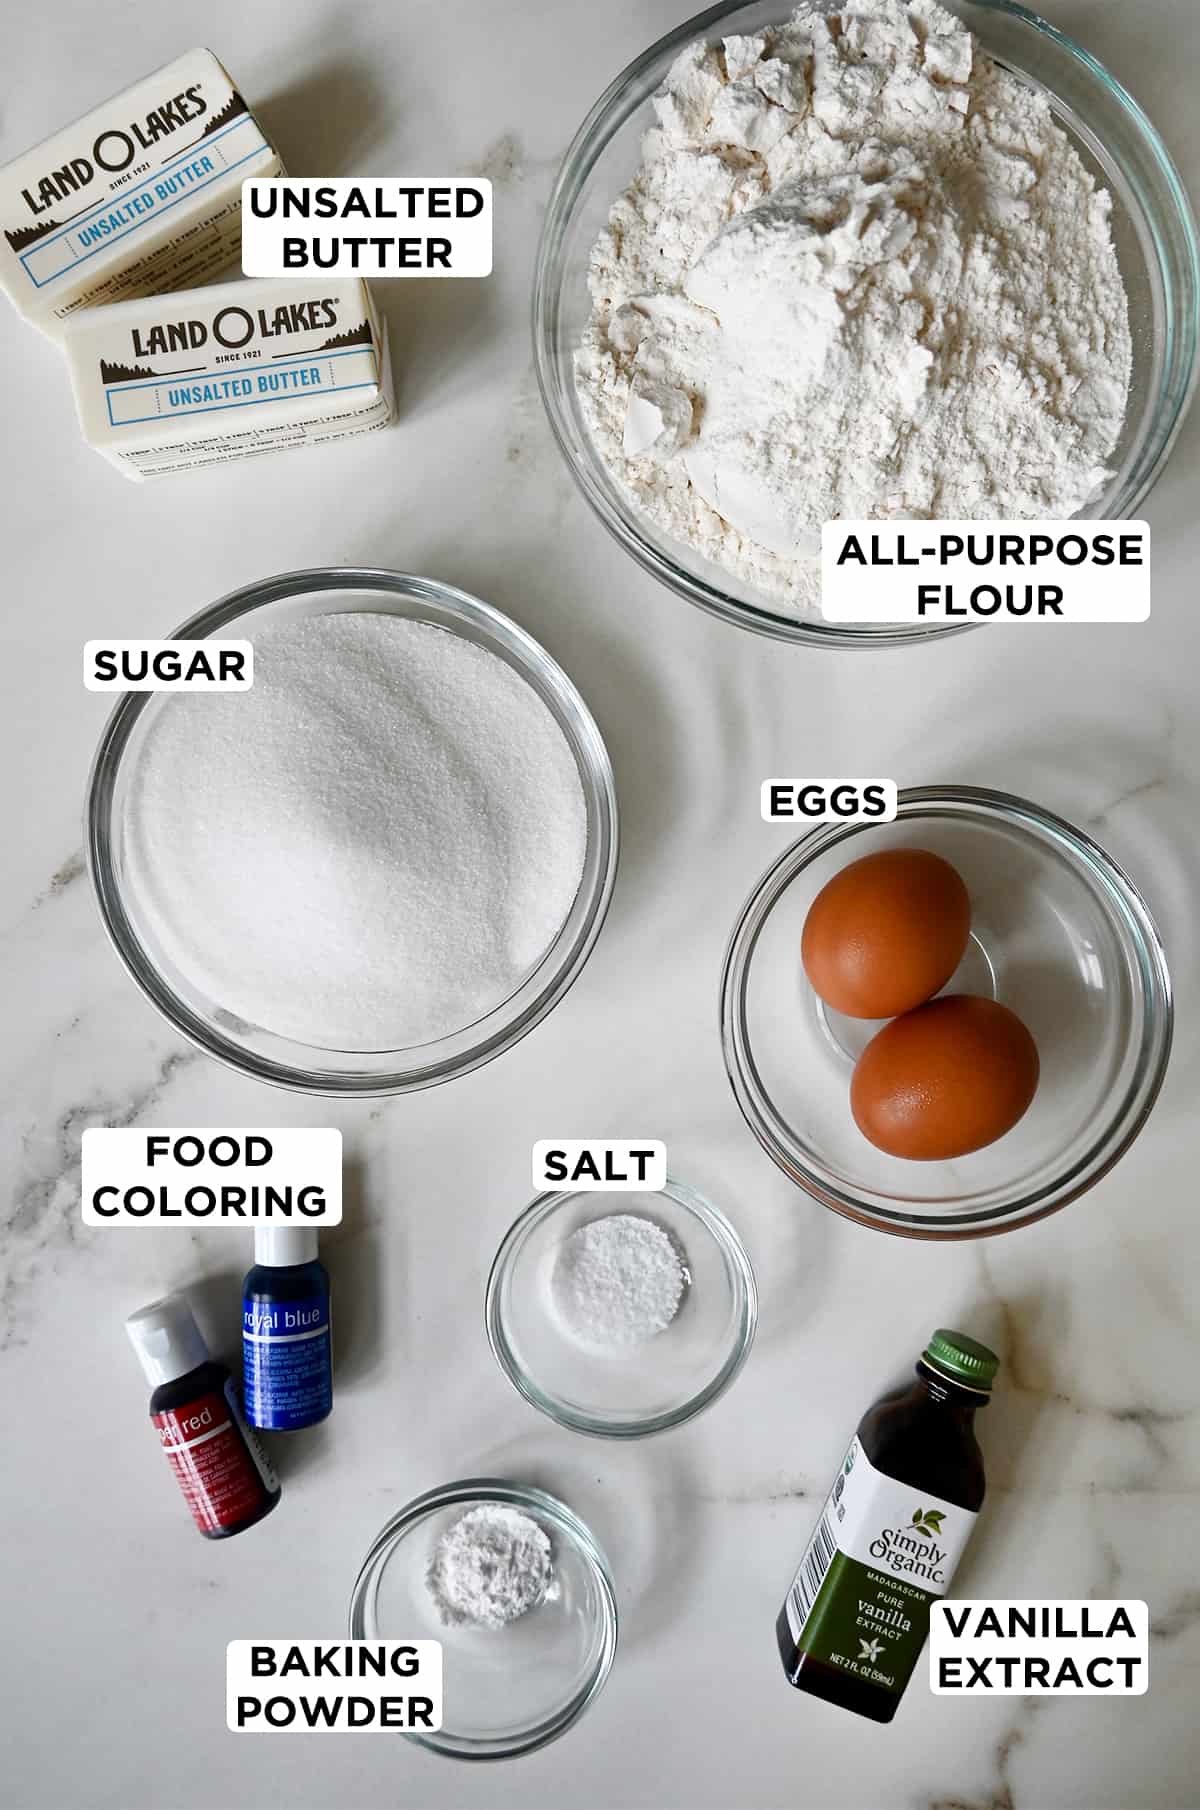
The base of this dough is very similar to my favorite butter cookies and sugar cookies. These are the ingredients you’ll need:
- All-purpose flour: Flour serves as the base ingredient in these cookies, providing structure and texture.
- Baking powder: Helps the cookies rise and become light and fluffy. It reacts with the other ingredients, particularly the eggs, to create carbon dioxide bubbles that expand during baking.
- Salt: Enhances the overall flavor profile by balancing sweetness.
- Unsalted butter: Butter adds richness and flavor to the cookies. Using unsalted butter allows better control over the salt content in the recipe. Just like my go-to no-chill chocolate chip cookies, make sure the butter is cold, straight from the fridge!
- Sugar: Granulated sugar provides sweetness and aids in tenderizing the cookies. It also contributes to browning during baking.
- Eggs: Act as binders and provide moisture to the dough.
- Vanilla extract: It complements the buttery and sweet flavors of the dough. Use pure vanilla extract for the best flavor. Almond extract can be substituted for a nutty twist. Because it has a stronger flavor, start by substituting half of the vanilla extract called for in the recipe with almond extract, and adjust according to your taste preference.
- Food coloring: I highly recommend using gel-based food coloring because unlike water-based, gel food coloring delivers exceptionally vibrant colors with just a few drops.
Crank up your favorite music, preheat your oven, and slice and bake your way to the ultimate Independence Day dessert.
- Prepare the dough. In a medium-sized bowl, whisk together the all-purpose flour, baking powder and salt. Set this dry mixture aside. In a separate large bowl or n the bowl of a stand mixer fitted with the paddle attachment, beat the butter until smooth, about 2 minutes. Add the sugar and continue beating until the mixture is light and fluffy, about 3 minutes. Add the eggs one at a time, beating well after each addition, then add the vanilla.
- Incorporate the dry ingredients. Gradually add the dry mixture to the wet ingredients, mixing until a cohesive dough forms. Ensure all the dry ingredients are fully incorporated, but be careful not to overmix.
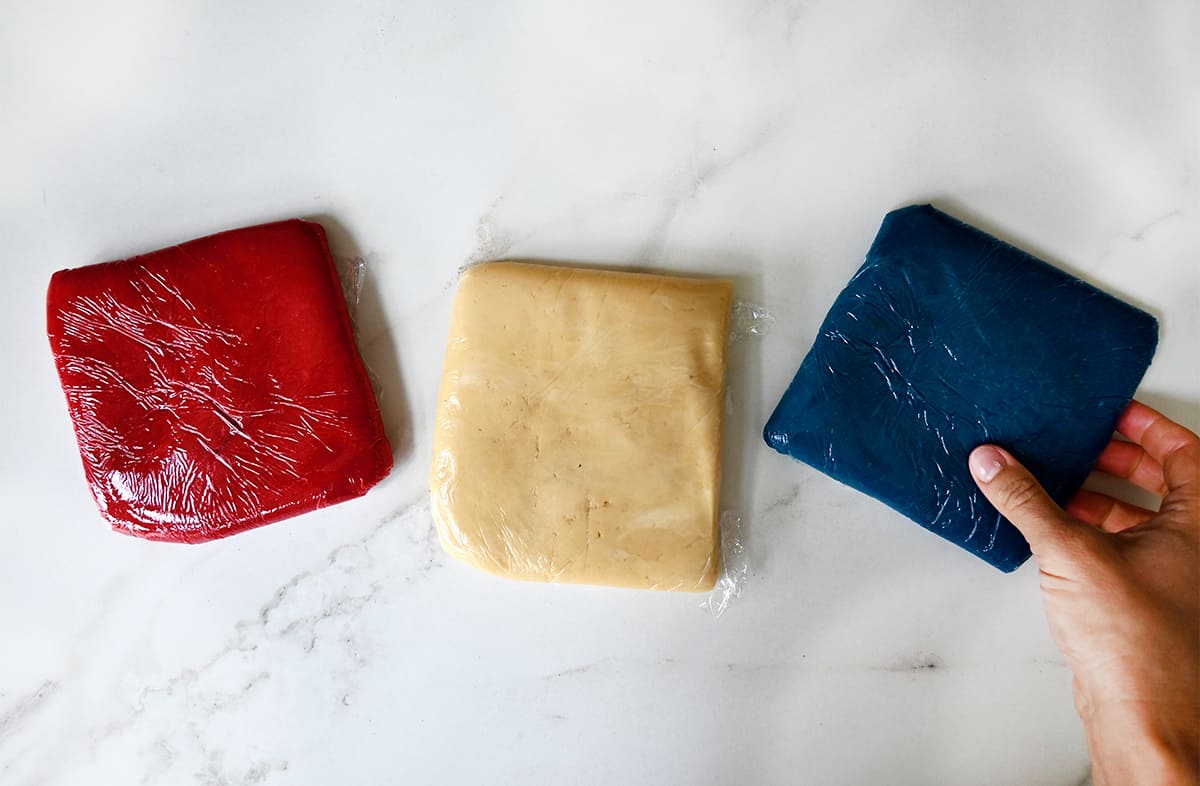
- Divide and color the dough. Remove the dough and divide it into three equal portions. Leave one portion plain and color one portion red and the other portion blue. Add a few drops of food coloring at a time, mixing well after each addition, until you achieve the desired color intensity.
- Shape the dough, wrap in plastic wrap and refrigerate. Shape each of the three doughs into 4- by 4-inch squares, wrap them securely in plastic wrap and place them in the fridge. Refrigerate for 30 minutes.
- Roll out the dough. Remove the dough from the fridge and cut each square in half to form two rectangles. Wrap half of each color of dough in plastic wrap and return it to the fridge (you’ll roll out those portions after the first log is formed). Place each portion of dough between two pieces of wax paper and roll each into a rectangle about 1/8-inch thick. Make sure the rectangles are as close to the same size as possible for even pinwheel cookies.
- Assemble the pinwheels. Peel the top layer of wax paper off of the red dough and then peel the wax paper off one side of the white dough and use the other side to transfer the white dough on top of the red dough. Peel off the wax paper from one side of the blue dough and use the other side to transfer it atop the white dough. Gently press the layers together to create a stack. Starting from one of the shorter edges, tightly roll the stack into a log. Ensure the roll is firm and compact. Repeat the rolling and stacking process with the remaining dough in the fridge. Wrap each log in wax paper and then plastic wrap and refrigerate them for 1 hour.
- Prevent flat-sided cookies. Remove the dough logs and roll them on the counter several times so they don’t develop a flat side. Alternately, stand the rolls up in glasses in the fridge. Refrigerate the dough for 4 more hours.
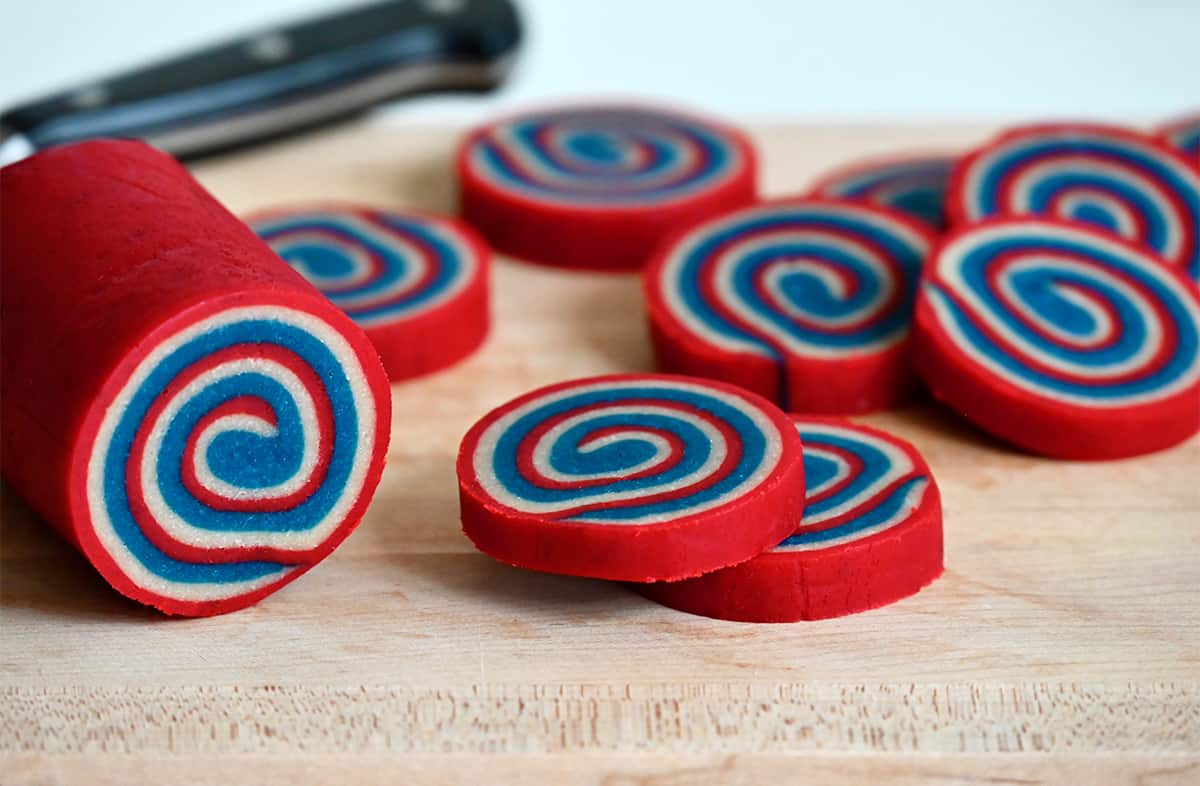
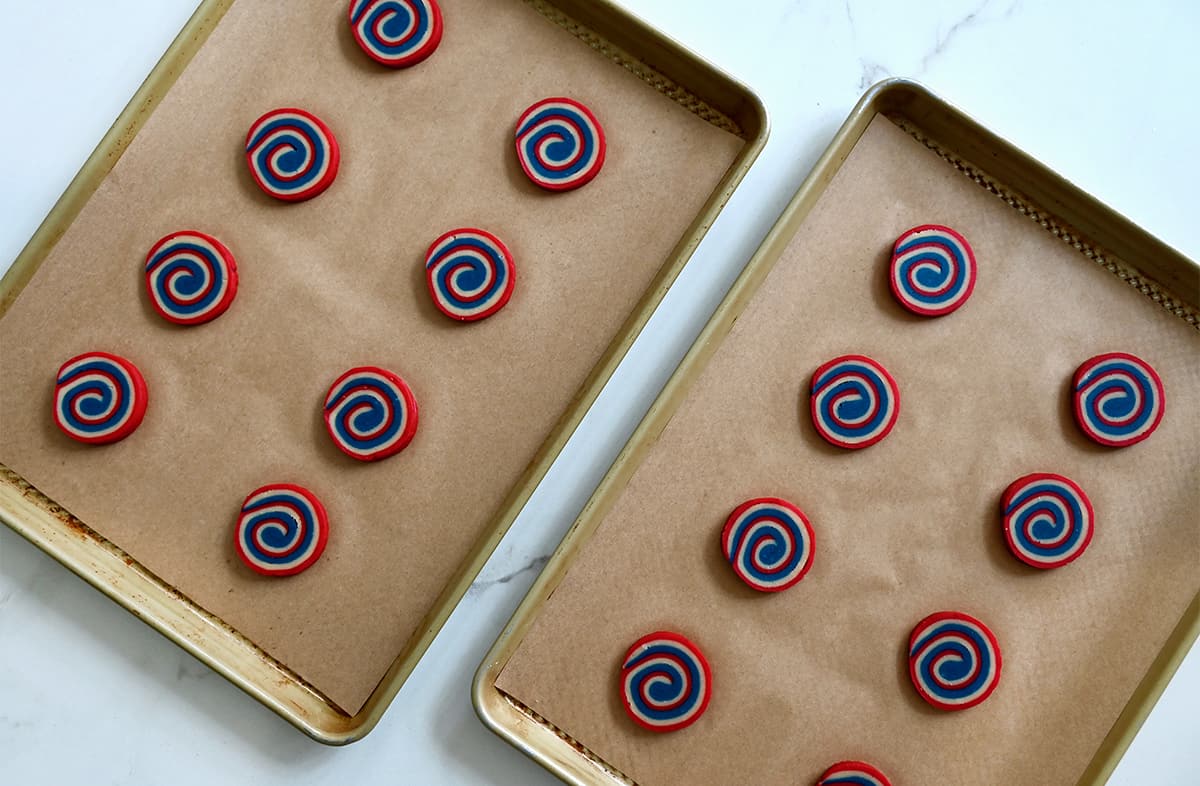
- Slice and bake. When ready to bake, preheat the oven to 350ºF. Remove the dough logs from the fridge, unwrap and slice each log into rounds, about ¼ inch thick. Place the sliced cookies onto baking sheets lined with parchment paper, leaving some space between them to allow for spreading. Bake in the preheated oven for approximately 9-11 minutes, or until the edges are lightly golden.
- Cool and serve. Once baked, remove the cookies from the oven and transfer them to wire racks to cool completely. Once cooled, serve and enjoy these beautiful 4th of July cookies!
- Chilled Dough is Key: To achieve well-defined swirls, it’s crucial to chill the dough thoroughly before slicing and baking. The colder the dough, the easier it is to handle and shape. Aim for at least five hours of chilling time or even overnight in the refrigerator.
- Roll Tightly and Evenly: When rolling the dough into a log, ensure it is compact and evenly shaped. This will help create consistent swirls and prevent air pockets between the layers.
- Wax Paper for Easy Rolling: Place a sheet of wax or parchment paper on your work surface before rolling out the dough. This will prevent sticking and make it easier to lift and roll the dough into a tight log.
- Freeze for Later: If you’re planning ahead, you can freeze the dough log for up to 3 months. Simply wrap it tightly in plastic wrap and place it in a freezer-safe bag. Thaw in the refrigerator overnight before slicing and baking.
FAQs
You can store baked pinwheel cookies in an airtight container at room temperature for up to 1 week.
You can prep the dough (until right before the slice step) 48 hours in advance, seal in plastic wrap and refrigerate.
Absolutely! The cookie dough logs can be frozen for up to 3 months. Wrap securely with two layers of plastic wrap and place in a freezer-safe bag. Thaw in the refrigerator before slicing and baking. Baked pinwheel cookies can also be frozen for up to 1 month. Cool them completely, arrange in a single layer on a baking sheet, freeze until firm, and then transfer to a freezer-safe container or bag. Thaw at room temperature for 30 minutes to 1 hour before enjoying.
Yes! Other extracts such as almond, peppermint or orange can all be substituted for the vanilla extract in this recipe. Just be mindful of the strength of the extract you’re using, as some flavors might be more potent than others.
Yes, the dough must be refrigerated after it’s mixed in order for the butter to solidify. Otherwise the dough will be too soft to roll.
Ingredients
- 3 cups all-purpose flour
- 1/2 teaspoon baking powder
- 1/2 teaspoon salt
- 1 cup (2 sticks) unsalted butter
- 1 1/3 cups sugar
- 2 large eggs
- 2 teaspoons vanilla extract
- Red food coloring
- Blue food coloring
Instructions
- In a medium bowl, sift together the flour, baking powder and salt.
- In the bowl of a stand mixer fitted with the paddle attachment, beat the butter until smooth, about 2 minutes. Add the sugar and continue beating until the mixture is light and fluffy, about 3 minutes. Add the eggs one at a time, beating between each addition, then add the vanilla.
- Turn the mixer off. Add the flour and then beat just until combined. Remove the dough and separate it into three equal pieces. Shape one piece of the dough into a 4- by 4-inch square, wrap it securely in plastic wrap and place it in the fridge. (This will be the white portion of the cookies.)
- Return one of the remaining pieces of dough to the stand mixer bowl, and with the mixer on “low,” add in the red food coloring until it reaches your desired color. Remove the red dough, shape it into a 4- by 4-inch square, wrap it securely in plastic wrap and place it in the fridge. (This will be the red portion of the cookies). Clean out the bowl to remove any red food coloring residue.
- Add the final piece of dough to the stand mixer bowl, and with the mixer on “low,” add in the blue food coloring until it reaches your desired color. Remove the blue dough, shape it into a 4- by 4-inch square, wrap it securely in plastic wrap and place it in the fridge. (This will be the blue portion of the cookies.)
- Refrigerate the dough for 30 minutes.
- Remove the dough from the fridge and cut each square in half to form two rectangles. Wrap half of each color of dough in plastic wrap and return it to the fridge. Place the red dough in between two pieces of wax paper and roll it into a rectangle about 1/8-inch thick. Roll out the white dough between two separate pieces of wax paper until it is a rectangle about 1/8-inch thick. Roll out the blue dough between two separate pieces of wax paper until it is a rectangle about 1/8-inch thick.
- Peel the top layer of wax paper off of the red dough and then peel the wax paper off one side of the white dough and use the other side to transfer the white dough on top of the red dough. Peel off the wax paper from one side of the blue dough and use the other side to transfer it atop the white dough. Very lightly roll the three layers together.
- Starting at the shorter end of the rectangle, roll the dough as tightly as possible into a log. Repeat the rolling and stacking process with the remaining dough in the fridge. Wrap the logs in wax paper and then plastic wrap and refrigerate them for 1 hour.
- Remove the dough logs and roll them on the counter several times so they don’t develop a flat side. Alternately, stand the rolls up in glasses in the fridge. Refrigerate the dough for 4 more hours.
- When ready to bake, preheat the oven to 350ºF and line two baking sheets with parchment paper. Remove the dough from the fridge and slice each log into 1/4-inch rounds. Place the rounds about 2 inches apart on the baking sheets, as the cookies will expand when baked.
- Bake the cookies for 9 to 11 minutes until pale golden, and then transfer them to a wrack to cool completely.
- ★ Did you make this recipe? Don't forget to give it a star rating below!
Nutrition
Did you try this recipe?
Leave a comment below with your star rating!
This post may contain affiliate links.
Cookie dough recipe adapted from Gale Gand.


I made these for the first time today, and they turned out very well. I did want to share a few important points:
* The total time on the recipe doesn’t include the 5 1/2 total hours that the dough needs to chill.
* If you double or triple the ingredients, you’ll need to make adjustments to step 3, where you shape pieces of dough into 4×4 squares. Since I doubled the recipe, I made 8×4 squares and then cut them in half.
* The food coloring adds a good bit of liquid, which can make the red and blue dough a little harder to work with. I would add a little flour next time to compensate. (For what it’s worth, I used 1 0.67-ounce tube of red and 3 0.67-ounce tubes of blue.)
Thanks for your notes, Mark!
Hi! I’m making this recipe for the first time, and I’m wondering if you can roll the three colors out, each one as approximately 13×6 rectangle instead of two smaller batches. That’s how I make regular pinwheels.
Hi Elizabeth! This makes a lot of cookies and I find doing it in one batch more unwieldy but if you’d like to try it that way, you’re totally welcome to!
Great idea for the Fourth of July. Thanks! They look great!
You are so welcome, Gayle! I hope you enjoy the cookies if you give the recipe a shot!
I made these for the holiday and they turned out great!
Yay! I’m thrilled you enjoyed the recipe, Eliza!
Made these for this last 4th of July – a fun and easy festive treat!
I’m thrilled you enjoyed the recipe, Natalie!
I love these cookies! They are so festive and I love switching up the colors to match other holidays, too.
I’m so thrilled you’ve been enjoying the recipe, Pat!
My mom used to make these when I was a kid. She would then frost the edges and roll them in clear sugar crystals for sparkle.
Love that!
HOW IN THE WORLD DO YOU ROLL OUT EACH COLOR DOUGH TO 4″ X 4″ & GET 48 COOKIES OUT OF THIS DOUGH?
Hi Kathe – The 4- by 4-inch squares are just for the initial chill time. Then each square of dough is cut in half and rolled into a large rectangle about 1/8-inch thick, stacked with the other colors, then formed into a log (you’ll end up with two logs of cookie dough). :)
Do i have to leave it in the fridge for 4 hours? that seems like a long time.
Hi Angelica – The dough must chill for a significant amount of time or it’s too soft to roll.
I’m making the dough now. The red and blue did come out dark like yours in the picture. I added a lot of each color and it came out a dark pink and same for blue. How do you achieve a true red and navy blue?
Hi Jill! I used gel-based food coloring for the red and regular food coloring for the blue.
Hi, I want to halve this recipe, to make just 24 cookies, and I also want to bring it somewhere on an 8 hour trip in a car. Would the halving work and how should I go about it when I’m rolling out pieces? Also, how would you recommend storing the cookies to bring them on my trip?
Hi there! Yes, you can just halve the entire recipe and all measurements, but I’m not entirely certain you’ll have identical results. The cookies will definitely last on a road trip and can be stored in an airtight container.
Hi! I want to make these about a week in advance and then slice them the day before/of. After I roll the dough up, can I put I in the freezer?
Hi Mimi – I’ve never tried freezing this dough before so I can’t say with certainty if that would work. You could prep the dough (until right before the slice step) 48 hours in advance, seal in plastic wrap and refrigerate.
Hello! I was wondering. English is my second language and I find the instructions hard to follow. Can I just put the balls of dough in the freezer covered with plastic film and then roll them out on the counter using the parchment paper? Thanks!
Hi Marcela – Yes! But I recommend rolling out the dough between two separate pieces of wax paper and using parchment paper to line your baking sheets when ready to bake. I hope that helps!
How would you commend making multiple batches. I cook goodies for my husbands work from time to time and I would have to probably make 4 batches of this. Can they be in the fridge longer than 4 hours?
Hi Trinity! You can prep the dough 48 hours in advance, seal in plastic wrap and refrigerate.
These looks fantastic, can’t wait to make them! Do you soften the butter at all or do you put it into the mixer straight from the fridge? (I keep mine refrigerated)
Straight from the fridge!
Do you use granulated suger or confectioners sugar?
Granulated sugar!
I bake cookies all the time and would consider myself an expert. The dough was delicious and very soft, even after refrigerated. I rolled the dough in white jimmies before refrigerating. I got the dough to work for me and the cookies are beautiful. If you are new to baking cookies, I would suggest freezing the dough rolls instead of refrigerating. They will still be easy enough to cut and might tack on a minute of baking but they won’t mush while you are cutting and will keep their circle form much better. Happy 4th!
Thanks so much for the tip, Sara! Thrilled you enjoyed the cookies :)
I tried it and it was a complete fail. I followed every direction but after it was done baking I took them out and was letting them cool but they kept on getting thinner and hardening.
Hi Kali! I’m sorry the recipe didn’t work for you. I’ve never experienced this with this recipe but I’d be happy to help you troubleshoot if you want to email me at kelly@justataste.com.
Can you use Pillsbury Sugar cookie roll dough and just use 2 rolls divided into 3 equal amounts then use food coloring, roll each one out flat use Pam Spray to kept from sticking and make the roll them cut?
Hi Pauls – I’ve never tried this method with store-bought cookie dough so I’m not sure if that would work.
Hi!
How far in advance can these be made. Can the dough be frozen and then defrosted before slicing? Thanks!
Hi Linda! I’ve never tried freezing this dough before so I can’t say with certainty if that would work. You could prep the dough (until right before the slice step) 48 hours in advance, seal in plastic wrap and refrigerate.
This is a fun recipe, thanks! My dough was soft, I chilled each layer a bit before I rolled it off the parchment onto the other layers and it really helped it not stick and made it all go smoothly. I also rolled them in some blue sprinkles before I sliced and baked which was a nice effect. Happy 4th!!
Do u have to use un salted butter???
Yes, I’d recommend it, Lauren, as you want to be able to control the salt quantity.
These look great. Can’t wait to try them for a party. Thanks!
This is a great tasting dough, but it is way to soft to roll and stack and roll again.
I really want to make these! What was the 6 hours spent on? I didn’t think that they were in the fridge for too long. Did you use liquid or gel food coloring? Thanks!
Hi Holly – The dough must chill for a significant amount of time or it’s too soft to roll. And I use gel-based food coloring.
Every year I make something patriotic for my adult daughter’s birthday. The pinwheels were the biggest hit ever. They look cool, and the flavor is awesome! Thanks for sharing!
Awesome! So glad you enjoyed the recipe!
I made these yesterday and they turned out great! These are definitely some of the coolest cookies that I have made. The only downside is that you have the wait from start to finish.
I’m curious as to why your recipe says to roll the cookies into a log by staring at the short end. I believe rolling it this way would end up with one very fat but not very long log. Wouldn’t it be best to roll the cookies into a pinwheel shape by starting from the long end and rolling towards the other side of the long end?
Hi Lys! You’ll want to roll from the short end so you have a more compact spiral and regular size cookies. Hope that helps!
Made these cookies to bring to my family 4th of July bqq tomorrow! They are currently chilling in the fridge and can’t wait to cut into them and see how they turned out! Such an easy dough recipe and endless possibilities for different flavors and designs!
Awesome! Hope you enjoyed them!
You could try adding in fruit purée such as strawberries, raspberries, or blueberries… Not sure if it will add enough color but worth a try!
So cute! I hope to make them for the 4th of July gathering we have at our house. Thanks for sharing.
Awesome! I hope you enjoy the recipe, Debbie!
Tried this recipe and dough was so sticky. Didn’t work at all.
I’m making these right now and the dough is so soft after 30 min of refrigeration its still too soft to roll out properly :(
Hi Kathleen – You can leave the dough in the fridge for as long as it takes for the butter to re-solidify.
We just made these for our 4th of July celebration and we are so happy with the results! They really look just like your pictures. And they’re tasty too. Have you tried this with almond extract instead of vanilla? We might try that next time!
Tip: We used a wire cheese slicer instead of a knife to cut the cookies. That seemed to work well and didn’t squish the dough.
I know it is way late, but I substituted half of the vanilla with almond extract. My family loved them!
So glad you enjoyed the recipe, Jennifer!
Just in case anyone else runs into the same problems we had… Do you weigh your flour or just scoop? I weighed mine and the dough was ridiculously soft even after refrigerating so we kneaded in probably another cup overall before it was workable. I also think 1/8 inch is much thinner than the layers of dough in the pictures. We have bands for our rolling pin that help you roll to the correct thickness and we had twice as many swirls and our layers look much thinner. Having the dough that thin made it pretty hard to work with. They still turned out pretty darn cute but my daughter threw in the towel and I ended up having to finish the cookies because of the soft dough and the insanely thin dough. I would recommend rolling the dough to 1/4 inch if you want your cookies to look the the ones in the photos, and adding an extra cup of flour if you measure by weight.
These turned out beautifully! Plus..most of my posts are “experiments, but please at least work” projects! So love these deep colors. :)
Did these last year and they were a HUGE hit. Tried again last night … didn’t use enough food coloring and they look like blue and pink cotton candy colors :( I’ll try again today, and serve the others as back-ups after these disappear :D Still, I LOVE this! Thanks!
hi, can I shorten the 4 hour refrigerating time by putting them in the freezer?
Hi Jacob! I’ve never tried freezing this dough before so I can’t say with certainty if that would work. Let me know if you try it!
Laura, I know this is a year after the fact, but if you still need a food coloring alternative you can use cherry juice and blueberry juice. (You can use orange juice if you need orange coloring, etc.)
Hi! I stumbled across your cookie recipe on Pinterest and I had to try it out myself. While I found the dough-log-forming to be a little on the difficult side, it was much easier than I initially imageined. I’ve got photos of my attempt and your recipe (with a link back here, of course!) featured on my blog. (: Thanks for posting such a fun recipe! It was great!!
Hi there! Do the cookies taste soft and chewy? Or are they like normal cookies? (not sure how to describe) If they are soft and chewy, is there a way to make them more crunchy?… (again, not sure how to describe).
Hi Grace! Yes, they’re soft and chewy and not crispy, just as long as you bake them as directed :)
I visited various sites but the audio quality for audio songs existing at this web page is
actually wonderful.
I just tried these with my niece for the 4th of July.. And we’re not doing too great! The dough I very sticky. Right now we’re letting the dough chill in the fridge before cutting and placing in oven.
Hi Madeline – It’s important to only mix the dough just until the flour is combined (per the recipe instructions), otherwise the dough will be too sticky, and to also refrigerate the dough for 30 minutes to give the butter a chance to firm up.
This E-How page was extremely helpful for me
http://www.ehow.com/list_6927712_food-coloring-alternatives.html
Thanks, Kelly! Looking forward to making these cookies later this week, then (if I can be patient enough)! :)
This has recipe has been pinned for awhile! I would love to make these for the 4th of July this year, but how far in advance can I prepare the dough before the “slice-and-bake” step? A week? Two days? Please advise, thanks!
Hi Whitney! To be safe, I’d prep the dough (until right before the slice step) 48 hours in advance. Make sure you keep it sealed in plastic wrap!
Love these! They kept their shape so well, and each color is sharp and not blended.
Can these cookies be put in the freezer until ready to bake??
how much in advance can make the dough and keep it stored in the refig before baking
hi..i just want to ask for how long does this cookies can last if i keep it in an airtight container?
Can we omit the eggs ?:)
My mom used to make chocolate and vanilla pinwheel cookies that were yummy. When my boys were small, I experimented making chocolate and peanut butter pinwheels but they never turned out very well. Couldn’t figure out how to make the pnut butter dough so it would roll out without falling apart. They all gotten eaten anyway.
I made the cookies and they turned out great. Didn’t have any more Red and Blue dye so used 3 other colours. It looks and taste amazing! Thanks for posting this cookie recipe!
0708131536-00.jpg
do u need to use unsalted butter?
Yes, the butter must be unsalted. Enjoy!
do you have to refrigerate it?
Yes, the dough must be refrigerated after it’s mixed in order for the butter to solidify. Otherwise the dough will be too soft to roll.
what kind of food coloring did you use?
I use gel-based food coloring for the red and regular food coloring for the blue. Either works great!
Your photography is awesome! What kind of camera do you use?
Thank you, Layla! I have a Nikon D7000 and use an 18-105mm lens. You can check out this link for more info: https://www.justataste.com/faqs/
What a fun 4th of July recipe! I’m going to give these a try.
Kelly! These are gorgeous! Congrats on a lovely recipe!
AMAZING!! Love it when kitchen experiments turns out successfully the very first time!
The pictures on your site are amazing, I am always so inspired by your posts! These cookies look great, I want to try them out for Fourth of July!
Thanks so much, Shaina! Hope you’re having a great start to summer! XOXO
Kelly, your photos are so beautiful that I pinned this blog post to my 4th of July AND my Cookies boards before even reading what you had to say!
Thank you so much, Kathleen!
These are so fun! Swoon! My kids will love this idea!
These look so awesome Kelly!! So festive :)
I love the way you can just slice these into perfect 4th of July Cookies! Great “Experiment”
So pretty. If I Make these, it will be a little more simple for me… being in Canada, I just need the red and white layer!!
How many drops of food coloring did you use for your dough? I never seem to be able to get the right colors, so I’m curious!
Hi Lisa! I used about 1 1/2 teaspoons of food coloring, but you can just eyeball it based on how vibrant you want the colors to be. Enjoy!
what a great idea. i love the festivity. and these look beautiful and yummy!
How beautiful are those?! They look perfect, I want to wear one as a necklace.
I really like these! From the first time I spotted them! I’m not currently in the US, I’m in the UK, but thought maybe I can adapt the colours for one of our national days!
colorful, pretty, and neat! :)
I would do a happy dance as well if my cookies came out with a perfect red, white and blue pinwheel! These will go great on my 4th of july table.
These are so much fun!!
Does anyone have a natural/clean alternative for the red & blue coloring? I love these cookies but I can’t use artificial dyes. They have made my son sick & irritable.
Thank you!!!
These are just too fun, Kelly! Seriously gorgeous, too!
Seriously, these are brilliant!!
So beautiful and almost too pretty to eat!
How FUN are these?!! I want a stack!
These look almost too pretty to eat!
These are so crazy gorgeous! Pinning now!! :)
These are absolutely gorgeous and SO festive!
Those are soooo cool! What an awesome 4th of July recipe. Make sure you stop by my link party and share your Facebook Page!
How fun! They came out perfectly, you make it look so easy, I think I might be able to pull it off :)
Yes, you definitely can, Liren!
I’ve been looking forward to these since you teased about them on Monday! ;) They are everything I imagined and more… such a incredible cookie for the 4th! Thanks for sharing.
Love the idea for the 4th of July!
These are a work of art! And talk about festive! Nicely done.
Such a cute idea!
Your swirls are PERFECT! Totally gorgeous!
So fun! Pinned!
Perfect color! Loving these!! Thanks for sharing:)
So fun!! And wow do they look perfect!! No faded colors and perfect circles! Beautiful!! My little sister would LOVE these
Yay! Sweet Victory, Kelly! Oh, do I know that “happy dance” well…right after the proverbial, “This Is An Experiment But Please Let It Work” (and fingers crossed) category–especially with gluten and grain free baking. I’m celebrating right with you, girl! Your Patriotic Pinwheel Icebox Cookies ROCK! Also, your food photography is stunning and lets the beautiful red, white and blue shine. Love the side-by-sides, too. Perfect for the 4th of July! Pinning! xo
Thanks so much, Stacy!
These are so fun!! Omg, they look awesome too!