
Skip the oven and satisfy your sweet tooth with a make-ahead-friendly recipe for No-Bake Chocolate Cookie Pops! These festive pops are the confectionery cousin to cake pops and are made with just five ingredients. I repeat: five ingredients!
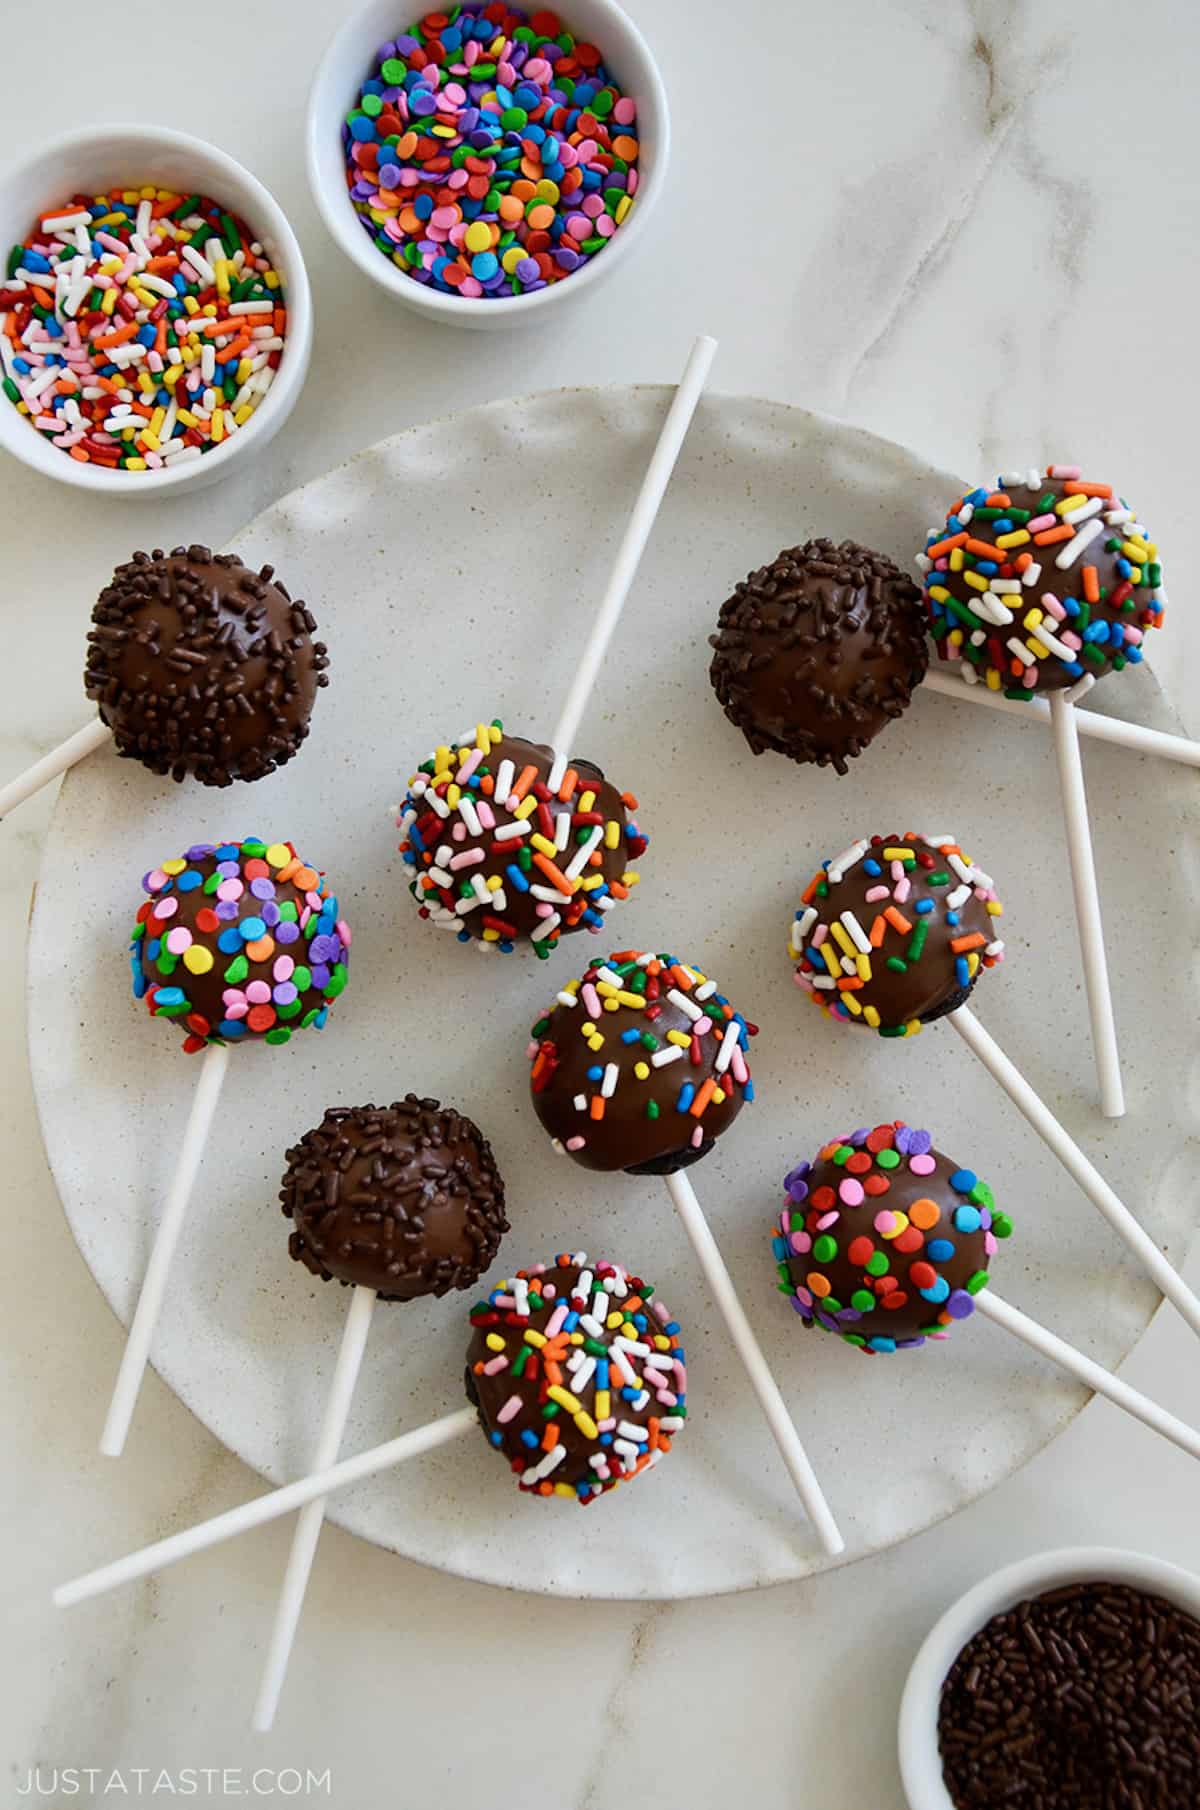
Table of Contents
No-bake desserts come in handy on a variety of occasions, whether you’re trying to beat the heat by steering clear of the oven, or you’re on the opposite side of the spectrum and your oven is on overdrive (hello, holidays!) so you want to free up some valuable real estate during prime time.
No matter the reason or the occasion, quick no-bake dessert recipes are always a good idea to have in your recipe repertoire. Once you’ve formed your chocolate cookie pops, it’s time for the fun to begin!
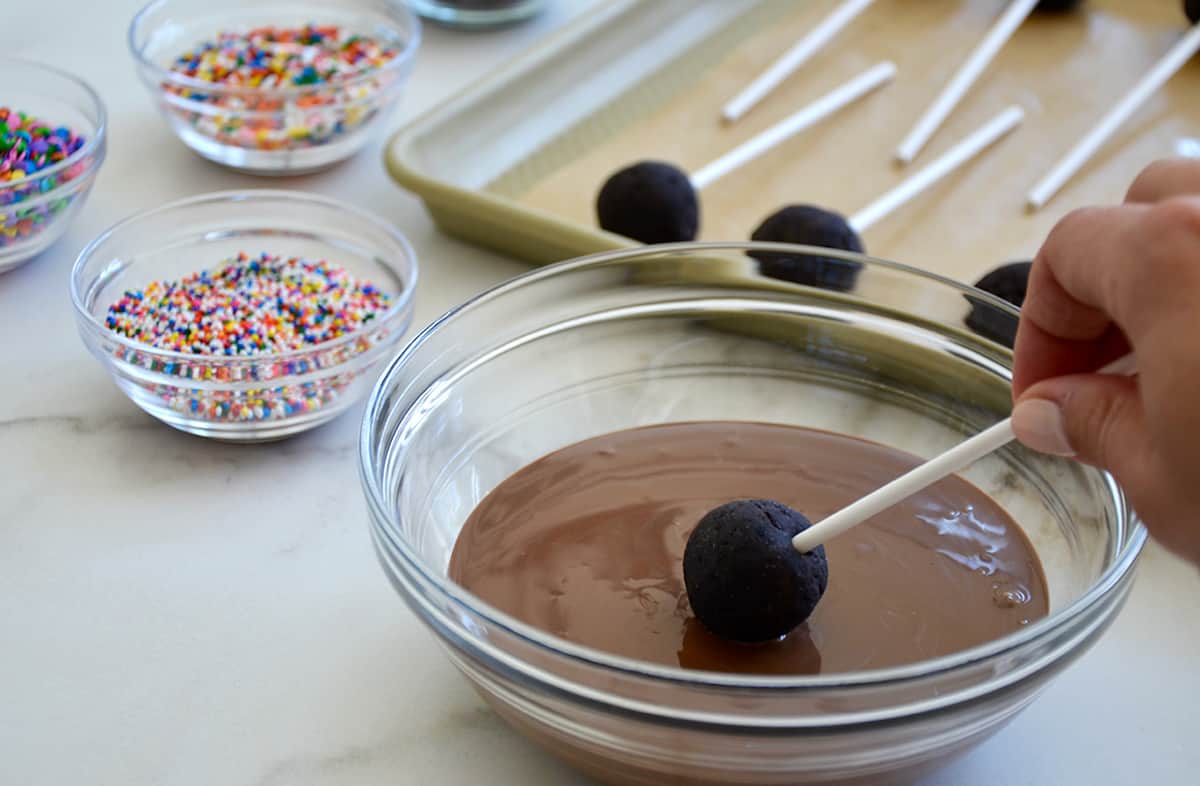
Dunk the pops in melted chocolate or candy melts in the color of your choosing. The trick here is that when the cold pops and the warm, melted chocolate meet, the chocolate (or candy melts) will solidify fast, so it’s important to move quickly into the next step…
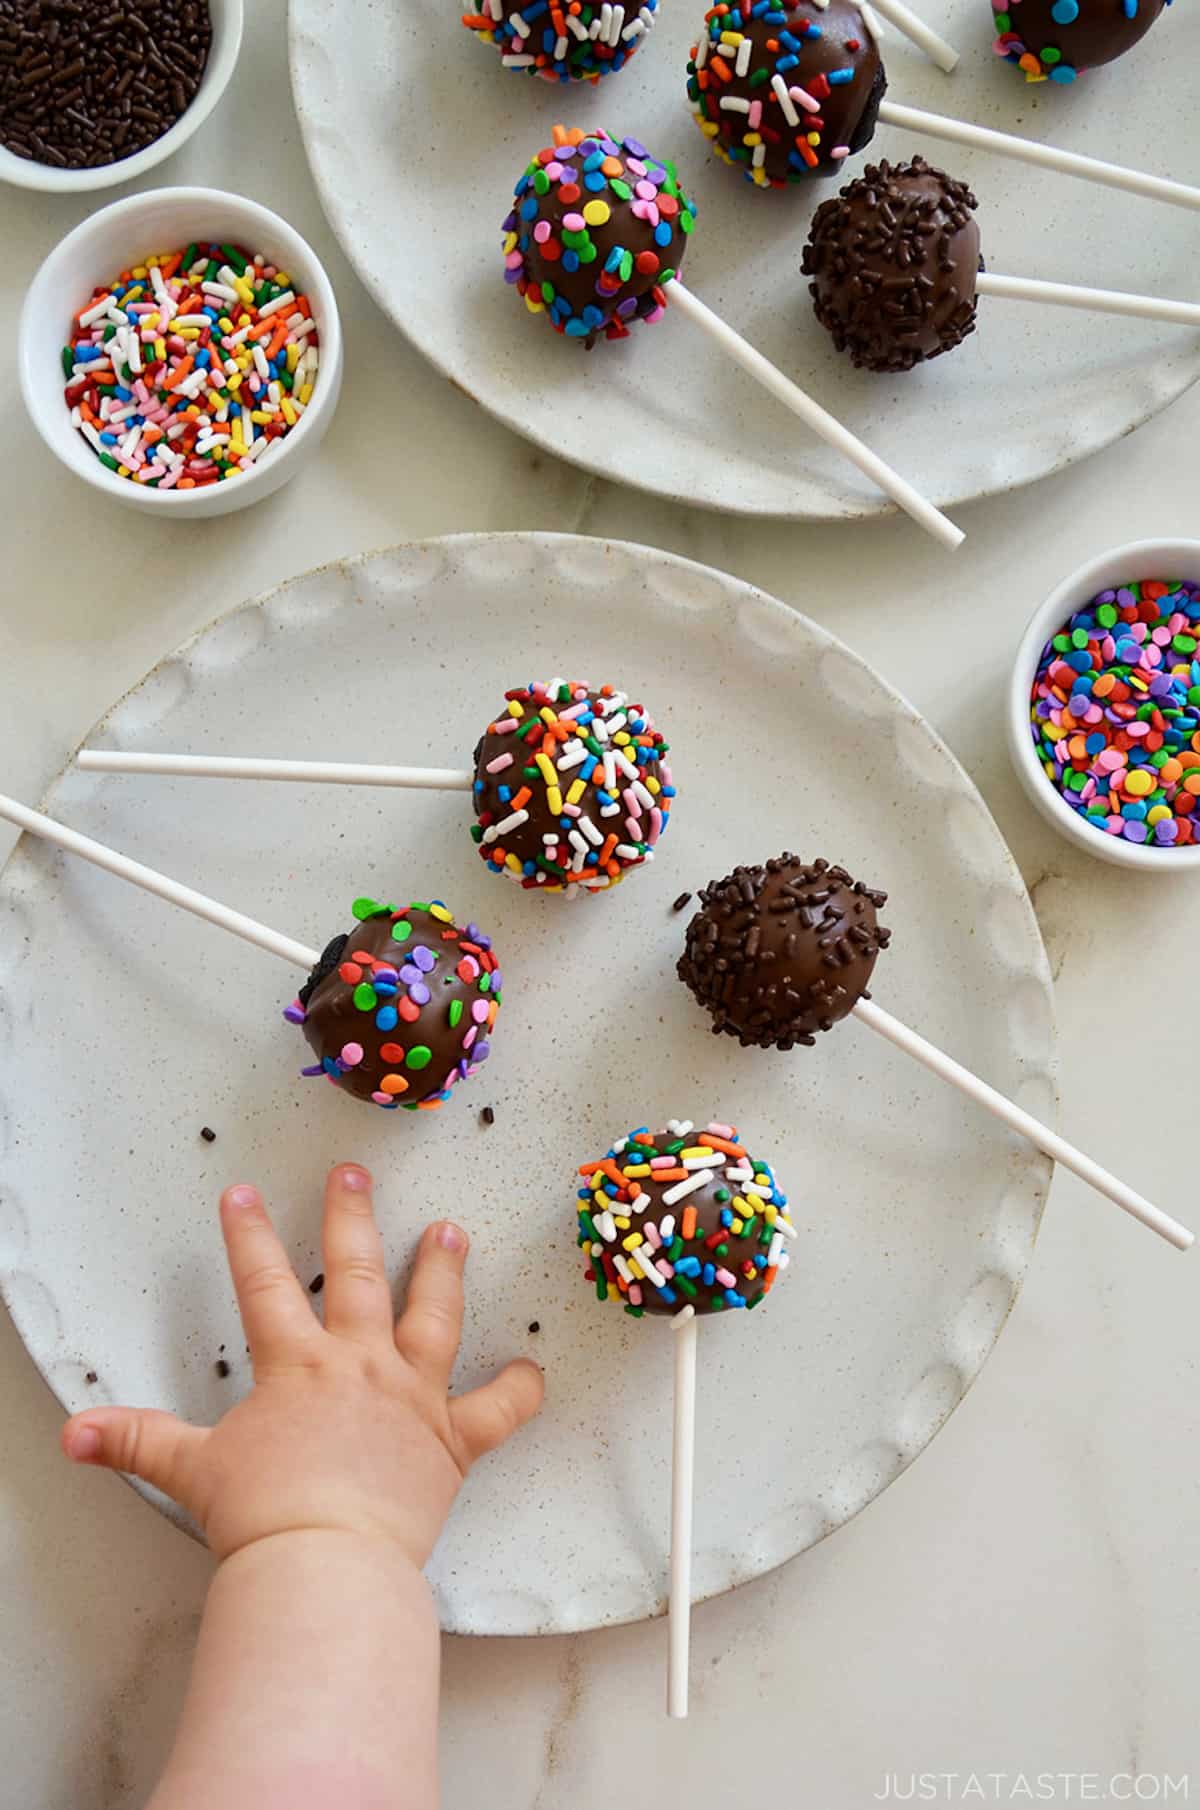
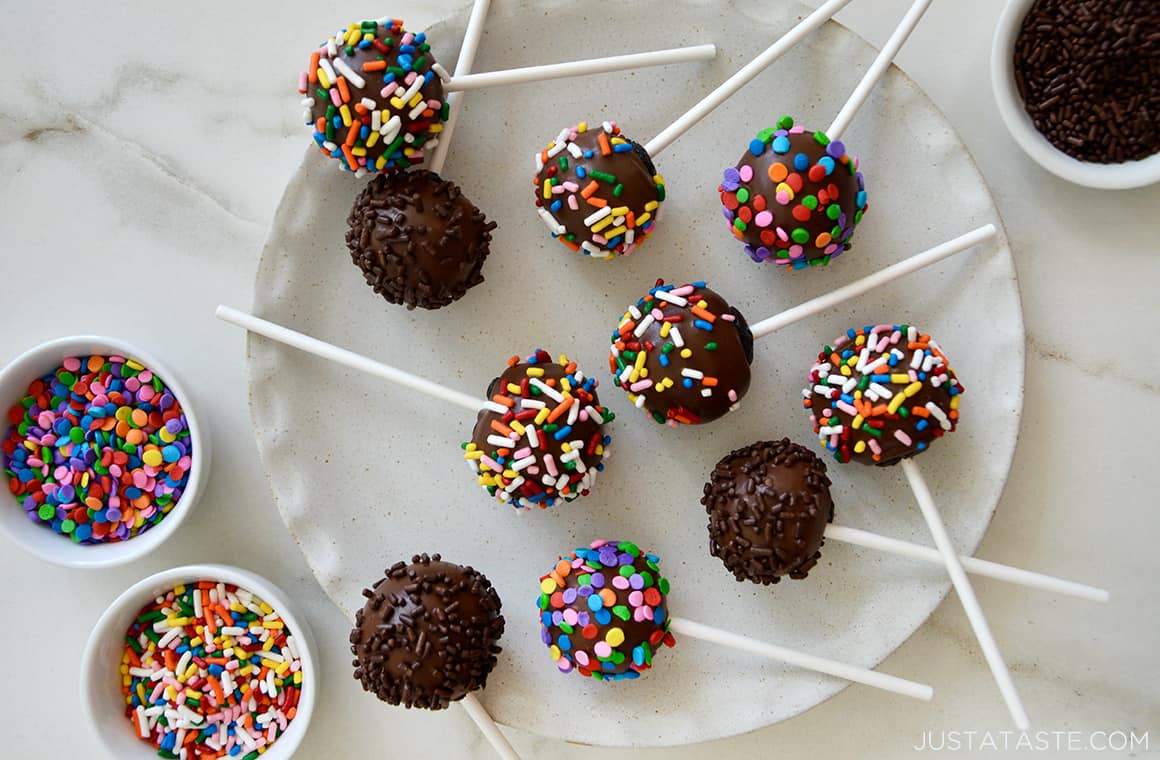
Decorate the pops with your choice of sprinkles, chopped nuts, toasted coconut or crushed pretzels. And, voilà! You’ve just whipped up the ultimate chocolatey treat.
Why They’re The Best
- Unlike cake pops that require baking and a significant amount of time to form, cookie pops are no-bake and come together in minutes.
- Make-ahead friendly.
- Perfect for sharing at parties, gatherings or as on-the-go treats.
- The combination of chocolate sandwich cookies and a chocolate coating provides a double dose of rich, chocolate flavor in every bite.
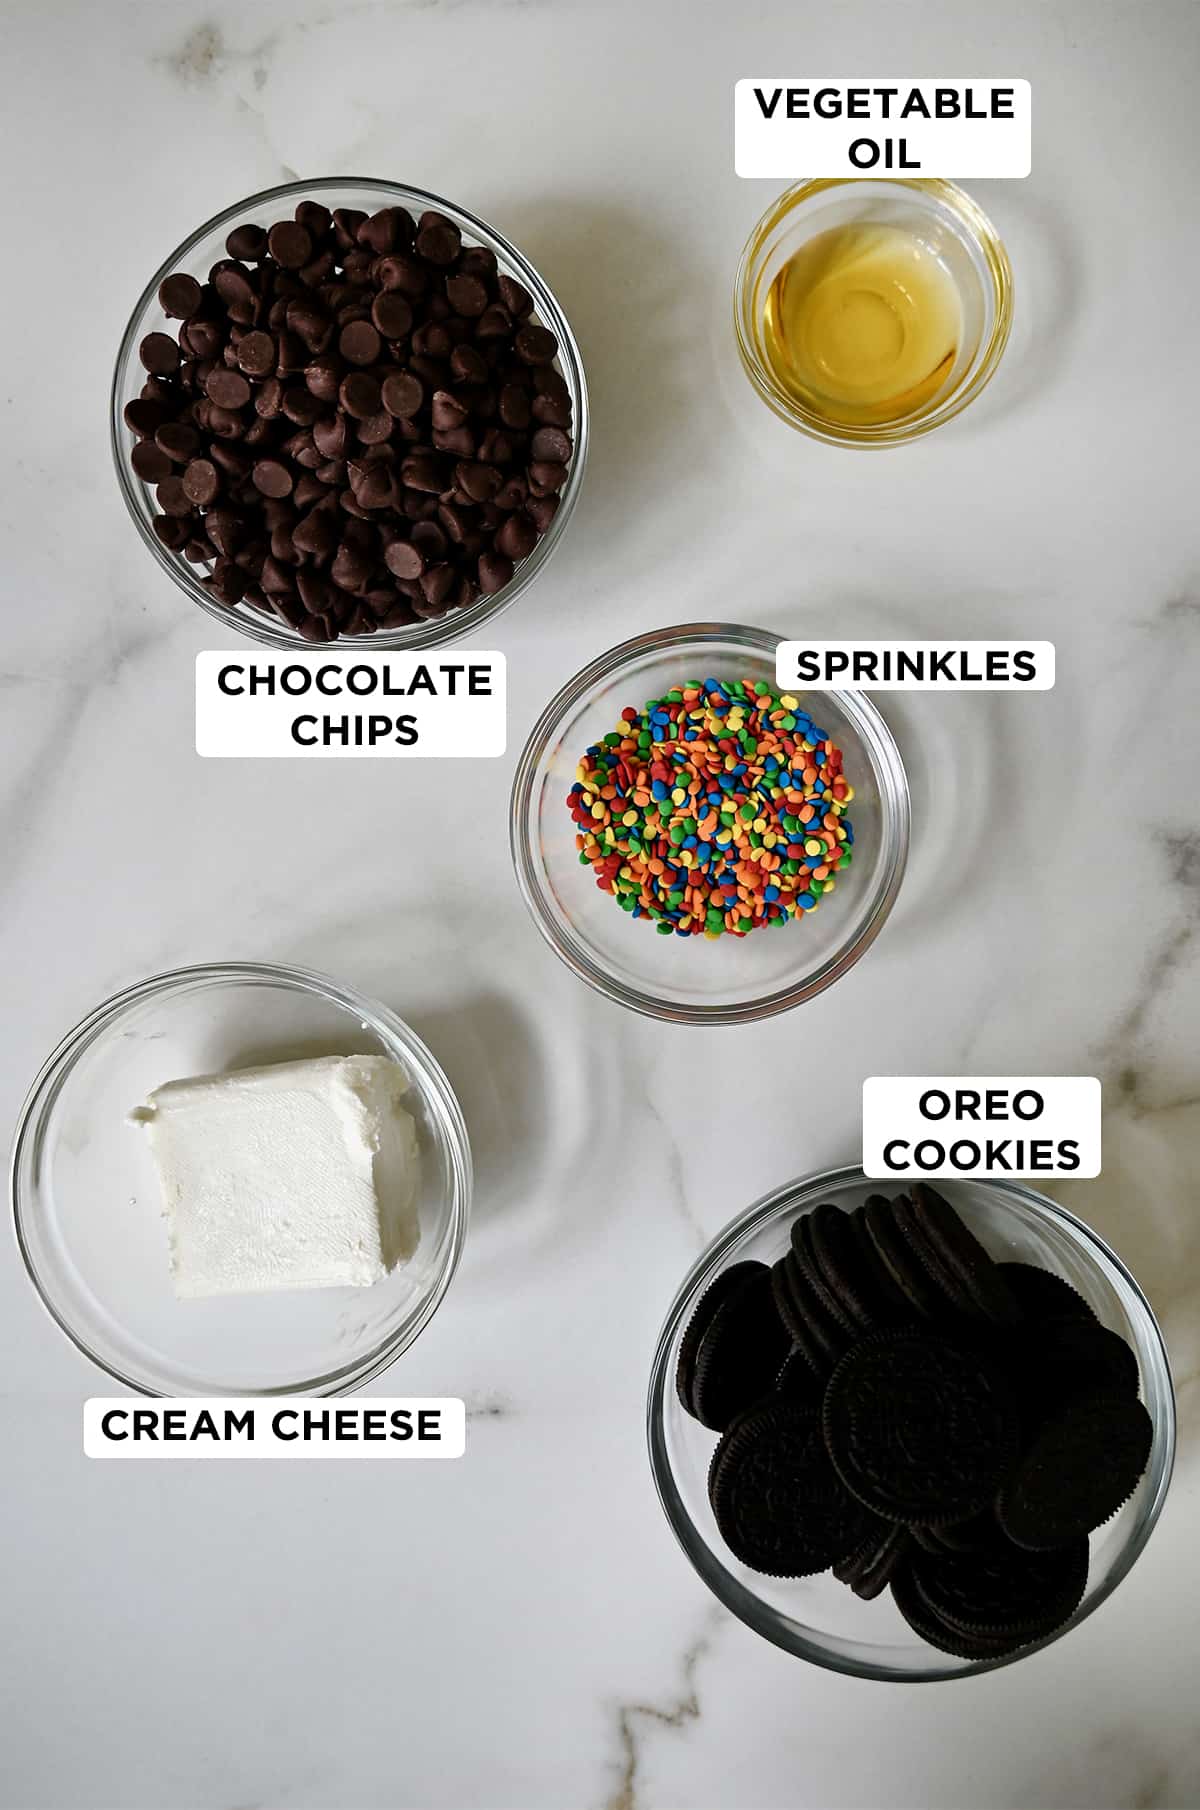
- Chocolate sandwich cookies with cream filling: You can use any brand of chocolate sandwich cookies available in your local grocery store.
- Cream cheese: This essential ingredient binds the cookie crumbs together and contributes to the smooth texture of the pops. It’s best to use regular cream cheese for this recipe.
- Chocolate chips: You can choose between milk chocolate or semisweet chocolate chips. Love dark chocolate? Use dark chocolate chips!
- Vegetable oil: Helps thin out the chocolate so it’s easier to dip. You can substitute vegetable oil with other neutral-flavored oils like canola oil or sunflower oil. Coconut oil works, too.
- Assorted toppings: Feel free to choose your favorite sprinkles, crushed nuts (such as almonds, walnuts or peanuts), or toasted coconut flakes for a personalized touch.
See the recipe card for full information on ingredients and quantities.
When it comes to variations of cookie pops, the options are endless. You can experiment with different sandwich cookie flavors, alternative coatings and a wide array of toppings. Find inspiration with these creative twists:
Cookie Variations
- No-Bake Cheesecake Cookie Pops: Swap the chocolate sandwich cookies for vanilla ones, a splash of lemon juice and a dip in white chocolate.
- Birthday Cookie Cake Pops: Flatten the mixture into pucks, pipe on a frosting border and, for added pizzazz, insert a birthday candle on top!
- Red, White and Blue Oreo Cookie Pops: This patriotic version is perfect for 4th of July, Memorial day or any time you want to celebrate America.
- Oreo Mint Pops: Use mint-flavored sandwich cookies instead of regular chocolate ones for a refreshing twist.
- Peanut Butter: Use peanut butter sandwich cookies to infuse a nutty flavor into the pops.
Alternative Coatings
- White chocolate: Just like my recipe for White Chocolate-Covered Strawberries, coating the pops in smooth and creamy white chocolate adds an extra touch of elegance and visual appeal.
- Dark chocolate: Opt for dark chocolate chips to create a more intense and bittersweet flavor profile.
- Peanut butter chips: For those who love the irresistible combination of chocolate and peanut butter, this one’s for you!
- Candy melts: Vibrant candy melts are my go-to choice when I want to add a pop of color or match a specific theme.
Topping Ideas
- Sprinkles: Experiment with various types of sprinkles, from rainbow-colored to seasonal-themed, to create visually vibrant and festive pops.
- Caramel or white chocolate: After dipping the pops in chocolate, drizzle them with caramel sauce or white chocolate for an elegant touch.
- Large-flake sea salt: If you love sweet and salty desserts, sprinkle a pinch of sea salt over the chocolate coating.
- Crushed candy: For added crunch, top with crushed candy pieces, such as peppermint candies or toffee bits.
- Make the cookie-cream cheese mixture. Place the cookies in the bowl of a food processor and pulse them until roughly chopped. Add the cream cheese and continue pulsing until the mixture is well combined and there are no large pieces of cookie remaining.
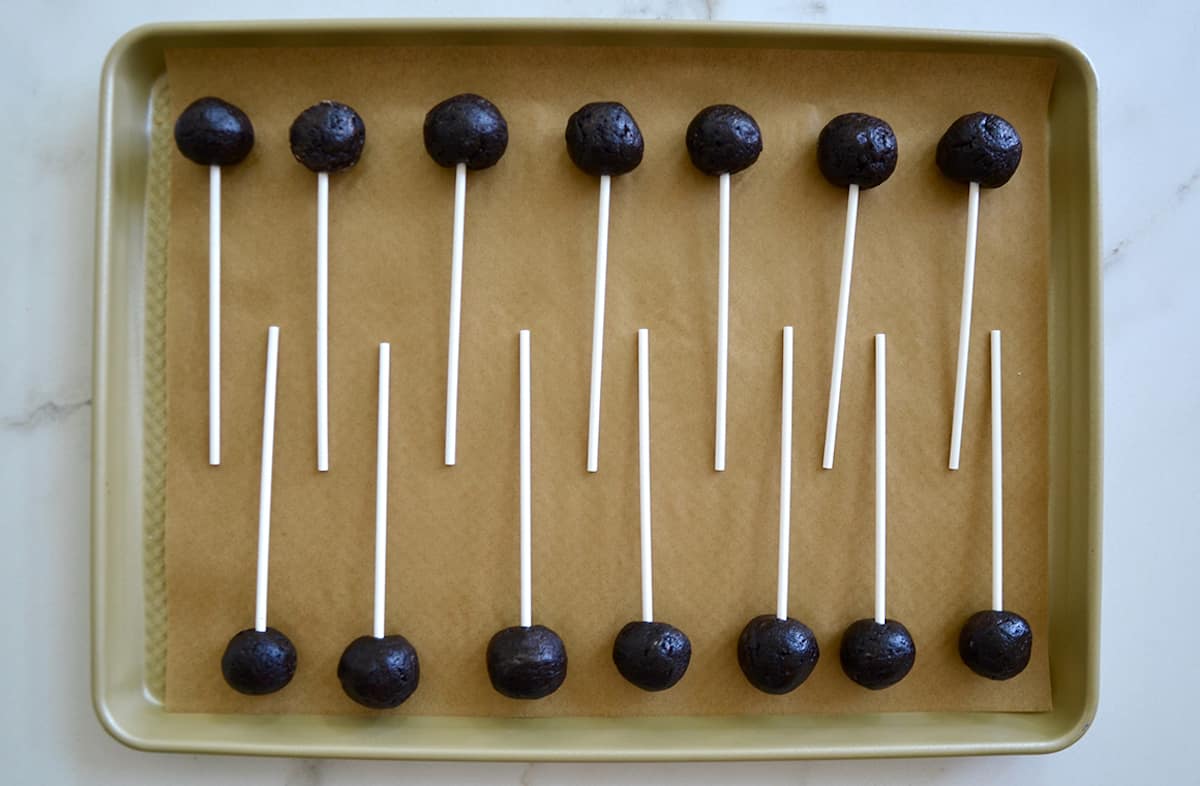
- Shape the mixture into pops. Line a baking sheet with parchment paper. Using your hands, squeeze and roll the cookie mixture into 1-inch balls. Insert a lollipop stick into each ball, place them on the baking sheet and freeze them for 30 minutes.
- Coat the pops in chocolate and decorate. Melt the chocolate and vegetable oil in the microwave on 30-second intervals, stirring between each interval, until fully melted. Dip the cookie balls in the melted chocolate then immediately garnish them with your toppings. Return the pops to the baking sheet. Loosely cover and refrigerate them for 1 hour or until the chocolate is set.
Kelly’s Note: No lollipops sticks? No problem! Turn these cookie pops into cookie truffles by serving them sans the sticks.
- Melt the Chocolate Carefully: When melting the chocolate chips, use a microwave-safe bowl and heat them in short intervals, stirring well after each interval. Be cautious not to overheat the chocolate to prevent it from seizing or burning.
- Dip Like a Pro: When dipping the pops into the melted chocolate, gently rotate and swirl them to ensure an even coating. Allow any excess chocolate to drip off before placing them on the baking sheet.
- Decorate Quickly: If adding toppings, decorate the pops immediately after dipping in the chocolate coating. This will ensure that the toppings adhere well to the pops.
Frequently Asked Questions
The best sticks to use for cookie pops are sturdy lollipop sticks.
Yes, freezing the cookie pops for at least 30 minutes before dipping them in the chocolate helps the pops hold their shape and prevents them from falling apart during the dipping process.
Cookie pops will last up to a week when stored in an airtight container in the fridge.
- Chocolate Chip Cookie Dough Dip
- Easy No-Bake Cheesecake
- Easy No-Bake Chocolate Tart with Raspberries
- No-Bake Chocolate Cheesecake Cups
- Easy No-Bake Cheesecake Parfaits
Ingredients
- 18 chocolate sandwich cookies with cream filling
- 4 ounces cream cheese
- 1 1/2 cups milk chocolate or semisweet chocolate chips
- 1 Tablespoon vegetable oil
- Assorted sprinkles, crushed nuts or toasted coconut flakes
Equipment:
- Lollipop sticks
Instructions
- Place the cookies in the bowl of a food processor and pulse them until roughly chopped. Add the cream cheese and continue pulsing until the mixture is well combined and there are no large pieces of cookie remaining.
- Line a baking sheet with parchment paper. Using your hands, squeeze and roll the cookie mixture into 1-inch balls. Insert a lollipop stick into each ball, place them on the baking sheet and freeze them for 30 minutes.
- Melt the chocolate and vegetable oil in the microwave on 30-second intervals, stirring between each interval, until fully melted. Dip the cookie balls in the melted chocolate then immediately garnish them with sprinkles, crushed nuts or toasted coconut flakes. Return the pops to the baking sheet. Loosely cover and refrigerate them for 1 hour or until the chocolate is set.
Kelly’s Notes
- When dipping the pops into the melted chocolate, gently rotate and swirl them to ensure an even coating. Allow any excess chocolate to drip off before placing them on the baking sheet.
- Turn these cookie pops into cookie truffles by serving them sans lollipop sticks.
- This recipe can be easily doubled.
- ★ Did you make this recipe? Don’t forget to give it a star rating below!
Nutrition
Did you try this recipe?
Leave a comment below with your star rating!
This post may contain affiliate links.
Recipe by Kelly Senyei of Just a Taste. Please do not reprint this recipe without my permission. If you'd like to feature this recipe on your site, please rewrite the method of preparation and link to this post as the original source.


Recipe is easy and fun. 1000 ways to vary taste. Perfect for every occasion
These Are Delightful my children loved them and I loved them. I put a little to much chocolate but it is fine. I will follow the exact recipe next Time, But They Were still good.
Thank You!
I’m so glad your family enjoyed the recipe, Zaniyah!
How long do the cake pops last, and do they have to be refrigerated?
Hi Kylie – The cookie pops will last up to a week when stored in an airtight container in the fridge.
I work at a daycare & our microwave oven is in another room. How can I keep the chocolate from hardening while letting the children take turns dipping?
Hi Mary – You can try putting it in a slow cooker!
Hi, Does the stick stay in the pop without falling in the chocolate and How long do they last. Thank you for sharing.
Hi there, Evy! Store these in an airtight container in the fridge and they’ll last up to a week.
Hi there I will fill you in on a super secret that will have you cake pop master in no time! OK so after you have formed your cake pop balls & you stick your stick lol in the cakepop just about to dip it in the chocolate… Stop there before you stick your stick in your cake pop you want to dip the stick itself into melted chocolate then into your balls & then let them sit just a min & then you can begin dipping into your melted chocolate & instead of dipping try lightly rolling in the melts & then carefully dip the top lol… I really hope all or some of that made some kind of sense to you good luck & take care & God Bless!
Looking at your nutritional info, what is a serving size? And do you have to store these in the fridge since they are made with cream cheese?
Hi Denise – Yes, you should store these in an airtight container in the fridge. And the Estimated Nutrition Facts provides nutritional information for one cookie pop.
Amazing and delicious keep these yummy/easy recipes coming
I’m thrilled you’ve been enjoying Just a Taste, Vanessa!
can we use homemade cheese in the recipe?
That should work!
We made these with Lemon Oreo’s and they came out fantastic. Used yellow melting wafers and then sprinkles to decorate them. Everyone actually loved the lemon over the chocolate one! Imagine that!
Hi, could you add peanut to the cream cheese? Similar to a peanut cup.
Hi Barbara – You can definitely swap in peanut butter, but the amount would just depend on if you’re keeping any of the cream cheese in the recipe. Would love to hear your results if you give it a shot!
Hi. What can be the possible substitutes for cream cheese? I checked the prices here and it’s really pricey. Hope you can reply :)
Hi Monty – There really isn’t a substitute for the cream cheese, as it’s one of the key ingredients and helps bind the cookie mixture.
Do these hold up well to freezing? I want to make a bunch for a HS reunion and want to make in batches.
Hi Shannon! I’ve never tried freezing them so I’m not sure how long they’d last in terms of the resulting taste/texture after a few days. Would love to hear your results if you do a test batch!
I froze then for a few weeks and they were fine!
Awesome! So glad to read that!
Hi Kelly,
Do u think I need to add butter to cream cheese or jut use as it is? I wanna make safari themed cake pops for a party, and kinda humid now in Singapore. Thank you so much!!
I’d only add cream cheese!
Can i use spreadable cream cheese ? What will be the amount then?
Hi Nujhat – No, you’ll want to definitely use regular cream cheese, as the consistency won’t be the same if you use the spreadable kind.
They sound pretty simple to make…I hope to make them for Halloween if I find the time or for your American Thanksgiving, since our Canadian Thanksgivings was celebrated the second week in October.
Hi – I am worried about the cream cheese – can these sit out all day or do they need to be refrigerated after a few hours?
I wouldn’t recommend having them sit out if it’s really hot/humid, but they’re totally fine at room temp for a few hours. Enjoy!
How do they hold up at room temp?
They’re great at room temp for several hours!
Approximately how many balls does this recipe yield? I have to make about 100 of them for a party and am trying to plan my shopping trip.
Thanks so much!
Hi Kelli! It depends on the size of the ball you form, but it should yield between 12-14 cookie pops. :)
Was curious if Coconut Oil would work instead of Vegetable Oil. I’ve made brownies with Coconut Oil before.
I haven’t tried using coconut oil in this recipe so I can’t say for certain that it would work, but my initial thought is that it should. Hope that helps!
Made these for the kids, but 3 adults taste tested them. They were pretty rich, and by accident one of them fell into my glass of white wine. Well….serendipitous find! They were so delicious dipped in white wine that this is how we ate them. Just thought I would share the tip if any winos out there are interested in attempting. :)
Love it! So glad you enjoyed the recipe.
Really good went down well with the guests, great idea!
So glad you enjoyed the recipe, Kate! :)
How far ahead could these be made? Could the cookie mixture on the stick, be frozen for several days and chocolate dipped the night before Thinking of doing for a dessert table at a wedding?
Hi there! I’ve never tried freezing them so I’m not sure how long they’d last in terms of the resulting taste/texture after a few days. Let me know if you do a test batch!
Wonderful idea!!!!
I try to make No-Bake Chocolate Cookie Pops
These are amazing!!!! Were a hit with everyone
So glad you enjoyed the recipe, Claire!
Could you make these the night before and store in the refrigerator?
Absolutely, Heather!
What is exactly cream chees? Is it sweet or salty? :)
It’s a savory spread!
Question
Can the Oreo Cookie Pops be made without a food processor?
Hi Sandi! I’m not sure how they could be made without it, as you want the Oreos and cream cheese to really mix together to form a smooth consistency.
My mix is too soft to ball up. I even added more cookie without the cream. In very sad I can’t seem to get it right when everyone’s comments said this should be super easy. Wonder where I went wrong.
I made these to include in my Christmas goody baskets as truffles and used the Mint Oreo Cookies. They were a hit!
So glad you enjoyed the recipe!
I love these, so fun! I want a cookie pop now! thanks Kelly :)
These are really delicious and so quick and simple to make. How long is the BB on these if kept refrigerated?
They’ll last up to a week!
Tried these yesterday to make for my SIL’s upcoming engagement party & then came out delicious…my one question- I did get w flat side laying them on the cookie sheet, what did I do wrong? Or any recommendations to remedy that?
Hi Kara – You can stick them in a styrofoam block to dry standing upright. So glad you enjoyed them!
These were so easy to make and they came out .so yummy ???? going to be making them for work
Awesome! So glad you enjoyed them!
That is my question also. I want to make & send these to my grandkids. Are they able to be left unrefridged?
wat can i substitute cream cheese with?
Hi there! There really isn’t a substitute for the cream cheese, as it’s one of the key ingredients and helps bind the cookie mixture.
I make these as cookie truffles. I freeze them, then give them to my children and their families. They freeze beautifully and only need a few minutes to thaw on a plate. I have been asked where I got such wonderfully rich baking chocolate. Had to confess the secret. I usually bake things from scratch, but nobody minds with these truffles.
Can you freeze these?? Wanted to make for a wedding.
Thank you!
Hi Bonnie! I’ve never tried freezing them so I can’t say with certainty how they’d turn out. Let me know if you give it a shot!
I made these and dipped them in Reese’s peanut butter chips….OMG I cannot describe the level of yumminess it was!!!
That sounds awesome! So glad you enjoyed the recipe!
can i use canola oil instead of vegetable oil?
Definitely!
can we use milk instead of ice cream
Hi Mona – There isn’t any ice cream in this recipe.
GReat recipe. How long in advance can you make this recipe. I have a shower tomorrow and I’d like to make this a day ahead..Will it be okay?
Thanks.
What can I use as a substitute for cream cheese?
Hi Aira – Unfortunately there is no substitute for cream cheese in this recipe, as you need the consistency of the cream cheese to not only help bind the cookies together, but also lend creaminess in texture.
quick question I’m making these in like a disk kinda shape for my mums birthday and we were hoping to put fondant on them. but as you know fondant melts in the fridge :( so i was wondering if you need to refrigerate the cake pops? also how long do they last before they become inedible ?
Hi Alexa – You’ll definitely need to refrigerate/freeze them so they hold their shape and don’t slip down the sticks when they’re on display.
Hi Leah, what a GREAT idea! Once dipped in chocolate though, how do you prevent the chocolate from dripping down the stick? I tried by resting treats ball side down but that just created a flat surface on the ball. (if that makes sense?!?!)
Hi Jess – If you shake off enough excess chocolate then there shouldn’t be any chocolate dripping down. And because the cookie balls are frozen, the cold should make the chocolate harden almost instantly. Hope that helps!
What a brilliant idea to put Oreo balls on a stick and make them cake pops!!! My daughter is turning one next Saturday and I was already planning on making Oreo balls but will definitely be putting them on a stick now. I have a feeling they are going to be a big party hit!
Loved these cake pops! Made them for my children and they didn’t like them (picky eaters!), but my wife and I sure enjoyed them. The kids did enjoy decorating them though ;)
Just what I was looking for for a cookie exchange – Do they have to be kept refrigerated?
Grand Marnier or Bailey’s hmmm these could be dangerous!!
I LOVE how easy these are!
Does the vegetable oil make the chocolate harden on the outside?
Hi Leah – The veg oil helps thin out the chocolate so it’s easier to dip!
What a fun way to switch up the dessert table for the holidays!
I love no bake treats! Easy and delicious :) My creations are always on the rustic looking side hehe and not quite as pretty as these, but now I want to try again and make some festive looking pops!
Gotta love an easy treat for the holidays! These are great, Kelly! Thanks! :)
These are so pretty! I can’t say I eat raw cookie dough but I would definately give these a try :)
So perfect, kelly!! LOVE!
Kelly, love these!
Wow these look amazing! I will definitely be making these! Thanks for the recipe!
Adelemamabrown.blogspot.com
Oh my goodness. So fun!!!
Love these!! Your pictures are beautiful!!
These are so cute! Love that they are no-bake too, naturally. :) These would be so fun to give away as gifts for the holidays!
So cute and just the perfect bite for the holidays!
These look awesome and incredibly festive too!
Daaaang, these look awesome! Love this idea!!
These are so fun! I’m keen to try my cake pop sticks again, and cookie ones look way more fun!
My girls love cookie pops! I love chocolate! Thinking these need to happen ASAP! :)
literally envisioning 30,000 different ways to make these because they are SO simple and perfect!!
also, may I suggest mascarpone cheese in lieu of regular cc? it has such a nice mellow sweetness to it, I think it could work great here :)
Kelly! These are so fun and perfect! Holiday’s will be a breeze with these cute pops! I agree with Averie, I love the festive sprinkle!
Kelly they look wonderful! This is a classic recipe that I make almost every Xmas and yours are just too beautiful! Love the festive sprinkles! Pinned