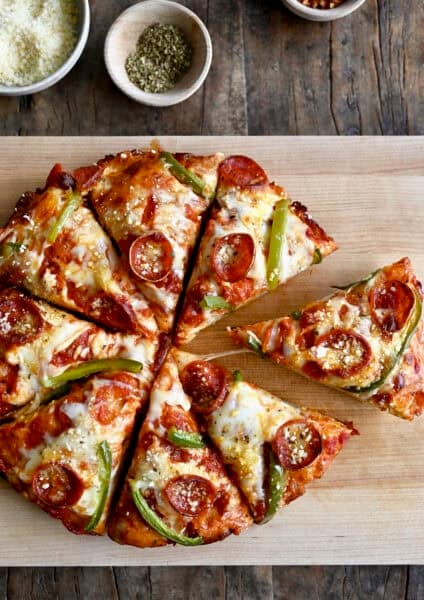
Step aside, ordinary pizza slice. Pepperoni Pizza Pull-Apart Bread is stealing the snack spotlight! This pizza bread is the perfect gameday appetizer, after-school snack or fun (and easy!) twist on family pizza night. Made with pizza dough, marinara sauce, pepperoni and plenty of cheese, all baked in a loaf pan. It’s a delicious way to enjoy your favorite pizza flavors!
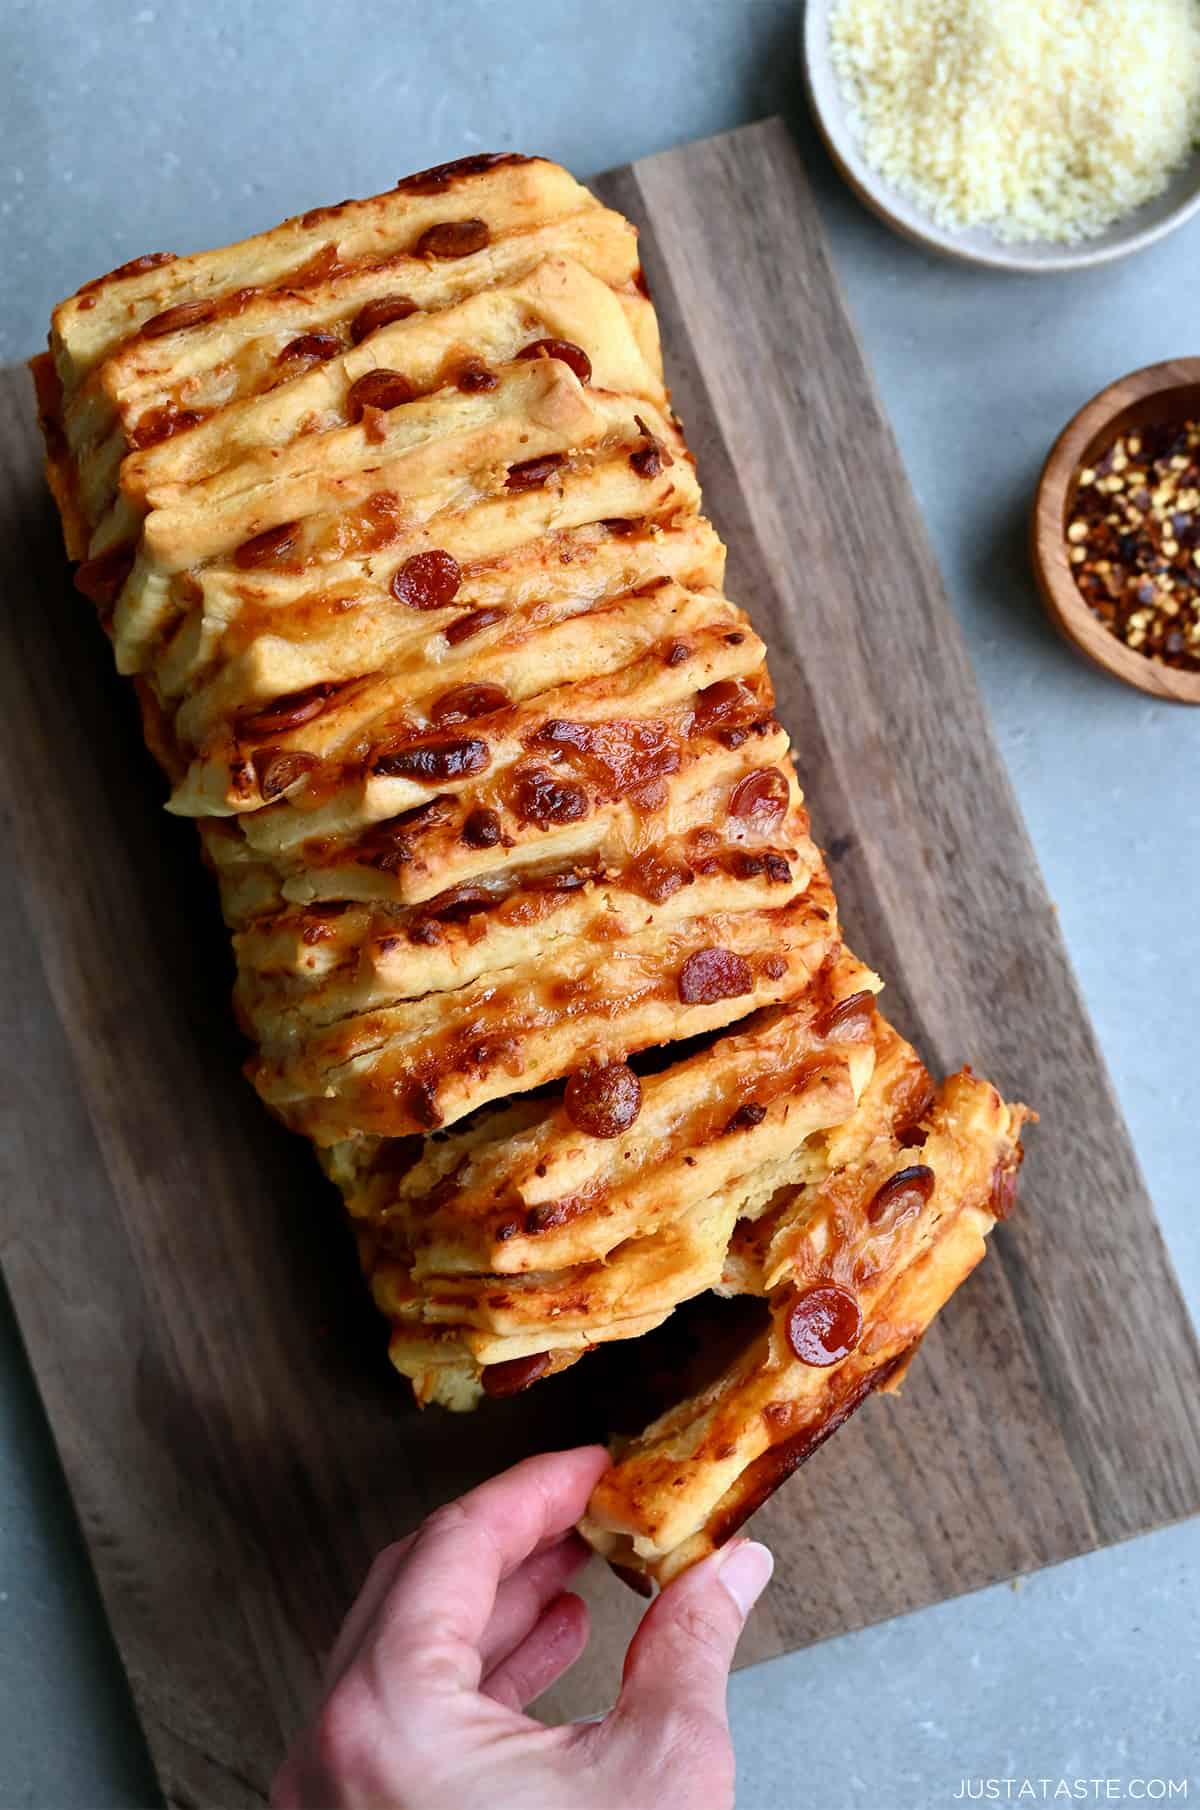
Table of Contents
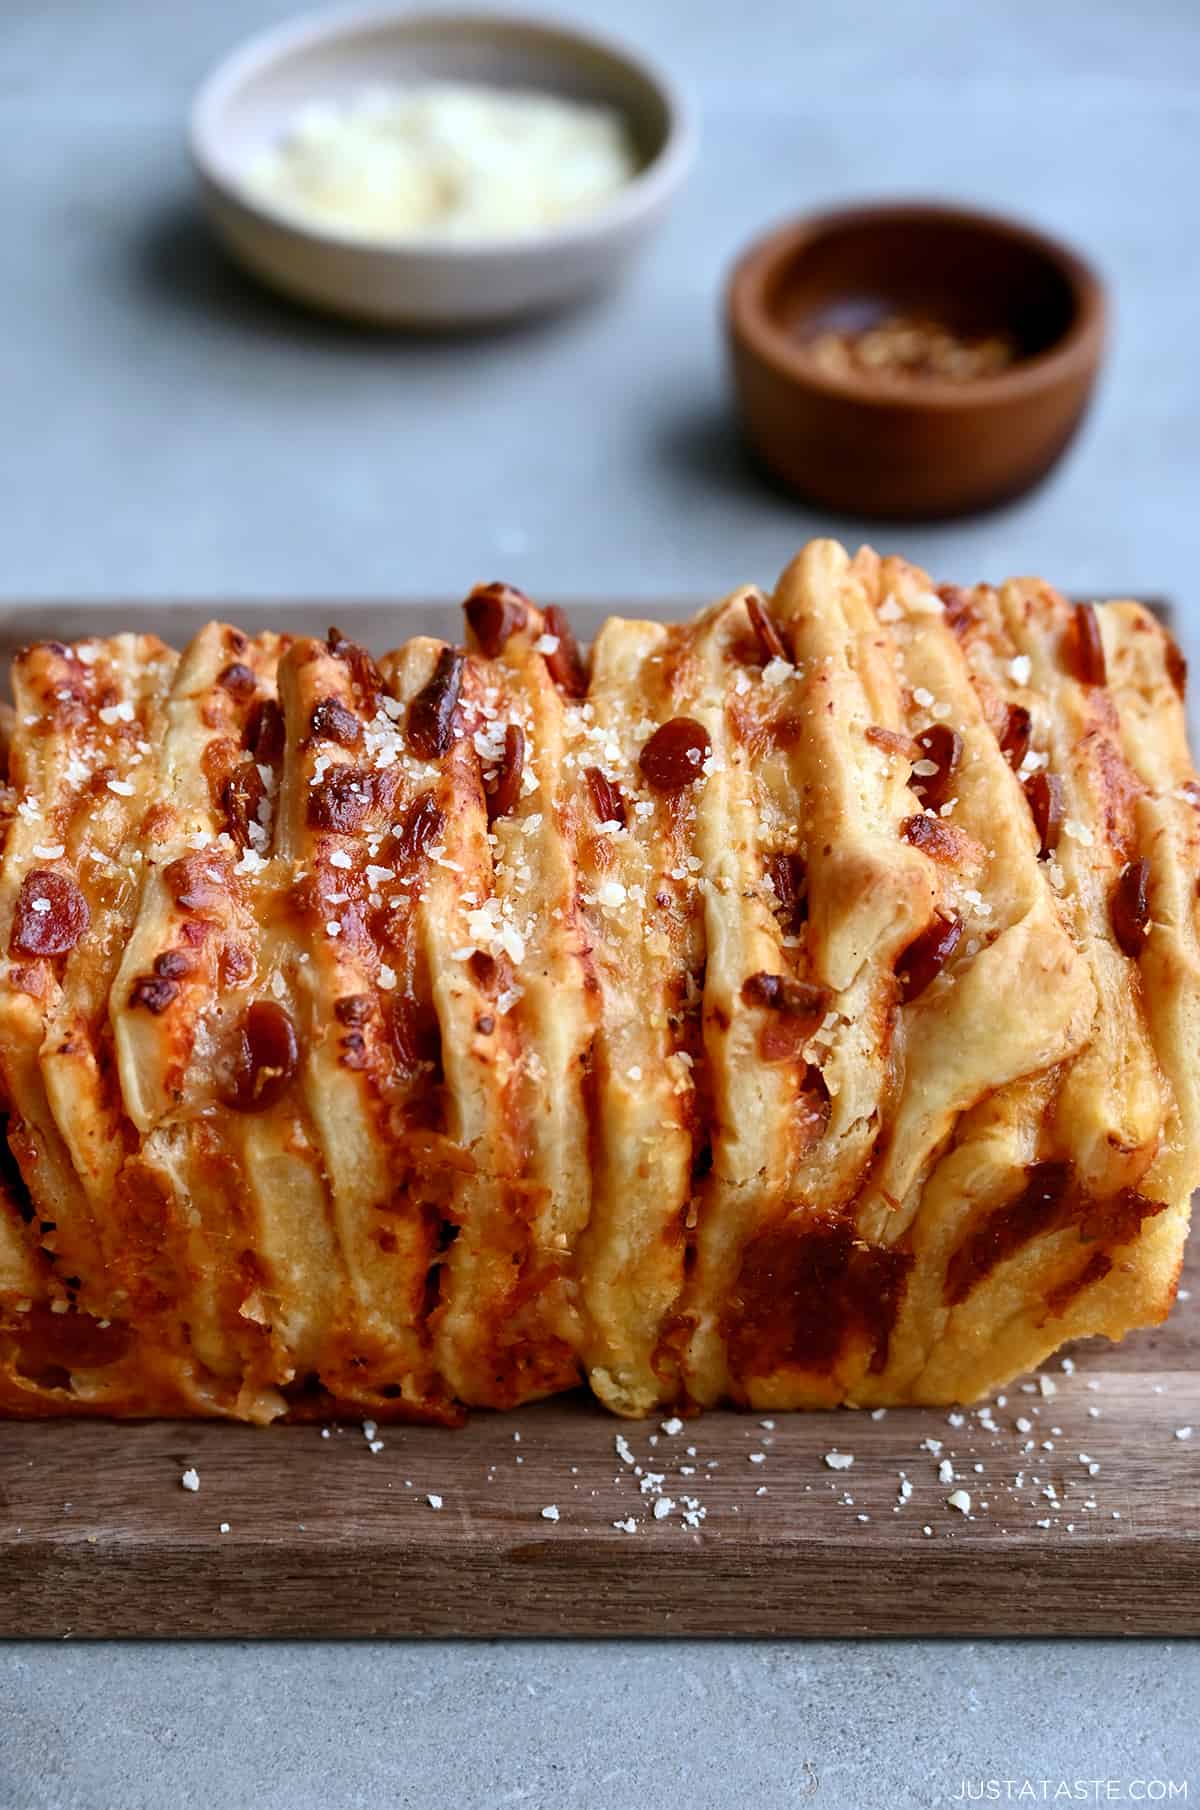
Allow me to introduce you to Pepperoni Pizza Pull-Apart Bread, featuring 20 layers of homemade dough sandwiched together with tangy tomato sauce, shredded mozzarella and pepperoni slices, which are then stacked and brushed with melted garlic butter.
This may just be my favorite pizza recipe ever!
This Pull-Apart Pizza Bread Is:
- Bursting with cheesy, pepperoni-stuffed layers. Stuffed crust pizza fans will love this recipe!
- Made with simple ingredients.
- Easily customizable.
- Perfect for sharing.
- Made with a rich dough, similar to thick pecan sticky buns, rather than a lean dough (think classic pizza dough), resulting in a texture that’s more tender and soft rather than the typical chewy, slightly crisp pizza crust.
I filed this recipe under the “Foods I Could Eat My Body Weight In” category, but I’ll let you be the judge of that.
Follow my recipe below for homemade pizza dough or use your favorite pre-made dough from your local grocery store for a time-saving alternative!
Most traditional pizza dough is considered a lean dough, made with just four basic ingredients: flour, water, yeast and salt. This type of dough results in a crust that’s chewy and slightly crisp. However, for this pull-apart bread, I prefer to use a rich dough. Rich doughs, like those used in homemade cinnamon rolls and soft dinner rolls, contain more fat and ingredients like milk, butter and eggs. These ingredients make the dough softer, more tender and richer in flavor.
Pizza dough:
- Flour: Just regular ol’ all-purpose flour is all you’ll need.
- Sugar: Good ol’ granulated sugar adds a touch of sweetness to the dough and helps activate the yeast.
- Instant yeast: It doesn’t require proofing, so you can add it directly to the dry ingredients.
- Milk: I prefer to use whole milk for its richness, but low-fat or plant-based milk also works.
- Unsalted butter: If you only have salted butter on hand, I recommend omitting the amount of added salt.
- Water: You’ll add this to a saucepan along with the milk and butter. This mixture hydrates the dough and activates the yeast.
- Eggs: It’s important to use eggs at room temperature to ensure even mixing with the other ingredients. To bring cold eggs to room temp quickly, place them in a bowl of warm water for a few minutes before using.
Toppings:
- Marinara sauce: Choose your favorite store brand or make your own homemade marinara sauce (it takes just 10 minutes!).
- Shredded mozzarella cheese: Melts beautifully, creating that irresistible cheese-pull we all love. Swap: Cheddar, provolone or a mix of Italian cheeses would all work well.
- Pepperoni: I’m all about the mini pepperoni slices! They’re my favorite in pizza dip, muffin pan pizza cups and this savory pull-apart bread.
- Garlic butter: You’ll make this by stirring together melted butter with a little minced garlic. This adds flavor and helps create a golden, crispy crust.
See the recipe card for full information on ingredients and quantities.
Kelly’s Note: Feel free to get creative with your toppings, opting for any combination of your usual favorites, such as olives, peppers, sausage, etc. If you’d put it on a pizza, you can put it in pizza pull-apart bread!
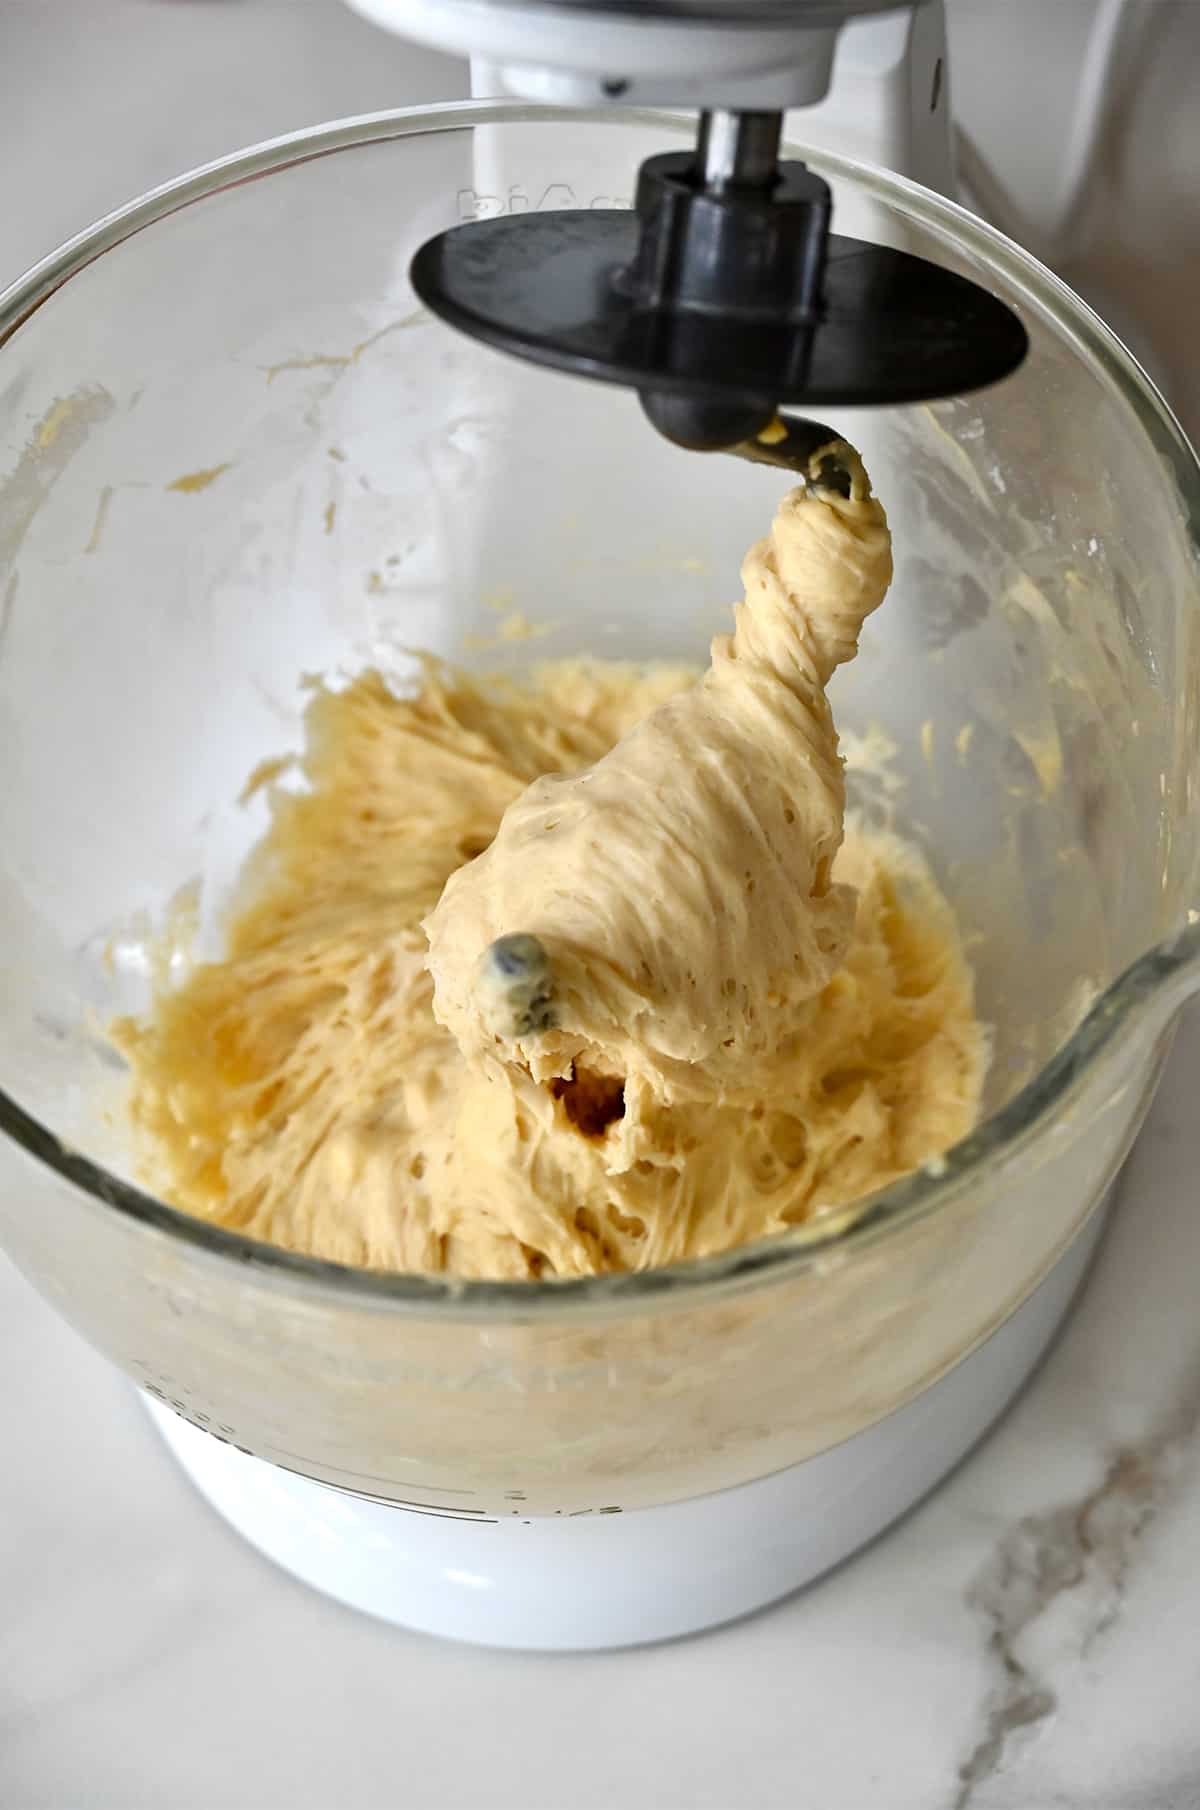
You’ll start by making the pizza dough. I use my stand mixer to knead the dough, but you can mix and knead the dough by hand if you don’t have one. It will require a bit more effort and time, but the results will be just as delicious.
- Stir together 2 cups of the flour with the sugar, salt and yeast. Set aside.
- Heat the milk and butter in a small saucepan over low heat until the butter is melted. Remove the saucepan from the stove and stir in the water. Use a kitchen thermometer to check the temp of the milk mixture. It should be between 120-130°F. Too hot or too cold and your dough won’t rise properly.
- Combine wet and dry ingredients. Pour the milk mixture over the dry ingredients, using a spatula to fold them together just until combined. Attach the dough hook to your stand mixer and knead the dough on low speed until fully incorporated, about 3 minutes.
- Add the eggs, one at a time, kneading in between each addition so that the eggs are fully incorporated.
- Add the remaining flour and knead until the dough is smooth.
Pro Tip: Pay attention to the dough’s consistency after adding the flour. It should be soft but slightly sticky. Add more flour if necessary, but avoid adding too much, as it can make the bread dense.
- Turn the dough out onto a floured surface and knead it 5 or 6 times just until it comes together into a ball.
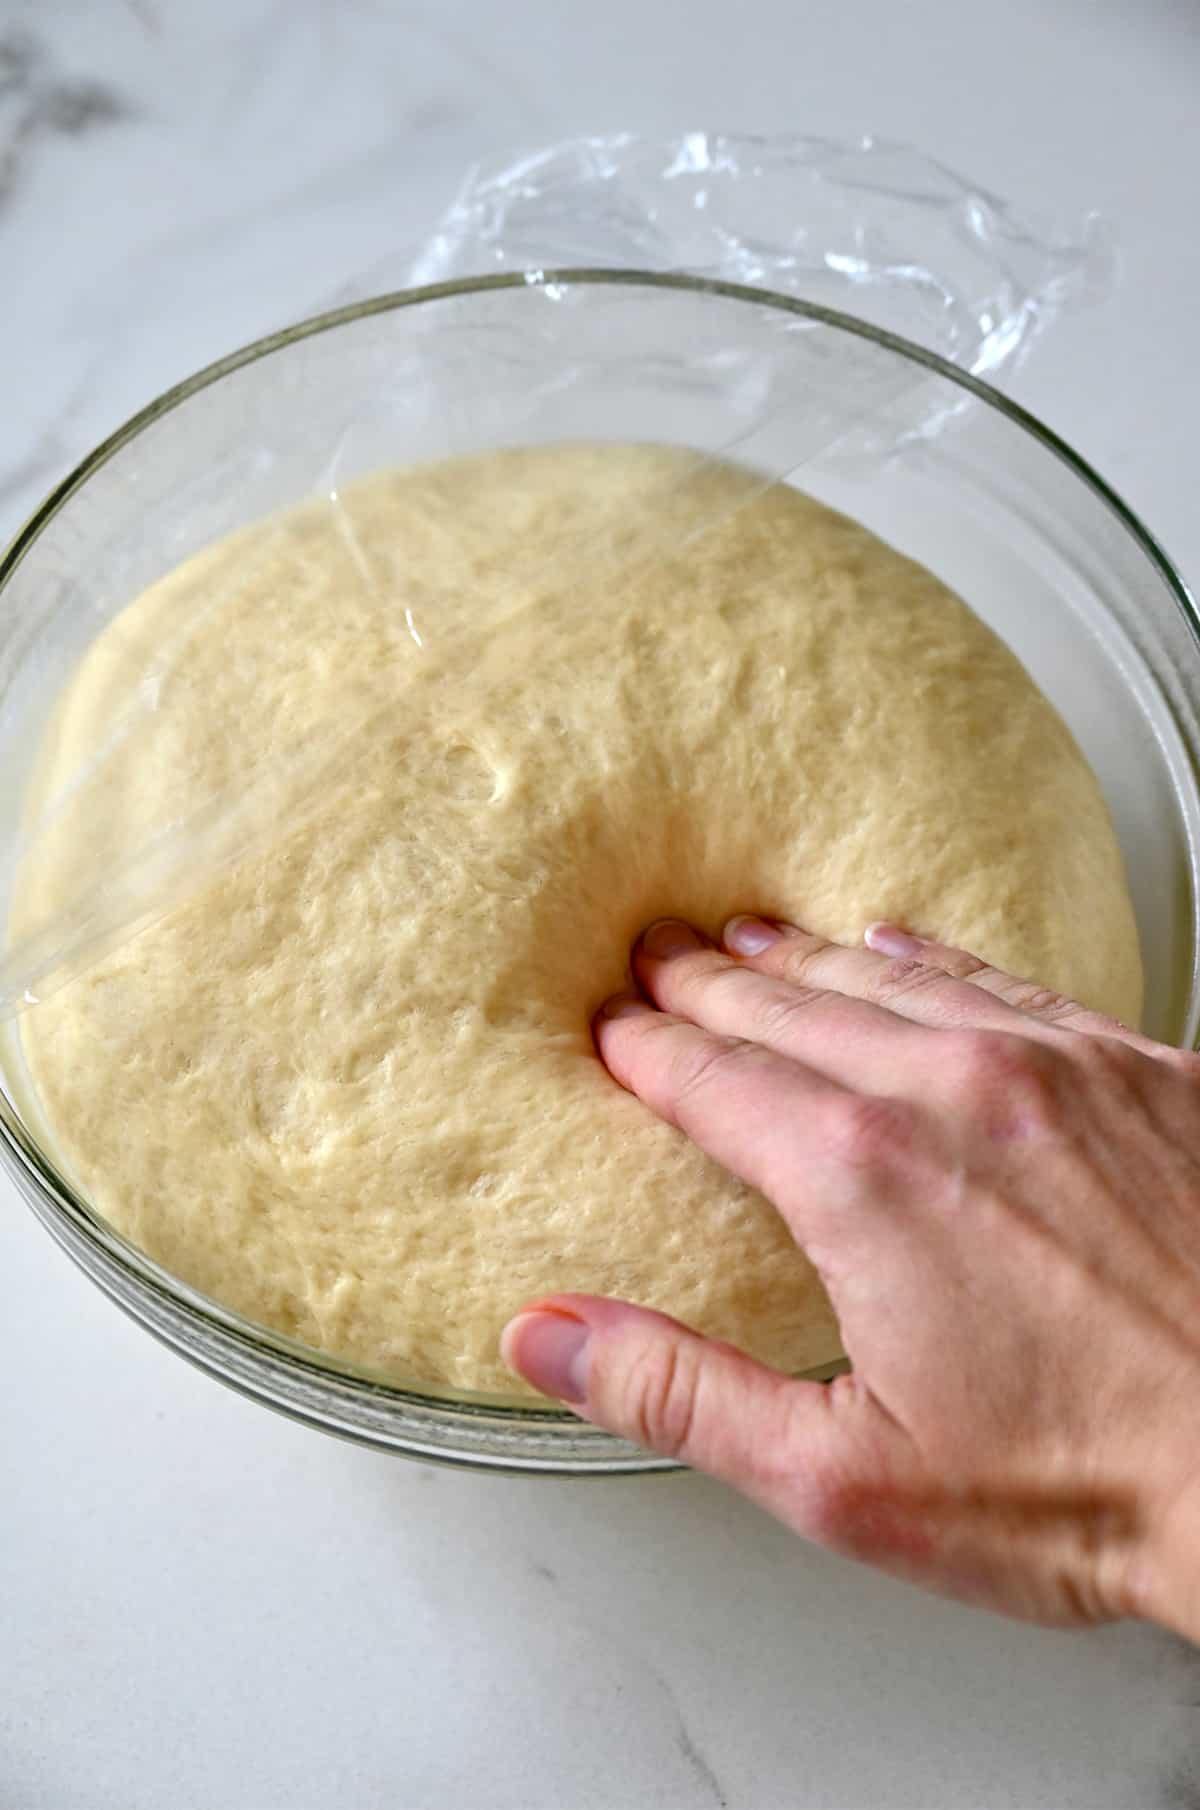
- Proof the dough. Allow the dough to proof in a warm, dry place for one hour, or until it doubles in size.
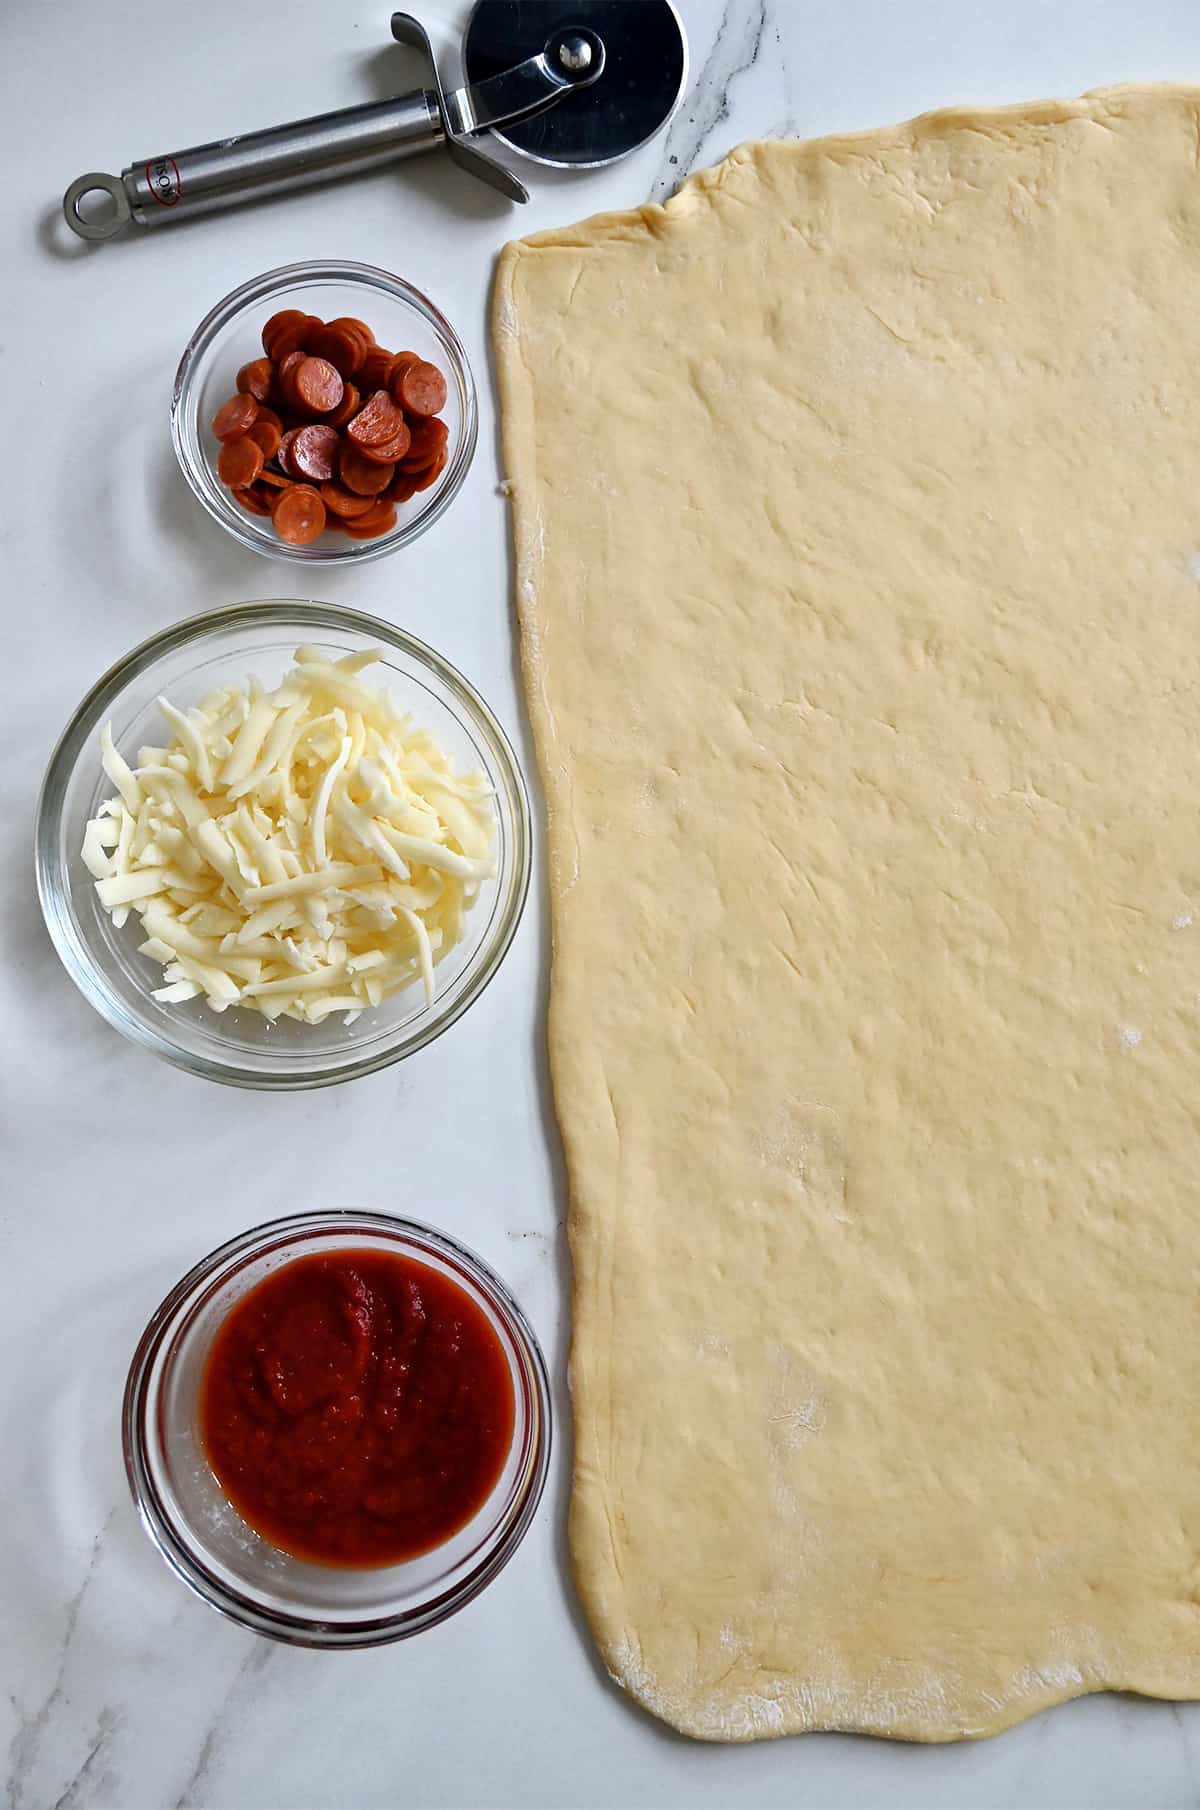
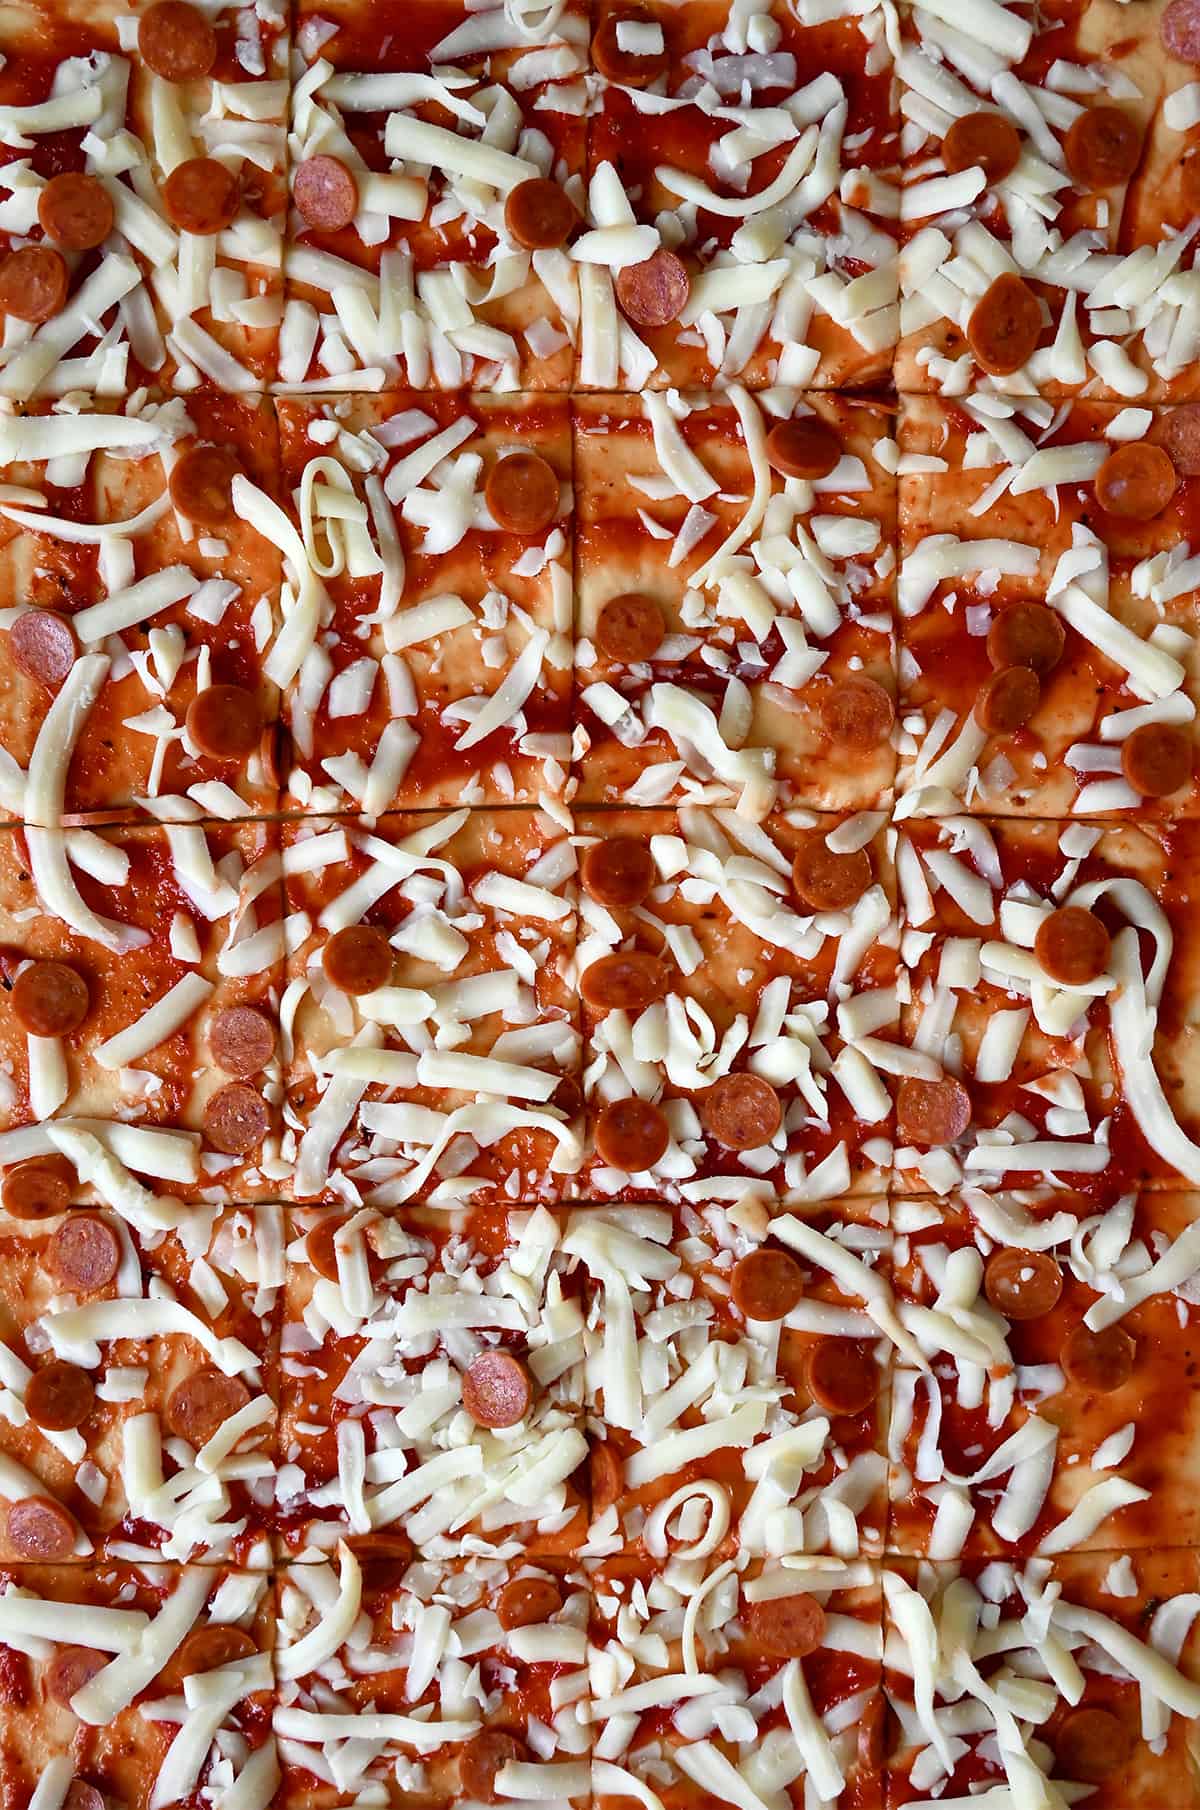
- Roll out the dough, then layer on your toppings. Brush the dough with the sauce, sprinkle it with the cheese and top it with the pepperoni.
- Cut the rectangle (width-wise) into 5 equal strips. Stack the strips atop one another and then cut the strips into 4 equal parts to make a total of 20 squares.
- Stack the squares into a greased loaf pan. Stack the squares against each other, with the cut sides down. This creates layers and adds to the pull-apart effect when serving.
- Proof again. Allow the dough to proof for the second time until it doubles in size. This step is crucial for achieving a light and airy texture in the finished bread.
- Brush with garlic butter and bake. It’ll go into a preheated 350Fº oven for 15 minutes. Then, you’ll remove the pan, brush the top again with garlic butter and then return the loaf to the oven to continue baking until the top is golden brown, about 15 minutes.

This cheesy pepperoni pizza pull-apart bread is best served warm, straight out of the oven. It’s perfect for sharing as an appetizer (hello, football party food!), as a fun family dinner served alongside a kale salad with warm bacon vinaigrette or as a snack after school. Serve it with extra marinara sauce for dipping and watch it disappear in no time!
- Quick tip for getting bread to rise: Turn your dryer into an at-home proofing box! Simply run your dryer for a few minutes then shut it off (this is important!). Place your covered bowl of dough inside and shut the door.
- It helps to have a very sharp knife or pizza wheel for cutting the dough into strips and squares.
- Roll out the dough into a rectangle as evenly as possible to ensure that each slice of bread cooks uniformly. This helps prevent some parts from being undercooked while others are overdone.
- Allow the baked bread to cool for 10 minutes in the pan before serving. This gives it time to set and makes it easier to remove from the pan without falling apart.
Common Questions
Yes, you can use active dry yeast instead of instant yeast, but you’ll need to activate it in warm liquid before using it. Follow the instructions on the yeast package for proofing in warm water with a pinch of sugar until it becomes frothy, then incorporate it into the recipe.
Grease the loaf pan generously with butter or cooking spray before assembling the pizza bread. This will help prevent sticking and make it easier to remove the bread once baked.
Yes, you can freeze both the dough and the baked bread. Wrap the dough tightly in plastic wrap and store it in a freezer bag for up to 3 months. Baked bread can also be wrapped tightly and frozen for up to 1 month. Thaw in the refrigerator overnight before reheating.
Store leftover bread in an airtight container in the refrigerator for up to 3-4 days. Reheat slices in the oven or microwave before serving.
- Easy Taco Salad Cups
- Easy Pizza Dough Soft Pretzel Knots
- Sheet Pan Nachos with Chicken
- Air Fryer Jalapeño Poppers
- Cheese-Stuffed Meatballs with Garlic Bread Dippers
- Everything Puff Pastry Pigs In a Blanket
Ingredients
For the dough:
- 2 3/4 cups all-purpose flour, divided
- 2 teaspoons sugar
- 1 teaspoon salt
- 2 1/4 teaspoons instant yeast (1 envelope)
- 1/3 cup whole milk
- 6 Tablespoons unsalted butter
- 1/4 cup water
- 2 large eggs, at room temperature
For the toppings:
- 1/2 cup pizza or marinara sauce
- 1 cup shredded mozzarella cheese
- 1/4 cup sliced pepperoni
- 2 Tablespoons unsalted butter, melted
- 2 cloves garlic, minced
Instructions
- In the bowl of a stand mixer, stir together 2 cups of the flour with the sugar, salt and yeast. Set aside.
- In a small saucepan, combine the milk and 6 tablespoons butter over low heat until melted. Remove the saucepan from the stove and stir in the water. Let set until it reaches 120-130ºF.
- Pour the milk mixture over the dry ingredients, using a spatula to fold them together just until combined.
- Attach the dough hook to your stand mixer and knead the dough on low speed until fully incorporated, about 3 minutes. Add the eggs, one at a time, kneading in between each addition so that the eggs are fully incorporated.
- Stop the mixer and add ½ cup of the remaining flour, kneading it on low speed until the dough is smooth, about 2 minutes. Add 3 more tablespoons flour and knead just until the dough is soft, but still slightly sticky.
- Lightly flour your work surface, and then turn the dough out onto the surface, kneading it 5 or 6 times just until it comes together into a ball.
- Lightly grease a large bowl. Place the dough in the bowl and secure it tightly with plastic wrap. Allow the dough to proof in a warm, dry place for one hour, or until it doubles in size. (See Kelly’s Notes.)
- Gently deflate the dough and turn it out onto a lightly floured work surface. Roll it into a rectangle measuring roughly 20″x11″. Brush the dough with the sauce, sprinkle it with the cheese and top it with the pepperoni. (See Kelly’s Notes.)
- Trim the edges, discarding any scraps, to make straight sides along the rectangle.
- Cut the rectangle (width-wise) into 5 equal strips. Stack the strips atop one another and then cut the strips into 4 equal parts to make a total of 20 squares. (See Kelly’s Notes.)
- Lightly butter a 9″x5″ loaf pan. Stack the squares against each other, cut-sides down. (There will be extra space on both sides.) Lightly cover the pan with plastic wrap and let it proof for 30 minutes or until it doubles in size.
- Preheat the oven to 350FºF.
- Stir together the melted butter and minced garlic.
- Place the loaf pan on a baking sheet and bake it for 15 minutes.
- Remove the pan from the oven, brush the top of the loaf with the garlic butter, and then return it to the oven to continue baking for 15 to 20 minutes, or until the top is golden brown.
- Remove the pan from the oven and let it rest for 10 minutes before turning the loaf out onto a serving plate.
Kelly’s Notes
- One of the most effective ways I’ve found to proof any type of bread is to run my dryer for a few minutes, and then shut it off and place the covered bowl of dough inside. Shut the dryer door and voila! Your very own warm, dark proofing box.
- Feel free to get creative with your toppings, opting for any combination of your usual favorites, such as olives, peppers, sausage, etc.
- It helps to have a very sharp knife or pizza wheel for cutting the dough into strips and squares.
- ★ Did you make this recipe? Don’t forget to give it a star rating below!
Nutrition
Did you try this recipe?
Leave a comment below with your star rating!
This post may contain affiliate links.
Dough recipe adapted from Chez Us.


I have a bread proofer and am wondering what temperature to proof at. Thank you for the recipe!
Hi Jan! What brand/model is it?
I proof dough, and soften cold ingredients like cream cheese, in the oven with just the oven light on. It’s quick, easy, and handy.
Great tip, Bunny!
Can you help describe how to eat this awesome creation? Does this bread require a knife and fork to eat? I know it says “pull apart,” does it pull apart very easily? From the picture, it looks like it would be very messy if it didn’t pull apart pretty cleanly/easily.
I’m very interested in making this, but hoping to get some feedback on this first to see whether it will be a good option for me and my family.
Thanks in advance!
No fork and knife needed! You just pull apart the gooey, cheesy slices with your fingers :)
When do you had the filling? Also, prep time is not 2 minutes!
This sounds delish, but I want to know when to add the pepperoni, etc.
Hi there, Jo! As noted in the instructions above, you’ll add the toppings after rolling the dough into a rectangle (paragraph 8) and before cutting it into strips.
This is my go-to for weekend indulging. It’s absolutely delicious and easy to whip up.
I’m thrilled you’re enjoying the recipe, Kelsey!
This looks delish, but I’m looking for a shortcut. I wondered if I could use Pilsbury pizza dough instead of making it from scratch.
Absolutely! You may have to adjust the baking time if the dough is a bit thinner, but it should work great. :)
I didnt like this recipe because the dough was too sweet.
Hi Kelly, I don’t have a stand mixer. Do I still follow the order of ingredients and mix with a spoon until ready for kneading? Thanks!
Yes that should work!
I time my bread for my dish washer to finish put the dishes away then place the dough in dishwasher to proof.
I made this today. It lasted five minutes and was delicious!!! Thanks!!!
So glad you enjoyed the recipe, Trish!
Use your kitchen table to roll your dough out :)
Can I get the same effect using ready made dough?
Hi Amy – That should work but you’ll have to adjust the baking time!
Hi Kelly
Just started reading your web site. I put a picture of this Pepperoni Pizza Pull-Apart Bread as the wallpaper on my wife’s computer. Hope she’ll get the hint!
(Salivating for a taste of this!)
Regards
Rich
Hah! I love that, Rich! So glad you found the site :)
With all due respect, comments would be great if you had made the recipe, but are worthless otherwise
Where will people be able to ask questions before making the recipe, if not in the comments?
I made this tonight, and gods was it so freaking good. Though I made too much lol. Great recipe.
Has anyone tried to reheat these to any successes ? I think the pull a part pizza is a great idea for a Appetizer .
Desperately could use some high altitude recipes. I’ve relocated to western wy and starting all over as a novice baker. I use my oven to raise bread dough on the off setting but use the lifght inside to make a cozy place to raise. Love your recipes. Janesmessages@yahoo. Com
Thanks so much, Jane! I have a high-altitude chocolate chip cookie recipe: https://www.justataste.com/2008/12/mile-high-chocolate-chip-cookies/
Hi Kelly! I love your blog, you make things look so easy to make. I made a sweet version of this kind of bread before (not yours) made it into cinnamon pull apart and I added raisins. I had a difficult time releasing it from the pan even after resting for 10 minutes. Is it okay if I put a piece of parchment at the bottom of the pan when making this. Thank you.
So glad you’re enjoying the recipes, Ela!
I too have used the dash-board-proof-box method. Love the dryer idea! No longer will I have to wait for sunny bread weather! Wait, if I use the dryer, that means I can’t use it as a dresser drawer!
I set my bowl of dough on a heating pad on lowest setting to rise, but I like the idea of the dryer. Also I recently read to use bottled water in the dough as the chemicals in tap water affect the rising ability. Hmm. Haven’t tried it yet though.
oh my gawd! This is my first time seeing this!!! I’ve made the pull apart bread but this is Brilliant!
Made tris recipe followed to a tee – except I made a second loaf with spinach instead of pepperoni, and doubled the garlic – unbelievably delicious
Awesome! So glad you enjoyed the recipe, David!
I laughed when I read you put you dough into the dryer….only because I always put my dough in the car, on the seat or on the dashboard, it all depends on how warm it is outside .
Just came across this recipe and fell in love! Delicious!
I knew you were a genius.. :)
Haha! Thank you, Gerry!
Can I just say…you are a genius? I’m at the fitness center working out with iPad in hand when I found this beauty! I can’t wait to finish so I can get to the market. Being a New Orleans gal, I’m going to try my hand at making one to reflect our most famous sandwich, the muffuletta ! Humm, can’t wait!
Love this idea, Tina! And love even more that you’re working out while planning your next meal. We must be long-lost sisters :)
Yum, looks like great fun!
We actually made this dish tonight, though we didn’t follow the instructions exactly. For one, we added green bell pepper brunoise and made our own pasta sauce (it’s much easier than it sounds and TOTALLY WORTH THE EFFORT).
As for the extra dough that was trimmed off the sides of the pre-cut pie? Rolled it up into individual biscuits and baked in muffin tins for the dog :)
All in all, this recipe is freaking delicious.
Make it!
BTW: Using the dryer as a proofing box? Pure genius.
Love your addition of green pepper and homemade marinara, Jack! So glad you enjoyed the recipe :)
Hi all! I love this recipe :) I cheat though and use the prepared dough from Trader Joes. It’s just like dough you would make yourself and does a wonderful job in this recipe!
Hi Kelly.. I made this bread over the weekend and it was absolutely SCRUMPALITIOUS !!!! Hy husband and I finished up most of it and that was all we managed to have for dinner. Thank for the lovely recipe. Am a huge fan of ur blog !! .. Cheers, Andrea
Hi Kelly.. quick question: the all purpose flour that is used .. is it bread flour or flour used in cakes etc. ( sorry .. silly question, i know).. love your blog.
Thanks, Andrea! It’s just regular ol’ all-purpose flour :) Enjoy!
I’m having the same problem as the commenter above – I followed the instructions to the absolute letter but mine came out totally wrong… it was still almost raw in the middle! What could have happened?!
I tired this tonight and it didn’t turn out good at all. The middle layers weren’t even cooked, they were still raw dough. Anyone else have this issue?
looks yummy!
this looks really good, but i have a very small kitchen (live in a trailer no counter space to roll dough) and was wondering if this would be just as good with Grands biscuits pulled apart then layered? I guess i could shape/cut them into squares but probably wouldnt get same taste results. any suggestions
Can you make the dough in a bread machine? I’m without a stand mixer, so I’m trying to figure out the easiest way to make this!
just made this last night and it was WONDERFUL. great recipe. this is the first time I ever used yeast and made a dough from scratch before too :)
This was great! I used a pasta sauce, and I think a thicker pizza sauce would work better as much of mine cooked out the bottom (i think? or maybe I didn’t put enough on), but it was still great! The dough ended up incredible…just perfect consistency baked and how it peals off in the layer, delicious. I’m actually thinking it could almost serve as a savory bread more than just variation on pizza. Maybe something with cheese and veggies, more harvest oriented for thanksgiving/fall. As per all the recipes posted on Justataste, I am always amazed with the success I have. You test out and create recipes that are replicable in form and taste, even for a guy who just uses his hands/a spoon for mixing…k barbaridad–una maravilla!
I absolutely love your comments, Yoey! I’m so glad you enjoyed the pizza pull-apart bread and I hope you’re doing well!
Oh my word, this looks good! Your pictures are fabulous!!! :)
Have Mercy….this looks beyond amazing.
Another way to proof bread, turn the oven light on and set the dough inside, works well.
Love this idea!!
Carmen
Made this last night for the football crowd…it was gone in seconds! Such a cool presentation and the dough was so easy to work with. Will definitely become a household favorite!
Wow, that looks amazing, Kelly! I love your photos and the step-by-step photos are awesome!!
Like it!.. will give it a try for sure
That proofing idea is brilliant! I almost always leave my dough to rise in the laundry room as it is, but this takes it to the next level. Definitely tucking that knowledge in my back pocket.
Looks amazing, I confident I could devour that loaf in a matter of minutes.
SCRUMPTIOUSLY GORGEOUS !!!!! :D Will try to make this next week !
Looks like something I could eat a wholllle lot of!
Now I know what to use my drying rack for! =)
I saw the picture, read the title and immediately started drooling! I know why this is now your fave recipe on your blog. This will be a hit in my house!
What a great tip to allow dough to rise in the dryer! By the way, I discovered your blog after I started reading your Dummies book on food blogging. I had a food blog for about six months and abandoned it because it was taking too much time (I’m a perfectionist!) but I’m thinking about getting back to it. I really appreciate how positive and motivating your book is to get started in food blogging. The pizza looks wonderful too!
Thanks so much, Laura! Don’t hesitate to be in touch if you ever have any questions. You can reach me at kelly@justataste.com. So glad you’re enjoying the book!
Could you use Pepperidge Farm puff pastry instead of making the dough??
Hi Kirsten – I haven’t made it using packaged puff pastry, so I cannot say with certainty that you’ll get the same result, but I would guess that store-bought pizza dough would provide a closer result than puff pastry. Hope this helps!
I love everything about this, such a fun way to eat pizza, Kelly!
I absolutely need this!
This literally is just mean! My friends and I have been discussing making a monkey bread version of this for weeks…we might have to make this instead! It looks phenomenal…sign me up.
I always love “different” methods and approaches for classic dishes. Very creative!
I am sooo going to make a version of this next week omgaaaaaaaaaaaaah.
oh my gosh amazing!! the bread and the tip for the dryer. thank you thank you!!
This. Is brilliant. Beer and pizza pull-apart bread for all!
omg how fabulous!!
This looks AMAZING! What a great idea!
Good lord. I want to say more, but it’s hard to type without looking away from the photographs, and I’m not willing to do that. I love the dryer idea, too, by the way – I have the hardest time getting a good rise out of my doughs, and this may be a lifesaver!
Yes, please. This looks amazingly decadent and the perfect half-time food for football season. Bring the cheesiness on!
This looks perfect! I love that idea of the dryer proofing box! Awesome!
this looks amazing and fun way to eat pizza!! your slices are so perfectly straight! thank you for the sweet idea of proofing in a dryer – amazing!!
What a fun take on pizza!