Take the stress out of your side dish spread with the ultimate recipe for Easy Homemade Dinner Rolls made with just 7 ingredients. These soft and buttery rolls are for anyone with a fear of yeast. If you can stir, you can make these pillowy rolls!
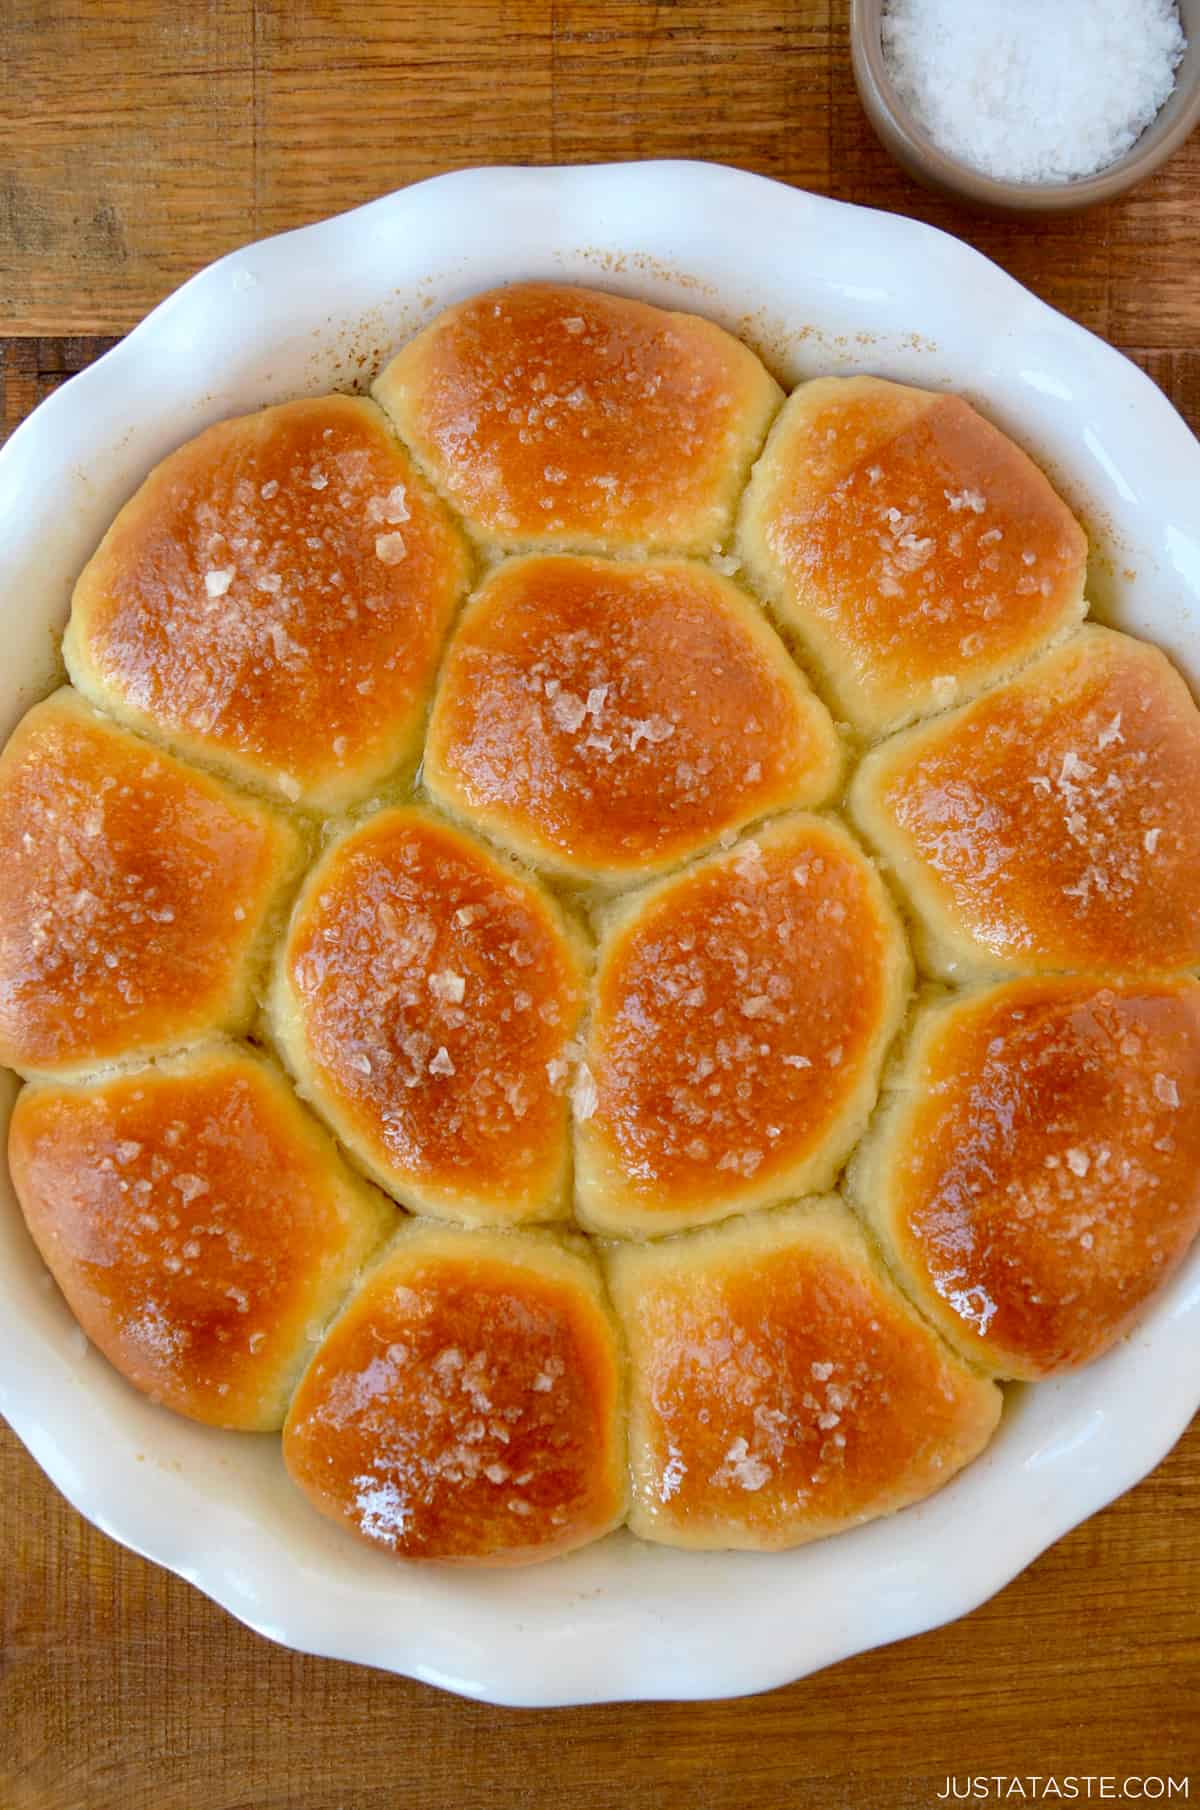
Table of Contents
It doesn’t take many clicks around these pages to come to two simple conclusions:
- Doughnuts might as well be a food group.
- Carbs can come in all shapes and sizes and we embrace them all.
When it comes to carbs, I have a very definitive list of favorites on the savory side (sweet is a whole other story):
Basically, if it’s hot, yeasty and qualifies as a carb, I am down to par-tay.
And who can seriously resist bread fresh from the oven? Especially when it’s insanely fluffy, buttery and perfect for pulling apart and popping shoving into your mouth.
This is a recipe for those with a fear of yeast and all things involving rising times. If you can stir, you can make these dinner rolls.
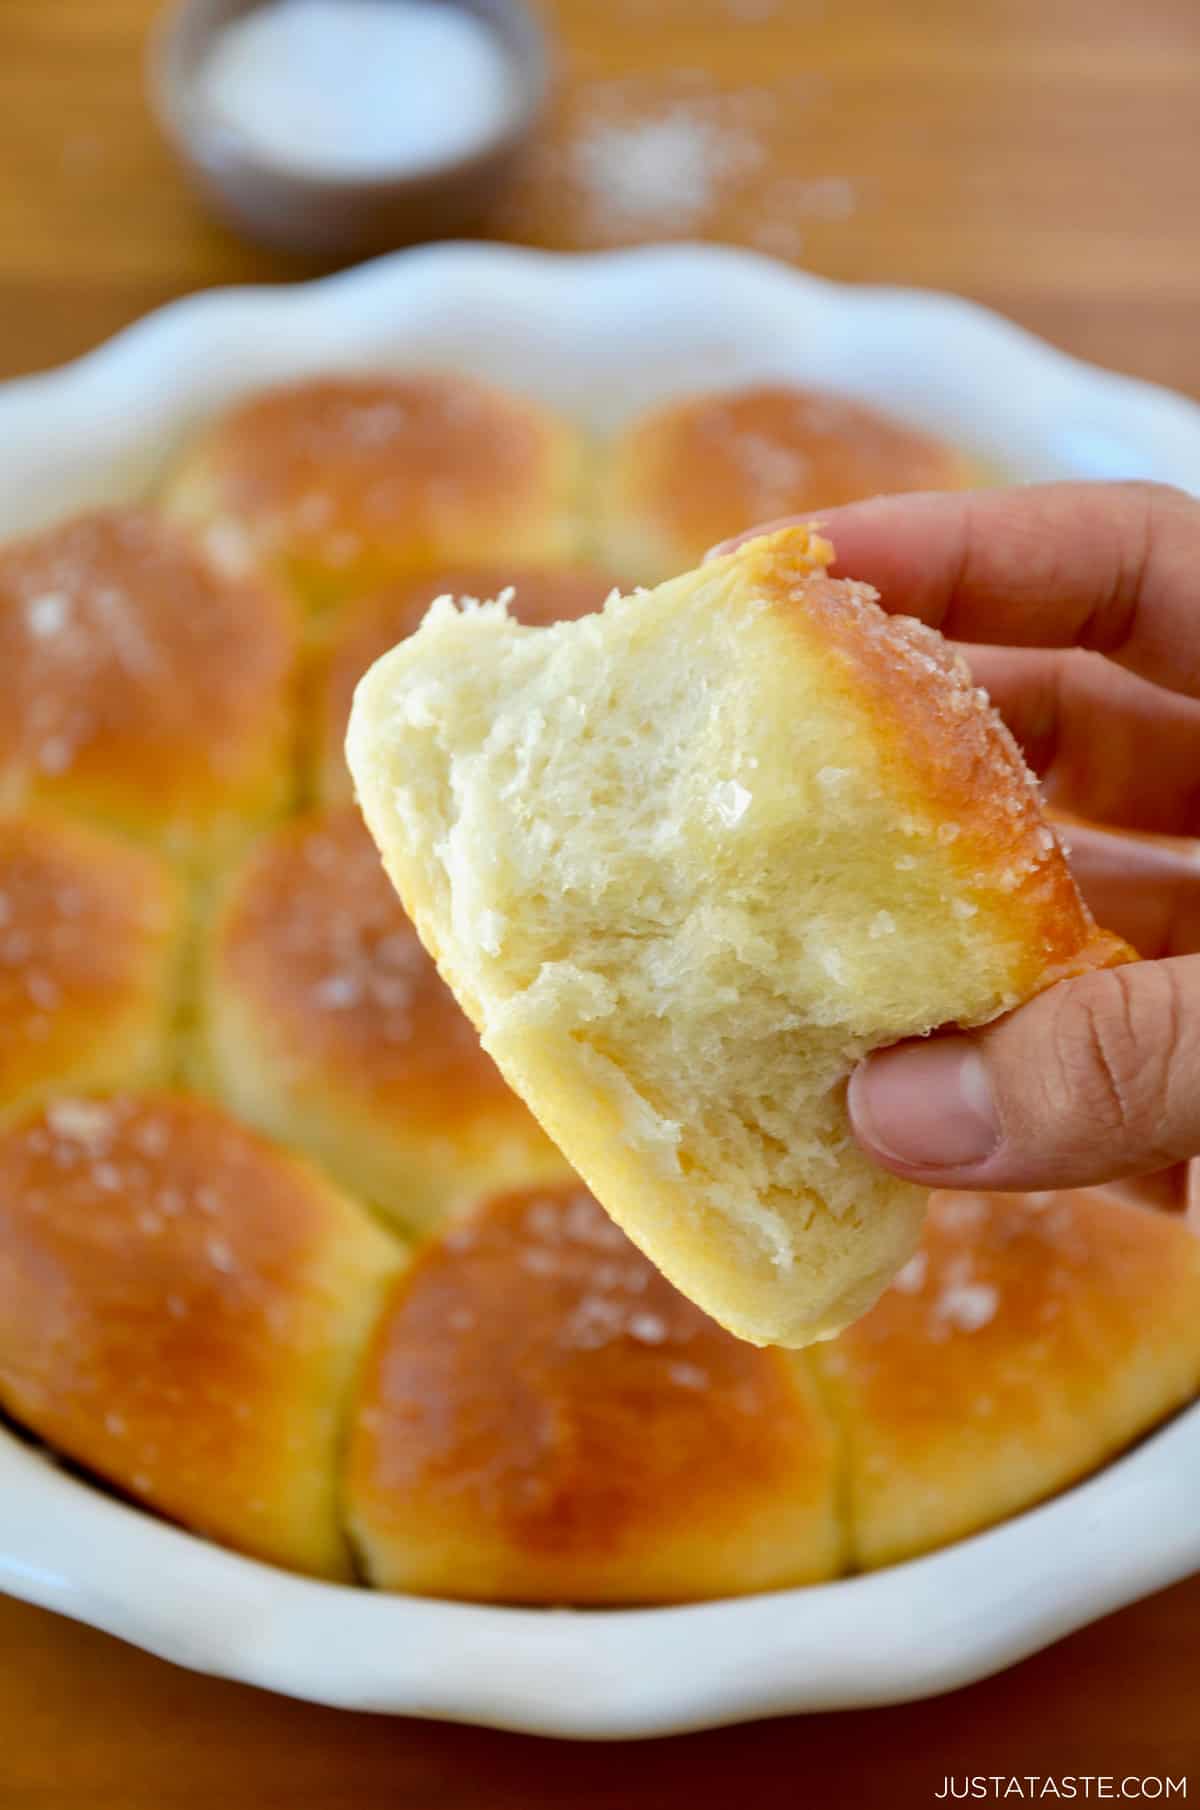
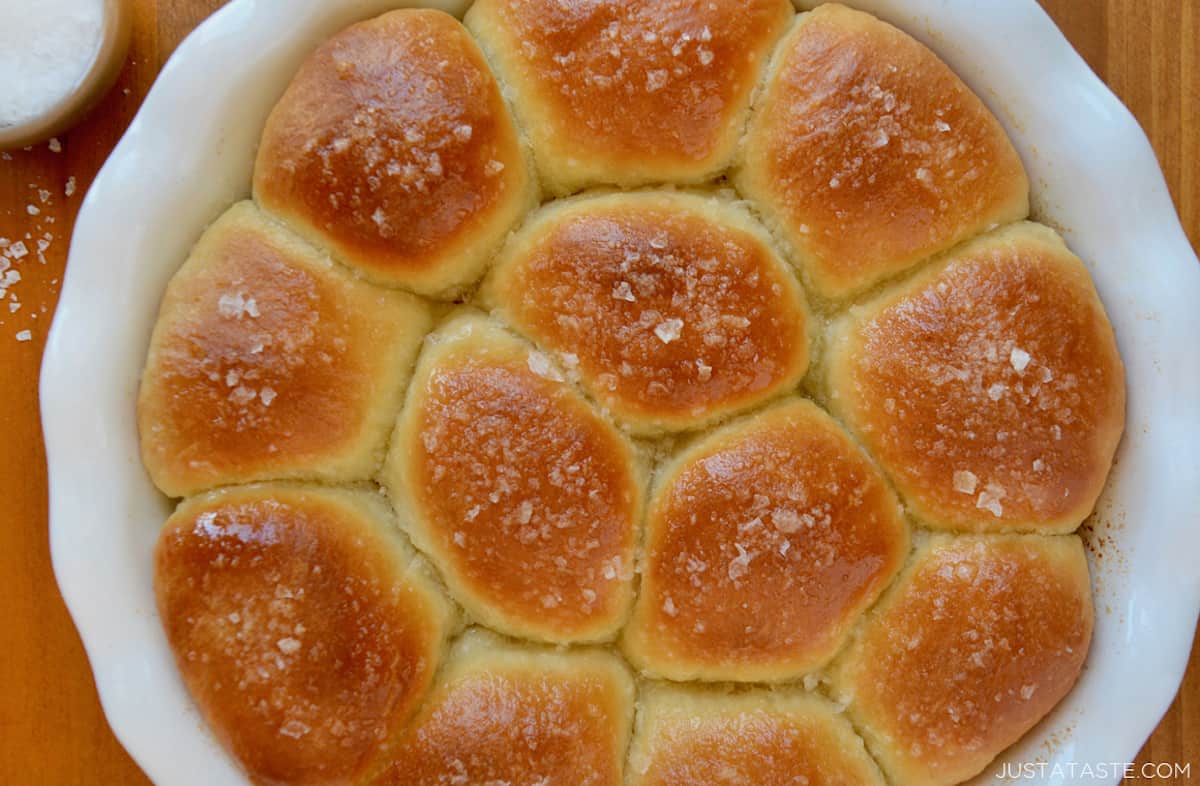
The best part is, this recipe is totally a blank canvas. I’ve topped mine off with melted butter and large-flake sea salt (love that crunch), but the sky is the limit.
I can imagine endless variations, from garlic and cheese to fresh herbs and, dare I say, chocolate! And don’t miss my pumpkin dinner rolls flavored with a hint of pumpkin spice.
Whip up these rolls for a holiday feast (hello, Thanksgiving essential!) or add them to your weeknight menu for the ultimate wow factor. Best of all, any leftovers are great toasted in the a.m. with butter and jam or halved and stuffed with all of your sandwich favorites.
Bread dough’s texture depends on its fat content. A lean dough with less fat results in a crustier, chewier bread. A rich dough with more fat results in a softer, richer bread. Just like my overnight cinnamon rolls, soft dinner rolls require a rich dough, which contains ingredients like milk and butter. Let’s take a closer look at each of the 7 ingredients you’ll need for this recipe.
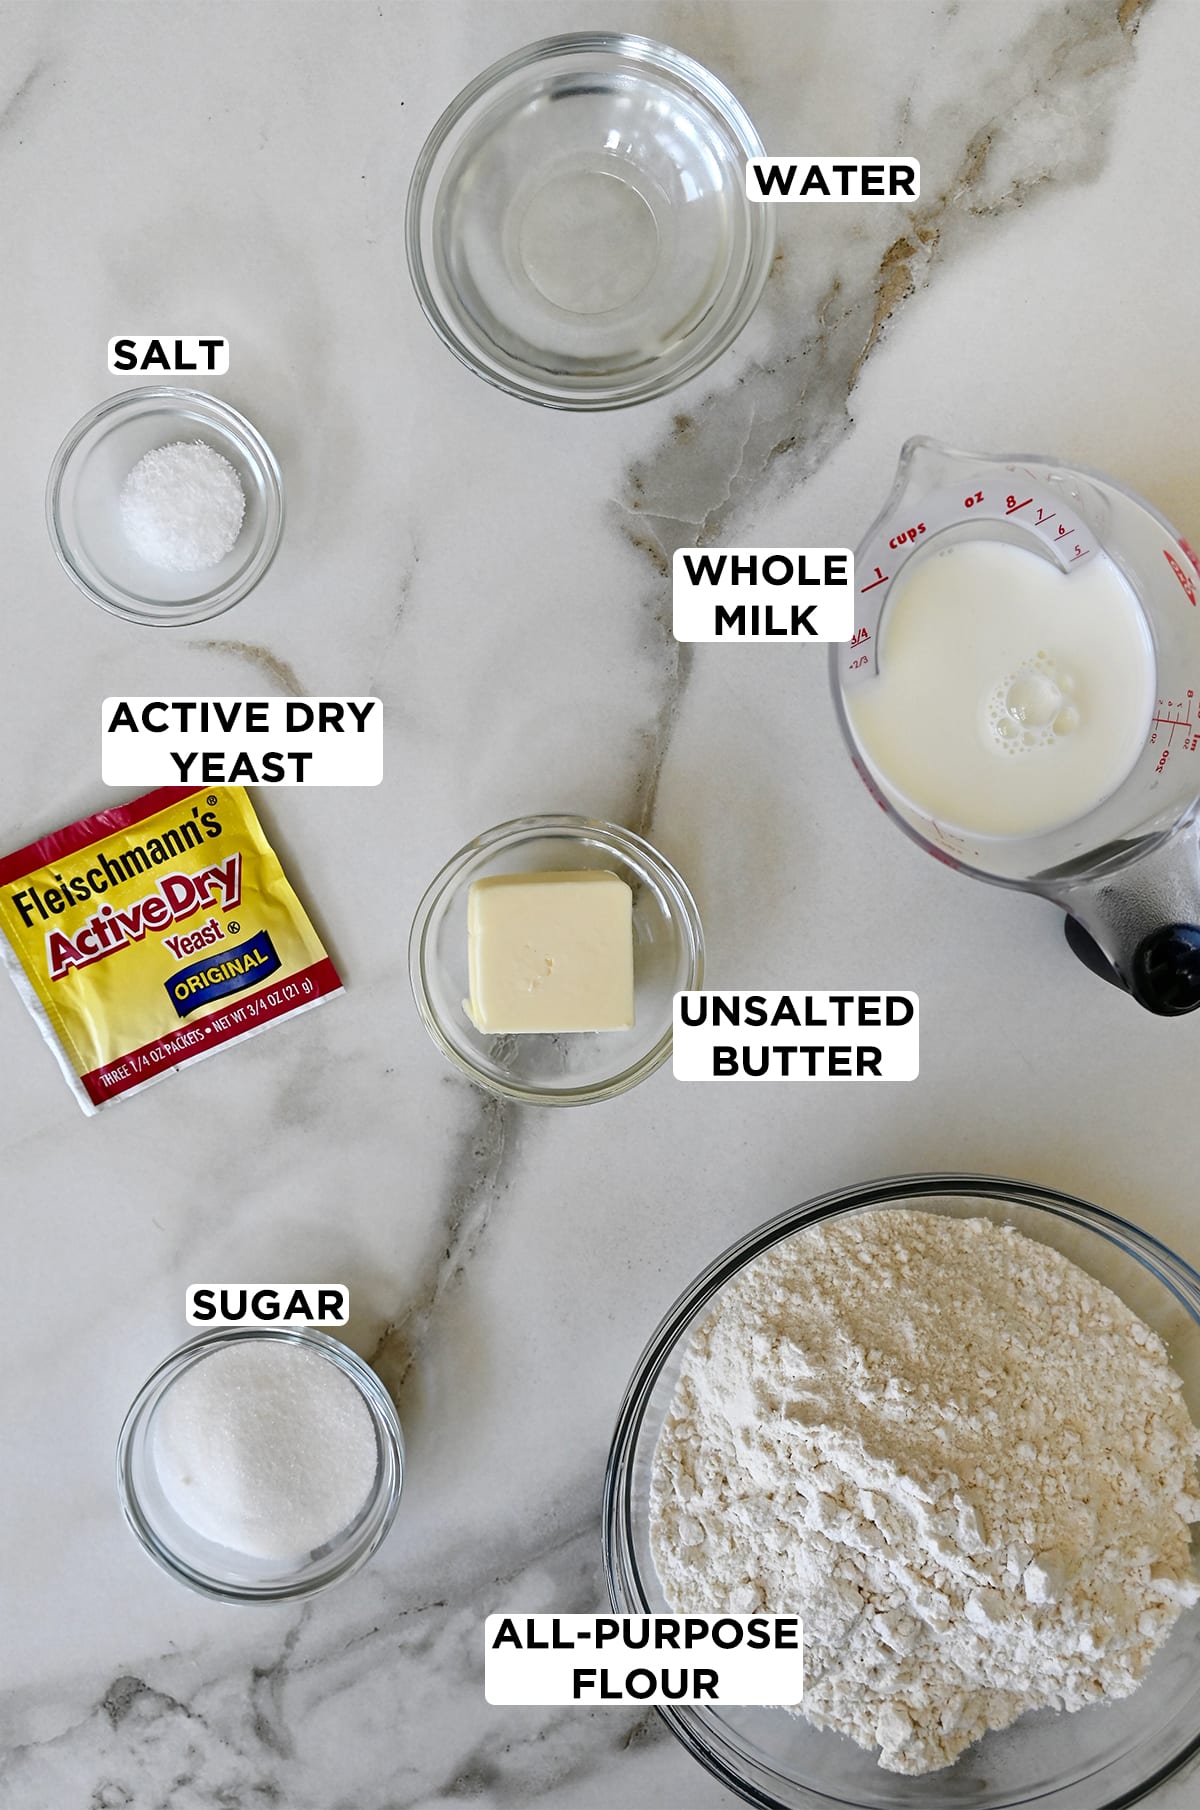
- Active dry yeast: This type of yeast needs to be dissolved in warm water to activate it. It helps the dough to rise and gives the bread its soft texture.
- Warm water (110°F): The warm water is used to activate the yeast. It helps dissolve the yeast and sugar, initiating fermentation. The ideal temperature of 110°F is necessary for the yeast to thrive. You can use a kitchen thermometer to ensure the water is at the correct temperature. If you don’t have a thermometer, aim for water that feels warm but not hot to the touch.
- Sugar: Sugar serves as food for the yeast. It fuels the fermentation process and enhances the flavor of the rolls.
- All-purpose flour: Flour is the primary structure of the rolls. It provides the necessary gluten to trap the carbon dioxide produced by the yeast, allowing the dough to rise and become airy. You can use bread flour for a slightly chewier texture, but all-purpose flour works well for soft dinner rolls.
- Salt: This adds flavor to the dough and also controls the fermentation process by slowing down the yeast activity. It prevents the dough from rising too quickly. You can adjust the amount of salt to your taste, but don’t omit it entirely.
- Whole milk: Milk adds moisture and a tender crumb to the rolls. You can use other types of milk, such as skim milk or plant-based alternatives like almond or soy milk, but whole milk gives the rolls a richer texture and flavor. If using a non-dairy milk, choose one with a neutral taste.
- Unsalted butter: Butter contributes to the flavor and richness of the dinner rolls. It also helps create a soft texture. You can substitute unsalted butter with salted butter, but if you do so, reduce the additional salt in the recipe to maintain the right balance.
- Large-flake sea salt (optional): This ingredient is optional and is used for garnish to add a touch of saltiness and visual appeal to the rolls. If you choose not to use it, your dinner rolls will still turn out delicious.
See the recipe card for full information on ingredients and quantities.
The recipe is flexible and can easily be doubled to feed a crowd or to have extra rolls on hand
- Activate the yeast. In the bowl of a stand mixer fitted with the dough hook, combine the warm water, yeast and sugar. Let the mixture stand for 5 minutes until it becomes frothy. This foamy yeast is the key to making your rolls rise.
- Prepare the dough. Add 1 cup of the flour, as well as the salt, whole milk and melted butter and beat for 2 minutes. Add an additional 1 cup of flour and beat on high speed for 2 minutes until the dough begins to form a ball. (If the dough is still very sticky, add an additional ¼ cup flour as needed.)
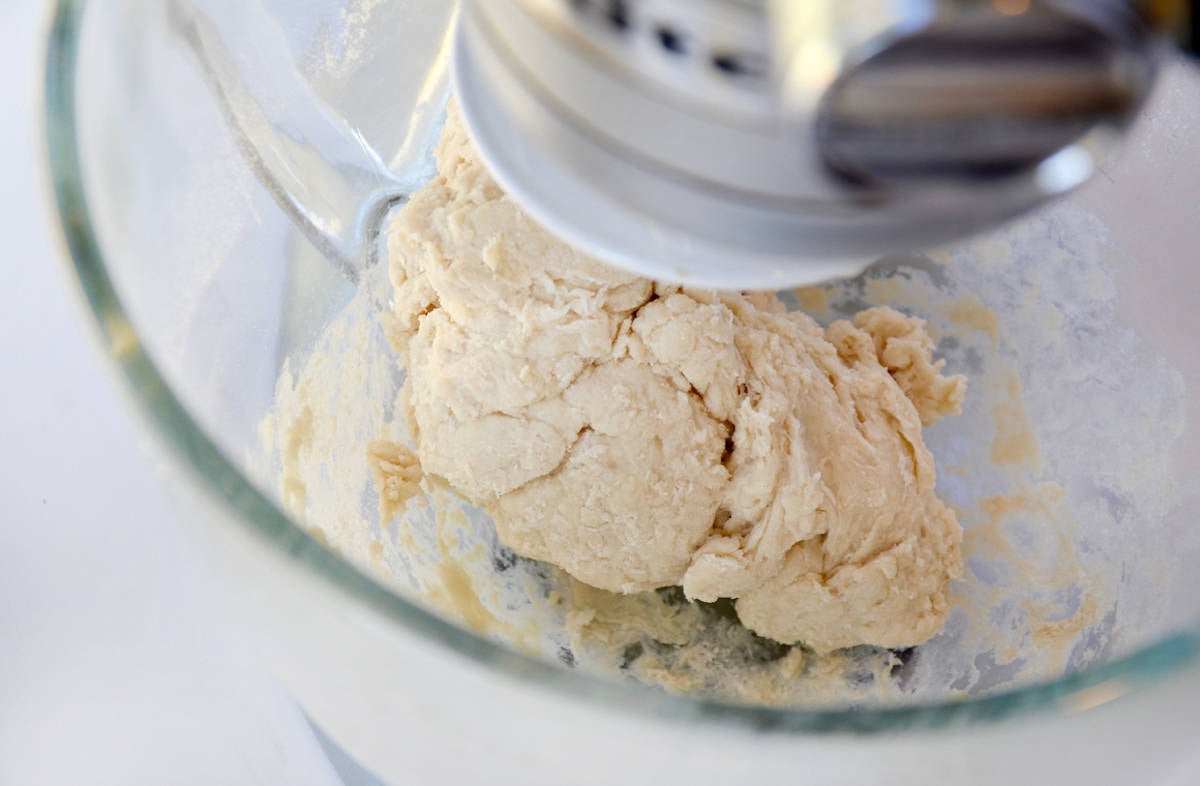
- Knead the dough. Lightly flour your work surface. Scrape the dough onto your work surface, and using the heel of your hand, knead it for 2 minutes.
Pro Tip: If the dough feels very firm and unpliable when you knead it, that’s a sign that it’s starting to become over-kneaded. Immediately stop and let it rest for 10-15 minutes. Allowing the dough to rest will give you a better shot at a more tender result.
- Let the dough rise. Place the dough in a greased bowl and cover the bowl with a towel or plastic wrap. Set the bowl in a dark, warm place for 30 minutes until it has doubled in size.
Kelly’s Note: My suggestion for the #1 best place to proof doughs of all kinds is in your dryer! Start by running your dryer for 5 minutes, and then turn it off (this is important!). Add the covered bowl of dough to the dryer and close the door. Your dough is now proofing in yeast’s dream environment: It’s warm. It’s dark. It’s humid.

- Shape the rolls. After the dough has risen, punch it down to release any air bubbles. Then, divide the dough into 12 equal pieces. Roll each piece into a ball and place them in a greased 8-inch round pan.
- Let the dough rise a second time. Cover the pan with a towel then return it to a dark, warm place for 30 minutes. This will allow the rolls to become even lighter and fluffier.
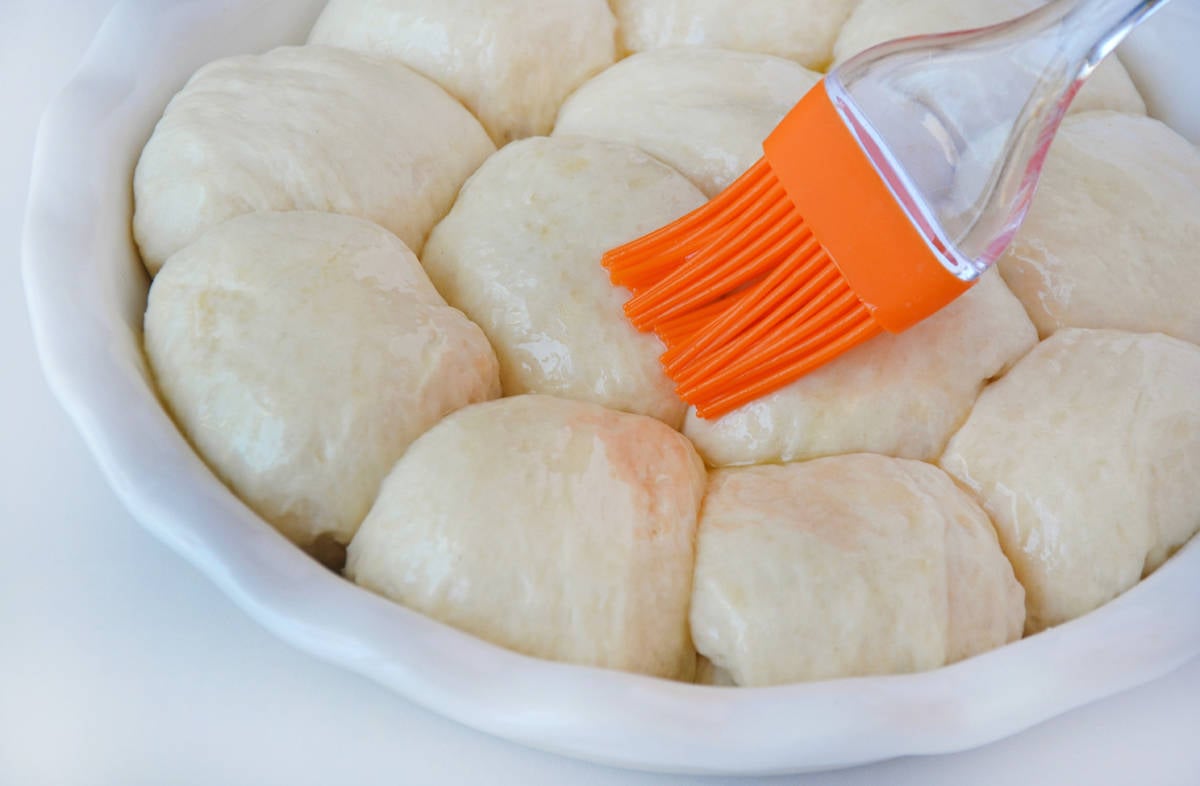
- Bake in a 375°F oven. Uncover the rolls, brush them with butter and then bake them for 20 to 25 minutes until they are golden brown and cooked through.
- Brush with butter and serve. Remove the rolls from the oven, brush them with additional melted butter and immediately sprinkle them with the sea salt (optional). Serve them warm.
Making yeast rolls ahead of time is a convenient way to enjoy fresh, homemade rolls without the stress of last-minute baking. Here’s how you can prepare yeast rolls in advance:
Freezer Instructions
- Prepare the dough: Follow the directions up until you place the (unbaked) rolls in the baking pan.
- Freeze the rolls: Tightly cover the pan with plastic wrap and then place them in a freezer-safe bag to minimize exposure to air. Yeast rolls can be frozen for up to 1 to 2 months.
- When ready to serve: Remove the rolls from the freezer and place them in the fridge overnight. This slow thawing process prevents the dough from becoming soggy and ensures it’s safe to consume.
- Room temperature rise: On the day you plan to serve the rolls, bring them to room temp to rise. This step is crucial for the rolls to regain their fluffy texture.
- Bake as directed: Once doubled in size, bake them as directed in the original recipe. They will emerge from the oven fresh, warm and ready to be enjoyed.
Overnight Instructions
If you plan to store yeast rolls in the refrigerator rather than freezing them, the method is somewhat different. When refrigerating dough, it’s more about slowing down the yeast’s activity to allow for extended proofing and flavor developmet. Here’s how you can refrigerate yeast rolls:
- Prepare the dough: Follow the directions up until you place the (unbaked) rolls in the baking pan.
- Refrigerate the rolls: Instead of freezing, you’ll place the covered pan with the rolls in the refrigerator. The cool temperature will slow down the yeast’s activity. The dough can remain in the refrigerator for up to 12-24 hours.
- When you’re ready to bake the rolls: Remove them from the refrigerator and allow them to come to room temp, which usually takes about 30 minutes.
- Bake as directed: Since the dough has had an extended period in the refrigerator, it may take a few minutes longer to bake than if you were baking them immediately. Watch for the rolls to turn golden brown.
- Instant Yeast: You can use instant yeast as a substitute for active dry yeast. Use the same amount, but there’s no need to dissolve it in water or wait for it to foam. Mix it directly with the dry ingredients.
- Check Yeast Activation: Make sure your yeast isn’t expired. After mixing the yeast with warm water and sugar, wait for it to foam (around 5-10 minutes). If it doesn’t foam, your yeast may be inactive and it’s best to start over with fresh yeast.
- Measure Accurately: Learn how to measure flour accurately. Baking is a science, and precise measurements are crucial!
- Knead the Dough: Kneading is essential for developing gluten and achieving the right texture. Knead the dough until it’s smooth and elastic, which usually takes around 7-10 minutes.
- Shaping the Rolls: Aim for consistency in size to ensure even baking. You can use a kitchen scale to weigh the dough for uniform rolls.
- Don’t Rush the Rise: Let the dough rise as specified in the recipe. Rushing this step can affect the texture and flavor of the rolls. Be patient, and let the yeast work its magic!
- Storing Leftovers: You can store leftover rolls in a sealed plastic bag for 1-2 days at room temp. However, keep an eye on the moisture and open the bags every now and then if they look like they’re getting too soft.
Common Questions
No stand mixer? No problem! Just mix the dough in a bowl until well combined and then knead it by hand for the time specified in the recipe.
The dough should feel smooth, slightly tacky, and elastic when properly kneaded. It should not be too dry or too sticky. To check, press your finger into the dough; it should spring back but leave a slight indentation. Achieving the right texture is essential for soft, fluffy dinner rolls.
Several factors could affect the rising process, such as expired yeast, improper water temperature or not giving the dough enough time to rise. Check these variables and adjust as needed.
Sure! Just omit all other salt.
Find more inspiration for hot, homemade carbs below!
- Easy Homemade Bread (No Yeast)
- Easy Homemade Bagels
- Easy Homemade Focaccia (No Yeast)
- Easy Homemade Soft Pretzels
- Easy Pull-Apart Pretzel Rolls
Ingredients
- 1 (1/4-oz.) packet active dry yeast
- 1/4 cup warm water (110°F)
- 2 Tablespoons sugar
- 2 cups all-purpose flour, plus more as needed
- 1/2 teaspoon salt
- 1/2 cup whole milk
- 2 Tablespoons unsalted butter, melted, plus more for brushing
- Large-flake sea salt (optional)
Instructions
- In the bowl of a stand mixer fitted with the dough hook, combine the warm water, yeast and sugar. Let the mixture stand for 5 minutes.
- Add 1 cup of the flour, as well as the salt, whole milk and melted butter and beat for 2 minutes.
- Add an additional 1 cup of flour and beat on high speed for 2 minutes until the dough begins to form a ball. (If the dough is still very sticky, add an additional ¼ cup flour as needed.)
- Lightly flour your work surface. Scrape the dough onto your work surface, and using the heel of your hand, knead it for 2 minutes then place the dough in a greased bowl and cover the bowl with a towel. Set the bowl in a dark, warm place for 30 minutes until it has doubled in size.
- Grease an 8-inch round pan with cooking spray or butter.
- Divide the dough into 12 pieces then roll each piece into a ball and arrange the balls in the prepared pan. Cover the pan with a towel then return it to a dark, warm place for 30 minutes.
- Preheat the oven to 375°F. Uncover the rolls then bake them for 20 to 25 minutes until they are golden brown and cooked through.
- Remove the rolls from the oven, brush them with additional melted butter and immediately sprinkle them with the sea salt (optional). Serve them warm.
Kelly’s Notes
- Make sure your yeast isn’t expired. After mixing the yeast with warm water and sugar, wait for it to foam (around 5-10 minutes). If it doesn’t foam, your yeast may be inactive and it’s best to start over with fresh yeast.
- If the dough feels very firm and unpliable when you knead it, that’s a sign that it’s starting to become over-kneaded. Immediately stop and let it rest for 10-15 minutes. Allowing the dough to rest will give you a better shot at a more tender result.
- Make-Ahead Instructions: If you want to prepare the rolls in advance, follow the directions up until you place the (unbaked) rolls in the baking pan then tightly cover the pan with plastic wrap. The dough can remain in the refrigerator for up to 12-24 hours or in the freezer for up to 2 months. If you’ve refrigerated the rolls, remove them from the refrigerator and allow them to come to room temp, which usually takes about 30 minutes. Baked as directed. If you’ve frozen the rolls, remove the rolls from the freezer and place them in the fridge overnight then bring them to room temp to rise before baking them as directed.
- You can store leftover rolls in a sealed plastic bag for 1-2 days at room temp. However, keep an eye on the moisture and open the bags every now and then if they look like they’re getting too soft.
- ★ Did you make this recipe? Don’t forget to give it a star rating below!
Nutrition
Did you try this recipe?
Leave a comment below with your star rating!
This post may contain affiliate links.


This is my favorite recipe for yeast rolls. Hadn’t made them in a while and forgot where I saw the recipe. I am happy I found it. It would be good to add a Pinterest pin button so I could keep it with my other recipes.
So glad you enjoyed the recipe, Patricia! There is a red Pinterest icon on each photo, which allows you to pin it.
This recipe is wonderful! They turned out perfect and so very easy to make. I would not change a thing. Thank you for giving us such a great dinner roll recipe. My husband loved them! He thought I bought them! lol
I have a tip I saw on All recipes U-Tube video. When need to let the dough rise, put the mixed dough in your instant pot on the yogurt setting for the time needed for the dough to rise. Do not add anything other than the dough. Close the lid and let the magic happen.
Thanks again
Great tip, Patsy! Thank you for sharing!
I’m looking for a recipe that is like the yeasty light rolls I had at the school cafeteria. This is my second try and this isn’t it. I liked the.salt on the rolls. It was a little dense. Probably my fault. And I had to let it rise longer than 30 minutes. Good flavor though. I’m glad I tried it but am still looking.
My young grandchildren love these dinner rolls. They call them Papa Rolls. I have made them several times and they turn out perfect every time.
Love reading this, Donnie!
This is a wonderful recipe. Made rolls for the first time using it. Wasn’t hard at all, smelled amazing, and tasted wonderful. Will definitely be my got to. They weren’t the prettiest ( work in progress here) delicious!!
So glad you enjoyed it!
I made these for a dinner party of 20. I picked this recipe be cause it seemed easy to double and quick. According to your instructions I should have been finished in about 3 hours at the most. Actually it took six and a half hours. Your rising time of 30 minutes is way off unless like you said you put them in the dryer but I don’t have a dryer. Also in the spring I don’t have the heat on so my house was about 70° not toasty at all which it would have had to been to rise in 30 minutes it took about two and a half hours for each rise. The only thing that saved me was I googled how long does it take bread to rise and it provided some much-needed information. Also when I was reading through your article just now you state that you should brush the rolls with butter just before you bake them. That is not in your recipe directions. For those two reasons I gave the recipe a three because I felt like it wasn’t very accurate. However they smell divine and I am hoping they will be delicious.
Wish I could give 10 stars!!! So easy to make (surprisingly) and the result was heavenly. Adding this to our regular rotation. Thanks!
Love reading this, Eliza! Thank you!
This is my to go dinner rolls recipe always wins
Love reading this, Tahani! Thank you!
Not a fan! Have made dinner rolls for many years, but will go back to my original recipe or frozen.
Followed all the instructions, and ended up with not a great result!
I’m sorry you didn’t enjoy the recipe, Jan.
First time at succeeding in making delicious dinner rolls. Made them yesterday for our daughter in laws birthday, she loves bread, her comment was “just put a candle in those rolls and call it my bd cake”…lol….I forgot to save the recipe, took a bit searching, but thankful i finally found it…a 5 star recipe.
Love reading this, Dora!
i made the rolls at first they were awesoe but then i made cinnamon rolls out of it and they are the best i have made or eaten my husband really likes them to .Finally a good recipe for a beginner like me we have had some doozies .thank u
I’m so glad you enjoyed the recipe, Cathy!
I made your rolls they came so soft and perfect I like s roll recipe just limit amount of flour and your recipe was right for it
So glad you enjoyed the recipe, Rita!
I had tried a different Dinnr Rolls recipe that didn’t taste very good. But when I tried this recipe, we ate them before they cooled. This is an excellent recipe for me.
I’m so glad you enjoyed the recipe, Cynthia!
what can you use if you don’t have a dough hook?
Hi Darnell! You could try mixing it by hand.
These are my go to rolls from now on. I made a double batch for Thanksgiving. They were a HIT! I love how easy it is to make variations too. Thanks for sharing. I never thought I’d be a baker!
Woohoo! I’m so thrilled you’ve been enjoying the recipe, Kayti!
Great dinner rolls, will definitely make them again!
I’m so thrilled you enjoyed the recipe, Louise!
These are sooo delicious and so easy to make!
I’m so glad you enjoyed the recipe, Jennifer!