All you need is 30 minutes and a few simple ingredients to whip up a family-favorite recipe for The Best Cheddar Biscuits. They’re light, flaky, cheesy and, best of all, easy to make. The secret to biscuit-making success comes down to my top tip for rolling and folding the dough like a pro. Make them today then serve up biscuit sandwiches all week long!
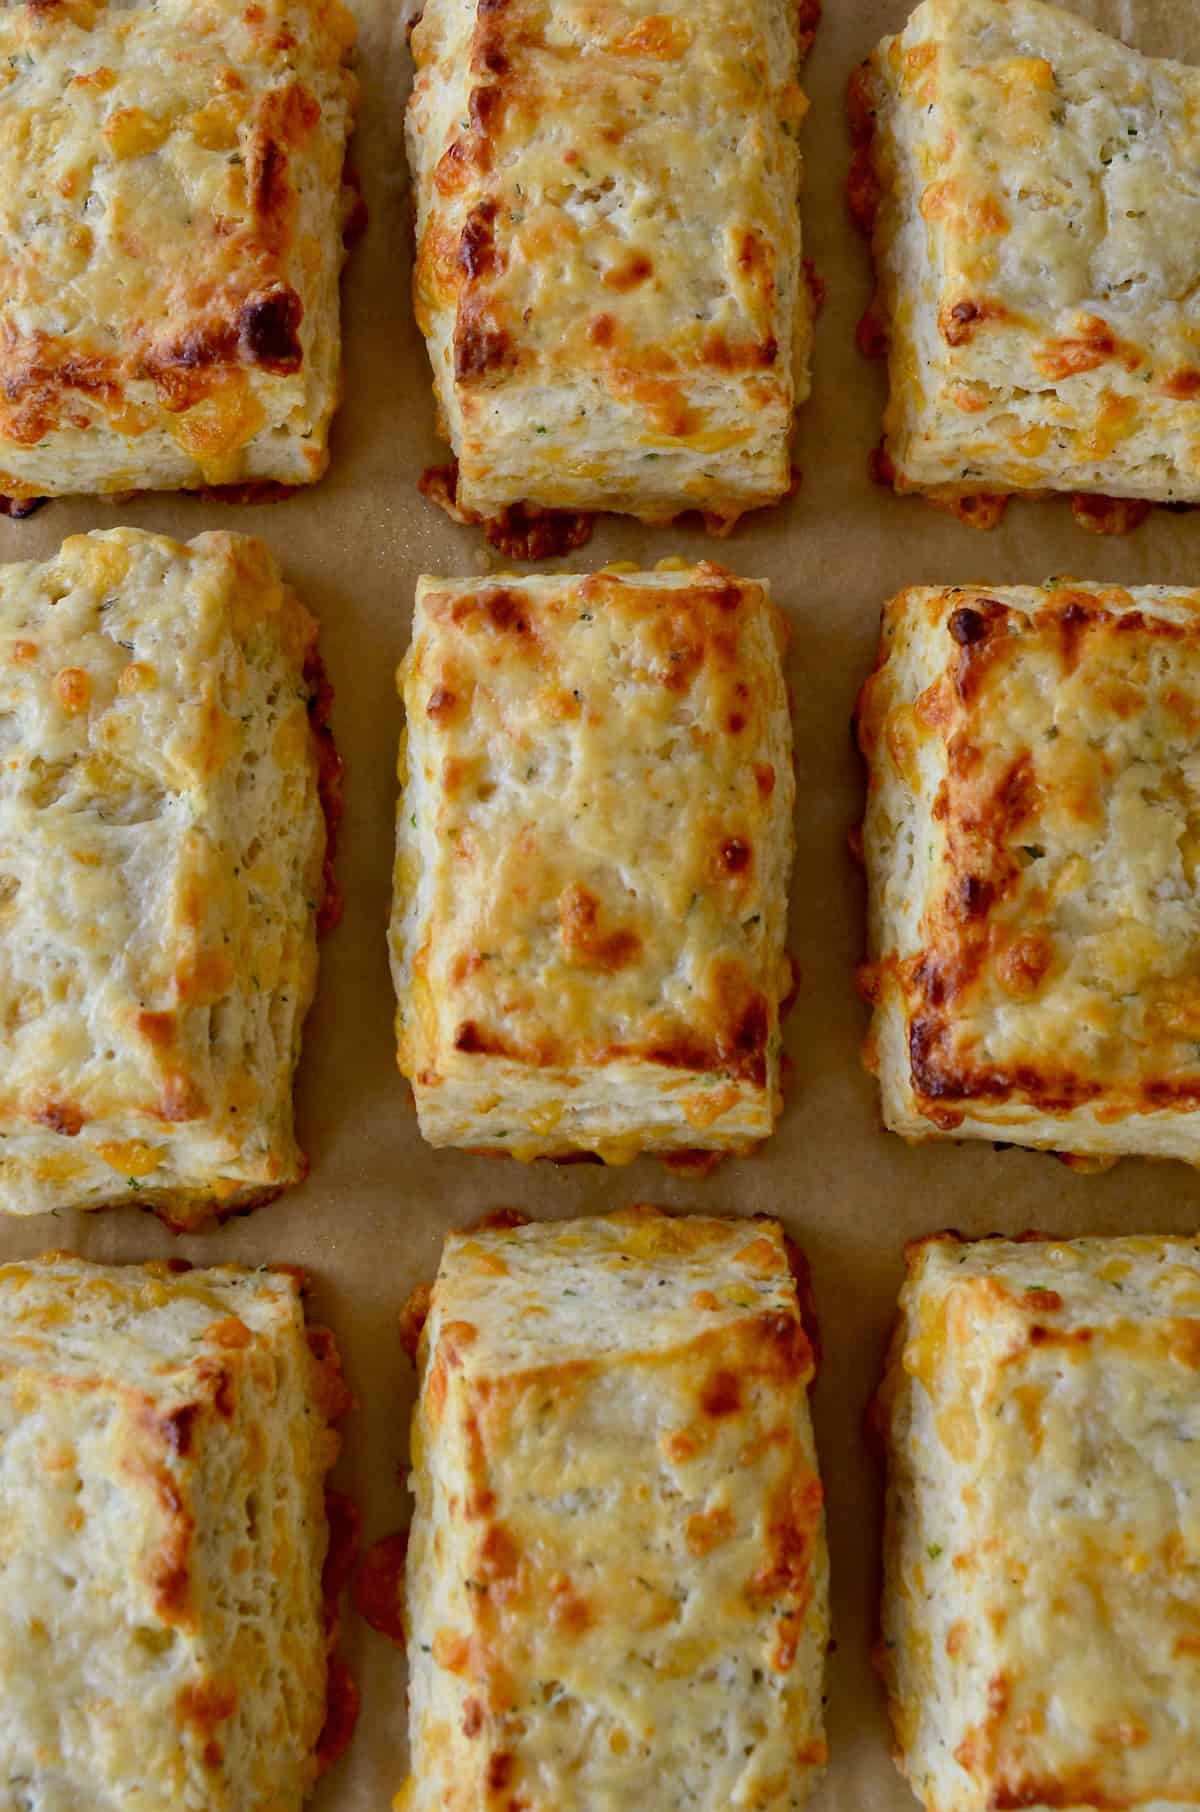
Table of Contents
Certainly, canned biscuits have their place in my kitchen. I love using them as a shortcut ingredient for recipes like air-fryer doughnuts and easy monkey bread. But when it comes to homemade carbs, few recipes surpass my love of light and fluffy cheddar biscuits.
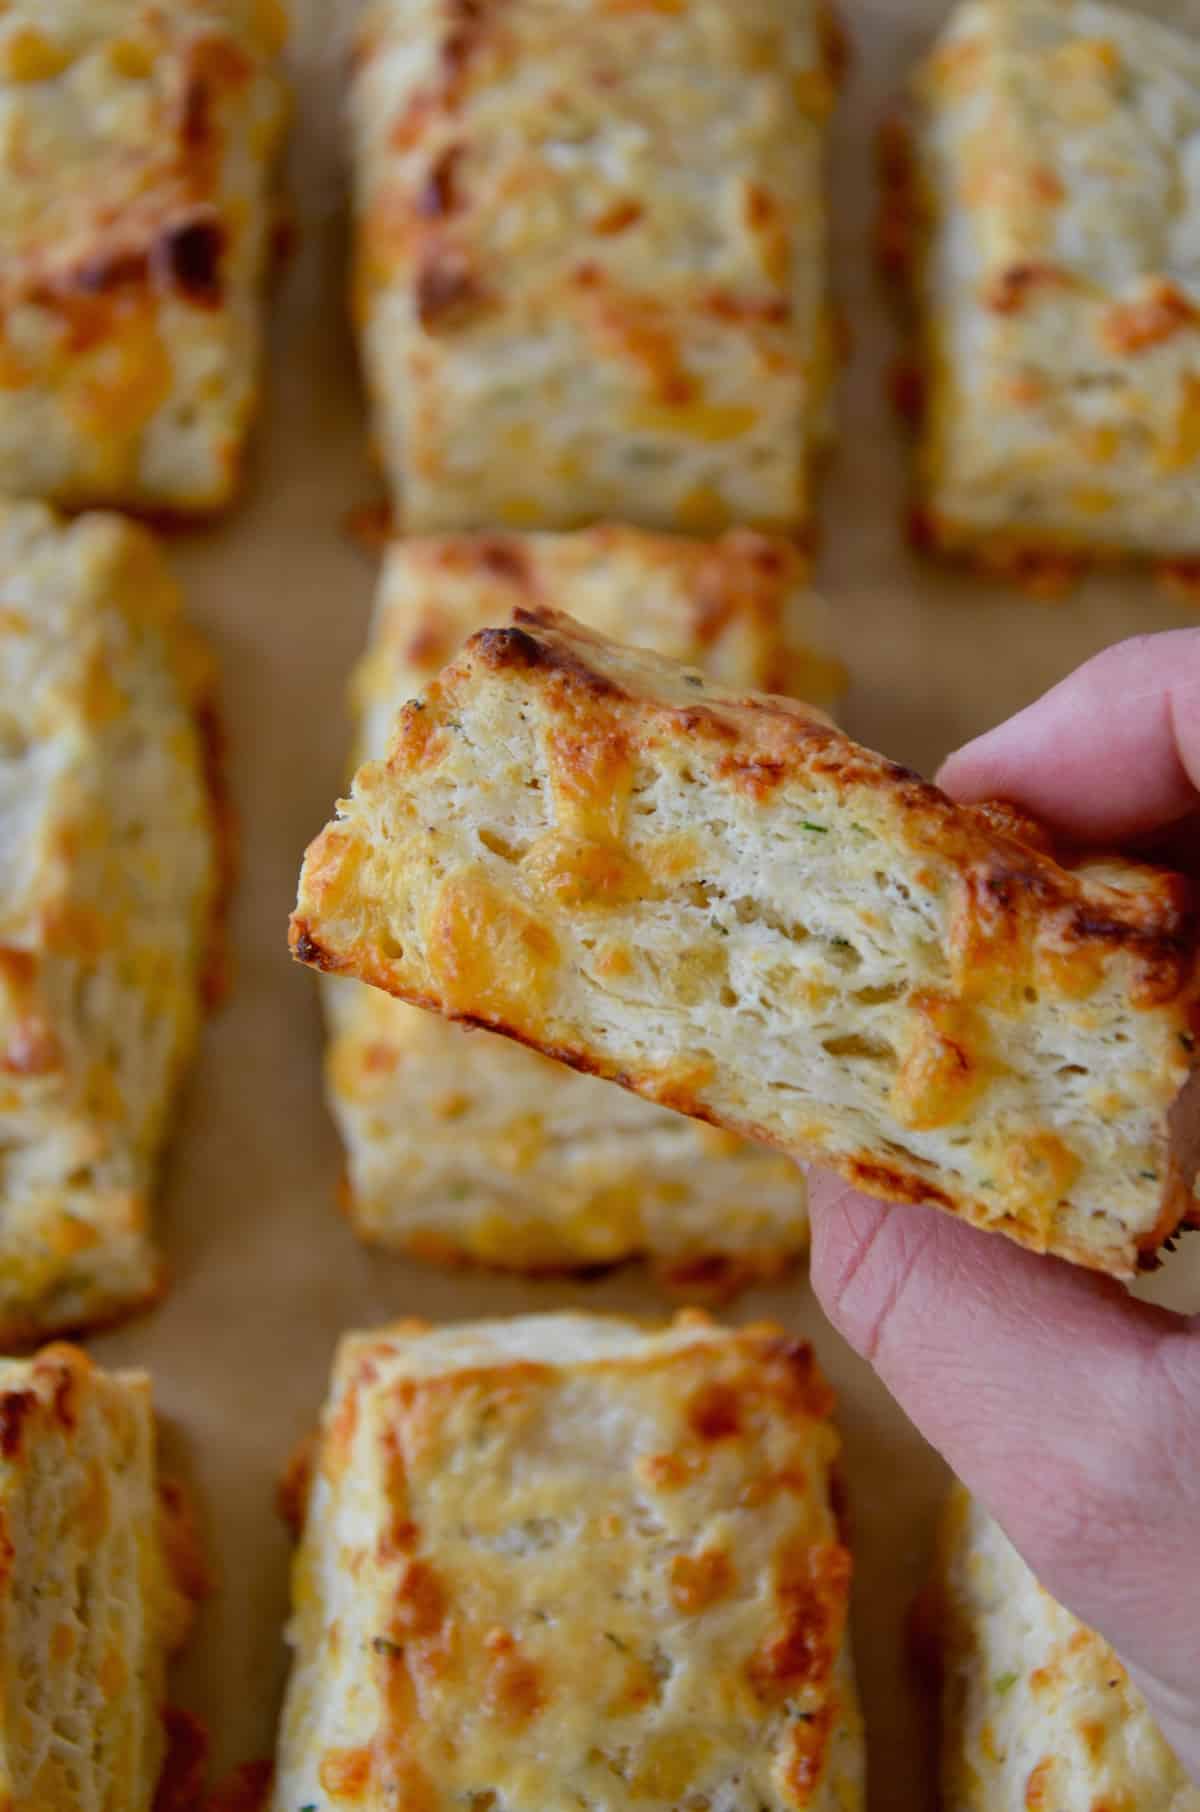
There’s just something therapeutic about about peeling apart the stacked layers of butter, cheese and chives, and knowing that your very hands created this perfect marriage of flour and fat.
Homemade biscuits are so much better than their canned counterparts. They have a loftier, flakier texture, a fresher flavor since they’re made with real ingredients and no preservatives, and you can customize them with a variety of cheese, herbs, and other ingredients.
So grab the flour, cheddar, and chives then preheat your oven for The Best Cheddar Biscuits, which are perfect for snacking or serving alongside soup, salad or entrées of all kinds.
What’s to Love
- Irresistibly flaky. My fold technique ensures the dough is layered into yummy pull-apart flakes.
- Buttery flavor. Plenty of unsalted butter plus buttermilk enriches these biscuits.
- Made with just 10 ingredients.
- Quick to prep and bake. In just about 30 minutes, you can have warm herb and cheese biscuits on your table.
- Loaded with cheesy goodness.
- All-purpose flour: For the best results, measure the flour using the scoop-and-sweep method.
- Baking powder: This leavening agent interacts with the acidity in the buttermilk for lofty biscuits.
- Sugar: A tiny bit of granulated sugar slows down the development of the gluten for a tender biscuit.
- Garlic powder: Adds a mellow garlicky flavor without being overpowering.
- Salt: Kosher salt balances and enhances the flavor.
- Pepper: Black pepper adds a spicy kick.
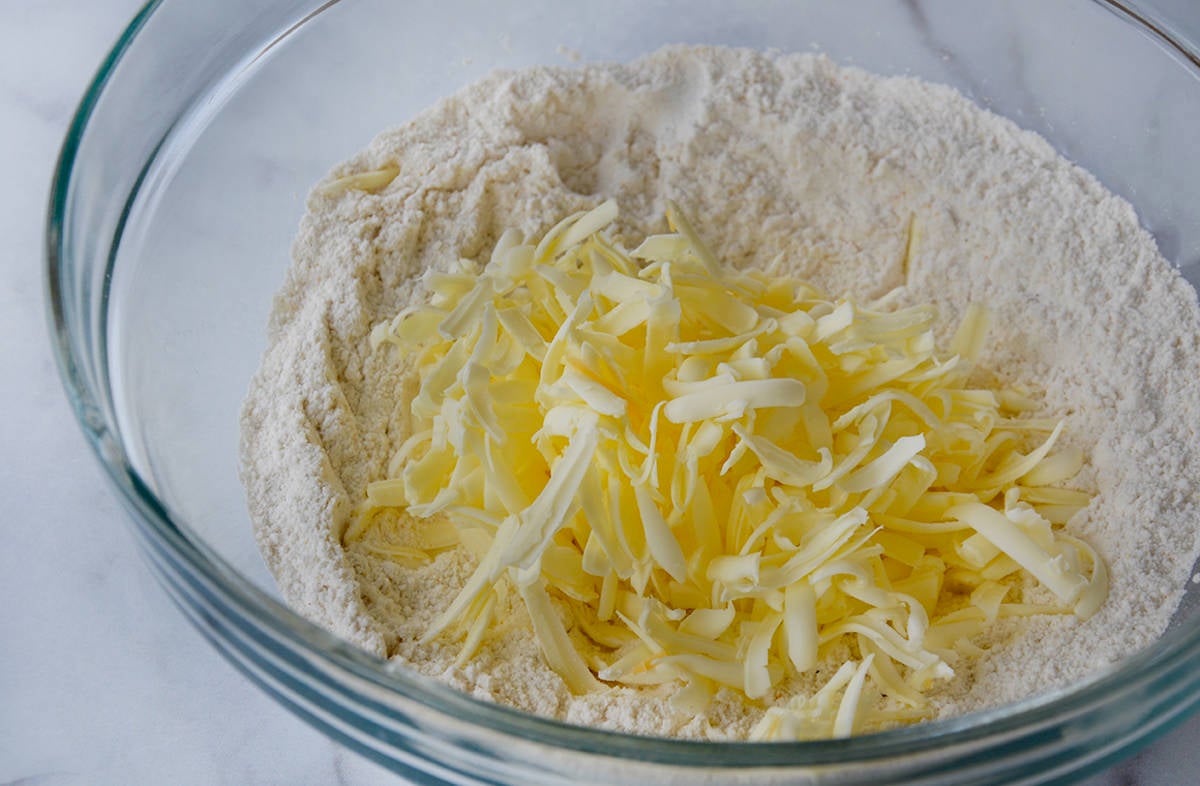
- Butter: Make sure the butter is super-cold so it grates easily. Keeping the butter cold is crucial for achieving a flaky texture.
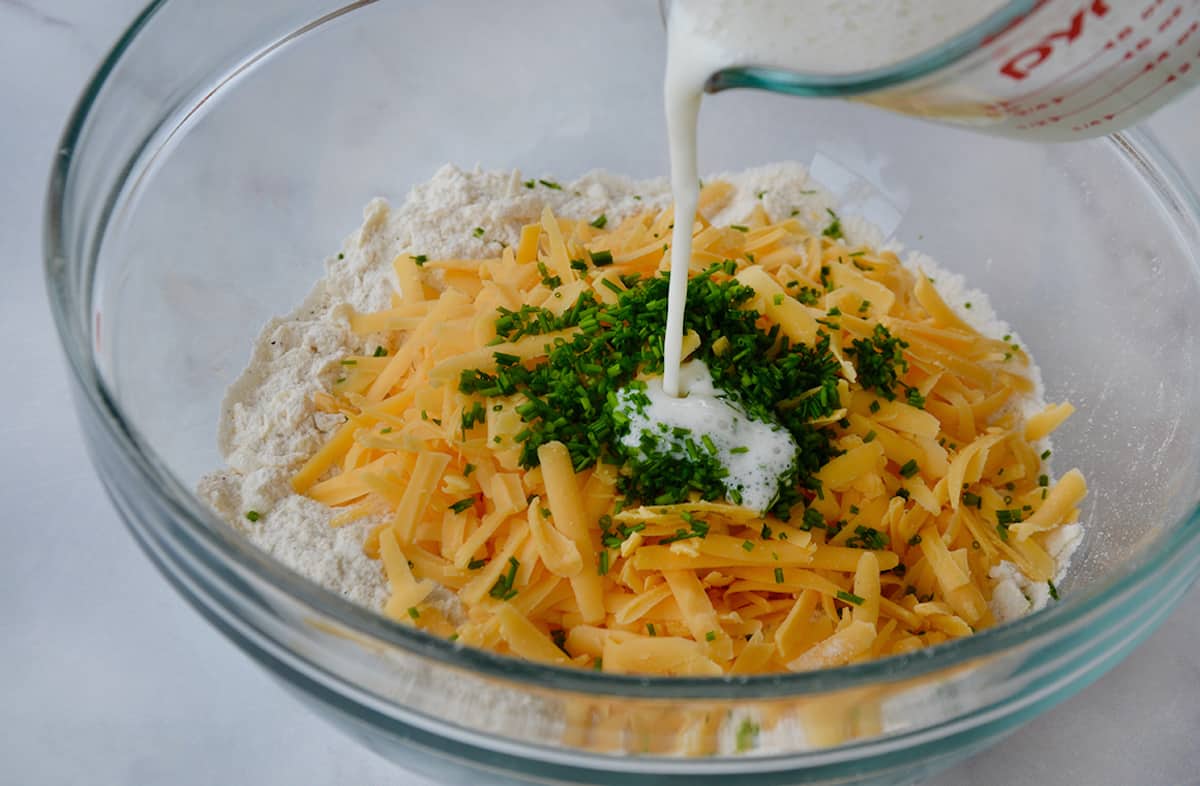
- Buttermilk: The acidity of the buttermilk is crucial to activate the leavening power of the baking powder. You’ll also brush the tops of your cheddar biscuits with buttermilk, which helps achieve a golden-brown color during baking. Save leftover buttermilk to use in ranch salad dressing or freeze it for future use.
- Cheddar cheese: I recommend using a high-quality cheddar and taking the extra step to grate it yourself for the best flavor and meltability. Both sharp and mild versions work in this recipe.
- Chives: A sprinkling of fresh chives adds a bright herby flavor. If you’re using dried chives, you’ll need less since dried herbs are more potent than fresh.
See the recipe card for full information on ingredients and quantities.
Pro Tip: Put the butter in the freezer 15 to 30 minutes before you’re about to make the biscuits so it is firm enough to grate.
Success Tip 1: Use cold fat.
When it comes to making biscuits from scratch, there are a few tricks that separate decent biscuits from slam-dunk biscuits, and it all starts with a simple kitchen gadget: the box grater.
Freezing and then grating the butter allows the cold fat to be evenly distributed within the biscuits, and the result is flaky layers and buttery pockets in every light bite.
Success Tip 2: Fold and roll the dough.
The second most important on the list of tips for mastering cheddar biscuits is the folding and re-rolling of the dough (a.k.a. lamination).
Much like croissants, biscuit dough benefits from being rolled, folded and then re-rolled. It’s this repetitive process that stacks all the layers atop one another, yielding the flakiest possible biscuits.

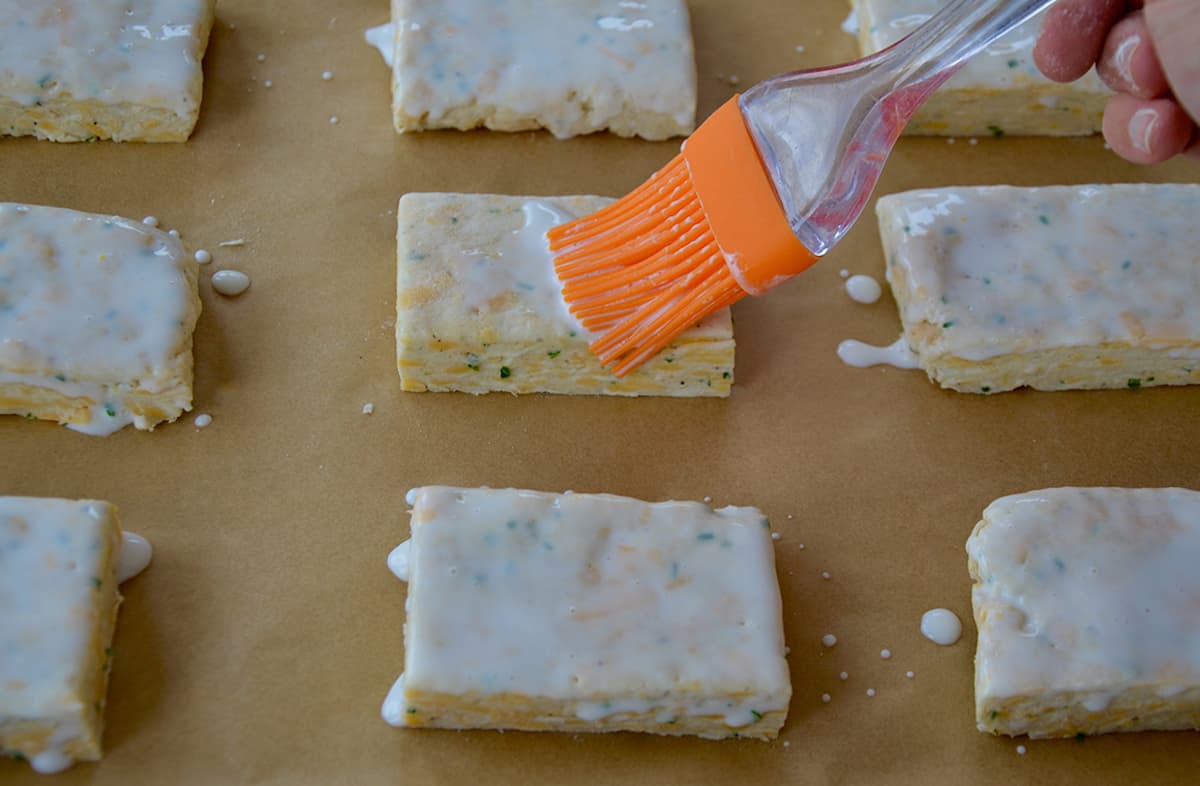
Success Tip 3: Brush with buttermilk.
And last but not least on your path to biscuit domination: the final brush of buttermilk. A thick coating of the cool milk not only adds moisture but ensures your biscuits will achieve the essential golden brown top.
- After cutting out the biscuits, let them chill in the freezer for 15 minutes. This step preserves flakiness by allowing the butter layers to re-solidify and helps maintain the biscuits’ shape during baking.
- No buttermilk? No problem! I have an entire post on buttermilk substitutions. Milk can be combined with lemon juice, vinegar, yogurt or other acidic ingredients for a substitute. I also like to have powdered buttermilk on hand so I can make biscuits or buttermilk pancakes at a moment’s notice.
- If using dried chives, use a smaller amount. Because dried herbs are more potent than fresh, you’ll only need 1 ½ teaspoons of dried chives.
- Don’t overwork the dough. The key to tender biscuits is keeping the dough cool and working it just enough to combine the ingredients. The butter needs to stay solid until the biscuits go in the oven or the texture will be heavy and gummy.

- Store: Leftovers can be stored at room temperature in an airtight container or sealable plastic bag for up to 3 days.
- Freeze: Baked biscuits can be frozen for up to 3 months. To freeze, place the cooled biscuits on a baking sheet and place in the freezer until frozen solid, then transfer to a plastic freezer bag or airtight container.
- Make-Ahead: The dough is freezer-friendly before baking and before brushing with buttermilk. Freeze the individual cut portions on a baking sheet until solid, then transfer to a sealable plastic freezer bag. The dough can be stored in the freezer for up to 3 months. You can bake them from a frozen state; add about 5 more minutes to the bake time.
Flaky cheddar biscuits are a versatile side dish that can be served alongside your favorite Thanksgiving recipes, alongside barbecue, seafood or hearty soups. Here are some of my favorite pairings:
- Slow Cooker Hawaiian Pulled Pork
- Salsa Corn Chowder
- Grilled Buffalo Shrimp
- Oven-Baked Baby Back Ribs
- Creamy Homemade Tomato Soup
- Homemade Sausage Gravy – Smother this rich, creamy gravy over your biscuits for a cheesy twist on biscuits and gravy!
Common Questions
If you don’t have it on hand, you can make your own buttermilk using milk and an acidic ingredient like vinegar or lemon. Powdered buttermilk also works in this recipe.
Leftover cheddar biscuits will stay fresh for up to 3 days, stored in an airtight container at room temperature.
You can use a food processor to make biscuit dough, but make sure not to overwork the dough or it will become tough. Pulse the dry ingredients in the food processor until combined. Then add the butter and pulse just until it forms the consistency of small pebbles. With the motor running, add the buttermilk, cheese and chives, just until the dough comes together. Remove the dough from the food processor and roll it out as the recipe directs.
Bacon is a great addition to cheddar biscuits, especially if you’re serving them at breakfast or brunch! Use my recipe for bacon cheddar biscuits for the full instructions.
- Easy Homemade Soft Pretzel Bites
- The Complete Guide to Easy Homemade Bagels
- Cheesy Pull-Apart Garlic Bread
- Easy Scallion Pancakes with Soy Dipping Sauce
- Simple Skillet Cornbread
- Gruyere Chive Popovers
Craving more? Subscribe to Just a Taste to get new recipes, meal plans and a newsletter delivered straight to your inbox! And stay in touch on Facebook, TikTok, Pinterest and Instagram for all of the latest updates.
Ingredients
- 2 cups all-purpose flour, plus more for dusting work surface
- 1 Tablespoon baking powder
- 1 teaspoon white sugar
- 1 1/2 teaspoons garlic powder
- 1/2 teaspoon kosher salt
- 1/4 teaspoon black pepper
- 1/2 cup (1 stick) unsalted butter, cold
- 3/4 cup buttermilk, cold, plus more for brushing biscuits
- 2 cups freshly grated cheddar cheese
- 1 1/2 Tablespoons chopped fresh chives
Instructions
- Line a baking sheet with parchment paper.
- In a large bowl, whisk together the flour, baking powder, sugar, garlic powder, salt and pepper.
- Grate the butter on the large hole of a box grater. (Alternately, dice it into small cubes.)
- Add the butter to the bowl with the flour, and using your fingers, work the butter into the flour until the texture resembles small pebbles.
- Add the buttermilk, shredded cheddar cheese and chives, and using a spatula, mix together the ingredients just until combined.
- Lightly flour your work surface then turn out the dough. Using your hands, gather and knead the dough just until it is cohesive. (Do not overknead the dough.)
- Using a rolling pin, roll out the dough until it’s 1/2-inch thick. Fold it into thirds (like a letter) then rotate the dough 90° and roll it out again until it is a 10×6-inch rectangle that’s 3/4-inch thick.
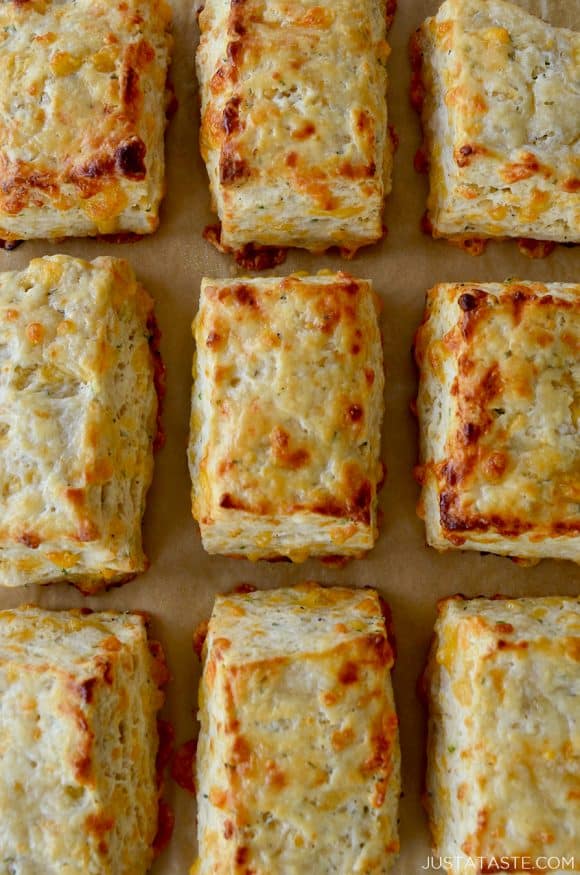
- Using a sharp knife, cut the rectangle into 9 rectangular biscuits. Arrange the biscuits on the prepared baking sheet then brush the tops of them with buttermilk. Place the baking sheet in the freezer for 15 minutes.
- Preheat the oven to 425°F.
- Bake the biscuits until they are golden brown and no longer doughy, 15 to 18 minutes. Remove the biscuits from the oven and serve.
Kelly’s Notes
- No buttermilk? No problem! Add 1 tablespoon of lemon juice or vinegar to a liquid measuring cup, then pour in milk (any variety) up to the “1 cup” mark. Stir the mixture then let it sit for 5 minutes until it curdles and thickens slightly, then proceed with the recipe as directed.
- Put the butter in the freezer 15 to 30 minutes before you’re about to make the biscuits so it is firm enough to grate.
- Don’t overwork the dough. The key to tender biscuits is keeping the dough cool and working it just enough to combine the ingredients. The butter needs to stay solid until the biscuits go in the oven or the texture will be heavy and gummy.
- Store: Leftovers can be stored at room temperature in an airtight container or sealable plastic bag for up to 3 days.
- Freeze: Baked biscuits can be frozen for up to 3 months. To freeze, place the cooled biscuits on a baking sheet and place in the freezer until frozen solid, then transfer to a plastic freezer bag or airtight container.
- Make-Ahead: The dough is freezer-friendly before baking and before brushing with buttermilk. Freeze the individual cut portions on a baking sheet until solid, then transfer to a sealable plastic freezer bag. The dough can be stored in the freezer for up to 3 months. You can bake them from a frozen state; add about 5 more minutes to the bake time.
- ★ Did you make this recipe? Don’t forget to give it a star rating below!
Nutrition
Did you try this recipe?
Leave a comment below with your star rating!
This post may contain affiliate links.
Recipe by Kelly Senyei of Just a Taste. Please do not reprint this recipe without my permission. If you'd like to feature this recipe on your site, please rewrite the method of preparation and link to this post as the original source.


I had issues with this recipe. When I went to cut them, I felt they were way too big, and ended up cutting them into 12 biscuits. They hardly rose at all in the oven, and weren’t thick enough to even slice in half. Also, the center was too much cheese and not enough biscuit
Hi Sharon! It sounds like your leavener wasn’t fresh or you didn’t laminate the dough as directed in the recipe. They should definitely rise if you leavener is fresh/working!
Your butter measurements are different to here in NZ, how much does one stick of butter weigh, in ounces or metric measurements please, as I wish to try this recipe.
Hi Glenyss! One stick of butter (1/2 cup) equals 113 grams. :)
I made these last night and my husband and I loved them. Thank you.
You are so welcome, Jody! I’m thrilled you and your husband enjoyed the recipe!
I am an absolute amateur in the kitchen, these were easy and perfect! Thanks for the great recipe!
I’m so glad you enjoyed the recipe, Beth! :)
Absolutely the best cheddar biscuits I’ve ever made and eaten! My husband requests that I make them at least once a week. He says they remind him of the cheddar scones he used to have as a kid in England. Since I make them so often I usually use dried chives and they come out perfect!
Love reading this, Tammy! I’m thrilled you and your husband have been enjoying the biscuits!
I really enjoyed these! I did have a quick question. I was want to make these a few days ahead of time for a church potluck. Would if be best to freeze the dough after rolling and cutting or should I freeze them after baking?
So glad you’re enjoying the recipe, April! I’d freeze them before baking :)
Can you substitute the Buttermilk by using Heavy Cream?
Hi! You’ll need the acidity in the buttermilk to react with the leavener. You can make a quick version by adding 1 tablespoon lemon juice or vinegar to a liquid measuring cup, then pour in milk up to the 1 cup mark. Let the mixture sit for 5 minutes, then use 3/4 cup for this recipe and save the rest for another use. And just in case you don’t have lemon juice on hand, here’s a link to even more dairy and non-dairy buttermilk substitutes: https://www.justataste.com/what-can-i-substitute-for-buttermilk/
Just outstanding from someone who has made biscuits a million different ways. The creation of layers with folding adds a great dimension — lemellae. Grating the frozen butter is messy, but effective. Terrific flavor, nice and flaky. We used habanero cheddar, which added a nice kick.
I’m so thrilled you enjoyed the recipe, Jim! And habanero cheddar sounds amazing!
Really enjoyed these and super easy to make.
Really moreish
Have enjoyed dipping in cream of tomato soup
I’m so glad you enjoyed the recipe, Jean!
Made these biscuits for my family a couple weeks ago and served them with seafood chowder! Tonight we are having lobster and they requested these same biscuits! A huge hit for us! Thanks for sharing!! ❤️
YUM! I’m thrilled your family has been enjoying the biscuits, Jennifer!
Hi Kelly,
Just made these biscuits and they are delicious, thank you for the recipe.
One question, how do I store them and or freeze them baked, please advise?
Thank you,
Eileen
I’m so thrilled you enjoyed the recipe, Eileen! The biscuits can be stored at room temperature in an airtight container or sealable plastic bag for up to 3 days. You can also freeze the baked biscuits for up to 3 months. To freeze, I recommend freezing them in a single layer on a baking sheet before transferring them to a plastic freezer bag or airtight container.
It deserves 10Stars but…ingredients call for Buttermilk….but presentation pics mention heavy cream on top before bake…so Heavy cream and buttermilk are not the same….please guide me!
Thanks for catching that, Jorge! Buttermilk on top works (as does heavy cream!). We’ve updated the recipe.
No sir they are not.
This recipe is a keeper! So easy to follow and the biscuits were absolute perfection.
I’m so thrilled you enjoyed the recipe, Amy!
can these be made ahead and frozen? If so, what is the baking instructions from frozen?
Absolutely, Lana! You’ll just need to add about 5 more minutes to the bake time when baking them from a frozen state.
Hi there! These sound delish! Can you skip the sugar? I am cutting out all sugar (honey & maple syrup included) all together.
Absolutely!
Hi just wanted to know can you use normal full cream milk instead of butter milk?
Hi Louise! You’ll need the acidity in the buttermilk to react with the leavener. You can make a quick version by adding 1 tablespoon lemon juice or vinegar to a liquid measuring cup, then pour in milk up to the 1 cup mark. Let the mixture sit for 5 minutes, then use 3/4 cup for this recipe and save the rest for another use. And just in case you don’t have lemon juice on hand, here’s a link to even more dairy and non-dairy buttermilk substitutes: https://www.justataste.com/what-can-i-substitute-for-buttermilk/