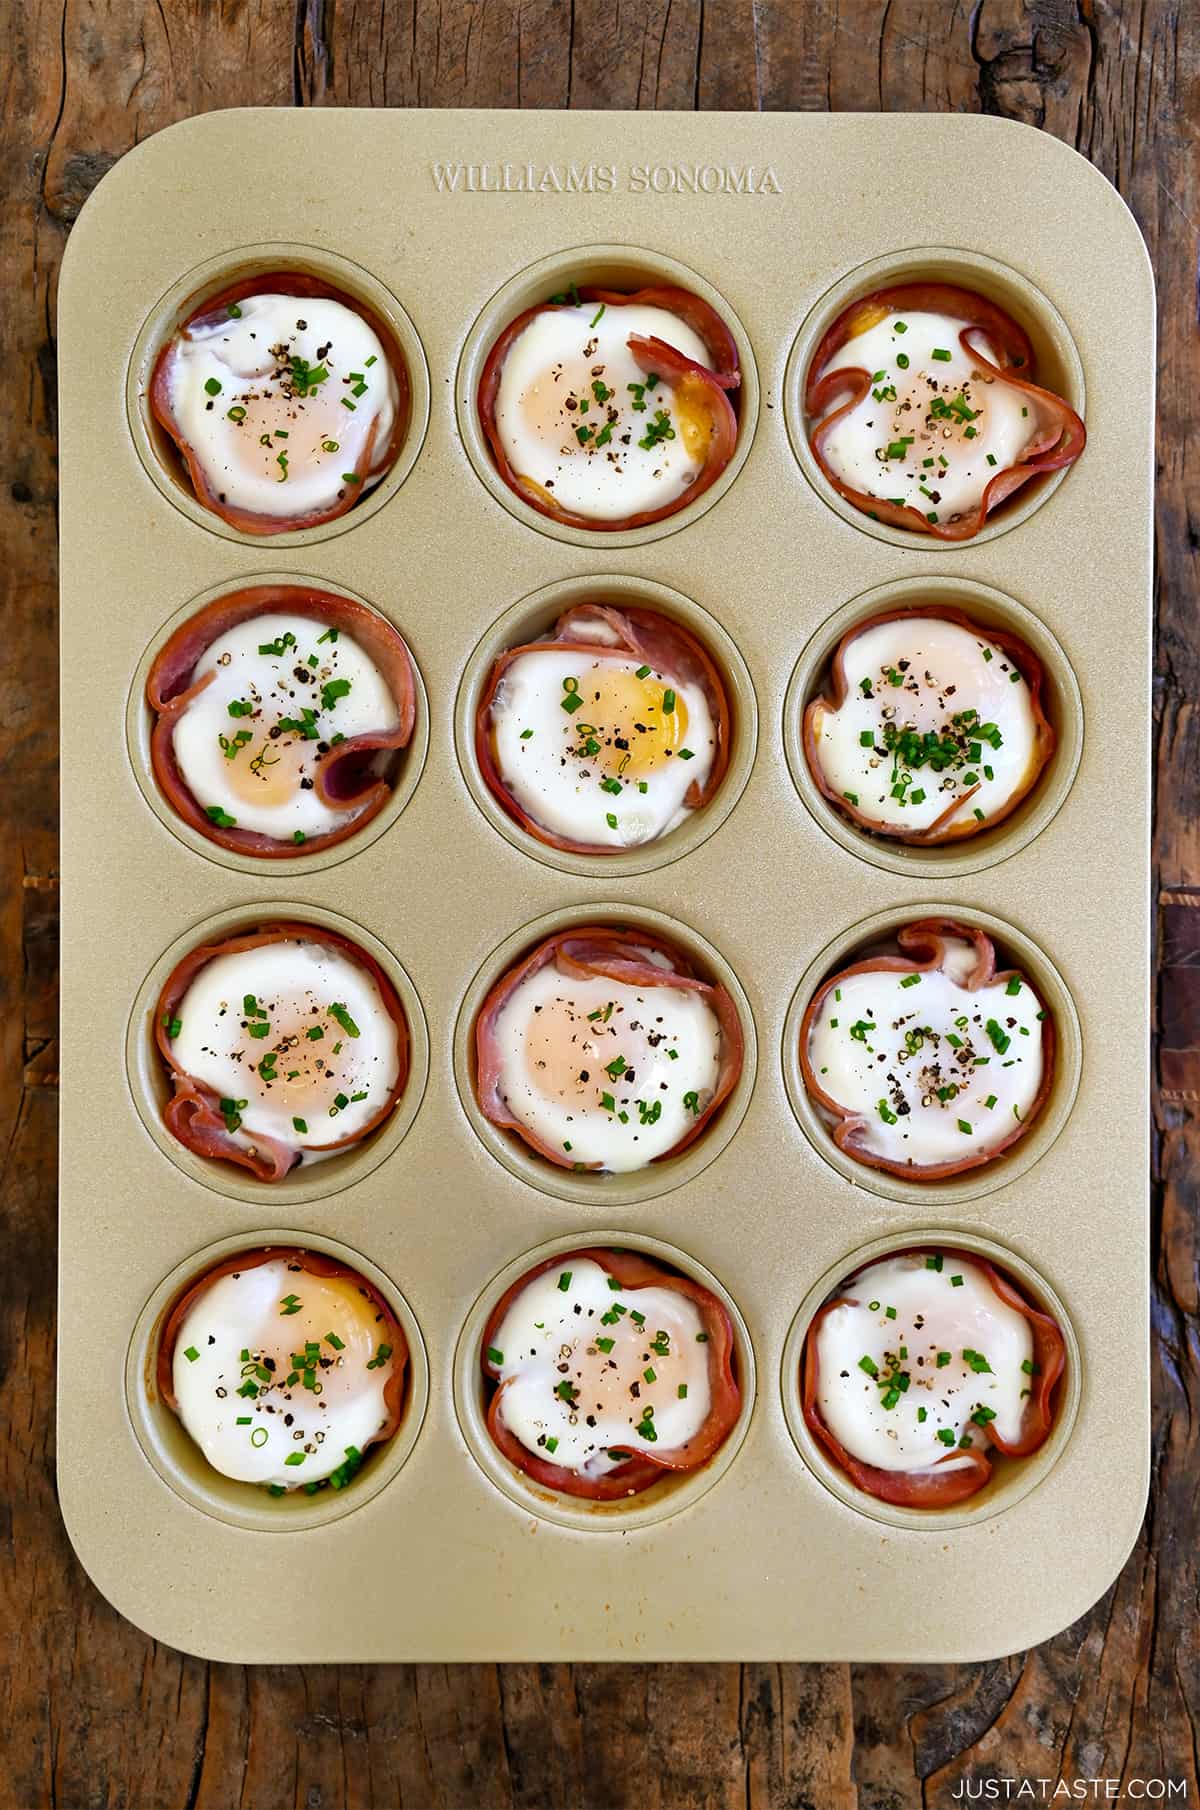
Start your day on a delicious note with a 20-minute recipe for Ham and Cheese Egg Cups! All you need is three simple ingredients for this protein-packed breakfast that’s perfect for busy weekday mornings, holiday entertaining or lazy weekend brunches.
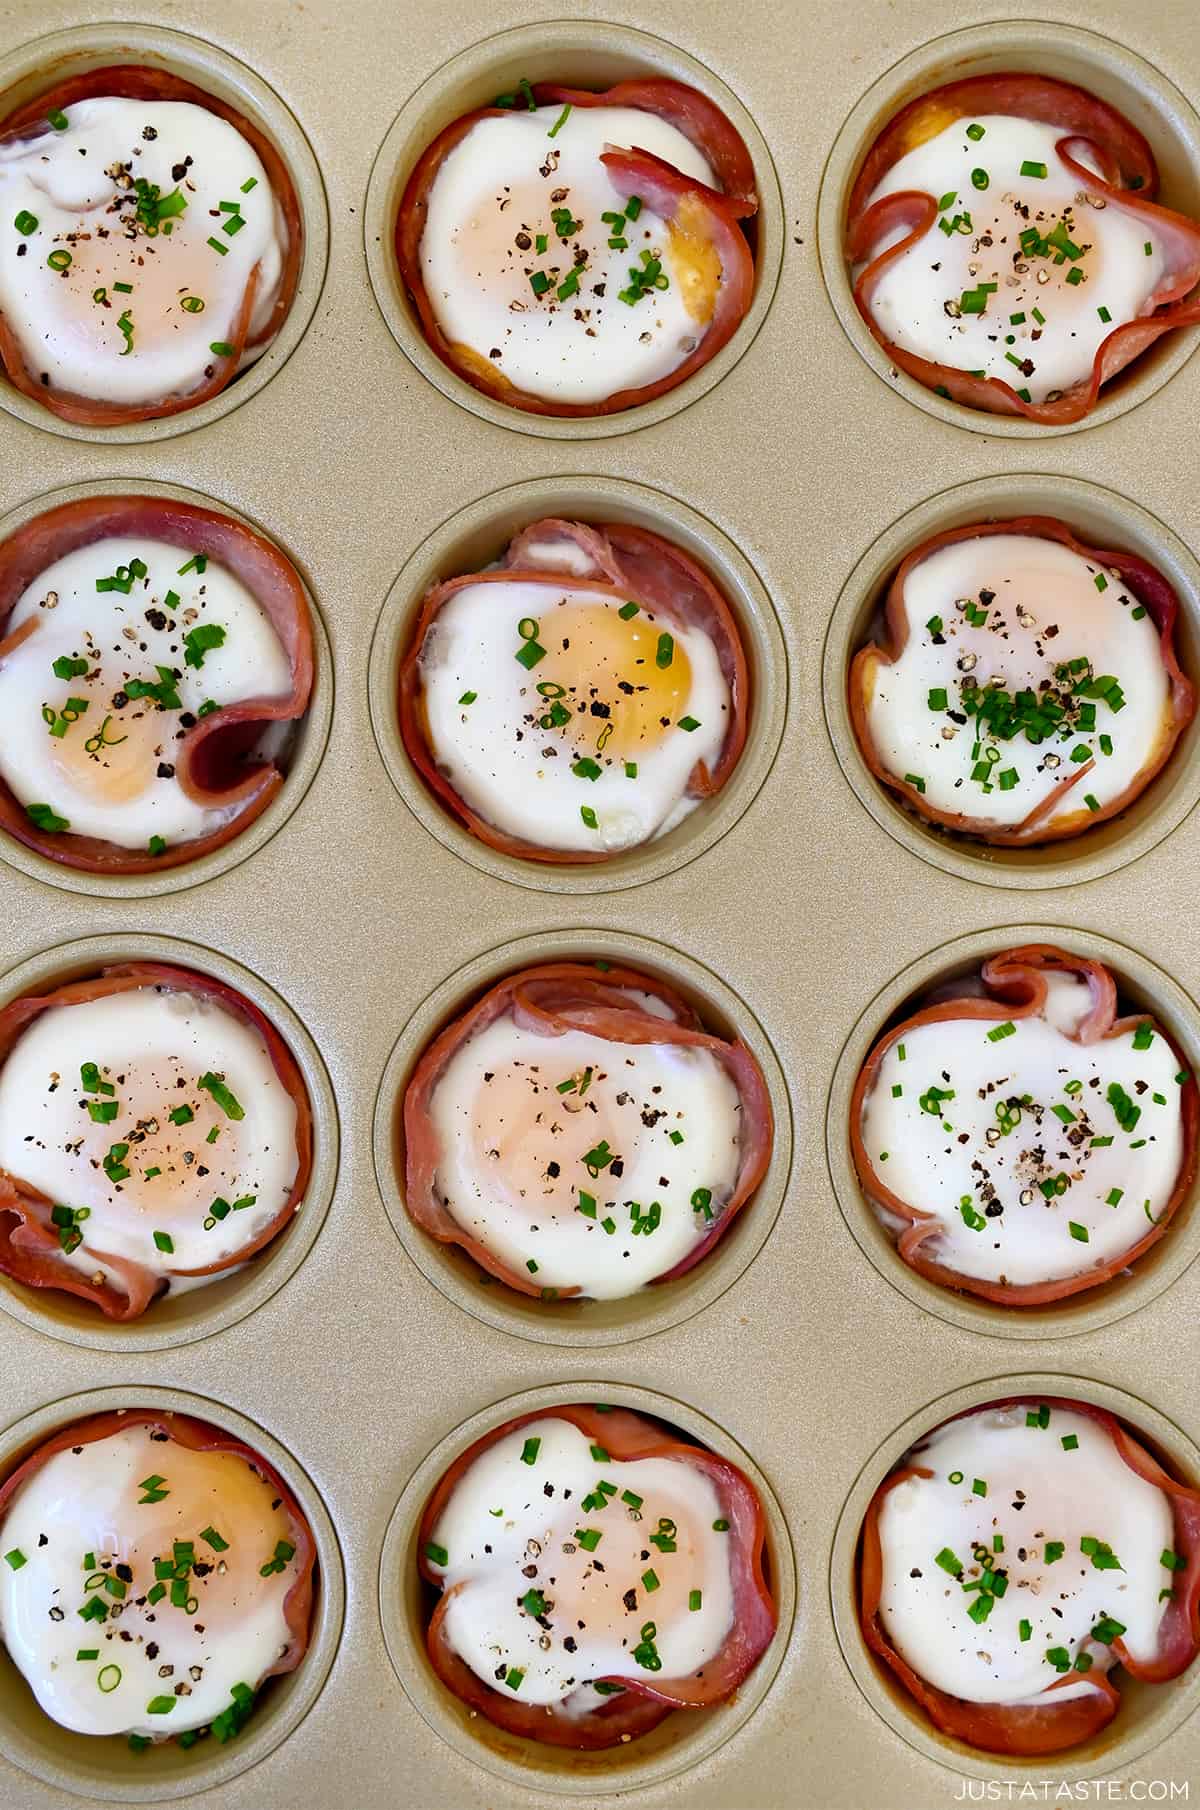
Table of Contents
As it turns out, you all are big fans of just about anything (other than a muffin) that you can whip up in a muffin tin. From granola made in a muffin tin and bacon, egg and cheese puff pastry cups to taco salad cups and even lasagna cups and spinach artichoke dip cups, there isn’t anything I won’t make in a muffin pan!
So when I had some leftover ham from a brunch I hosted with friends, I couldn’t resist the opportunity to create another delicious dish in everyone’s favorite individual serving size. Welcome to the muffin pan party, ham and cheese egg cups!
What’s to Love
- They’ll be on your table in 20 minutes or less.
- Made with only 4 ingredients.
- Individual portions make serving (and cleanup!) a breeze.
- Perfect for serving any size crowd.
- They’re packed with protein.
- Low-carb and gluten-free.
Consider these baked ham and egg cups the low-carb version of baked eggs in bread bowls. Instead of hollowed-out dinner rolls, these savory cups are made with ham and packed with flavor. To bring this tasty creation to your breakfast table, you’ll need just a few simple ingredients:
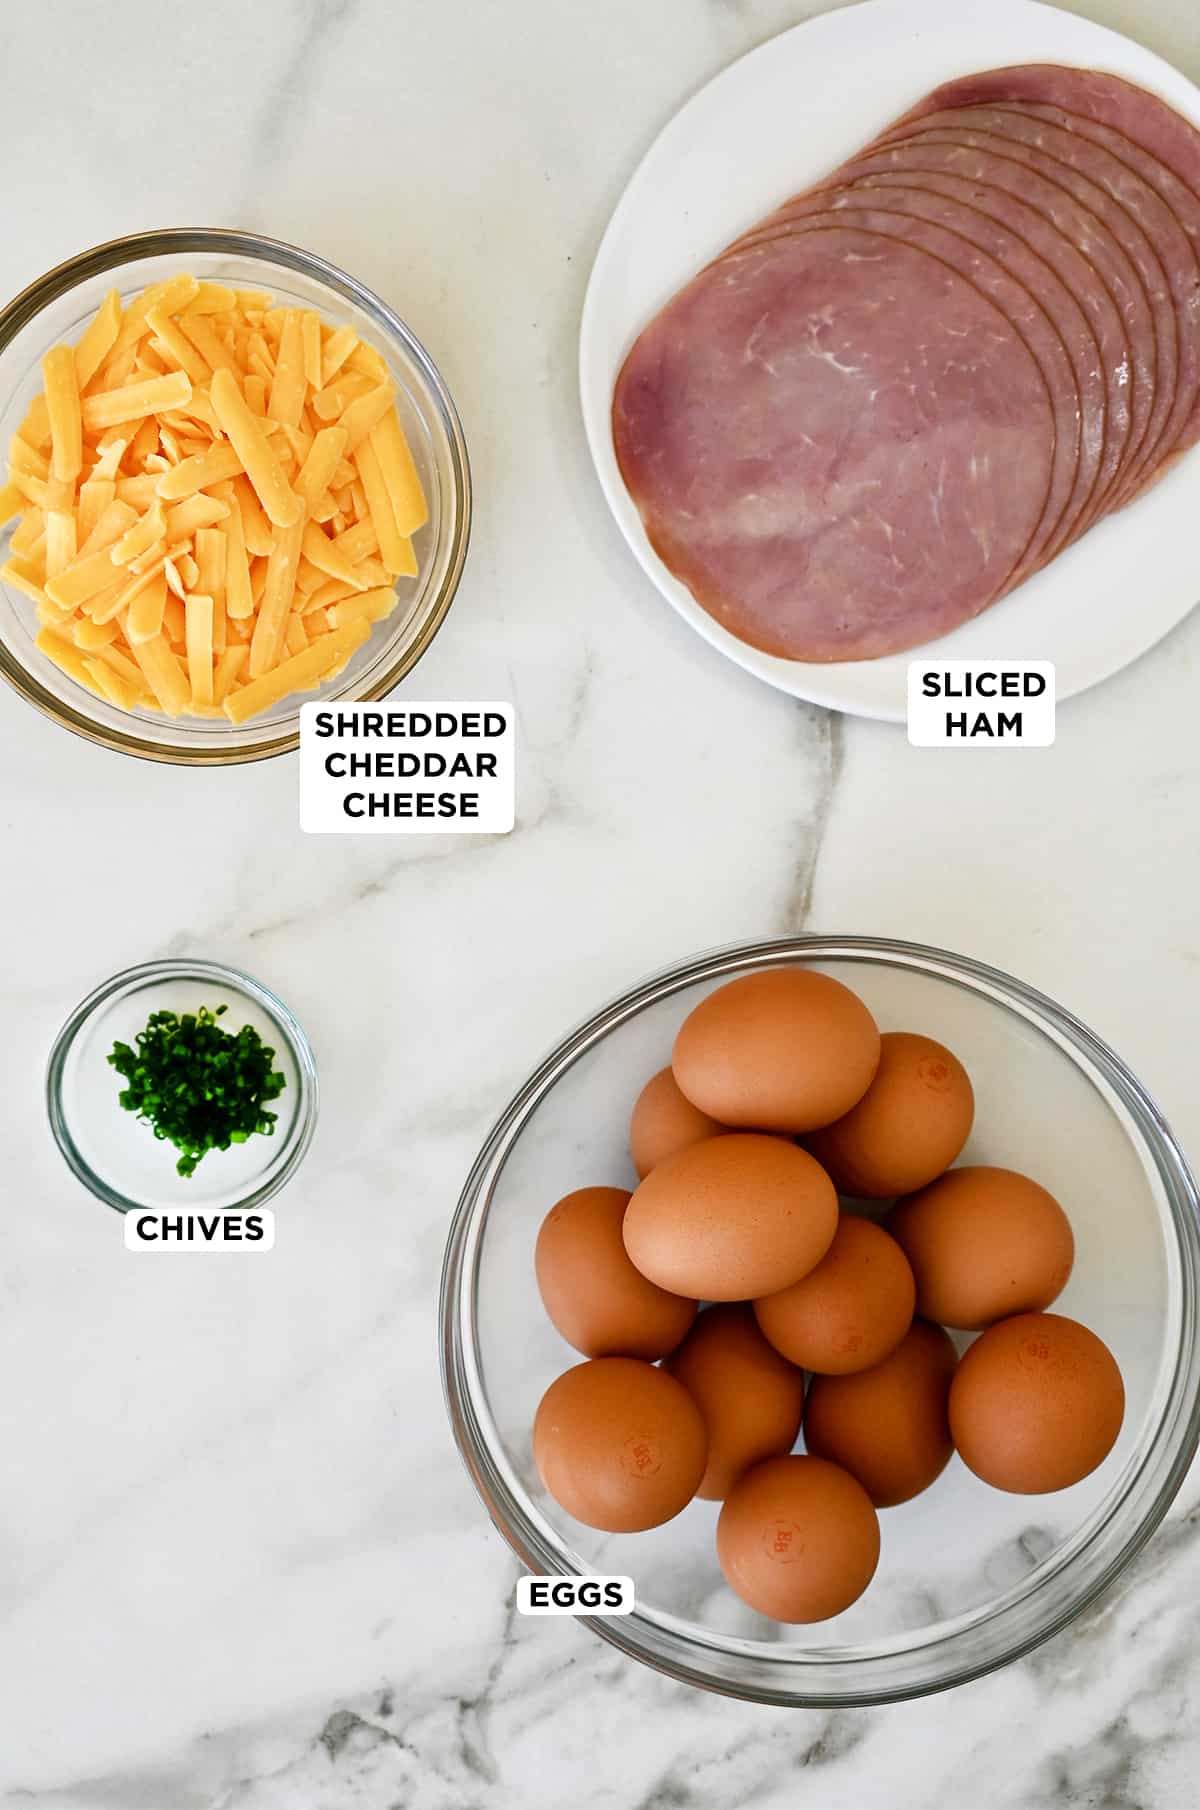
- Deli ham: Use your favorite type of ham, whether it’s smoked, honey-glazed or black forest ham. I recommend using thin slices as they’re easier to mold into the cups.
- Shredded cheddar cheese: I prefer sharp cheddar for its robust flavor, but a mild cheddar works, too. Or, experiment with other cheese varieties like Monterey Jack, pepper jack, Swiss or gouda.
- Eggs: You’ll need a dozen large eggs for this recipe.
- Fresh chives: I use these as a garnish to add a mild onion-like flavor and a pop of color to the dish.
See the recipe card for full information on ingredients and quantities.
The muffin tin has become my kitchen MVP, transforming ordinary ingredients into bite-sized wonders that are not only adorable (I’m looking at you mini pecan pies!) but also incredibly convenient. No need to worry about slicing or dishing out servings—each person gets their own perfectly portioned ham and egg breakfast cup. Here’s how easy it is to make them:
- Preheat the oven to 375°F and grease your muffin pan with cooking spray.
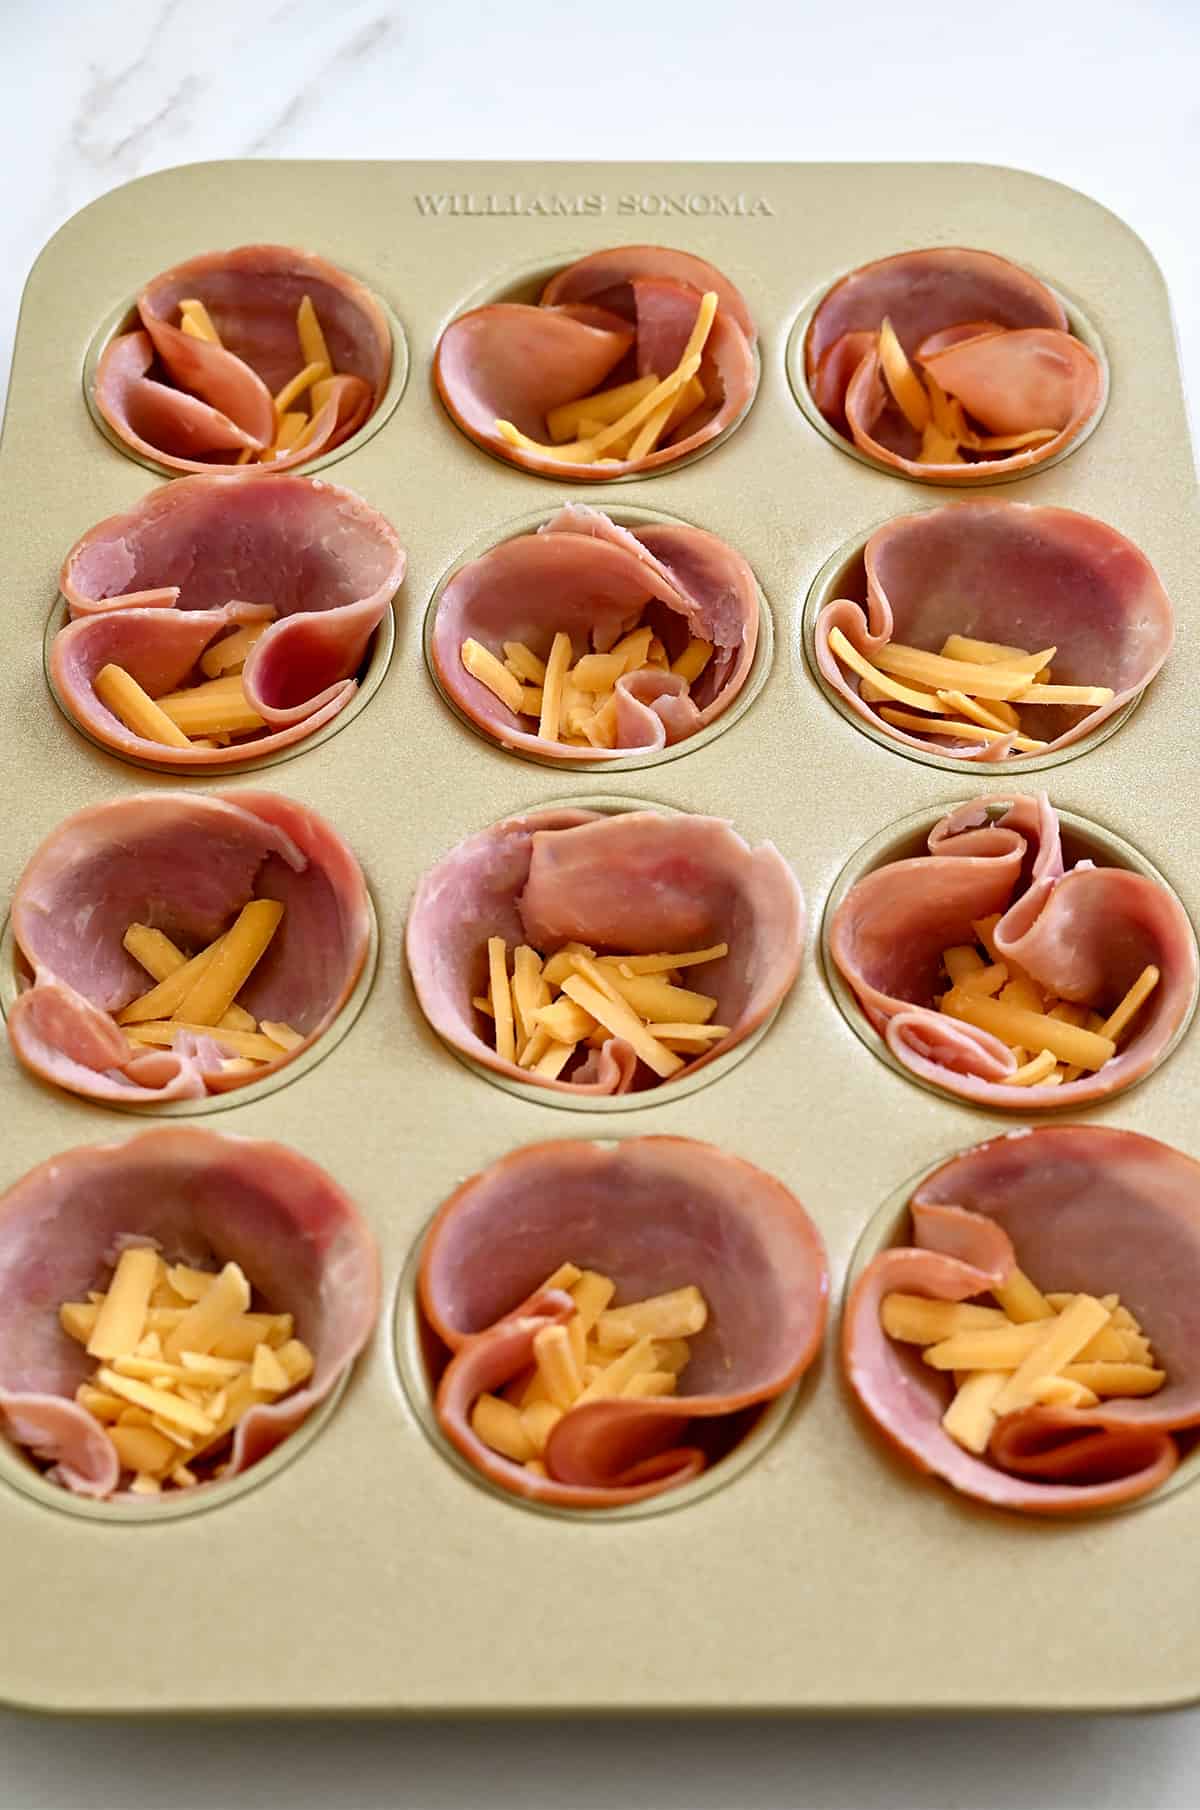
- Prepare the ham cups. Arrange one slice of ham inside each muffin cup so that it’s touching the bottom and sides of each cup.
- Add the cheese. Sprinkle a generous amount of shredded cheddar cheese into the ham cups. The cheese will melt and create a delicious layer at the bottom of each cup.
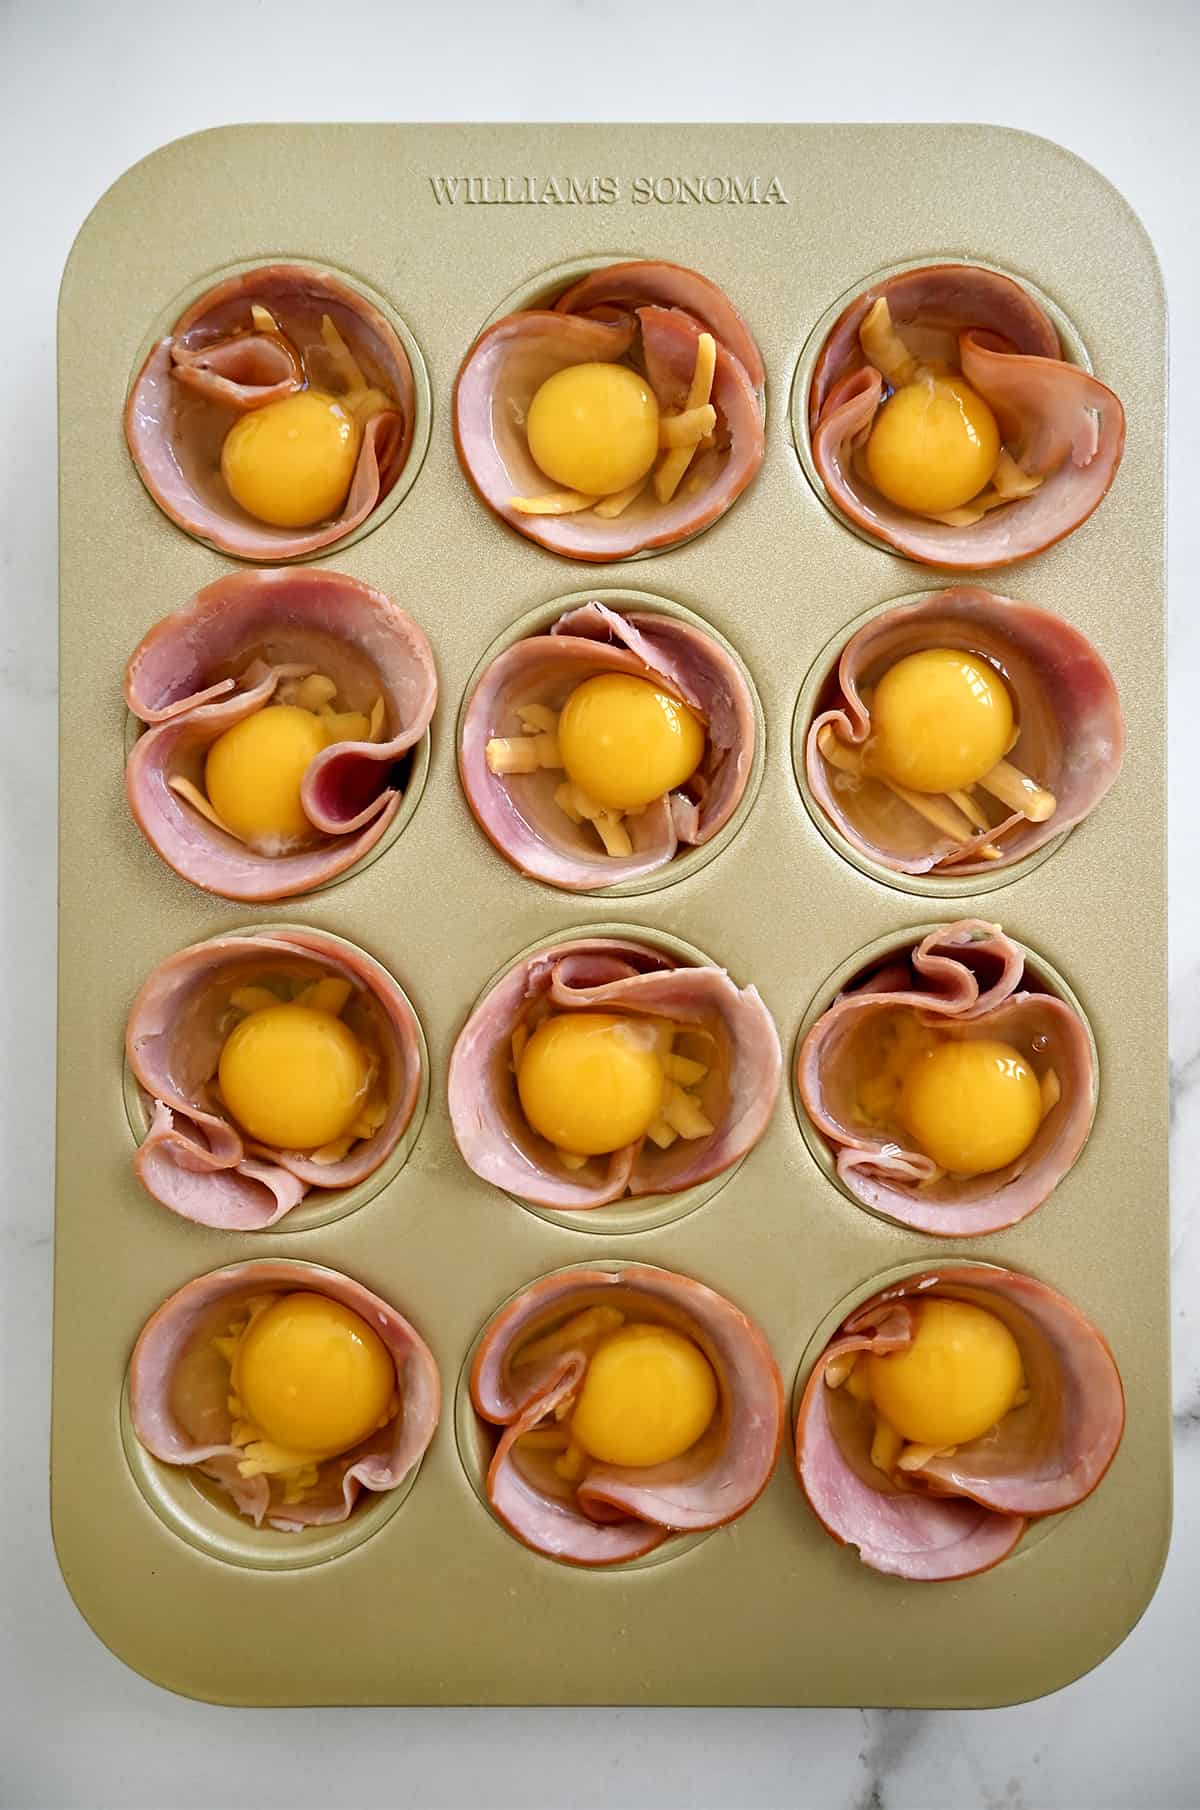
- Crack and add eggs. Sprinkle the eggs with salt and pepper.
Pro Tip: If you prefer scrambled eggs, beat the eggs in a bowl before pouring them into each cup.
- Bake until the yolk reaches your desired doneness, about 12 minutes for runny yolks or about 15 minutes for firm yolks.
- Serve and enjoy! Remove the cups from the oven then garnish them with the chives. Let them cool for 5 minutes in the pan then carefully lift them out and serve.
Meal Prep Tip: If you want to save a few minutes of prep time before your guests arrive, mold the sliced ham into the muffin tin to create the cups the night before serving. Cover the tin with plastic wrap and refrigerate overnight. This way, the ham cups will be ready to be filled the next morning.
- Use a standard 12-cup muffin pan.
- Don’t skip greasing your pan! Coat the muffin tin with cooking spray to ensure easy removal of the breakfast cups and minimal sticking.
- These really are best when fresh. I don’t recommend baking the ham cups in advance.
- Swap the ham for crispy hash browns! If you’re looking for a vegetarian spin on these baked egg cups, don’t miss my recipe for Cheesy Hash Brown Cups with Baked Eggs.
Elevate your brunch experience with these deliciously diverse recipes! From savory favorites to sweet indulgences, these are my go-to dishes to serve alongside ham and egg cups:
- The Best Fruit Salad with Honey-Lime Dressing
- Pecan Sticky Buns or Make-Ahead Cinnamon Rolls with Cream Cheese Frosting
- Fruit and Cream Cheese Breakfast Pastries
- Extra Crispy Roasted Potatoes or Crispy Hash Browns
- White Sangria for All Seasons
Common Questions
Absolutely! Customize the recipe by adding your favorite diced vegetables, herbs or spices.
Keep an eye on the baking time and adjust as needed to achieve the desired level of doneness for the eggs. The longer you cook the baked eggs, the more firm they’ll be.
While I recommend enjoying these while fresh, you can store leftovers in an airtight container in the refrigerator for up to 4 days. Reheat in the microwave for 30-60 seconds or until warmed through.
- Quick Sheet Pan Pancakes
- Freezer-Friendly Egg White Muffins
- 5-Ingredient Strawberry Breakfast Pastries
- Healthy Breakfast Cookies
- Healthy Breakfast Egg Muffins
Ingredients
- Cooking spray
- 12 thin slices deli ham
- 1 1/2 cups shredded sharp cheddar cheese
- 12 large eggs
- 1 Tablespoon chopped fresh chives
Instructions
- Preheat the oven to 375°F.
- Grease a 12-cup standard muffin pan with cooking spray.
- Arrange one slice of ham inside each muffin cup so that it’s touching the bottom and sides of each cup.
- Divide the cheese among the cups then crack an egg into each of the cups.
- Sprinkle the eggs with salt and pepper then bake the cups until the yolk reaches your desired doneness, about 12 minutes for runny yolks or about 15 minutes for firm yolks.
- Remove the cups from the oven then garnish them with the chives. Let them cool for 5 minutes in the pan then carefully lift them out and serve.
Kelly’s Notes
- Don’t skip greasing your pan! Coat the muffin tin with cooking spray to ensure easy removal of the breakfast cups and minimal sticking.
- These really are best when fresh, however, you can store leftovers in an airtight container in the refrigerator for up to 4 days. Reheat in the microwave for 30-60 seconds or until warmed through.
-
★ Did you make this recipe? Don’t forget to give it a star rating below!
Nutrition
Did you try this recipe?
Leave a comment below with your star rating!
This post may contain affiliate links.


Wish I saw this before my breakfast crowd at Christmas! Oh well, I can’t wait to try this recipe. Thank you
Kelly!
Let me know how you like the recipe when you try them, Gayle!
Made these as a test run for Xmas morning and they turned out awesome!!!! So quick and yummy to serve with English muffins on the side.
I’m so happy to hear that you enjoyed the recipe, Ruby! Sounds like a great Christmas morning breakfast to come!